

- SAP Community
- Products and Technology
- Technology
- Technology Blogs by SAP
- Data Events scenario With SAP Event Enablement Add...
Technology Blogs by SAP
Learn how to extend and personalize SAP applications. Follow the SAP technology blog for insights into SAP BTP, ABAP, SAP Analytics Cloud, SAP HANA, and more.
Turn on suggestions
Auto-suggest helps you quickly narrow down your search results by suggesting possible matches as you type.
Showing results for
former_member54
Explorer
Options
- Subscribe to RSS Feed
- Mark as New
- Mark as Read
- Bookmark
- Subscribe
- Printer Friendly Page
- Report Inappropriate Content
03-04-2022
8:58 AM
Last year it was announced that SAP NetWeaver Add-On for Event enablement is also available for SAP S/4HANA in this blog post. Thanks to that customers can build customized events in SAP S/4HANA systems. There are also blog posts with step-by-step guides on how to create notification events with customized message types in SAP ECC:
However, data events are always the area that customers would like to understand more because in some cases the publisher of the events want to decouple entirely in the communications and are not expecting additional API calls for more information after events have been delivered.
ejaz123 has already published a blog post on data events. But in this blog post, I will show you the end-to-end configuration in both SAP S/4HANA and SAP Event Mesh. To make the scenario closer to a real use case, I'm using SAP Cloud Integration of SAP Integration Suite as a consumer for the data events triggered.
Both data events and notification events inform consumers of significant changes.
However, Notification events are typically as small as possible and contain only the absolutely required information. The idea behind this type of event is that consumers are informed of a change and can then decide whether they care about this change or not. If the change isn’t relevant for the consumer, the consumer ignores the event completely. If the change is relevant for the consumer, the consumer will follow up by requesting additional data and executing on this data.
On the contrast, data events already contain all data in respect to the event that might be relevant for the consumer. No additional request is needed. other advantage/difference is, with SAP Event Enablement Add-on, you can build table views to extract data from multiple database tables.
In this blog post, I will introduce you the step-by-step guide on how to build data events With SAP Event Enablement Add-on for SAP S/4HANA and SAP Event Mesh, and consume the events with SAP Cloud Integration AMQP adapter.
Before all the configuration and testing, the Queue and Topic in SAP Event Mesh should be ready. I'll not put the detailed steps here as this has been described in a lot of other blog posts and tutorials.
The Queue name I used in this guide is: SAP/EM/DEMO/BP/DataEventsQ
The Topic name I used in this guide is: SAP/EM/DEMO/BP/DataEventsT
Go to SM59 --> Create RFC Connection with connection type ‘G’ --> pointing to the URI from the service key (from the httprest section)
Enter the URI in the "Host" without "https://" from the service Key:
Create another RFC connection with Type "G" with the token endpoint from the service key
Enter the token endpoint from the service key and enter "/oauth/token" in the Path Prefix
In "Logon and Security" tab, select "active" and "Anonym ssl client (Anonym)" for Security Option
Go to transaction SPRO --> SAP Reference IMG --> Integration with other SAP Components --> SAP NetWeaver AddOn for Event enablement --> Connection and Replication Object Customizing
Click "New Entries" to create a new connection instance
Enter a descriptive Instance name, in my case it's EM_EDMO_INS.
Enter the RFC HTTP Destination that was created in step 1.1, put the ISO code to utf-8 and select Cloud Type as "SAP EM" which is the type for SAP event mesh communication for Event enablement.
Go to "Default Values", add SAP_EM_CLIENT_ID default attributes and enter Client ID from Service Key. Add another default attribute with name SAP_EM_TOKEN_DESTINATION, and enter the OAuth Connection name that was created in Step 1.2.
Go to "Error Type Mapping" and create mapping for different response codes to ensure correct handling of the codes.
Save the changes.
Go to transaction SPRO --> SAP Reference IMG --> Integration with other SAP Components --> SAP NetWeaver AddOn for Event enablement --> Set the cloud connection password
Select the Cloud Instance that was created and enter the password with the client secret from the Service Key.
Click Execute.
Secret will be created successfully after execution.
Create message type: Go to transaction SPRO --> SAP Reference IMG --> Integration with other SAP Components --> SAP NetWeaver AddOn for Event enablement --> ALE Delta Customizing --> Message Type in ALE for Cloud Interface -- Click "New Entries"
For our example I create the message type ZBP_Data
Save the Message Type.
Activate message type: Go to transaction SPRO --> SAP Reference IMG --> Integration with other SAP Components --> SAP NetWeaver AddOn for Event enablement --> ALE Delta Customizing --> Activate Change Pointers for Message Types -- Click "New Entries"
Select the message type that was created - ZBP_Data, select "active" and Save the data.
Go to Transaction SE11-->Enter a Database view name, in our case I entered ZBUSINESSPARTNER -->Click Create
In Table/Join Conditions tab, select all the tables you want to extract data from which are related to Business Partner, in this example I selected BUT000 and BUT020.
In View Fields Tab, click Table Fields --> Select the table you want to add fields from and click Copy --> Repeat for all the tables, make sure there are no duplicated fields. Select all the fields that are required for data extraction.
Go back to Table/Join Conditions tab and select the tables to create join conditions, make sure the join conditions are as simple as possible.
Save the Table View.
Do Not Forget to activate the table view!!
After creating your own message type for communication, you need to create your Outbound Object and link the logical message type.
Go back to transaction SPRO --> SAP Reference IMG --> Integration with other SAP Components --> SAP NetWeaver AddOn for Event enablement --> Connection and Replication Object Customizing
Select the Connection Instance created earlier in step 2.1. In our case the name is EM_DEMO_INS
Click "Outbound Objects"
Change to Edit mode and click "New Entries"
Click Header Attributes and click New Entries.
Enter below header attributes:
Save the data.
Go to transaction SWE2 and create event linkage for the data event:
The receiver Function Module to trigger the event is /ASADEV/ACI_EVENTS_TRIGGER (this is the FM starting from SP02 of the add-on).
Activate the linkage.
Create an iFlow and select AMQP adapter as sender adapter.
In the Connection Tab, enter below parameters:
In the Processing Tab, enter the queue name with format: queue:<queue name>
Add a groovy script to log the payload in attachment so that it can be easily viewed for testing purpose.
Deploy the iFlow in SAP Cloud Integration.
Go to Transaction BP, create a new Business Partner and save the data.
Go to SAP Cloud Integration Message Monitoring and check the message.
The payload has been logged in the attachment. You can find all the details for the related to the BP created.
With this step-by-step guide, you should be able to build a scenario with either SAP S/4HANA system or SAP ERP system together with this SAP Event Enablement Add-on. The benefit of this Add-on is that you can customize your own events on top of the standard objects. And with SAP Event Broker as a service - SAP Event Mesh, it will be easy to connect to event-enabled SAP backends. Hope you find all the above steps easy to implement. Happy Eventing!!!
- SAP Enterprise Messaging for SAP ERP: HowTo-Guide (Part 1 – Connectivity)
- SAP Enterprise Messaging for SAP ERP: HowTo-Guide (Part 2 – First use case)
However, data events are always the area that customers would like to understand more because in some cases the publisher of the events want to decouple entirely in the communications and are not expecting additional API calls for more information after events have been delivered.
ejaz123 has already published a blog post on data events. But in this blog post, I will show you the end-to-end configuration in both SAP S/4HANA and SAP Event Mesh. To make the scenario closer to a real use case, I'm using SAP Cloud Integration of SAP Integration Suite as a consumer for the data events triggered.

Data Events vs. Notification Events
Both data events and notification events inform consumers of significant changes.
However, Notification events are typically as small as possible and contain only the absolutely required information. The idea behind this type of event is that consumers are informed of a change and can then decide whether they care about this change or not. If the change isn’t relevant for the consumer, the consumer ignores the event completely. If the change is relevant for the consumer, the consumer will follow up by requesting additional data and executing on this data.
On the contrast, data events already contain all data in respect to the event that might be relevant for the consumer. No additional request is needed. other advantage/difference is, with SAP Event Enablement Add-on, you can build table views to extract data from multiple database tables.
In this blog post, I will introduce you the step-by-step guide on how to build data events With SAP Event Enablement Add-on for SAP S/4HANA and SAP Event Mesh, and consume the events with SAP Cloud Integration AMQP adapter.
Prerequisites
- SAP Event Mesh (default plan) has been provisioned in your subaccount.
- User has been granted the necessary role collections on SAP BTP
- Service Instance, Service Key, Message Queue are ready
- Installation of the Add-on. Installation and Set-Up Documentation can be found at: https://help.sap.com/viewer/e966e6c0e61443ebaa0270a4bae4b363/1.0/enUS/3eba827c531344eb879d8e35022d90...
Step 0: Queue and Topic creation in SAP Event Mesh
Before all the configuration and testing, the Queue and Topic in SAP Event Mesh should be ready. I'll not put the detailed steps here as this has been described in a lot of other blog posts and tutorials.
The Queue name I used in this guide is: SAP/EM/DEMO/BP/DataEventsQ

The Topic name I used in this guide is: SAP/EM/DEMO/BP/DataEventsT
Step 1: Configure HTTP Connections in SAP S/4HANA
1.1 Create a RFC connection
Go to SM59 --> Create RFC Connection with connection type ‘G’ --> pointing to the URI from the service key (from the httprest section)


Service Key
Enter the URI in the "Host" without "https://" from the service Key:

RFC Connection Type G
1.2 Create an OAuth Connectivity
Create another RFC connection with Type "G" with the token endpoint from the service key

Create OAuth Connection
Enter the token endpoint from the service key and enter "/oauth/token" in the Path Prefix

Enter Token Endpoint
In "Logon and Security" tab, select "active" and "Anonym ssl client (Anonym)" for Security Option
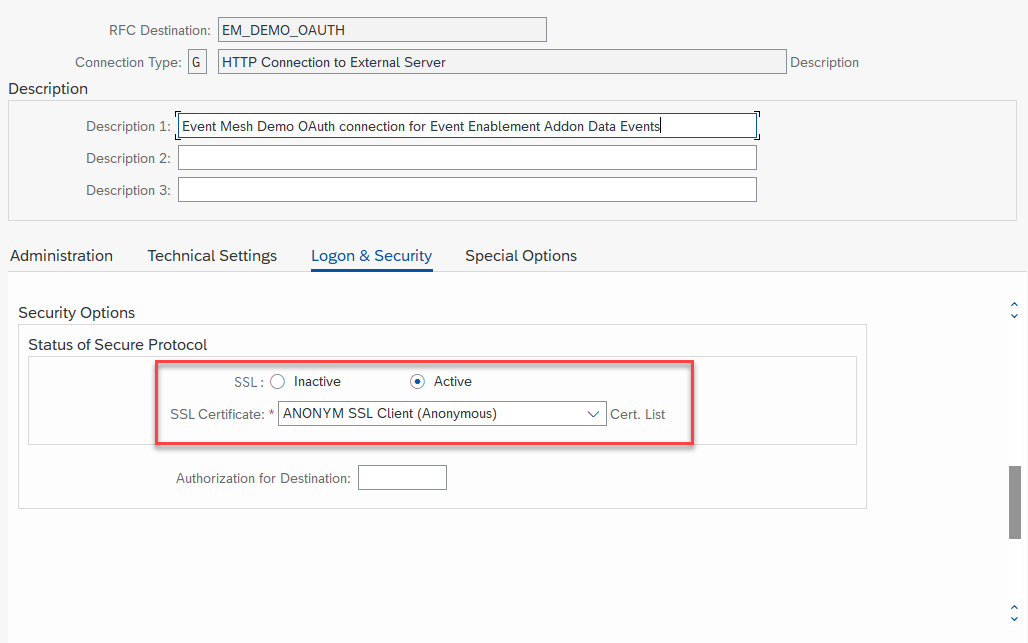
Logon and Security
Step 2: Configuration in SAP S/4HANA SPRO --> SAP Reference IMG
2.1 Create a new connection instance
Go to transaction SPRO --> SAP Reference IMG --> Integration with other SAP Components --> SAP NetWeaver AddOn for Event enablement --> Connection and Replication Object Customizing

Connection and Replication Object Customizing
Click "New Entries" to create a new connection instance

New Entries
Enter a descriptive Instance name, in my case it's EM_EDMO_INS.
Enter the RFC HTTP Destination that was created in step 1.1, put the ISO code to utf-8 and select Cloud Type as "SAP EM" which is the type for SAP event mesh communication for Event enablement.

Create an Instance
Go to "Default Values", add SAP_EM_CLIENT_ID default attributes and enter Client ID from Service Key. Add another default attribute with name SAP_EM_TOKEN_DESTINATION, and enter the OAuth Connection name that was created in Step 1.2.

Default Values
Go to "Error Type Mapping" and create mapping for different response codes to ensure correct handling of the codes.

Error Type Mapping
Save the changes.
2.2 Set Cloud Connection Password for the connection created
Go to transaction SPRO --> SAP Reference IMG --> Integration with other SAP Components --> SAP NetWeaver AddOn for Event enablement --> Set the cloud connection password

Set the cloud connection password
Select the Cloud Instance that was created and enter the password with the client secret from the Service Key.

Click Execute.
Secret will be created successfully after execution.

2.3 Create Logical message type for the event communication
Create message type: Go to transaction SPRO --> SAP Reference IMG --> Integration with other SAP Components --> SAP NetWeaver AddOn for Event enablement --> ALE Delta Customizing --> Message Type in ALE for Cloud Interface -- Click "New Entries"
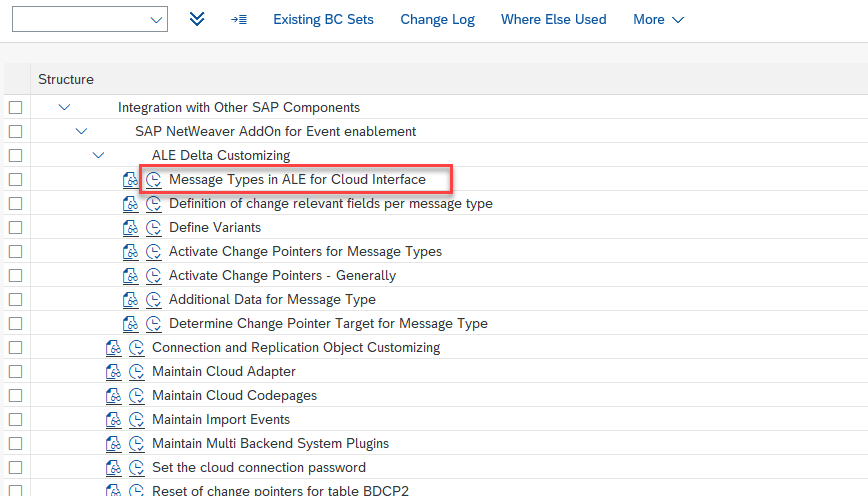
Message Type in ALE for Cloud Interface

New Entries
For our example I create the message type ZBP_Data

Message Type
Save the Message Type.
Activate message type: Go to transaction SPRO --> SAP Reference IMG --> Integration with other SAP Components --> SAP NetWeaver AddOn for Event enablement --> ALE Delta Customizing --> Activate Change Pointers for Message Types -- Click "New Entries"

Activate Change Pointers for Message Types

New Entries
Select the message type that was created - ZBP_Data, select "active" and Save the data.
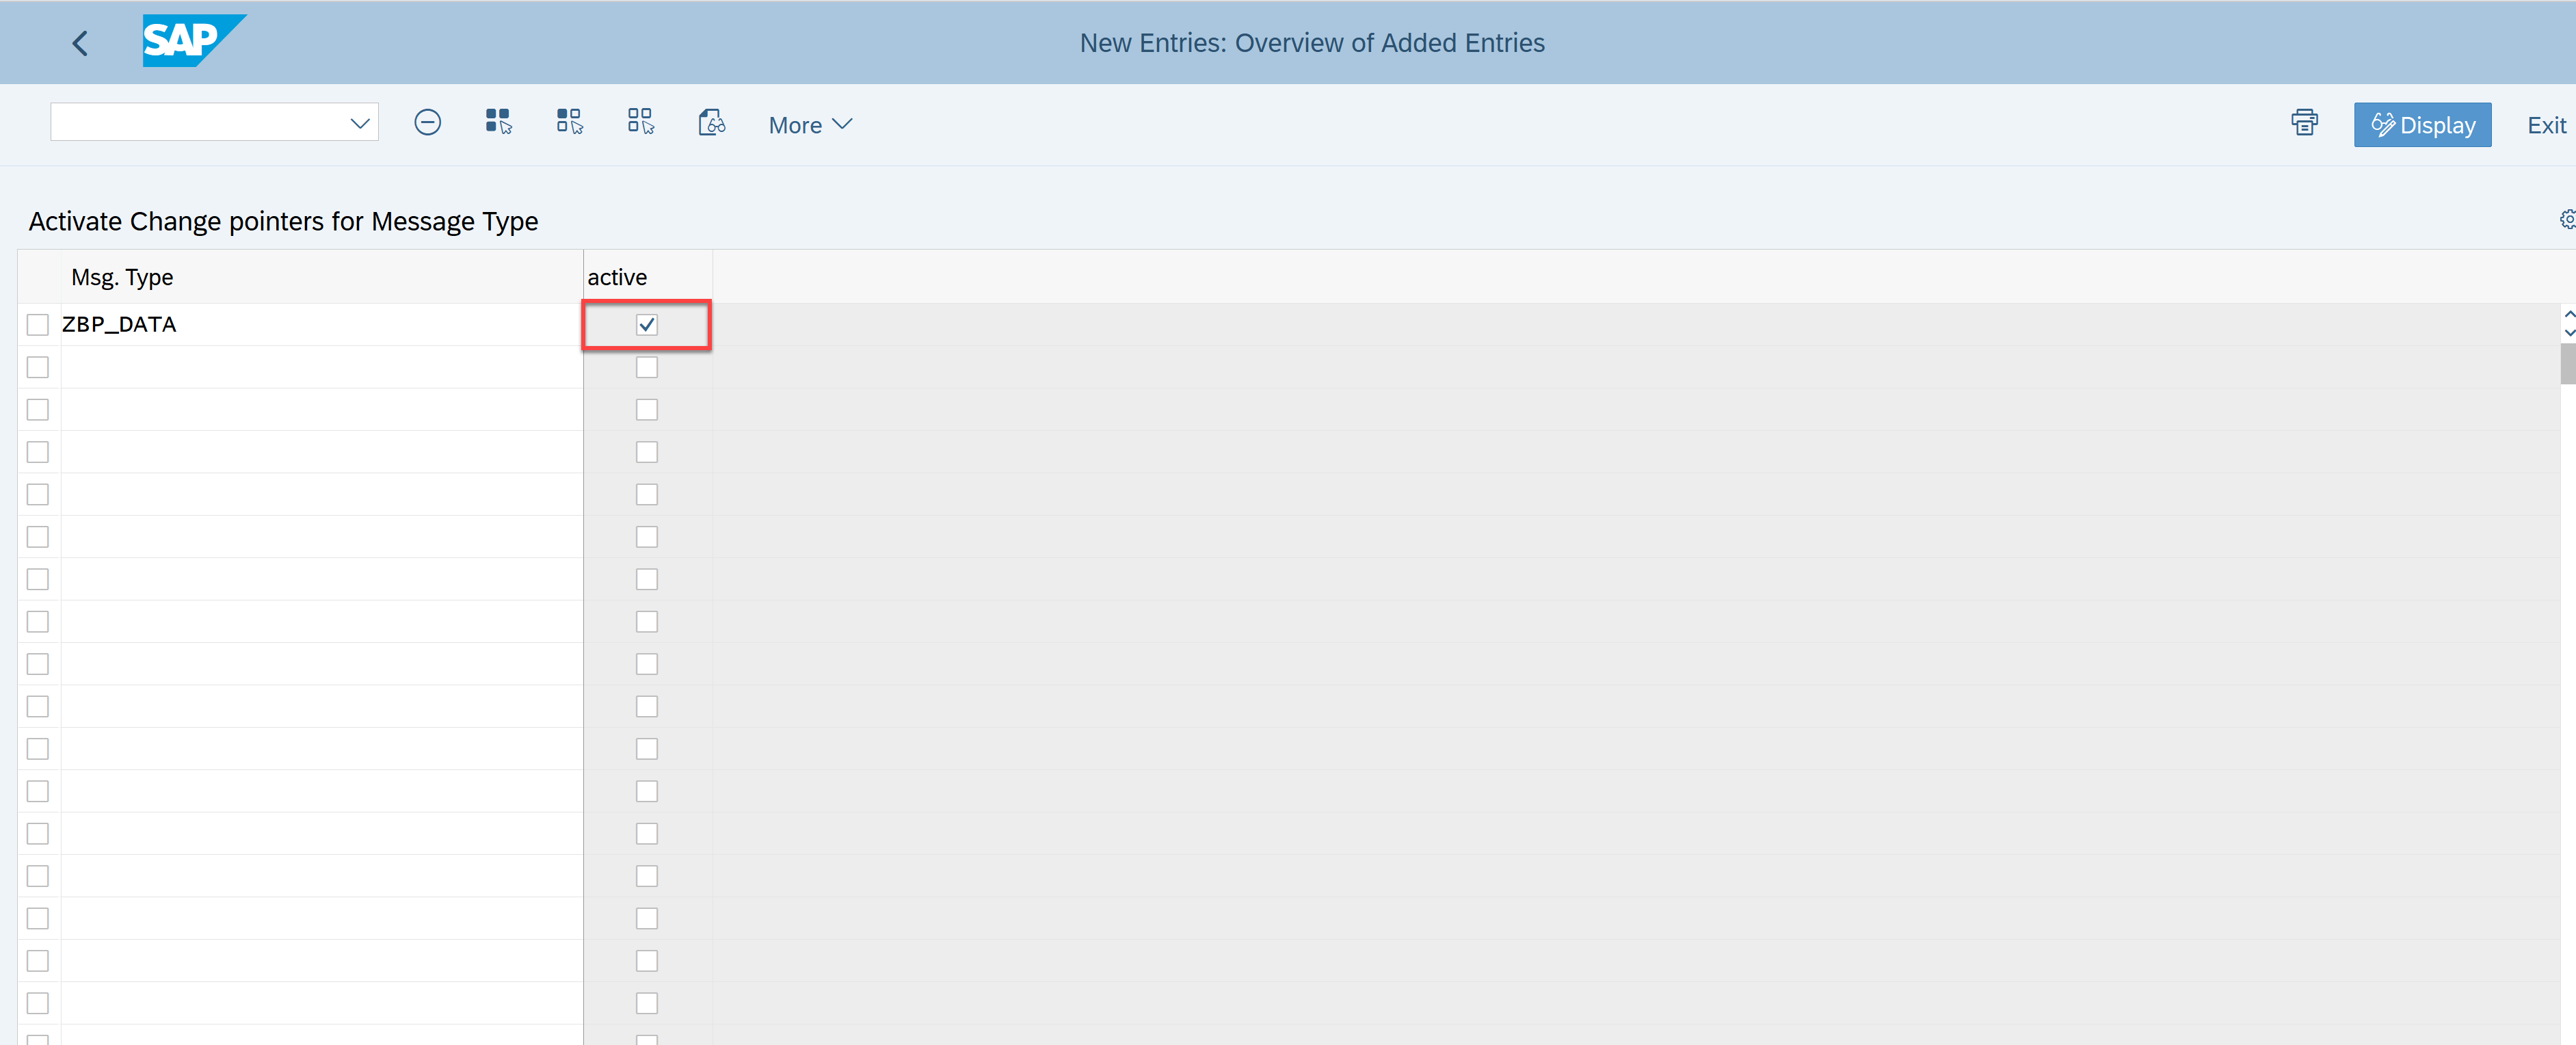
Activate the message type
Step 3: Build Database table view for all the data needed from Business Partner tables
Go to Transaction SE11-->Enter a Database view name, in our case I entered ZBUSINESSPARTNER -->Click Create


Select Database view
In Table/Join Conditions tab, select all the tables you want to extract data from which are related to Business Partner, in this example I selected BUT000 and BUT020.

Add tables
In View Fields Tab, click Table Fields --> Select the table you want to add fields from and click Copy --> Repeat for all the tables, make sure there are no duplicated fields. Select all the fields that are required for data extraction.

Table Fields
Go back to Table/Join Conditions tab and select the tables to create join conditions, make sure the join conditions are as simple as possible.

Join Conditions
Save the Table View.
Do Not Forget to activate the table view!!

Activate the Table View
Step 4: Customize Outbound Object
4.1 Create an outbound object
After creating your own message type for communication, you need to create your Outbound Object and link the logical message type.
Go back to transaction SPRO --> SAP Reference IMG --> Integration with other SAP Components --> SAP NetWeaver AddOn for Event enablement --> Connection and Replication Object Customizing

Connection and Replication Object Customizing
Select the Connection Instance created earlier in step 2.1. In our case the name is EM_DEMO_INS
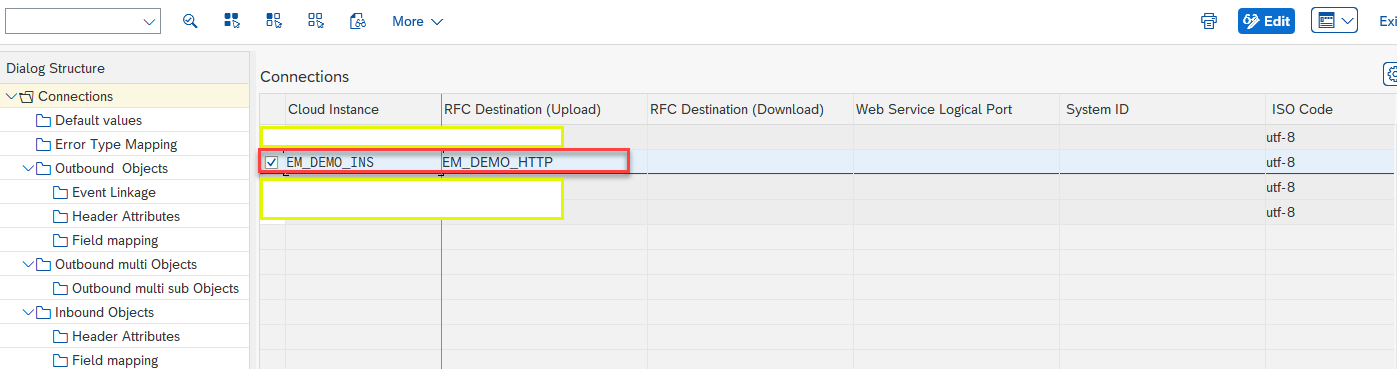
EM_DEMO_INS
Click "Outbound Objects"

Outbound Objects
Change to Edit mode and click "New Entries"

New Entries
- Put a descriptive name for the outbound object, in my case, I put EM_DEMO_BP
- Enter the Extraction Function Module as /ASADEV/ACI_GEN_VIEW_EXTRACTOR
- Enter Item Lines as 1
- Enter the Message Type created in step 2.3, in our case, it's ZBP_Data
- Select a Load Type, in this case I use Incremental Load
- Select "SAP EM" as Implementation Event
- Enter the Formatting Function as /ASADEV/ACI_GEN_VIEWFRM_SAP_EM
4.2 Enter the Header Attributes for the outbound object
Click Header Attributes and click New Entries.
Enter below header attributes:
- ACI_VIEW - name of the database table view created in step 3 (this is very important for data events as all the customizations for the data come from this table view). In our case, it's ZBUSINESSPARTNER
- SAP_EM_CALL_METHOD - "POST"
- SAP_EM_CONT_TYPE - "application/json"
- SAP_EM_QOS - Can be "0" or "1" depending on the quality of service you want to use, in my case I use 1
- SAP_EM_TOPIC - The topic name you created in SAP Event Mesh, in our case, it's SAP/EM/DEMO/BP/DataEventsT

Header Attributes
Save the data.
4.3 Create Event Linkage
Go to transaction SWE2 and create event linkage for the data event:

Create Event Linkage
In the detailed page, add the BP object type and put the event, here I put CREATED. And link it to the receiver type that was created in the logical message type - ZBP_DATA.
The receiver Function Module to trigger the event is /ASADEV/ACI_EVENTS_TRIGGER (this is the FM starting from SP02 of the add-on).
Activate the linkage.

Step 5: Create an iFlow in SAP Cloud Integration
3.1 Create an iFlow with the default template and use AMQP sender adapter
Create an iFlow and select AMQP adapter as sender adapter.

iFlow in SAP Cloud Integration
In the Connection Tab, enter below parameters:
- Host: the amqp uri of the SAP Event Mesh service in the Service Key
- Port: 443
- Path: AMQP path in the Service Key, which is /protocols/amqp10ws
- Proxy Type: Internet
- Authentication: OAuth Client Credentials artifact created in security material with the token endpoint, client ID and client secret from the Service Key
- Credential Name: The name of the OAuth Credential

Connection Tab

OAuth Credential in Security Material
In the Processing Tab, enter the queue name with format: queue:<queue name>

Processing Tab
Add a groovy script to log the payload in attachment so that it can be easily viewed for testing purpose.


Groovy - Log the payload
Deploy the iFlow in SAP Cloud Integration.
Step 6: Testing
Go to Transaction BP, create a new Business Partner and save the data.

Go to SAP Cloud Integration Message Monitoring and check the message.
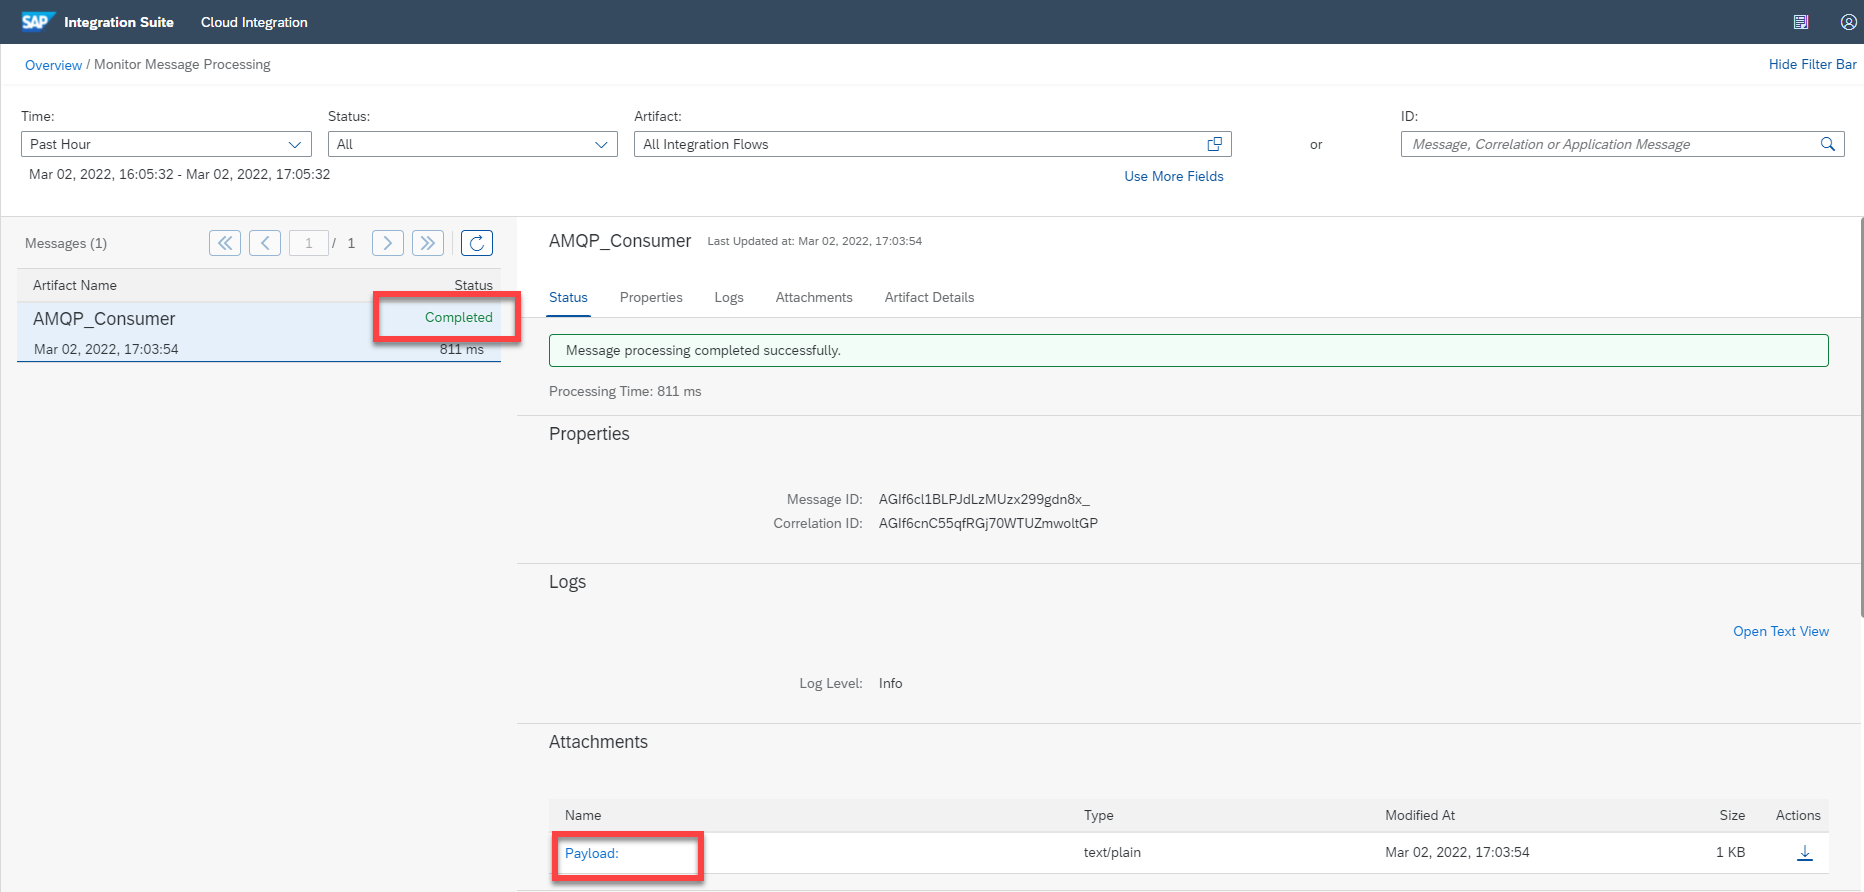
The payload has been logged in the attachment. You can find all the details for the related to the BP created.
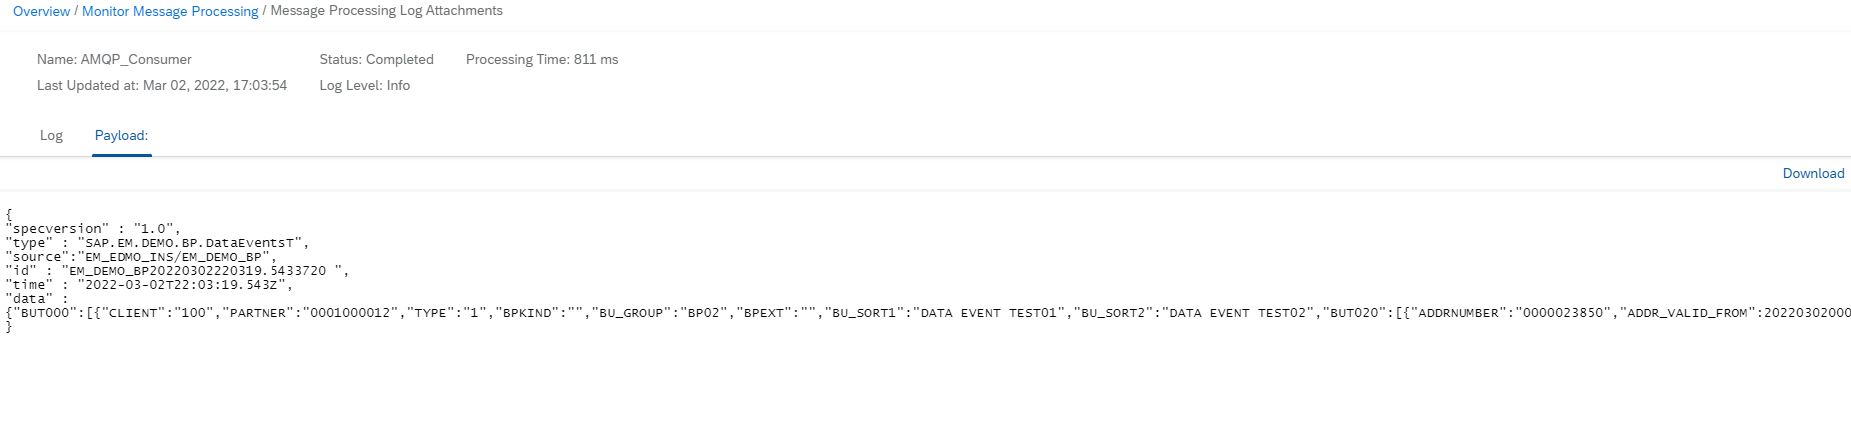
Payload in SAP Cloud Integration

Payload in JSON format
Summary
With this step-by-step guide, you should be able to build a scenario with either SAP S/4HANA system or SAP ERP system together with this SAP Event Enablement Add-on. The benefit of this Add-on is that you can customize your own events on top of the standard objects. And with SAP Event Broker as a service - SAP Event Mesh, it will be easy to connect to event-enabled SAP backends. Hope you find all the above steps easy to implement. Happy Eventing!!!
Additional Info
- You can ask questions about the topic in SAP Community with the Q&A tag link for SAP Event Mesh
- SAP Community topic for SAP Event Mesh: https://community.sap.com/topics/event-mesh.
- SAP Help Guide on SAP NetWeaver Add-On for Event enablement
- SAP Help Guide on SAP Event Mesh
- SAP Managed Tags:
- Cloud Integration,
- SAP ERP,
- SAP Event Mesh,
- SAP S/4HANA
Labels:
22 Comments
You must be a registered user to add a comment. If you've already registered, sign in. Otherwise, register and sign in.
Labels in this area
-
ABAP CDS Views - CDC (Change Data Capture)
2 -
AI
1 -
Analyze Workload Data
1 -
BTP
1 -
Business and IT Integration
2 -
Business application stu
1 -
Business Technology Platform
1 -
Business Trends
1,658 -
Business Trends
92 -
CAP
1 -
cf
1 -
Cloud Foundry
1 -
Confluent
1 -
Customer COE Basics and Fundamentals
1 -
Customer COE Latest and Greatest
3 -
Customer Data Browser app
1 -
Data Analysis Tool
1 -
data migration
1 -
data transfer
1 -
Datasphere
2 -
Event Information
1,400 -
Event Information
66 -
Expert
1 -
Expert Insights
177 -
Expert Insights
295 -
General
1 -
Google cloud
1 -
Google Next'24
1 -
Kafka
1 -
Life at SAP
780 -
Life at SAP
13 -
Migrate your Data App
1 -
MTA
1 -
Network Performance Analysis
1 -
NodeJS
1 -
PDF
1 -
POC
1 -
Product Updates
4,577 -
Product Updates
341 -
Replication Flow
1 -
RisewithSAP
1 -
SAP BTP
1 -
SAP BTP Cloud Foundry
1 -
SAP Cloud ALM
1 -
SAP Cloud Application Programming Model
1 -
SAP Datasphere
2 -
SAP S4HANA Cloud
1 -
SAP S4HANA Migration Cockpit
1 -
Technology Updates
6,873 -
Technology Updates
419 -
Workload Fluctuations
1
Related Content
- Exploring Integration Options in SAP Datasphere with the focus on using SAP extractors - Part II in Technology Blogs by SAP
- IoT - Ultimate Data Cyber Security - with Enterprise Blockchain and SAP BTP 🚀 in Technology Blogs by Members
- Unify your process and task mining insights: How SAP UEM by Knoa integrates with SAP Signavio in Technology Blogs by SAP
- 10+ ways to reshape your SAP landscape with SAP BTP - Blog 4 Interview in Technology Blogs by SAP
- New webcast series on “SAP BTP DevOps and Observability in Action” in Technology Blogs by SAP
Top kudoed authors
| User | Count |
|---|---|
| 35 | |
| 25 | |
| 17 | |
| 13 | |
| 8 | |
| 7 | |
| 6 | |
| 6 | |
| 6 | |
| 6 |