

- SAP Community
- Products and Technology
- Technology
- Technology Blogs by SAP
- [SAP & MS Teams] 4 - SAP BTP subaccount configurat...
Technology Blogs by SAP
Learn how to extend and personalize SAP applications. Follow the SAP technology blog for insights into SAP BTP, ABAP, SAP Analytics Cloud, SAP HANA, and more.
Turn on suggestions
Auto-suggest helps you quickly narrow down your search results by suggesting possible matches as you type.
Showing results for
Product and Topic Expert
Options
- Subscribe to RSS Feed
- Mark as New
- Mark as Read
- Bookmark
- Subscribe
- Printer Friendly Page
- Report Inappropriate Content
02-14-2022
5:11 PM
Welcome back to the blog post series about how to create your own Microsoft Teams extension using SAP BTP and Microsoft Azure. In today’s fourth blog post, I will provide you with the first setup steps in SAP Business Technology Platform and Microsoft Azure required for this sample application.
As explained in the first blog post (click here), this sample Microsoft Teams extension for SAP SuccessFactors will allow you to create leave requests right from within Microsoft Teams. It also provides features for managers to approve or reject leave requests. As explained in the preface, this blog post series has a special focus on those customers interested in or already using the SAP Business Technology Platform and corresponding integration services.
The series will be published in multiple editions which are structured the following.
A quick reminder for your convenience – Feel free to check out the GitHub repository provided in the SAP-samples organization. Please be aware that the repository is still being updated, so make sure you’re pulling on a regular basis.
https://github.com/SAP-samples/btp-extend-workflow-cai-msteams/tree/full-scope
In this blog post you will start setting up the sample application in your own landscape. Today’s focus is on the configuration of your SAP Business Technology Platform, the trust to your Azure Active Directory and the required (test) users for this sample scenario. So I would say - Let’s get it started!
The SAP Business Technology Platform will be the heart of this extension scenario. Besides hosting the runtime of your application (including the bot handler), it will also provide the required integration capabilities (using SAP Cloud Integration) and handle important security requirements.
For this blog post series, you can either make use of an existing SAP Business Technology Platform subaccount or create a new subaccount. As explained in the first parts of this blog post series, a trial account should be sufficient for this purpose. Feel free to use the following tutorial in case you need to set up a new trial account (click here).
For your dedicated SAP BTP subaccount, the following entitlements need to be assigned in addition to the default service entitlements (like Authorization and Trust Management Service - XSUAA).
Check the following documentation to find out how to assign entitlements to your subaccount (click here). Please be aware that you need to be Global Account Administrator to assign entitlements to a subaccount.
Before you start off with the configuration of the different SAP BTP components, the first thing you need to define, is the name of your application, as it will be used throughout the upcoming blog posts as <cf-app-name-placeholder>.
I recommend including the subdomain of your SAP BTP subaccount and the name of the Cloud Foundry space in your application name, to make the resulting Cloud Foundry route unique. The route is the public endpoint of your extension application. Therefore, you should also add an identifier like teams-leave or leave-request to your application name, as there might be multiple apps running in your Cloud Foundry space. Please note down the resulting application name, as you will need it in the following blog posts.
Recommended syntax
cf-app-name-placeholder (Application name)
<Subaccount subdomain>-<Cloud Foundry (CF) space>-<Identifier>
Samples
Check the availability of the resulting Cloud Foundry route before you continue, to make sure it is not already taken.
How can I check whether the resulting route for my application name is still available?
You can make use of the cf check-route command as explained in the official Cloud Foundry documentation (click here). Please make sure you’re checking things for the correct region (e.g., us10, eu20, ap20) of your dedicated SAP BTP subaccount.
cf CLI v6
cf check-route <cf-app-name-placeholder> cfapps.<BTP region>.hana.ondemand.com
Sample:
cf check-route sap-teams-dev-leave-request cfapps.eu20.hana.ondemand.com
cf CLI v7
cf check-route cfapps.<BTP region>.hana.ondemand.com --hostname <cf-app-name-placeholder>
Sample:
cf check-route cfapps.eu20.hana.ondemand.com --hostname sap-teams-dev-leave-request
Hint - Things look different in case you’re using a custom domain in your SAP BTP subaccount. You should be free to choose from your available subdomains in this case.
If not done yet, please subscribe to SAP Integration Suite in your dedicated SAP BTP subaccount. A detailed explanation of how to do this, can be found in the following tutorial (click here). Please be aware, that for this scenario, you only require the Cloud Integration (Design, Develop and Operate Integration Scenarios) capability. Once you have provisioned the Cloud Integration capability and assigned the generated roles to your SAP BTP subaccount user, continue with the next step of this blog post.
Hint - The linked tutorial describes the subscription process using an SAP BTP trial environment. Please be aware that the described booster only exists in the trial environment! In all other scenarios, make sure you assign the respective roles to your SAP BTP subaccount user before you start and once again after successful provisioning of the SAP Cloud Integration capability! More information can be found in the official documentation (click here).
Create a Progress Integration Runtime service instance of type integration-flow. You can name it e.g., integration-runtime. This service is required to access your integration flows from your Microsoft Teams extension application and from SAP SuccessFactors. For example, notifications are sent to an integration flow using Client Credentials of this service instance. The official documentation on how to configure the Process Integration Runtime can be found in SAP Help (click here).
Hint - If you’re using the Integration Suite booster (only available in the trial environment) this service instance will be created automatically for you. Please make sure to update the service instance after executing the booster, using the JSON parameters below, as the booster will configure a slightly different setup.
Please provide the following JSON parameters when creating or updating your service instance. The password-based grant type is required by SAP SuccessFactors Intelligent Service Center.
Once the instance is created, switch to the Service Keys section, create a new service key for SAP SuccessFactors and also name it e.g., successfactors. It allows SAP SuccessFactors to send notifications to your integration flows. Once the service key is created, note down the parameters <clientid>, <url> and <clientsecret>. You will need them at a later point in time.
Repeat the same process for a new teamsextension service key. To be able to call integration flows from your extension application, you will need to provide a valid Client ID and Secret in the app’s environment variables. Therefore, also for this service key, note down the parameters <clientid>, <url> and <clientsecret>.
Create a new XSUAA instance in your SAP BTP subaccount using the below settings. This XSUAA instance is required to authenticate access to the notification endpoint of your extension application. This ensures, that only SAP Cloud Integration will be able to send messages to your extension application by providing the client credentials of this XSUAA instance.
Name: <cf-app-name-placeholder>-xsuaa
Service: Authorization and Trust Management Service (xsuaa)
Plan: apiaccess
As said, you will need your application name multiple times during the next blog posts, so if you didn’t set it at the beginning of this blog post, please do it now. Use the following JSON parameters when creating the XSUAA instance. This JSON is also available in the GitHub repository (xs-security.json - click here).
Once the XSUAA service instance is created, add a new service key to be used by SAP Cloud Integration. You can name it e.g., cloudintegration. Note down the parameters <clientid>, <apiurl> and <clientsecret>. You will need them when configuring the SAP Cloud Integration security settings.
Note - If you change the name of the XSUAA instance, please keep in mind that you also need to adjust the manifest.yml file of your extension application (see GitHub). This ensures the correct binding of the XSUAA instance to your extension application in case of a redeployment.
As explained in the third blog post (click here), this integration scenario requires the usage of multiple Microsoft Azure services like the Active Directory. In case you don’t have access to an Microsoft Azure account (including a paid or trial subscription), check out the following tutorial in the latest openSAP course (click here). It explains in detail how to create a new Microsoft Azure account and how to get a free trial subscription.
As many tutorials exist on how to configure the trust between SAP BTP and Microsoft Azure, the required steps won’t be explained in detail by this blog post. Please check the following tutorial (click here) or the SAP HANA Academy (click here) and learn how to set up the required trust.
Before doing so, please read through the following important hints for this Microsoft Teams extension scenario, as some minor changes (compared to the normal trust setup) are required. If you’re facing any issues while setting up the trust, please also check out the famous blog post by Martin Räpple (click here).
Hints - While doing your Azure Active Directory configuration, you need to change the saml/SSO substring of the Reply URI field to oauth/token (see the screenshot below). This is mandatory to set the correct recipient URI in the SAML assertion.
Furthermore, please ensure that the user’s email address (user.mail) is used as the Unique User Identifier (Name ID) by checking the claims of your SAML configuration. As described in the linked tutorials, please make sure you're adding the Groups claim to your configuration. Feel free to add further additional claims (if required) as depicted in the screenshot below.
Once the trust between your cloud landscapes is established, you can disable the SAP BTP user logon using Azure Active Directory as an Identity Provider (IdP). The trust setup is only required for technical purposes (usage of Principal Propagation). If you're already using Azure Active Directory as IdP for other use-cases in your SAP BTP subaccount, please double check if user logon is required for these scenarios before changing this setting.
Please make sure, you enabled the creation of shadow users in the same screen, as you can see in the screenshot below. More information on shadow users can be found in the SAP Help portal (click here).
Hint - In an advanced version of this sample scenario, the usage of XSUAA might be replaced by an architecture based on the SAP Identity and Authentication Service. When this extension application was developed, SAP IAS was not yet capable of doing the required token exchanges for Principal Propagation. It is planned to support this requirement in a future release (subject to change).
For this sample scenario, you will need matching users in SAP SuccessFactors and Azure Active Directory. Additionally, you need to create a user group in Azure Active Directory and the corresponding Role Collection mapping on the SAP BTP side. This allows your users to call the respective integration flows once the Principal Propagation flow has reached the SAP BTP landscape.
The user mapping criteria for this sample scenario, will be the users's email address. Using the email address is a common approach for mapping users across multiple system landscapes and is also supported by default when using SAP Cloud Integration and SAP SuccessFactors.
In case you already have (test) users in Azure Active Directory whose email addresses match their corresponding SAP SuccessFactors email addresses, you can skip this step. Just make sure your users include at least one employee and his or her corresponding manager to test all relevant application features, including notifications. This relationship can be checked in the Org Chart of your SAP SuccessFactors instance.
Hint - This sample scenario assumes, that the direct manager of a user will also be responsible for approving or rejecting an employee's leave request. If your time off workflows are configured differently, please make sure the correct approver is available in Azure Active Directory.
Now it’s time to setup the mapping criteria, which is the email address in this sample scenario. In case you’re creating new users in Azure Active Directory, these users will receive an email address like name.surname@yourdomain.onmicrosoft.com, including your onmicrosoft.com domain or your own corporate domain like sap.com. Please make sure, you’re updating this new email address (if necessary) also in SAP SuccessFactors to make the mapping work for the sample scenario.
In our sample we choose Caroline and Jane from our SAP SuccessFactors Org Chart (see screenshot above) and create corresponding users in our Azure Active Directory. As both users receive a new email address like jane.watson@sap.onmicrosoft.com, we head back to SAP SuccessFactors and update the email addresses to have matching identities.
Hint - You can use an SAP SuccessFactors admin user to change the primary email address of a user. Just use the search field to find a user (or click on a user within the Org Chart) and scroll down in the profile to change the contact information details.
Create a new security user group in your Azure Active Directory. Give it a meaningful name like Microsoft Teams Extension Test Users. All users supposed to use the new extension application, have to be assigned to this group. Please do so by switching to the Members area of your new user group.
The Object ID of this user group will later be mapped to a role collection in SAP BTP. So, before you move on, please note down the Object ID from the Overview section. The group assignment of your Active Directory users will be provided to SAP BTP using the Groups claim of your SAML configuration. The required Role Collection Mapping on the SAP BTP side will be done in one of the next steps.
Please assign the new user group to the Enterprise application that was created when you set up the trust between Azure Active Directory and SAP BTP. You find it in the Enterprise applications section of your Azure Active Directory.
Hint - Please be aware that if you’re using a free Azure Active Directory, you have to add all (test) users manually, as groups cannot be added. Nevertheless, the previous group assignment will be available in SAP BTP via the configured SAML claim.
Last but not least, go back to your SAP BTP subaccount and open the Role Collection Mapping for the Azure Identity Provider, which you created when setting up the trust between the landscapes. Map the CI_Messaging role collection to the Object Id of the Azure Active Directory user group (see screenshots below).
This Role Collection Mapping allows your users to call the existing integration flows with their propagated identity. This is possible due to an automated assignment of the required role collection to the respective shadow users based on the Role Collection Mapping.
If the CI_Messaging role collection does not exist in your SAP BTP subaccount yet, please create it manually and add the available MessagingSend role in the Roles section. This role is created once you setup the Process Integration Runtime.
Hint - Make sure you’re passing the Azure Active Directory user group assignment as Groups parameter in your SAML claims. This has been part of the trust setup tutorial (click here). If you followed this tutorial step by step, you should be fine. Otherwise please check your SAML claims in the Azure Active Directory once again to match the below settings.
You’re done with all the configuration steps? Perfect, you’ve made the start of the technical implementation! Your SAP BTP and Microsoft Azure environments are settled for the next steps! Look forward to the next part of the blog post series, in which you will set up your SAP SuccessFactors instance and configure more security related settings.
Stay curious!
As explained in the first blog post (click here), this sample Microsoft Teams extension for SAP SuccessFactors will allow you to create leave requests right from within Microsoft Teams. It also provides features for managers to approve or reject leave requests. As explained in the preface, this blog post series has a special focus on those customers interested in or already using the SAP Business Technology Platform and corresponding integration services.
The series will be published in multiple editions which are structured the following.
- Preface and scenario introduction (click here)
- Target application features (click here)
- Requirements and application architecture (click here)
- SAP BTP subaccount configuration and test users (this blog post)
- Set up your SAP Integration Suite for integration capabilities
- Create a Process Integration Runtime instance for API access
- Configure an XSUAA instance to handle security
- Set up trust between Azure Active Directory and SAP BTP
- Create test users in Azure Active Directory
- SAP SuccessFactors instance setup (click here)
- Set up your SAP Cloud Integration instance (click here)
- Get your Microsoft Azure settings ready (click here)
- Deploy your Microsoft Teams extension (click here)
- Improvement ideas and further topics (click here)
A quick reminder for your convenience – Feel free to check out the GitHub repository provided in the SAP-samples organization. Please be aware that the repository is still being updated, so make sure you’re pulling on a regular basis.
https://github.com/SAP-samples/btp-extend-workflow-cai-msteams/tree/full-scope
In this blog post you will start setting up the sample application in your own landscape. Today’s focus is on the configuration of your SAP Business Technology Platform, the trust to your Azure Active Directory and the required (test) users for this sample scenario. So I would say - Let’s get it started!
SAP Business Technology Platform
The SAP Business Technology Platform will be the heart of this extension scenario. Besides hosting the runtime of your application (including the bot handler), it will also provide the required integration capabilities (using SAP Cloud Integration) and handle important security requirements.
For this blog post series, you can either make use of an existing SAP Business Technology Platform subaccount or create a new subaccount. As explained in the first parts of this blog post series, a trial account should be sufficient for this purpose. Feel free to use the following tutorial in case you need to set up a new trial account (click here).
For your dedicated SAP BTP subaccount, the following entitlements need to be assigned in addition to the default service entitlements (like Authorization and Trust Management Service - XSUAA).
| Service | Plan | Quota |
| Process Integration Runtime | integration-flow | 1 |
| Integration Suite | standard_edition / trial | 1 |
| Cloud Foundry Runtime | MEMORY | 1 GB |
Check the following documentation to find out how to assign entitlements to your subaccount (click here). Please be aware that you need to be Global Account Administrator to assign entitlements to a subaccount.
Extension application name
Before you start off with the configuration of the different SAP BTP components, the first thing you need to define, is the name of your application, as it will be used throughout the upcoming blog posts as <cf-app-name-placeholder>.
I recommend including the subdomain of your SAP BTP subaccount and the name of the Cloud Foundry space in your application name, to make the resulting Cloud Foundry route unique. The route is the public endpoint of your extension application. Therefore, you should also add an identifier like teams-leave or leave-request to your application name, as there might be multiple apps running in your Cloud Foundry space. Please note down the resulting application name, as you will need it in the following blog posts.
Recommended syntax
cf-app-name-placeholder (Application name)
<Subaccount subdomain>-<Cloud Foundry (CF) space>-<Identifier>
Samples
| Subaccount subdomain | sap-teams | b12345ed6trial |
| CF space name | dev | trial |
| Identifier | leave-request | teams-leave |
| Application name | sap-teams-dev-leave-request | b12345ed6trial-trial-teams-leave |
Check the availability of the resulting Cloud Foundry route before you continue, to make sure it is not already taken.
How can I check whether the resulting route for my application name is still available?
You can make use of the cf check-route command as explained in the official Cloud Foundry documentation (click here). Please make sure you’re checking things for the correct region (e.g., us10, eu20, ap20) of your dedicated SAP BTP subaccount.
cf CLI v6
cf check-route <cf-app-name-placeholder> cfapps.<BTP region>.hana.ondemand.com
Sample:
cf check-route sap-teams-dev-leave-request cfapps.eu20.hana.ondemand.com
cf CLI v7
cf check-route cfapps.<BTP region>.hana.ondemand.com --hostname <cf-app-name-placeholder>
Sample:
cf check-route cfapps.eu20.hana.ondemand.com --hostname sap-teams-dev-leave-request
Hint - Things look different in case you’re using a custom domain in your SAP BTP subaccount. You should be free to choose from your available subdomains in this case.
SAP Cloud Integration
| Purpose: SAP Cloud Integration is the central integration component of your extension architecture. It provides swift integration between your Microsoft Teams extension application, SAP SuccessFactors, and other solutions like SAP S/4HANA Cloud or On-Premise systems. Besides reusable security configurations, most of the data transformations and enrichment takes place in SAP Cloud Integration using integration flows. They are provided in the GitHub repository and can also be enhanced to fit your own requirements. |
If not done yet, please subscribe to SAP Integration Suite in your dedicated SAP BTP subaccount. A detailed explanation of how to do this, can be found in the following tutorial (click here). Please be aware, that for this scenario, you only require the Cloud Integration (Design, Develop and Operate Integration Scenarios) capability. Once you have provisioned the Cloud Integration capability and assigned the generated roles to your SAP BTP subaccount user, continue with the next step of this blog post.
Hint - The linked tutorial describes the subscription process using an SAP BTP trial environment. Please be aware that the described booster only exists in the trial environment! In all other scenarios, make sure you assign the respective roles to your SAP BTP subaccount user before you start and once again after successful provisioning of the SAP Cloud Integration capability! More information can be found in the official documentation (click here).
Process Integration Runtime
| Purpose: The Process Integration Runtime allows technical access to your integration flows. This is required so that your extension application can communicate with SAP Cloud Integration and send new leave requests to be processed. On the other hand, the technical access is required for the communication between SAP SuccessFactors and SAP Cloud Integration once notifications need to be processed and enriched before sending them your extension application. |
Create a Progress Integration Runtime service instance of type integration-flow. You can name it e.g., integration-runtime. This service is required to access your integration flows from your Microsoft Teams extension application and from SAP SuccessFactors. For example, notifications are sent to an integration flow using Client Credentials of this service instance. The official documentation on how to configure the Process Integration Runtime can be found in SAP Help (click here).
Hint - If you’re using the Integration Suite booster (only available in the trial environment) this service instance will be created automatically for you. Please make sure to update the service instance after executing the booster, using the JSON parameters below, as the booster will configure a slightly different setup.
 Integration Suite booster |  Update Process Integration Runtime |
Please provide the following JSON parameters when creating or updating your service instance. The password-based grant type is required by SAP SuccessFactors Intelligent Service Center.
{

    "grant-types": [

        "refresh_token",

        "urn:ietf:params:oauth:grant-type:saml2-bearer",

        "client_credentials",

        "password",

        "urn:ietf:params:oauth:grant-type:jwt-bearer"

    ],

    "redirect-uris": [],

    "roles": [

        "ESBMessaging.send"

    ]

}
Once the instance is created, switch to the Service Keys section, create a new service key for SAP SuccessFactors and also name it e.g., successfactors. It allows SAP SuccessFactors to send notifications to your integration flows. Once the service key is created, note down the parameters <clientid>, <url> and <clientsecret>. You will need them at a later point in time.
Repeat the same process for a new teamsextension service key. To be able to call integration flows from your extension application, you will need to provide a valid Client ID and Secret in the app’s environment variables. Therefore, also for this service key, note down the parameters <clientid>, <url> and <clientsecret>.
XSUAA instance
| Purpose: As you will set up a binding between your extension application and an XSUAA instance, this instance can be used to authenticate access to the API endpoints of your extension application. This is required to protect the notification endpoint and only give your integration flows the respective access permission. |
Create a new XSUAA instance in your SAP BTP subaccount using the below settings. This XSUAA instance is required to authenticate access to the notification endpoint of your extension application. This ensures, that only SAP Cloud Integration will be able to send messages to your extension application by providing the client credentials of this XSUAA instance.
Name: <cf-app-name-placeholder>-xsuaa
Service: Authorization and Trust Management Service (xsuaa)
Plan: apiaccess
As said, you will need your application name multiple times during the next blog posts, so if you didn’t set it at the beginning of this blog post, please do it now. Use the following JSON parameters when creating the XSUAA instance. This JSON is also available in the GitHub repository (xs-security.json - click here).
{

    "xsappname": "<cf-app-name-placeholder>",

    "tenant-mode": "dedicated",

    "description": "Security profile for Microsoft Teams extension",

    "scopes": [

        {

            "name": "uaa.user",

            "description": "UAA"

        }

    ],

    "role-templates": [

        {

            "name": "Token_Exchange",

            "description": "UAA",

            "scope-references": [

                "uaa.user"

            ]

        }

    ]

}
Once the XSUAA service instance is created, add a new service key to be used by SAP Cloud Integration. You can name it e.g., cloudintegration. Note down the parameters <clientid>, <apiurl> and <clientsecret>. You will need them when configuring the SAP Cloud Integration security settings.
Note - If you change the name of the XSUAA instance, please keep in mind that you also need to adjust the manifest.yml file of your extension application (see GitHub). This ensures the correct binding of the XSUAA instance to your extension application in case of a redeployment.
Azure Active Directory Trust
| Purpose: The key pillar of the Principal Propagation process is the trust between your Azure Active Directory and your SAP BTP subaccount. This trust needs to be established in both landscapes. It allows you to obtain a SAML assertion for your Microsoft Teams users in the Microsoft Azure environment, which can be used to request a valid access token for SAP BTP services like SAP Cloud Integration. |
As explained in the third blog post (click here), this integration scenario requires the usage of multiple Microsoft Azure services like the Active Directory. In case you don’t have access to an Microsoft Azure account (including a paid or trial subscription), check out the following tutorial in the latest openSAP course (click here). It explains in detail how to create a new Microsoft Azure account and how to get a free trial subscription.
SAP BTP - Azure Active Directory trust
As many tutorials exist on how to configure the trust between SAP BTP and Microsoft Azure, the required steps won’t be explained in detail by this blog post. Please check the following tutorial (click here) or the SAP HANA Academy (click here) and learn how to set up the required trust.
Before doing so, please read through the following important hints for this Microsoft Teams extension scenario, as some minor changes (compared to the normal trust setup) are required. If you’re facing any issues while setting up the trust, please also check out the famous blog post by Martin Räpple (click here).
Hints - While doing your Azure Active Directory configuration, you need to change the saml/SSO substring of the Reply URI field to oauth/token (see the screenshot below). This is mandatory to set the correct recipient URI in the SAML assertion.

Azure Active Directory - SAML Configuration
Furthermore, please ensure that the user’s email address (user.mail) is used as the Unique User Identifier (Name ID) by checking the claims of your SAML configuration. As described in the linked tutorials, please make sure you're adding the Groups claim to your configuration. Feel free to add further additional claims (if required) as depicted in the screenshot below.

SAML Unique User Identifier and Groups
Disable User Logon in SAP BTP
Once the trust between your cloud landscapes is established, you can disable the SAP BTP user logon using Azure Active Directory as an Identity Provider (IdP). The trust setup is only required for technical purposes (usage of Principal Propagation). If you're already using Azure Active Directory as IdP for other use-cases in your SAP BTP subaccount, please double check if user logon is required for these scenarios before changing this setting.
Please make sure, you enabled the creation of shadow users in the same screen, as you can see in the screenshot below. More information on shadow users can be found in the SAP Help portal (click here).
 Trust configurations |
Microsoft Azure Trust settings |
Hint - In an advanced version of this sample scenario, the usage of XSUAA might be replaced by an architecture based on the SAP Identity and Authentication Service. When this extension application was developed, SAP IAS was not yet capable of doing the required token exchanges for Principal Propagation. It is planned to support this requirement in a future release (subject to change).
Setup your users
For this sample scenario, you will need matching users in SAP SuccessFactors and Azure Active Directory. Additionally, you need to create a user group in Azure Active Directory and the corresponding Role Collection mapping on the SAP BTP side. This allows your users to call the respective integration flows once the Principal Propagation flow has reached the SAP BTP landscape.
The user mapping criteria for this sample scenario, will be the users's email address. Using the email address is a common approach for mapping users across multiple system landscapes and is also supported by default when using SAP Cloud Integration and SAP SuccessFactors.
Create test users in Azure Active Directory
In case you already have (test) users in Azure Active Directory whose email addresses match their corresponding SAP SuccessFactors email addresses, you can skip this step. Just make sure your users include at least one employee and his or her corresponding manager to test all relevant application features, including notifications. This relationship can be checked in the Org Chart of your SAP SuccessFactors instance.

SAP SuccessFactors Org Chart
Hint - This sample scenario assumes, that the direct manager of a user will also be responsible for approving or rejecting an employee's leave request. If your time off workflows are configured differently, please make sure the correct approver is available in Azure Active Directory.
Now it’s time to setup the mapping criteria, which is the email address in this sample scenario. In case you’re creating new users in Azure Active Directory, these users will receive an email address like name.surname@yourdomain.onmicrosoft.com, including your onmicrosoft.com domain or your own corporate domain like sap.com. Please make sure, you’re updating this new email address (if necessary) also in SAP SuccessFactors to make the mapping work for the sample scenario.
Sample mapping

SAP SuccessFactors sample organization
In our sample we choose Caroline and Jane from our SAP SuccessFactors Org Chart (see screenshot above) and create corresponding users in our Azure Active Directory. As both users receive a new email address like jane.watson@sap.onmicrosoft.com, we head back to SAP SuccessFactors and update the email addresses to have matching identities.

Same email address in Active Directory and SAP SuccessFactors
Hint - You can use an SAP SuccessFactors admin user to change the primary email address of a user. Just use the search field to find a user (or click on a user within the Org Chart) and scroll down in the profile to change the contact information details.
Azure Active Directory user group
Create a new security user group in your Azure Active Directory. Give it a meaningful name like Microsoft Teams Extension Test Users. All users supposed to use the new extension application, have to be assigned to this group. Please do so by switching to the Members area of your new user group.
The Object ID of this user group will later be mapped to a role collection in SAP BTP. So, before you move on, please note down the Object ID from the Overview section. The group assignment of your Active Directory users will be provided to SAP BTP using the Groups claim of your SAML configuration. The required Role Collection Mapping on the SAP BTP side will be done in one of the next steps.

Azure Active Directory - User group
Enterprise application user (group) assignment
Please assign the new user group to the Enterprise application that was created when you set up the trust between Azure Active Directory and SAP BTP. You find it in the Enterprise applications section of your Azure Active Directory.
Hint - Please be aware that if you’re using a free Azure Active Directory, you have to add all (test) users manually, as groups cannot be added. Nevertheless, the previous group assignment will be available in SAP BTP via the configured SAML claim.
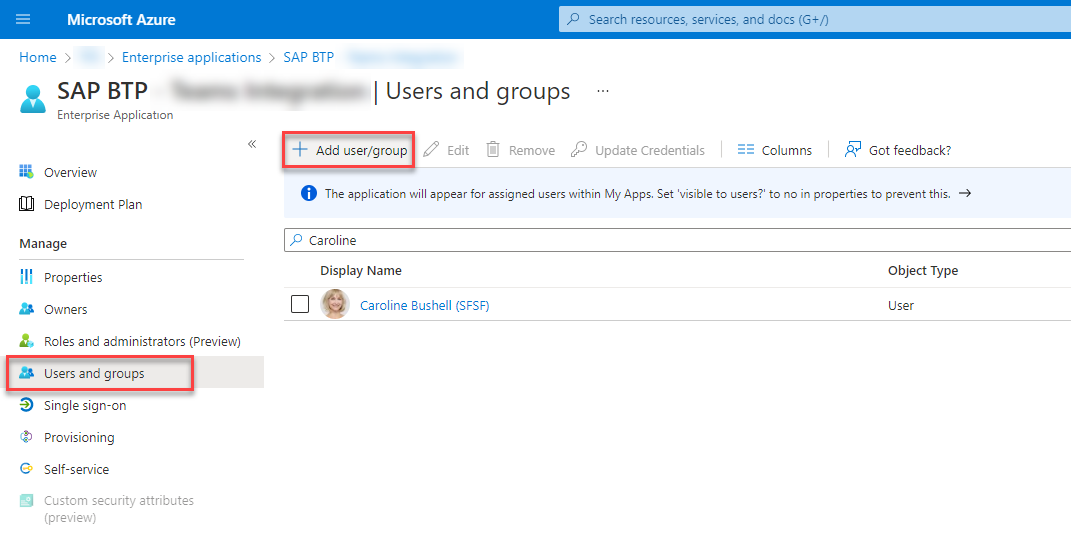
Assign the group or single users to your Enterprise application
SAP BTP Role Collection Mapping
Last but not least, go back to your SAP BTP subaccount and open the Role Collection Mapping for the Azure Identity Provider, which you created when setting up the trust between the landscapes. Map the CI_Messaging role collection to the Object Id of the Azure Active Directory user group (see screenshots below).
This Role Collection Mapping allows your users to call the existing integration flows with their propagated identity. This is possible due to an automated assignment of the required role collection to the respective shadow users based on the Role Collection Mapping.
 Role Collection Mapping |  Role Collection Mapping |
If the CI_Messaging role collection does not exist in your SAP BTP subaccount yet, please create it manually and add the available MessagingSend role in the Roles section. This role is created once you setup the Process Integration Runtime.

Role Collection for technical integration flow access
Hint - Make sure you’re passing the Azure Active Directory user group assignment as Groups parameter in your SAML claims. This has been part of the trust setup tutorial (click here). If you followed this tutorial step by step, you should be fine. Otherwise please check your SAML claims in the Azure Active Directory once again to match the below settings.
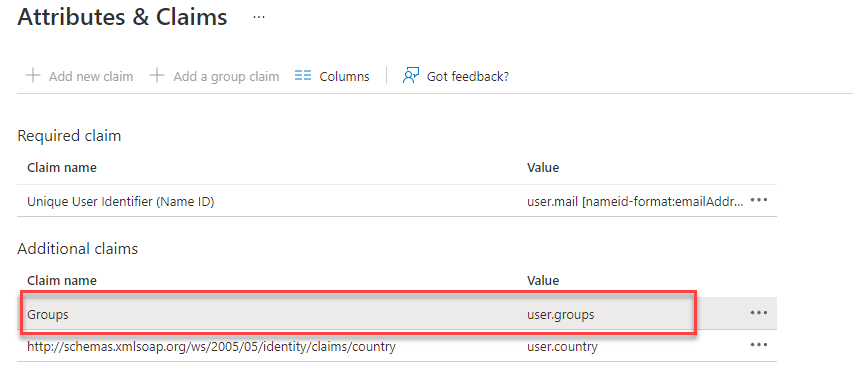
Groups claim in SAML configuration
What’s next?
You’re done with all the configuration steps? Perfect, you’ve made the start of the technical implementation! Your SAP BTP and Microsoft Azure environments are settled for the next steps! Look forward to the next part of the blog post series, in which you will set up your SAP SuccessFactors instance and configure more security related settings.
Stay curious!
Labels:
You must be a registered user to add a comment. If you've already registered, sign in. Otherwise, register and sign in.
Labels in this area
-
ABAP CDS Views - CDC (Change Data Capture)
2 -
AI
1 -
Analyze Workload Data
1 -
BTP
1 -
Business and IT Integration
2 -
Business application stu
1 -
Business Technology Platform
1 -
Business Trends
1,658 -
Business Trends
91 -
CAP
1 -
cf
1 -
Cloud Foundry
1 -
Confluent
1 -
Customer COE Basics and Fundamentals
1 -
Customer COE Latest and Greatest
3 -
Customer Data Browser app
1 -
Data Analysis Tool
1 -
data migration
1 -
data transfer
1 -
Datasphere
2 -
Event Information
1,400 -
Event Information
66 -
Expert
1 -
Expert Insights
177 -
Expert Insights
293 -
General
1 -
Google cloud
1 -
Google Next'24
1 -
Kafka
1 -
Life at SAP
780 -
Life at SAP
12 -
Migrate your Data App
1 -
MTA
1 -
Network Performance Analysis
1 -
NodeJS
1 -
PDF
1 -
POC
1 -
Product Updates
4,577 -
Product Updates
340 -
Replication Flow
1 -
RisewithSAP
1 -
SAP BTP
1 -
SAP BTP Cloud Foundry
1 -
SAP Cloud ALM
1 -
SAP Cloud Application Programming Model
1 -
SAP Datasphere
2 -
SAP S4HANA Cloud
1 -
SAP S4HANA Migration Cockpit
1 -
Technology Updates
6,873 -
Technology Updates
417 -
Workload Fluctuations
1
Related Content
- Onboarding Users in SAP Quality Issue Resolution in Technology Blogs by SAP
- Now available: starter kit for genAI on SAP BTP in Technology Blogs by SAP
- What’s new in Mobile development kit client 24.4 in Technology Blogs by SAP
- How to use AI services to translate Picklists in SAP SuccessFactors - An example in Technology Blogs by SAP
- Easy way to automate and configure the setup of a BTP account and Cloud Foundry using Terraform. in Technology Blogs by Members
Top kudoed authors
| User | Count |
|---|---|
| 32 | |
| 24 | |
| 8 | |
| 7 | |
| 7 | |
| 6 | |
| 6 | |
| 6 | |
| 5 | |
| 4 |