
- SAP Community
- Products and Technology
- Technology
- Technology Blogs by SAP
- Integration Suite - Versioning a Custom Adapter
Technology Blogs by SAP
Learn how to extend and personalize SAP applications. Follow the SAP technology blog for insights into SAP BTP, ABAP, SAP Analytics Cloud, SAP HANA, and more.
Turn on suggestions
Auto-suggest helps you quickly narrow down your search results by suggesting possible matches as you type.
Showing results for
former_member48
Explorer
Options
- Subscribe to RSS Feed
- Mark as New
- Mark as Read
- Bookmark
- Subscribe
- Printer Friendly Page
- Report Inappropriate Content
02-08-2022
10:00 AM
Introduction
SAP Cloud Integration provides capability to add custom adapters to the Integration tooling via SAP ADK Framework.
This feature is available with January 2022 release and with com.sap.cloud.adk.build.archive plugin 1.38.0 or above.
If you are not familiar with ADK and how to develop a custom adapter, you can have a look at this article. This blog assumes that you already developed a custom adapter project. We are going to look at how to version this adapter.
Pre-requisites
- Aware of maven archetypes.
- Aware of Apache Camel.
- Aware of OSGi and OSGi subsystem specification. The Adapter you develop is an OSGi esa file with type as Composite. That means it has be self-contained. If you use any dependencies, they have to be bundled within this ESA.
What is Versioning?
Before we begin, let us first understand what do we mean by versioning a custom adapter. CPI runtime does not support multiple runtime of a component. Which means, you cannot deploy two adapters at the same time. So, when we say adapter versioning, we refer to the component metadata version. You can create multiple versions of the component metadata and hence support multiple UI at the same time. The advantage is that, the existing integration scenarios will continue to have the older UI and the newer integration scenarios can get the newer UI.
It is the responsibility of the adapter developer to maintain the backward compatibility of the runtime in order to support the existing integration scenarios.
So, it is important to follow certain versioning rules.
Versioning Rules
There are three different components in a version string.
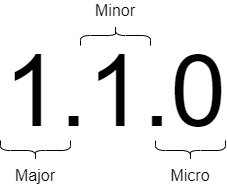
In CPI, we support only minor and micro version increments. Following are the rules to be followed while incrementing a version.
| Version Type | Applicable For | Rules |
|---|---|---|
| Micro Version | Small changes such as label and tooltip updates. |
|
| Minor Version | Adding a new feature Note: |
|
| Major Version | Incompatible Changes |
How to do Versioning
Ok, lets put the above theory into practice and see how we can version a custom adapter. For this, I am going to use the sample adapter that is getting generated when we create a new adapter project.
Following is how the UI looks like when I consume the sample greetings adapter in an integration flow.

Let's say, I would like to update the label 'Greetings Message' to something like 'Greet Here'. Since, we are not adding any new feature to our adapter, I am going with the micro version update (from 1.0.0 to 1.0.1).
I will open the metadata.xml in adapter project and navigate to AttributeMetadata section. I will update the label to 'Greet Here' as shown below.

Next step is to update the micro version of the metadata to 1.0.1. This needs to be done both at the component and variant level as shown below.

Finally, we also need to update the version in config.adk as shown below.

That's all we need to do for the micro version increment. Let's build the esa and import the same in web-ui. We can see that the label in the existing scenario is changed to the updated value.

So, as you can see micro version increment is always done in the existing metadata file. We should not create a new file for micro version increment.
Now, let's make some more changes to our adapter. I would like to introduce a new field called "Formatter". Using this field, I would like to format the output.
If you see the execution of the existing scenario, following is the message we see in exchange. I have enabled tracing to view the output.

In order to introduce a new field, first we need to modify the metadata. Since, we are introducing a new feature, we have to introduce a minor version for this (From 1.0.1 to 1.1.0).
Let's copy our metadata.xml to a new file named 'metadataV1.xml'. We should not have more than one variant in a versioned file. Hence, I am retaining only the receiver variant and removing the sender variant from the new file.
Important note to remember: We should not have more than one variant in a versioned metadata file. If you want to introduce version to both sender and receiver variants, you have to create separate metadata files for each of these variants.

Introduce the new field called 'formatter' in the new metadata file and provide the version (component and variant levels) as 1.1.0.


Let's also increment the version in config.adk. We need to increment it to 1.1.0.

Next step is to consume the new field at runtime. We need to introduce a new member variable 'formatter' in the endpoint class. Modify GreetingsEndpiong.java and add the new member variable.
private String formatter;


public String getFormatter() {

    return formatter;

}


public void setFormatter(String formatter) {

    this.formatter = formatter;

}
Now, this can be consumed in our producer to format our output. We always should remember to make the runtime backward compatible. Let's add the below code at the end of process method in GreetingsProducer.java before we set the exchange body.
String formatter = endpoint.getFormatter();

if(formatter != null) {

    messageInUpperCase = formatter + messageInUpperCase + formatter;

}
The adapter can now be built and let's import it onto web-UI. We also need to deploy the adapter.
When we open the existing scenario, we can notice that it still has the older UI. This is because, we have increased the minor version. Existing scenarios are not affected.
So, we will create a new scenario and consume the adapter. we can now notice the new field 'Formatter'.

Once we run the scenario, trace will show the new formatted output as below.

Summary
In summary, we have seen what are the different versioning rules to be followed. Also we have incremented both micro and minor version of our sample adapter.
- SAP Managed Tags:
- SAP Integration Suite,
- Cloud Integration
Labels:
You must be a registered user to add a comment. If you've already registered, sign in. Otherwise, register and sign in.
Labels in this area
-
ABAP CDS Views - CDC (Change Data Capture)
2 -
AI
1 -
Analyze Workload Data
1 -
BTP
1 -
Business and IT Integration
2 -
Business application stu
1 -
Business Technology Platform
1 -
Business Trends
1,658 -
Business Trends
92 -
CAP
1 -
cf
1 -
Cloud Foundry
1 -
Confluent
1 -
Customer COE Basics and Fundamentals
1 -
Customer COE Latest and Greatest
3 -
Customer Data Browser app
1 -
Data Analysis Tool
1 -
data migration
1 -
data transfer
1 -
Datasphere
2 -
Event Information
1,400 -
Event Information
66 -
Expert
1 -
Expert Insights
177 -
Expert Insights
298 -
General
1 -
Google cloud
1 -
Google Next'24
1 -
Kafka
1 -
Life at SAP
780 -
Life at SAP
13 -
Migrate your Data App
1 -
MTA
1 -
Network Performance Analysis
1 -
NodeJS
1 -
PDF
1 -
POC
1 -
Product Updates
4,577 -
Product Updates
344 -
Replication Flow
1 -
RisewithSAP
1 -
SAP BTP
1 -
SAP BTP Cloud Foundry
1 -
SAP Cloud ALM
1 -
SAP Cloud Application Programming Model
1 -
SAP Datasphere
2 -
SAP S4HANA Cloud
1 -
SAP S4HANA Migration Cockpit
1 -
Technology Updates
6,873 -
Technology Updates
421 -
Workload Fluctuations
1
Related Content
- SAP Integration Suite - IDOC to flat file conversion in Technology Q&A
- Lowest SAP ECC version that can be integrated with SAP BTP through Cloud Connector in Technology Q&A
- Convert multiple xml's into single Xlsx(MS Excel) using groovy script in Technology Blogs by Members
- Top Picks: Innovations Highlights from SAP Business Technology Platform (Q1/2024) in Technology Blogs by SAP
- How to build SOAP service in SAP Cloud Integration in Technology Blogs by Members
Top kudoed authors
| User | Count |
|---|---|
| 39 | |
| 25 | |
| 17 | |
| 13 | |
| 7 | |
| 7 | |
| 7 | |
| 7 | |
| 6 | |
| 6 |