
- SAP Community
- Products and Technology
- Technology
- Technology Blogs by SAP
- Integration Suite - Developing Custom Adapters wit...
Technology Blogs by SAP
Learn how to extend and personalize SAP applications. Follow the SAP technology blog for insights into SAP BTP, ABAP, SAP Analytics Cloud, SAP HANA, and more.
Turn on suggestions
Auto-suggest helps you quickly narrow down your search results by suggesting possible matches as you type.
Showing results for
former_member48
Explorer
Options
- Subscribe to RSS Feed
- Mark as New
- Mark as Read
- Bookmark
- Subscribe
- Printer Friendly Page
- Report Inappropriate Content
02-08-2022
9:51 AM
Introduction
SAP Cloud Integration provides capability to add custom adapters to the Integration tooling via SAP ADK Framework.
If you are familiar with the adapter development using eclipse plugins, we offered the development of custom adapters with a dependency to Eclipse Oxygen. With January 2022 increment, we are providing more efficient and convenient way to develop custom adapters using any IDE of your choice.
With this increment, you shall be able to create a maven based project even for reusing an existing camel component.
In this blog, I am going to show you how to create the adapter using archetypes and different maven phases for metadata generation and build.
Pre-requisites
- Aware of maven archetypes.
- Aware of Apache Camel.
- Aware of OSGi and OSGi subsystem specification. The Adapter you develop is an OSGi esa file with type as Composite. That means it has be self-contained. If you use any dependencies, they have to be bundled within this ESA.
Types of Adapter Projects
Creation of the adapter project uses maven archetypes. There are two archetypes available for adapter project creation.
Adapter Project based on New Component
In this type, you normally need to implement the camel component within the adapter project. A sample adapter with all the necessary classes and metadata for a component is generated during the project creation.
Maven coordinate - com.sap.cloud.adk:com.sap.cloud.adk.archetype-adapter
Adapter Project based on Existing Camel Component
This type can be used when you already have a camel component and you want to create the adapter based on this component. You can relate it to the non-maven adapter type in eclipse. Now this is also based on maven and hence normal maven lifecycle can be used to build the project.
Maven coordinate - com.sap.cloud.adk:com.sap.cloud.adk.archetype-adapter-component-reuse
You can either refer the component as a dependency in pom or manually copy the component jar into the project folder.
Enough theory! Let's create some adapters.
New Adapter Project Type
We are going to create the project using the below archetype. Following is the maven command reference
mvn archetype:generate -B -DarchetypeGroupId=com.sap.cloud.adk \

 -DarchetypeArtifactId=com.sap.cloud.adk.archetype-adapter \

 -DarchetypeVersion=1.0.1 \

 -DcomponentName=Greetings \

 -DadapterName=Greetings \

 -DadapterId=Greetings \

 -DadapterVendor=sap \

 -DadapterVersion=1.0.0 \

 -Dscheme=sap-greet \

 -DgroupId=com.sap.greet \

 -DartifactId=Greetings \

 -Dversion=1.0.0-SNAPSHOT
What are these command parameters mean?
| Parameter Type | Parameters | Description |
| Archetype Parameters | archetypeArtifactId | Maven artifactId of archetype |
| archetypeGroupId | Maven groupId of archetype | |
| archetypeVersion | Maven version of archetype | |
| Adapter Parameters | adapterName | Name of adapter |
| adapterId | ID of adapter | |
| adapterVendor | vendor name for your adapter | |
| adapterVersion | adapter version. Default value is 1.0.0 | |
| Camel component parameters | componentName | Camel component name. This will be used for the class names of the component |
| scheme | Endpoint scheme name of your camel component. | |
| Maven coordinates for Adapter project | groupId | Project groupId |
| artifactId | Project artifactId | |
| version | Project version |
You can either use the above archetype:generate command or any IDE of your choice to generate the project. Refer maven central repository for the latest version of the archetype.
Creation
I am using the Intellij IDE to generate the project. You can also use other IDEs like Eclipse or Visual Studio etc.

Providing the adapter parameters.
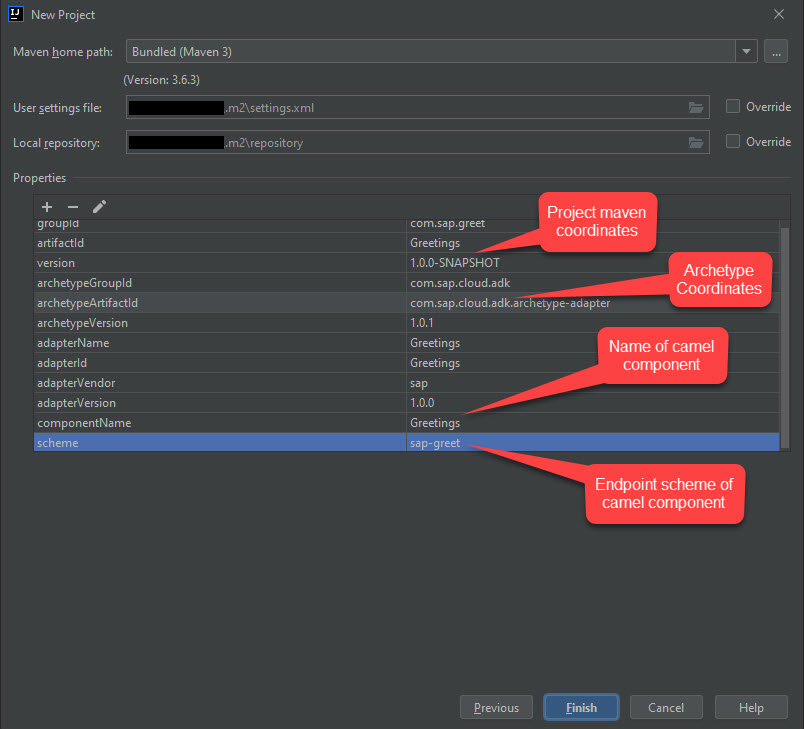
Clicking on the Finish button, adapter project is created.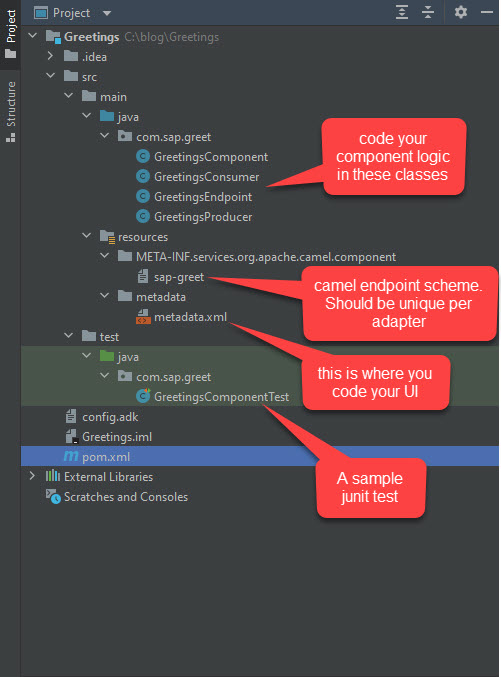
A sample camel component is already generated for your. Let's briefly understand what each of these files mean.
- GreetingsComponent - This is the component class implementation.
- GreetingsConsumer - This is a polling consumer. It just adds a Hello string with current time stamp.
- GreetingsProducer - This is the receiver implementation which converts the 'greetingsMessage' to upper case and also appends the exchange input to the final message.
- GreetingsEndpoint - This is the camel endpoint class. Here you will see the variables configured for your adapter. In the generated class, you can see a variable 'greetingsMessage'.
- GreetingsComponentTest - This is a junit test which asserts the producer and consumer logic.
- metadata.xml - this is the metadata xml generated automatically for you (As sample). Observe that it has two fields or is firstUriPart which is by default. Another one is matching to your @UriParam i.e. ‘greetingsMessage’.
Building your Adapter
Use the maven build commands to build the adapter project.
mvn clean installThe ADK plugin comes with various useful maven goals. Below screenshot shows the various maven goals which can be used in the adapter development process.

In case you want to re-generate the component metadata, generate-cmd goal can be used.
mvn adapter-build-plugin:generate-cmdIn the same way, if you want to generate the blueprint metadata, generate-bmd goal can be used.
mvn adapter-build-plugin:generate-bmdIf you want to do a validation check on the project explicitly, you can run the check goal. However, the check is executed automatically as part of the install command.
mvn adapter-build-plugin:checkNote that all the options provided in the eclipse plugin are provided as maven goals.
Testing
Once the maven build is successful, the esa file is generated in target/build. The esa file can now be imported in web-ui and can be consumed in an integration flow.
Reused Component Project Type
Here let's build an adapter based on an existing camel component!
The project is created using the archetype. Below is the maven command reference.
mvn archetype:generate -B -DarchetypeGroupId=com.sap.cloud.adk \
-DarchetypeArtifactId=com.sap.cloud.adk.archetype-adapter-component-reuse \
-DarchetypeVersion=1.0.1 \
-DadapterName=MyAdapter \
-DadapterId=MyAdapter \
-DadapterVendor=sap \
-DadapterVersion=1.0.0 \
-DgroupId=com.sap.sample \
-DartifactId=MyAdapter \
-Dversion=1.0.0-SNAPSHOTYou can either use the above archetype:generate command or any IDE of your choice to generate the project. Refer maven central repository for the latest version of the archetype.
Creation
I am using the Intellij IDE as before to generate the project.

Adapter project details are given in the next page

The project is created as shown below

component - This is where the camel component to be placed.
libs - The dependent jars need to be placed here.
metadata - This folder will contain the generated metadata xml file.
As you can see, all these folders are currently empty.
Open the pom.xml file. Here, you can refer the camel component maven coordinates as shown below. This way, the component jar and their dependencies are automatically copied to the respective folders during maven build.
 I am using the camel-rabbitmq camel component to create my adapter.
Building Your Adapter
Let us build the adapter using maven install command.
mvn clean installAfter the successful build, you can observe the following:
- camel-rabbitmq component has been copied to the component folder.
- The dependent bundles have been placed under the libs folder.
- metadata.xml has been generated for the component.
- The esa has been generated.

If you want to place the component and dependent jars manually, you are free to do so. However you need to comment out the maven-dependency-plugin from the pom file.
If you already have a non-maven based adapter project which was created using the old eclipse plugin, you can manually convert it to new maven based project.
- Generate a new project using the reuse component project type. Provide same adapter name as your existing project.
- Comment out the maven-dependency-plugin from the pom file.
- Copy the component jar, dependent jars and the metadata file to the respective folders of new adapter.
- Build the adapter using maven.
Summary
In summary, we have seen how to create both types of adapter projects. Also seen what are the different maven goals available for the adapter development.
- SAP Managed Tags:
- SAP Integration Suite,
- Cloud Integration
Labels:
4 Comments
You must be a registered user to add a comment. If you've already registered, sign in. Otherwise, register and sign in.
Labels in this area
-
ABAP CDS Views - CDC (Change Data Capture)
2 -
AI
1 -
Analyze Workload Data
1 -
BTP
1 -
Business and IT Integration
2 -
Business application stu
1 -
Business Technology Platform
1 -
Business Trends
1,661 -
Business Trends
86 -
CAP
1 -
cf
1 -
Cloud Foundry
1 -
Confluent
1 -
Customer COE Basics and Fundamentals
1 -
Customer COE Latest and Greatest
3 -
Customer Data Browser app
1 -
Data Analysis Tool
1 -
data migration
1 -
data transfer
1 -
Datasphere
2 -
Event Information
1,400 -
Event Information
64 -
Expert
1 -
Expert Insights
178 -
Expert Insights
270 -
General
1 -
Google cloud
1 -
Google Next'24
1 -
Kafka
1 -
Life at SAP
784 -
Life at SAP
11 -
Migrate your Data App
1 -
MTA
1 -
Network Performance Analysis
1 -
NodeJS
1 -
PDF
1 -
POC
1 -
Product Updates
4,578 -
Product Updates
323 -
Replication Flow
1 -
RisewithSAP
1 -
SAP BTP
1 -
SAP BTP Cloud Foundry
1 -
SAP Cloud ALM
1 -
SAP Cloud Application Programming Model
1 -
SAP Datasphere
2 -
SAP S4HANA Cloud
1 -
SAP S4HANA Migration Cockpit
1 -
Technology Updates
6,886 -
Technology Updates
395 -
Workload Fluctuations
1
Related Content
- Top Picks: Innovations Highlights from SAP Business Technology Platform (Q1/2024) in Technology Blogs by SAP
- SAP GUI for Java 8.10 on the Horizon in Technology Blogs by SAP
- Consuming CAPM Application's OData service into SAP Fiori Application in Business Application Studio in Technology Blogs by Members
- Value Unlocked! How customers benefit from SAP HANA Cloud in Technology Blogs by SAP
- Harnessing the Power of SAP HANA Cloud Vector Engine for Context-Aware LLM Architecture in Technology Blogs by SAP
Top kudoed authors
| User | Count |
|---|---|
| 11 | |
| 10 | |
| 10 | |
| 10 | |
| 8 | |
| 7 | |
| 7 | |
| 7 | |
| 7 | |
| 6 |