
- SAP Community
- Products and Technology
- Technology
- Technology Blogs by SAP
- Provision users from Microsoft Azure AD to SAP Clo...
Technology Blogs by SAP
Learn how to extend and personalize SAP applications. Follow the SAP technology blog for insights into SAP BTP, ABAP, SAP Analytics Cloud, SAP HANA, and more.
Turn on suggestions
Auto-suggest helps you quickly narrow down your search results by suggesting possible matches as you type.
Showing results for
Product and Topic Expert
Options
- Subscribe to RSS Feed
- Mark as New
- Mark as Read
- Bookmark
- Subscribe
- Printer Friendly Page
- Report Inappropriate Content
02-04-2022
6:46 AM
In this blog I will use SAP Cloud Identity Services - Identity Provisioning to replicate users from Microsoft Azure Active Directory to SAP Cloud Identity Services - Identity Authentication. Before we get into the detailed steps, let's quickly review the purpose of each one of these components.
SAP Cloud Identity Services - Identity Authentication (IAS) is SAP's cloud based SAML2 Identity Provider. IAS provides you with controlled cloud-based access to business processes, applications, and data. It simplifies your user experience through authentication mechanisms, single sign-on, on-premise integration, and convenient self-service options.
SAP Cloud Identity Services - Identity Provisioning (IPS) allows you to manage identity lifecycle processes for cloud and on-premise systems. IPS automates identity lifecycle processes. It helps you provision identities and their authorizations to various cloud and on-premise business applications.
Microsoft Azure Active Directory - Azure Active Directory (Azure AD) is Microsoft’s cloud-based identity and access management service and serves similar purpose as SAP Cloud Identity Services - IAS
The following picture highlights the scenario that we will setup with IPS. In our case, the source system will be Azure AD and target system will be IAS.
I've highlighted certain fields from the user profile because we will need to make changes to the default IPS rules to ensure fields like EmployeeID, Department, City and Country are handled. Some additional aspects to note for the users:
In order to replicate users from Azure AD to IAS we will need to perform the following steps:
I've also added a supplementary section at the end that covers how the properties and transformation rules can be modified in source and target system to handle specific scenarios.
Register an application with Microsoft Graph API
This completes part 1 of the setup.
Setup Azure AD as a source system in IPS
Setup IAS as a target system in IPS
Before we can setup SAP Cloud Identity Services - Identity Authentication (IAS) as a target system in IPS, we need to create a system users in IAS with the proper privileges to provision users.
This completes part 3 of the setup.
Run the source provisioning job
This completes part 4 of the setup.
Supplementary Section:
In the above scenario, certain fields(employee number, department, city, country etc.) were not replicated in IAS user profile. How do we handle this scenario? To address this we need to make certain changes to the properties and transformation rules for source and target systems.
Additional Resource:
The IPS help guide is great resource to learn about all the different transformation options that are available.
SCIM API Reference Guide for SAP Cloud Identity - Identity Directory Service
Microsoft Graph API's Guide
SAP Cloud Identity Services - Identity Authentication (IAS) is SAP's cloud based SAML2 Identity Provider. IAS provides you with controlled cloud-based access to business processes, applications, and data. It simplifies your user experience through authentication mechanisms, single sign-on, on-premise integration, and convenient self-service options.
SAP Cloud Identity Services - Identity Provisioning (IPS) allows you to manage identity lifecycle processes for cloud and on-premise systems. IPS automates identity lifecycle processes. It helps you provision identities and their authorizations to various cloud and on-premise business applications.
Microsoft Azure Active Directory - Azure Active Directory (Azure AD) is Microsoft’s cloud-based identity and access management service and serves similar purpose as SAP Cloud Identity Services - IAS
The following picture highlights the scenario that we will setup with IPS. In our case, the source system will be Azure AD and target system will be IAS.

Before we get into the process of replicating users from Azure to IAS, let's briefly look at the setup of my Azure AD users and groups. I have 10 users(ipsUser_01 to ipsUser_10) in Azure AD and they members of one of 2 groups: SAPCloudUsers1 or SAPCloudUsers2.
The screenshots below show couple examples of the user profile setup in Azure:


I've highlighted certain fields from the user profile because we will need to make changes to the default IPS rules to ensure fields like EmployeeID, Department, City and Country are handled. Some additional aspects to note for the users:
- The Country value for the users is set to Canada. IAS user profile expects country code instead of country name.
- Mobile phone number is empty for some users. IPS rules will have to be adjusted accordingly to handle this scenario.
In order to replicate users from Azure AD to IAS we will need to perform the following steps:
- Register an application with Microsoft Graph API
- Setup Azure AD as a source system in IPS
- Setup IAS as a target system in IPS
- Run the source provisioning job
I've also added a supplementary section at the end that covers how the properties and transformation rules can be modified in source and target system to handle specific scenarios.
Register an application with Microsoft Graph API
- Launch a browser window and access your Azure portal using the URL: https://portal.azure.com/. You will need to authenticate to your Azure AD using your admin credentials.
- Click Azure Active Directory.

- Click App Registration >> New registration.
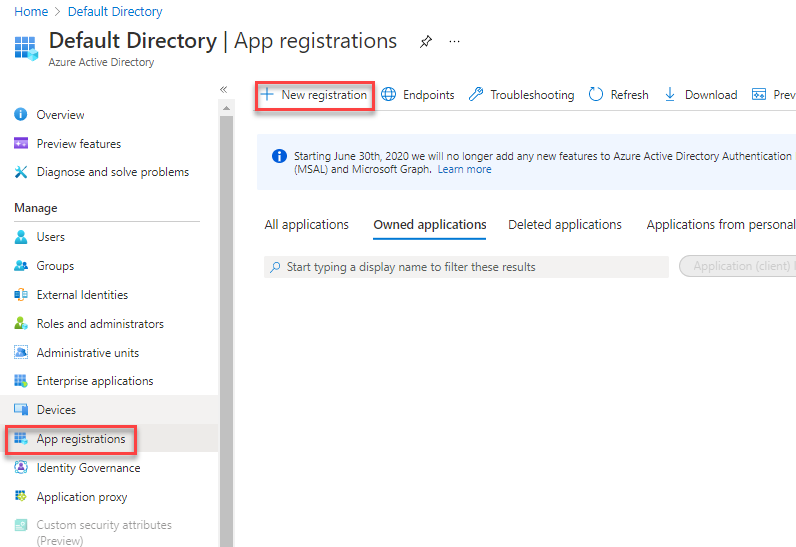
- Specify a name for your app and click Register.

- Click API permission >> Add a permission.

- Select Microsoft Graph.

- Click Application permissions.

- From the list of API permissions, expand User and select User.Read.All.

- From the API list also select Group >> Read.All and Directory >> Read.All. Click Add permissions at the bottom of the screen once done.
- The permissions are not granted by default. To grant the permissions, click Grant admin consent for Default Directory.

- Click Yes on the popup message and confirm that all permissions are granted.

- Click Overview from the left panel. Make a note of the Application (client) ID. You will need this later when creating the source system in IPS. Click Add a certificate or secret.

- Click New client secret.

- Specify a description and expiry time for the client secret.
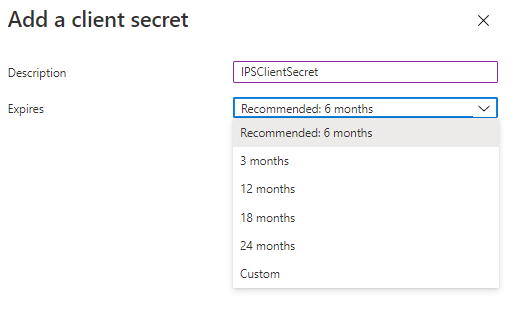
- You should have client secret added successfully. Make a note of the value field as you will need it later when creating the source system in IPS.

- Navigate to the main overview page of Azure AD and make a note of your Primary domain. You will need this value when creating the source system in IPS.

This completes part 1 of the setup.
Setup Azure AD as a source system in IPS
- Access your SAP Cloud Identity Services - Identity Provisioning (IPS) tenant.
- Click on Source Systems.

- Click Add.

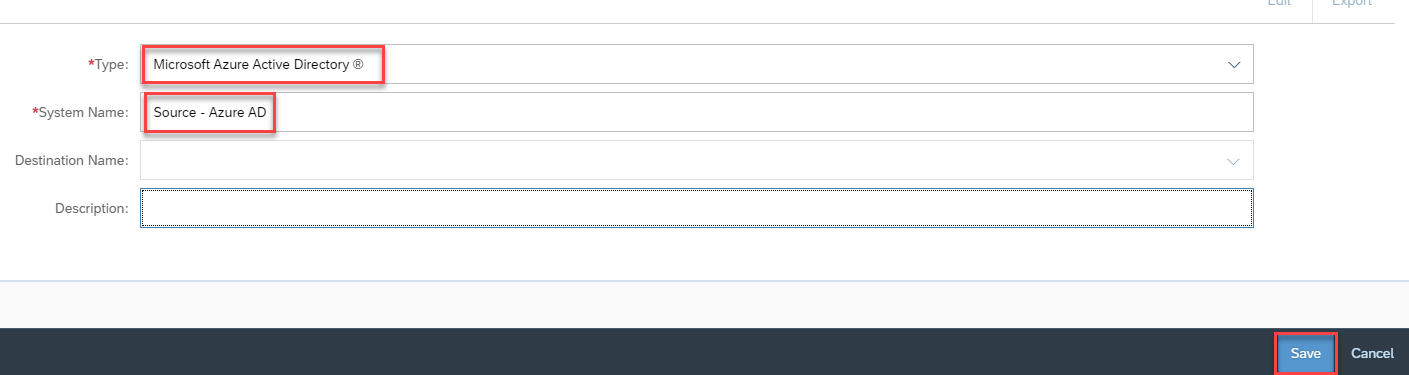
- Specify the following and click Save:
- Type: Microsoft Azure Active Directory
- System Name: <name of your choice>
- Click Properties. You will see a list of pre-created properties.

- Click Add to add new properties. Use the Standard option for non-sensitive properties and Credential option for password fields.
 Add the following properties one by one and click Save. The list below is minimum set of properties that are required for IPS to read user/group information from Azure. These properties can be further customized, for eg. to filter for specific users and/or groups. Take a look at the help guide for the complete list of properties that are possible with Azure AD as a source system.
- Type: HTTP
- ProxyType: Internet
- URL: https://graph.microsoft.com
- Authentication: BasicAuthentication
- User: <Application (client) ID> - See step 12 above.
- Password: <Shared secret value> - See step 15 above.
- aad.domain.name: <your Azure AD domain> - See step 16 above.
- OAuth2TokenServiceURL: https://login.microsoft.com/<aad.domain.name>/oauth2/token - Change the <aad.domain.name> to match your Azure AD domain.

- Now before we wrap up the configuration of the source system, it's also important to check the transformation rules. There is a slight issue with default transformations that if not corrected may cause the IPS read jobs to fail for certain users. Click on Transformations and click Edit to modify the default transformations. Scroll down until you find the condition highlighted in red and change it as per the screenshot highlighted in green. The modified rules will handle the scenario where the user profile in Azure AD may not have mobile phone value populated. The rules simply add a default value for the mobile phone in such a scenario. Without this change, any user that only has the Office phone field populated in Azure will fail during the provisioning job.

- Optionally set the parameter that ignores Azure AD groups. The default is set to true so the provisioning job will not read Azure AD groups. I set this to false so that I can read both users and their group membership from Azure AD.

- Save your changes.
This completes part 2 of the setup.
Setup IAS as a target system in IPS
Before we can setup SAP Cloud Identity Services - Identity Authentication (IAS) as a target system in IPS, we need to create a system users in IAS with the proper privileges to provision users.
- Open another browser tab and access your IAS Administration console.
- Under Administrators, click Add >> System.

- Specify a name for your user and ensure the following authorizations are enabled:
- Manage Users
- Manage Groups
- Manage Tenant Configuration

- For Set Password section, click Not Configured.

- Specify a password for your user and click Save. After saving, you will redirected back to the previous screen. Navigate back to the password screen and copy the User ID using the Copy icon. We need this User ID and the password later when setting up IAS as a target system in IPS.
 We now have everything needed to configure IAS as a target system in IPS.
 - Switch to Identity Provisioning browser tab.
- Click the Target System icon and click Add.

- Specify the following and click Save:
- Type: Identity Authentication
- System Name: <name of your choice>
- Source System: <your Azure AD source system created earlier>

- Under Properties, Add the additional properties below and click Save. Take a look at the help guide for the complete list of properties that are possible with Identity Authentication as a target system.
- Type: HTTP
- ProxyType: Internet
- URL: <your IAS tenant URL>
- Authentication: BasicAuthentication
- User: <IAS system user> - See step 5 above.
- Password: <IAS system user password> - See step 5 above.
This completes part 3 of the setup.
Run the source provisioning job
- Switch to Source Systems.
- Select your source job and click Jobs icon. Click Run Now icon to start the Read Job.

- Monitor the status of your job under the Job Logs until you see a Success or Failure status. You will need to navigate away and come back to this page to see the updated status.

- View the details of the job execution. In my case 10 users and 2 groups are created successfully.

- Access your target IAS tenant and confirm the users and groups are created successfully. The screenshot below shows the user that's created in IAS and setup for one of the groups. Few things to notice about the users that you just provisioned in IAS:
- The mobile phone field is populated with default value for ipsUser_01. This is expected as we modified our rules to handle this.
- EmployeeNumber, Department, City and Country/Region fields are not visible in the IAS user profile. How do we ensure these fields are also populated in IAS user profile? Answer to this question is in the supplementary section below.
- User groups and their members are correctly replicated in IAS. Groups will not be replicated if you forget to adjust the source transformation rules in for Azure set the parameter to ignore groups to false (see step 9 in Setup Azure AD as a source system in IPS section)

This completes part 4 of the setup.
Supplementary Section:
In the above scenario, certain fields(employee number, department, city, country etc.) were not replicated in IAS user profile. How do we handle this scenario? To address this we need to make certain changes to the properties and transformation rules for source and target systems.
- Update properties for your source job and add the following:
- Property: aad.user.properties
- Value: id,mail,userPrincipalName,<additional user attributes as described in MS Graph API>
- In my case, I set the value for the aad.user.properties value to: id,mail,userPrincipalName,employeeId,displayName,givenName,surname,jobTitle,city,companyName,country,businessPhones,mobilePhone,department

- Modify the source transformation rules and add the highlighted part to the rules.

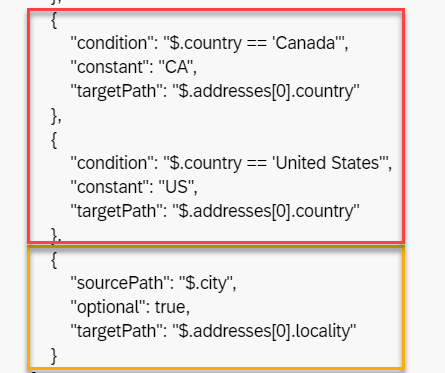
- The city and country fields also require additional modifications to source system transformation rules. Rules highlighted in yellow in the screenshot below maps the city field from Azure to the locality field that IAS expects. The country field in Azure user profile has the country name while IPS expects country code instead. I've added conditions(in red) to check the country name and set the appropriate country code for Canada and United States.
- For ensuring the department and employee numbers fields are also populate in IAS user profile, I am going to update the target system transformation rules set for IAS. Now you can also do handle this in the source transformation rules, but I will do this in the target. The screenshot below shows the before and after changes I made to rules for employeeNumber and department in IAS target system transformations.

With all the changes here, the user fields in IAS are populated correctly.
Additional Resource:
The IPS help guide is great resource to learn about all the different transformation options that are available.
SCIM API Reference Guide for SAP Cloud Identity - Identity Directory Service
Microsoft Graph API's Guide
- SAP Managed Tags:
- SAP Cloud Identity Services,
- Identity Provisioning
Labels:
29 Comments
You must be a registered user to add a comment. If you've already registered, sign in. Otherwise, register and sign in.
Labels in this area
-
ABAP CDS Views - CDC (Change Data Capture)
2 -
AI
1 -
Analyze Workload Data
1 -
BTP
1 -
Business and IT Integration
2 -
Business application stu
1 -
Business Technology Platform
1 -
Business Trends
1,661 -
Business Trends
87 -
CAP
1 -
cf
1 -
Cloud Foundry
1 -
Confluent
1 -
Customer COE Basics and Fundamentals
1 -
Customer COE Latest and Greatest
3 -
Customer Data Browser app
1 -
Data Analysis Tool
1 -
data migration
1 -
data transfer
1 -
Datasphere
2 -
Event Information
1,400 -
Event Information
64 -
Expert
1 -
Expert Insights
178 -
Expert Insights
273 -
General
1 -
Google cloud
1 -
Google Next'24
1 -
Kafka
1 -
Life at SAP
784 -
Life at SAP
11 -
Migrate your Data App
1 -
MTA
1 -
Network Performance Analysis
1 -
NodeJS
1 -
PDF
1 -
POC
1 -
Product Updates
4,577 -
Product Updates
326 -
Replication Flow
1 -
RisewithSAP
1 -
SAP BTP
1 -
SAP BTP Cloud Foundry
1 -
SAP Cloud ALM
1 -
SAP Cloud Application Programming Model
1 -
SAP Datasphere
2 -
SAP S4HANA Cloud
1 -
SAP S4HANA Migration Cockpit
1 -
Technology Updates
6,886 -
Technology Updates
403 -
Workload Fluctuations
1
Related Content
- Identity Federation: SAP Ariba SSO with SAP Cloud Identity Services - Identity Authentication in Technology Blogs by SAP
- SAP Secure Login Service for SAP GUI Now Supports Custom Certificate Authorities on AWS in Technology Blogs by SAP
- Single Sign On to SAP Cloud Integration (CPI runtime) from an external Identity Provider in Technology Blogs by SAP
- Overview: SAP Ariba SSO with SAP Cloud Identity Services - Identity Authentication in Technology Blogs by SAP
- Configuration: SAP Ariba SSO with SAP Cloud Identity Services - Identity Authentication in Technology Blogs by SAP
Top kudoed authors
| User | Count |
|---|---|
| 12 | |
| 10 | |
| 10 | |
| 7 | |
| 7 | |
| 7 | |
| 6 | |
| 6 | |
| 5 | |
| 4 |