
- SAP Community
- Products and Technology
- Technology
- Technology Blogs by SAP
- Part 6: Construct an SAP Graph Business Data Graph
Technology Blogs by SAP
Learn how to extend and personalize SAP applications. Follow the SAP technology blog for insights into SAP BTP, ABAP, SAP Analytics Cloud, SAP HANA, and more.
Turn on suggestions
Auto-suggest helps you quickly narrow down your search results by suggesting possible matches as you type.
Showing results for
stephanie_lewel
Participant
Options
- Subscribe to RSS Feed
- Mark as New
- Mark as Read
- Bookmark
- Subscribe
- Printer Friendly Page
- Report Inappropriate Content
02-03-2022
12:54 PM
INFO: This blog is part of a tutorial series for the standalone SAP Graph service on SAP BTP. Recently, SAP released a version of Graph in SAP Integration Suite with better user experience and functional enhancements (see this blog for details: https://blogs.sap.com/2023/02/22/announcing-graph-in-sap-integration-suite).
Hello!
In this sixth part of the tutorial on SAP Graph – the new API for connecting to your business data – we will discuss the concepts and configuration of the Business Data Graph. Please refer to the information map to see all parts of this tutorial series. The documentation on Help Portal provides an in-depth look at many of the concepts featured in this part.
What makes the “graph” in SAP Graph?
SAP Graph offers an API for developers, providing them one connection to your business data in the form of a connected graph of business entities which we call the Business Data Graph. The business data graph is constructed by SAP Graph through discovery of the landscape and reflects the connected data entities available in the landscape, including custom fields.
Part 5 introduced the roles of administrator and key user, and how to configure a landscape and the corresponding SAP Graph service with these responsibilities. This part (six) completes the process of creating a business data graph for the configured landscape.
Instead of experiencing a lengthy and convoluted handover of system-specific information, you can hand the developer the URL and credentials to the business data graph as an abstracted representation of the landscape. Development time is focused more on application building and less on knowledge transfer.
Configuring the Business Data Graph
We pick up from where we left off at the end of part 5. You created destinations to data source endpoints, added an SAP Graph service, and assigned yourself the key user role. Also, you generated and downloaded the credentials text file, which we will need in the next steps. Here is the process we will follow:
- Install the SAP Graph command-line configuration tool
- Generate a business data graph configuration file
- Edit the configuration file
- Activate a business data graph with the configuration file
Step 1: Install the SAP Graph configuration tool (graphctl)
Open a console (here we will use Windows and have created the subdirectory C:\demo, but this also works on other operating systems) and enter:
npm i -g @sap/graph-toolkit To check that the installation was successful, enter:
graphctl -v

Step 2: Log into the SAP Graph configuration tool
Provide the credentials text file that you generated previously as a parameter to the login command. Enter:
graphctl login -f <credentials file> A browser tab or window will open and require you to log in. Upon successful authentication you will see:

Close the browser window and return to the console.

Step 3: Generate the SAP Graph configuration file
Now is when the unique business data graph is constructed through a discovery of the landscape. The generated configuration file is effectively a recommended default configuration, that you can choose to adapt or fine tune.
In your console enter:
graphctl generate config -f <config.json> It may take some time for the configuration output to be generated.
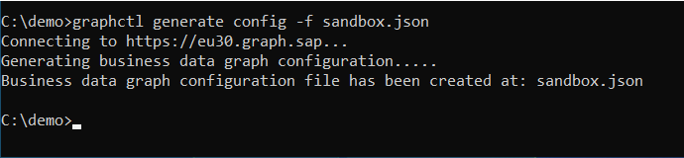
The graphctl tool has generated a default business data graph configuration file. Here is what the first few lines look like:
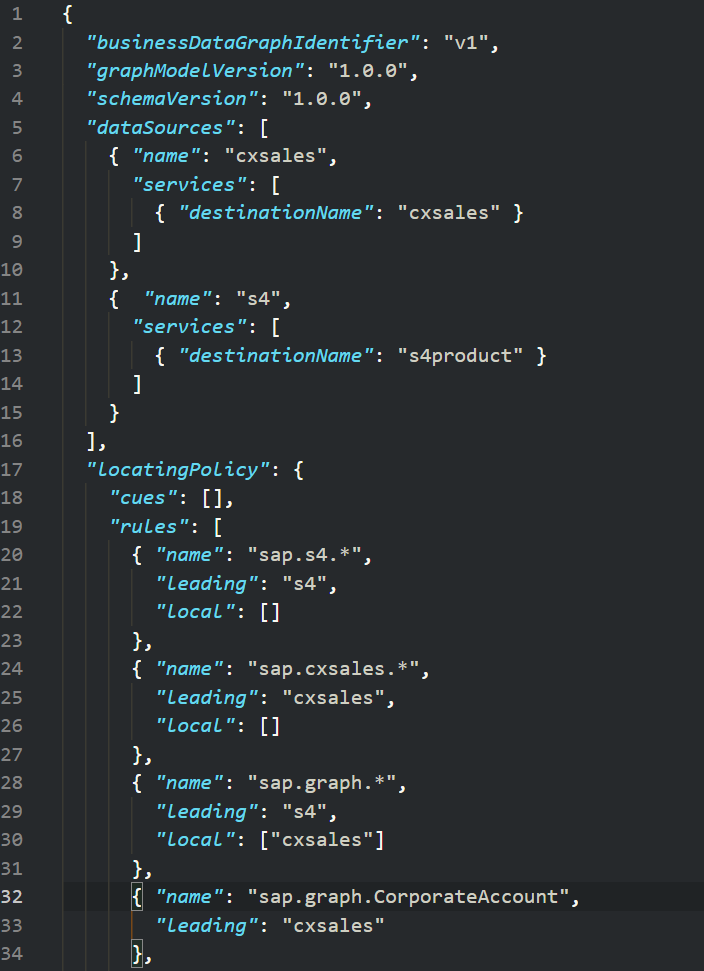
Lines 5-16 show the discovered data sources, based on the two destinations we created in part 5 of the tutorial series. Line 17 starts the data locating policy. This part specifies the rules that determine where SAP Graph looks for data. For instance, lines 28-30 specify that entities within the sap.graph namespace default to the "s4" data source, unless overwritten by a more specific rule, such as the rule in lines 32-34, which specify that sap.graph/CorporateAccount will actually be found in the "cxsales" data source.
Often, the generated default configuration file, based on heuristics, is all you need. In more complex use cases, it may need to be tweaked. You can also learn more about this topic in the documentation on Help Portal.
Just for fun, let's change just one small thing: go ahead and replace the default string "v1" in line 2 with something else, for instance "dev".
Step 4: Activate the configuration of the business data graph
In your console enter:
graphctl activate config -f <config.json> This may take a little time. Eventually, you will see:

Congratulations, you have successfully configured a business data graph!
Using your data
So, what now? Now comes the fun part!
Remember how in part 3 we wrote:
A file containing [business data graph credentials], credentials.json, is created during the process of setting up and configuring the business data graph. You receive this file and the business data graph identifier from the SAP BTP administrator or key user who configured the specific business data graph you want to access.
Well, that is exactly what we just did. We have our own credentials file and we generated a business data graph, which now has the identifier "dev". To test that everything works, go back to part 3 and:
- Copy the credentials file you used for login into the src folder and rename it credentials.json
- Change the value of the dataGraphId on line 4 of graph.js to "dev":
const dataGraphId = "dev"; And run the application again. Hurray!
In summary
This part of the tutorial series concludes the basic introduction to SAP Graph. In part 5 we learned how to set up a landscape for SAP Graph, which we used in this part (six) to create a business data graph. In part 3 of this series we learned how a developer creates a rudimentary application used by authenticated users to access the data in the business data graph. Note how the developer, in part 3, did not need to know anything about setting up landscapes or business data graphs – the developer only required the credentials file and the business data graph identifier.
Stephanie Lewellen, Product Manager – SAP Graph
Learn more about SAP Graph, or contact us at sap.graph@sap.com
- SAP Managed Tags:
- SAP Graph,
- SAP Integration Strategy,
- SAP Business Technology Platform
Labels:
4 Comments
You must be a registered user to add a comment. If you've already registered, sign in. Otherwise, register and sign in.
Labels in this area
-
ABAP CDS Views - CDC (Change Data Capture)
2 -
AI
1 -
Analyze Workload Data
1 -
BTP
1 -
Business and IT Integration
2 -
Business application stu
1 -
Business Technology Platform
1 -
Business Trends
1,661 -
Business Trends
86 -
CAP
1 -
cf
1 -
Cloud Foundry
1 -
Confluent
1 -
Customer COE Basics and Fundamentals
1 -
Customer COE Latest and Greatest
3 -
Customer Data Browser app
1 -
Data Analysis Tool
1 -
data migration
1 -
data transfer
1 -
Datasphere
2 -
Event Information
1,400 -
Event Information
64 -
Expert
1 -
Expert Insights
178 -
Expert Insights
270 -
General
1 -
Google cloud
1 -
Google Next'24
1 -
Kafka
1 -
Life at SAP
784 -
Life at SAP
11 -
Migrate your Data App
1 -
MTA
1 -
Network Performance Analysis
1 -
NodeJS
1 -
PDF
1 -
POC
1 -
Product Updates
4,578 -
Product Updates
323 -
Replication Flow
1 -
RisewithSAP
1 -
SAP BTP
1 -
SAP BTP Cloud Foundry
1 -
SAP Cloud ALM
1 -
SAP Cloud Application Programming Model
1 -
SAP Datasphere
2 -
SAP S4HANA Cloud
1 -
SAP S4HANA Migration Cockpit
1 -
Technology Updates
6,886 -
Technology Updates
395 -
Workload Fluctuations
1
Related Content
- It has never been easier to print from SAP with Microsoft Universal Print in Technology Blogs by Members
- CAP LLM Plugin – Empowering Developers for rapid Gen AI-CAP App Development in Technology Blogs by SAP
- AI Foundation on SAP BTP: Q1 2024 Release Highlights in Technology Blogs by SAP
- Integrating with SAP Datasphere Consumption APIs using SAML Bearer Assertion in Technology Blogs by SAP
- SAP BTP Innobytes – March 2024 in Technology Blogs by SAP
Top kudoed authors
| User | Count |
|---|---|
| 11 | |
| 10 | |
| 10 | |
| 9 | |
| 8 | |
| 7 | |
| 7 | |
| 7 | |
| 7 | |
| 6 |