
- SAP Community
- Products and Technology
- Technology
- Technology Blogs by SAP
- [SAP BTP Onboarding Series] SAP SuccessFactors Ext...
Technology Blogs by SAP
Learn how to extend and personalize SAP applications. Follow the SAP technology blog for insights into SAP BTP, ABAP, SAP Analytics Cloud, SAP HANA, and more.
Turn on suggestions
Auto-suggest helps you quickly narrow down your search results by suggesting possible matches as you type.
Showing results for
Product and Topic Expert
Options
- Subscribe to RSS Feed
- Mark as New
- Mark as Read
- Bookmark
- Subscribe
- Printer Friendly Page
- Report Inappropriate Content
01-31-2022
3:45 AM
In my previous blog, I covered all the features provided to Global Account administrators in the SAP BTP Cockpit. In this blog, I’m going to deep dive into the System Landscape topic. The power of SAP BTP is to give you the necessary tools and services to obtain data to insight for your business. To do that, you need to connect all your systems, so you have the data required to create an integration or extensions. SAP BTP cockpit supports the registration of the following systems:
In this blog, I’m going to show you how to register an SAP SuccessFactors (SFSF) system to your SAP BTP cockpit. As part of the configuration, you need to first meet some prerequisites in both your SAP SuccessFactors system and on the BTP Global Account level to ensure the data flow. In the SAP Community, you can find the end-to-end use-case example - Building Extensions for SAP SuccessFactors using APIs and Events | Hands-on Video Tutorials. Here, in this blog, we look at the new approach to connect SFSF and BTP.
For the enter system registration process, below are the required steps:
Note: You must have permission to access Extension Center in SAP SuccessFactors Admin Center.
This will ensure you have added the required Role to the user.
The next step is to validate if the settings are active in the Extension Center in SuccessFactors
In this step, log in to your SAP BTP Global Cockpit to create a SuccessFactors token in Systems.
The registration will show as pending at this step.
Log back into SuccessFactors > Extension Center, enter the Integration Key and select Add. The key should be listed under Multi-cloud Environment and the Integration Status should be ‘Integrating’. Once the connection is established successfully the status should change to ‘Integrated’.
Log back into your SAP BTP Cockpit and the system registration status should have changed to registered.
The next step is to create Formations for your SuccessFactors registration to be accessible in your Sub-Account.
In this step, we will assign Entitlements for the SAP SuccessFactors Extensibility Services to the Subaccount
To enable the integration of your extension applications with the newly registered SFSF system, you need to first create a service instance of the corresponding service. Service instance creation can be done in the Cloud Foundry Environment or Kyma Environment. The steps I’m going to detail here are focused on the Cloud Foundry environment.
Navigate to the sub-account you assigned with SFSF API consumption during the Formations step (5) and that has the required Entitlements from step 6.
Ensure you have Enabled and created Cloud Foundry Service and have created/access to Cloud Foundry Org Space to configure SFSF Extensibility (if not you would need access to them in case of missing authorization). In case Org Space is not created, please click on Create Space in Cloud Foundry.
Click on Next.
We will continue with bearer assertion using the system name as-is configuration from the previous screen, click on Next.
With this you should be able to see your Instance created, you can now add your SFSF Applications to your CF account and bind your extensions.
Hope this blog helps to get you started with your configurations for the SuccessFactors Extension scenario with BTP Account.
Please feel free to share your feedback on this blog post.
Regards,
Nagesh
- SAP S/4HANA Cloud (available for Cloud Foundry and Kyma environment)
- SAP Marketing Cloud (available for Cloud Foundry and Kyma environment)
- SAP SuccessFactors (available for Cloud Foundry and Kyma environment)
- SAP Commerce Cloud (available for Kyma environment)
- SAP Cloud for Customer (available for Kyma environment)
- SAP Field Service Management (available for Kyma environment)
In this blog, I’m going to show you how to register an SAP SuccessFactors (SFSF) system to your SAP BTP cockpit. As part of the configuration, you need to first meet some prerequisites in both your SAP SuccessFactors system and on the BTP Global Account level to ensure the data flow. In the SAP Community, you can find the end-to-end use-case example - Building Extensions for SAP SuccessFactors using APIs and Events | Hands-on Video Tutorials. Here, in this blog, we look at the new approach to connect SFSF and BTP.
For the enter system registration process, below are the required steps:
- Assign SFSF Roles and Permissions
- SFSF Registration in BTP cockpit
- Adding Integration Key to SFSF
- Check on Successful Registration
- Create Formation to make SFSF Accessible to Subaccounts
- Adding Entitlements to your Subaccount with SAP SuccessFactors Extensibility Services
- Setup the SAP SuccessFactors Service Instance
Assign SFSF Roles and Permissions
- Getting the roles activated in the SuccessFactors account. This process has changed when compared to the older version of getting it activated from the SFSF Provisioning account. Please ensure you follow the process carefully.
Note: You must have permission to access Extension Center in SAP SuccessFactors Admin Center.
- Log in to your SAP SuccessFactors Account -> Navigate to the Admin Center
- Select Role > Manage Permission Role
- In my case to keep things simple, I have created a new role. Enter your desired Name and description.

Image 1
- Under Permission Settings Select ‘Permission’
- In the Metadata Frameworkcategory select ‘Configure Object Definitions’ and ‘Admin Access to MDF OData API’

Image 2
- In the Manage Extensions on SAP BTP category select ‘Create Integration with SAP BTP’

Image 3
- Select Done
- Under Grant this role to, select Add and choose the users whom you want to assign this role. In my case, I am the Admin and the user, so I have selected Admin.

Image 4
- Select Done
- In case they are not active at this step, manually select your user and click on ‘Make Active’ Once successful the details should look as follows:

Image 5
- Select Save Changes, ensure the new Role is listed and active in the Permission Role List
This will ensure you have added the required Role to the user.
The next step is to validate if the settings are active in the Extension Center in SuccessFactors
- Enter Extension Center in the search box in SFSF
- If all the roles and permission are set, the user should be able to see the Integration Token box as per below

Image 6
SFSF Registration in BTP cockpit
In this step, log in to your SAP BTP Global Cockpit to create a SuccessFactors token in Systems.
- Select System Landscape > Systems
- Select ‘Register System’
- Enter the System Name, select type as SAP SuccessFactors, and choose Register
- Copy the new Token that is generated

Image 7
The registration will show as pending at this step.

Image 8
Adding Integration Key to SFSF
Log back into SuccessFactors > Extension Center, enter the Integration Key and select Add. The key should be listed under Multi-cloud Environment and the Integration Status should be ‘Integrating’. Once the connection is established successfully the status should change to ‘Integrated’.
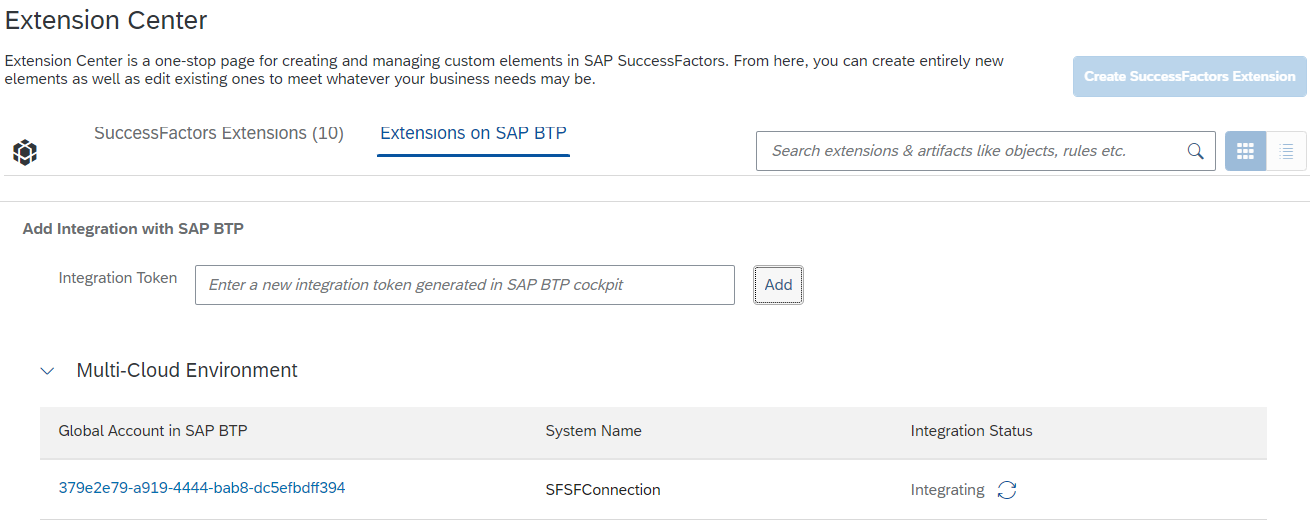
Image 9
Check on Successful Registration
Log back into your SAP BTP Cockpit and the system registration status should have changed to registered.

Image 10
Create Formation to make SFSF Accessible to Subaccounts
The next step is to create Formations for your SuccessFactors registration to be accessible in your Sub-Account.
- Log in to your SAP BTP Global Account, select Systems Information > Formations, and click on Create Formation
- Enter a Name for the formation
- Select the desired Subaccount to which your SFSF Registration should work
- Select Systems – select the SFSF connection which we registered in a previous step

Image 11
- Select Create. This will help us to create the formation with the required configurations.
Adding Entitlements to your Subaccount with SAP SuccessFactors Extensibility Services
In this step, we will assign Entitlements for the SAP SuccessFactors Extensibility Services to the Subaccount
- Navigate to SAP BTP Cockpit, select Entitlements > Entity Assignments, select your required Sub-Account, click on Go
- Select Add Service Plans
- Search for SAP SuccessFactors Extensibility, select API-access and select Add 1 Service Plan
- Save the settings

Image 12
Setup the SAP SuccessFactors Service Instance
To enable the integration of your extension applications with the newly registered SFSF system, you need to first create a service instance of the corresponding service. Service instance creation can be done in the Cloud Foundry Environment or Kyma Environment. The steps I’m going to detail here are focused on the Cloud Foundry environment.
Navigate to the sub-account you assigned with SFSF API consumption during the Formations step (5) and that has the required Entitlements from step 6.
Ensure you have Enabled and created Cloud Foundry Service and have created/access to Cloud Foundry Org Space to configure SFSF Extensibility (if not you would need access to them in case of missing authorization). In case Org Space is not created, please click on Create Space in Cloud Foundry.

Image 13
- In the sub-account cockpit, select Services > Service Marketplace, and on the right-side search for SAP SuccessFactors Extensibility and select it
- Click on Create in the next window and add the following settings
- Service: SAP SuccessFactors Extensibility
- Plan: api-access
- Runtime Environment: Cloud Foundry
- Space: sfsfspace (which is created in my sub-account)
- System Name: SFSFConnection (the Systems connection name created in Global Account)
- Instance Name: sfsfcli (to access Command Line Interface)
Click on Next.

Image 14
- Next, we should be able to see the Configure Instance Parameter, here we can configure the Authentication Type JSON File. It supports two ways
- OData access with OAuth 2.0 SAML bearer assertion
- OData access with OAuth 2.0 SAML bearer assertion with technical user
We will continue with bearer assertion using the system name as-is configuration from the previous screen, click on Next.

Image 15
- Review the settings in the review screen and select Create

Image 16
With this you should be able to see your Instance created, you can now add your SFSF Applications to your CF account and bind your extensions.

Image 17
Hope this blog helps to get you started with your configurations for the SuccessFactors Extension scenario with BTP Account.
Please feel free to share your feedback on this blog post.
Regards,
Nagesh
Labels:
3 Comments
You must be a registered user to add a comment. If you've already registered, sign in. Otherwise, register and sign in.
Labels in this area
-
ABAP CDS Views - CDC (Change Data Capture)
2 -
AI
1 -
Analyze Workload Data
1 -
BTP
1 -
Business and IT Integration
2 -
Business application stu
1 -
Business Technology Platform
1 -
Business Trends
1,658 -
Business Trends
91 -
CAP
1 -
cf
1 -
Cloud Foundry
1 -
Confluent
1 -
Customer COE Basics and Fundamentals
1 -
Customer COE Latest and Greatest
3 -
Customer Data Browser app
1 -
Data Analysis Tool
1 -
data migration
1 -
data transfer
1 -
Datasphere
2 -
Event Information
1,400 -
Event Information
66 -
Expert
1 -
Expert Insights
177 -
Expert Insights
296 -
General
1 -
Google cloud
1 -
Google Next'24
1 -
Kafka
1 -
Life at SAP
780 -
Life at SAP
13 -
Migrate your Data App
1 -
MTA
1 -
Network Performance Analysis
1 -
NodeJS
1 -
PDF
1 -
POC
1 -
Product Updates
4,577 -
Product Updates
342 -
Replication Flow
1 -
RisewithSAP
1 -
SAP BTP
1 -
SAP BTP Cloud Foundry
1 -
SAP Cloud ALM
1 -
SAP Cloud Application Programming Model
1 -
SAP Datasphere
2 -
SAP S4HANA Cloud
1 -
SAP S4HANA Migration Cockpit
1 -
Technology Updates
6,873 -
Technology Updates
420 -
Workload Fluctuations
1
Related Content
- Demystifying the Common Super Domain for SAP Mobile Start in Technology Blogs by SAP
- 10+ ways to reshape your SAP landscape with SAP BTP - Blog 3 Interview in Technology Blogs by SAP
- [SAP BTP Onboarding Series] Joule with SFSF – Common Setup Issues in Technology Blogs by SAP
- Deliver Real-World Results with SAP Business AI: Q4 2023 & Q1 2024 Release Highlights in Technology Blogs by SAP
- 10+ ways to reshape your SAP landscape with SAP Business Technology Platform – Blog Series in Technology Blogs by SAP
Top kudoed authors
| User | Count |
|---|---|
| 37 | |
| 25 | |
| 17 | |
| 13 | |
| 7 | |
| 7 | |
| 7 | |
| 6 | |
| 6 | |
| 6 |