
- SAP Community
- Products and Technology
- Technology
- Technology Blogs by SAP
- Develop Low Code app with SAP Business Application...
Technology Blogs by SAP
Learn how to extend and personalize SAP applications. Follow the SAP technology blog for insights into SAP BTP, ABAP, SAP Analytics Cloud, SAP HANA, and more.
Turn on suggestions
Auto-suggest helps you quickly narrow down your search results by suggesting possible matches as you type.
Showing results for
former_member68
Participant
Options
- Subscribe to RSS Feed
- Mark as New
- Mark as Read
- Bookmark
- Subscribe
- Printer Friendly Page
- Report Inappropriate Content
01-25-2022
5:46 AM
SAP Business Application Studio increases developer productivity and provides a simplified development experience tailored to the needs of citizen developers. This blog post demonstrates how to quick create an app by SAP Business Application Studio.
⭐ Create low code app in SAP Business Application Studio
⭐ Simplified build application modeling experience based on graphical editors
⭐ Test run app with sample data
Select menu Services/Instances and Subscriptions, click Go to Application icon to access the SAP AppGyver Lobby.
After all data models, sample data and services created, we need add a user interface for frontend page. Click "+" on User Interfaces tile to launch the UI creation wizard.
Type a new application name, and then next. Select UI Application Type, for this scenario, we select Template-Based, Responsive Application. For UI Application Template, select List Report Object Page. Finish on the wizard, ui development edit page will display after dependencies installed.
Integrate Your SAP Fiori Elements App into a New Launchpad Site
What you will learn
⭐ Create low code app in SAP Business Application Studio
⭐ Simplified build application modeling experience based on graphical editors
⭐ Test run app with sample data
Prerequisites
Environment
- Enable Low-Code/No-Code service in SAP BTP via Booster:
Booster guide you to initialize the service components in easy and quick way. The Low-Code / No-Code service on SAP BTP is available with a subscription booster. Booster could help you initiate the Low-Code/No-Code service quickly.
Enable Low-Code/No-Code service by booster - Setup Low-Code/No-code service w/o Booster
You can setup the Low-Code/No-Code service role collection manually if Booster not available.
Login to your SAP BTP Cockpit, and then navigate to Service Marketplace. Subscribe SAP AppGyver. Navigate to Security/Role Collections. Assign these roles to your user, make sure all roles nominated correctly.
| Roles | Role Template |
|---|---|
| Administrator | Business_Application_Studio_Administrator |
| AppGyverAdmin | AppGyverAdmin |
| Developer | Business_Application_Studio_Developer |
| RegistryAdmin | RegistryAdmin |
| RegistryDeveloper | RegistryDeveloper |

- Setup SAP HANA Cloud for the data persistence
For data persistence, we need enable SAP HANA Cloud and ensure HDI container exists already for the app deployment. refer to this blog post: Deploy SAP HANA Cloud
Step 1: Create Business Application project in Low code environment
Select menu Services/Instances and Subscriptions, click Go to Application icon to access the SAP AppGyver Lobby.

When Lobby launches, Select Business Application from Create drop-down list.

Enter your project, you will see the components list out on overview page. We will implement our first app by these components in next steps.

Step 2: Create new Data Models
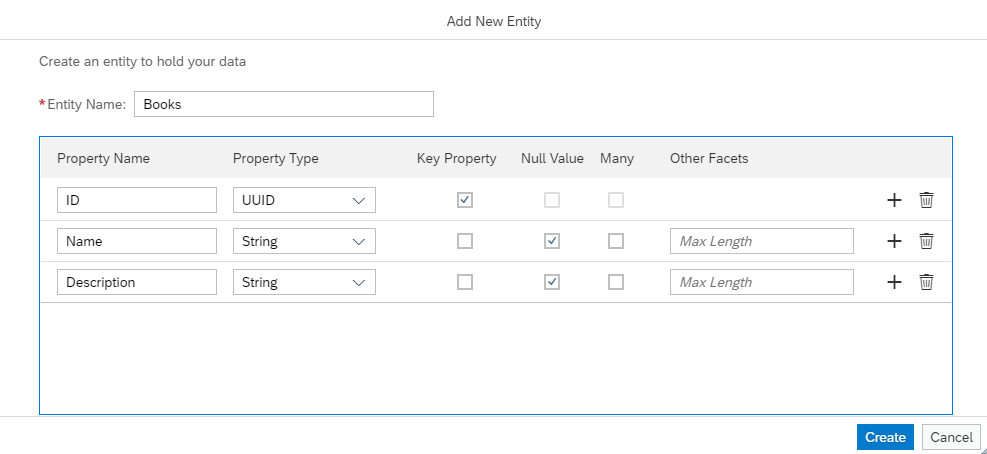
Click "+" on Data Models tile. Add new entity ID, Name and Description. ID is key property by default.
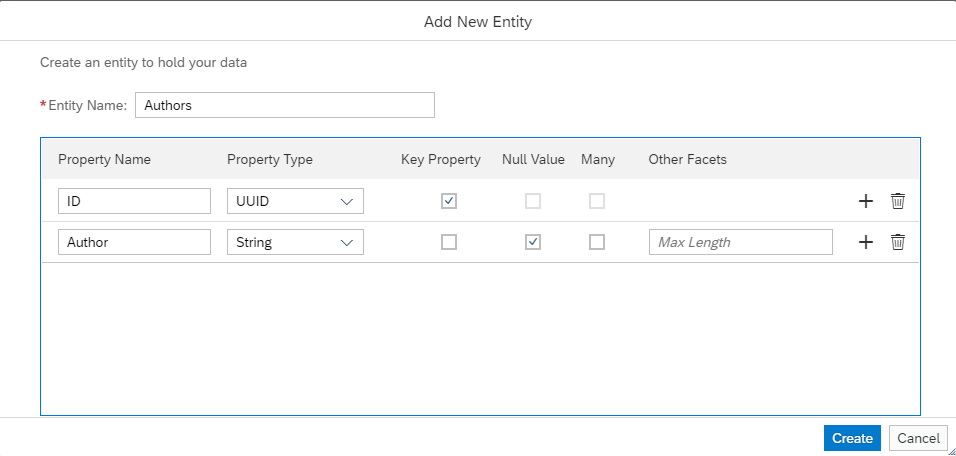
We will create one more entity Authors for the entity relevance using. This entity set to associated entity with Books.
Select entity Books on canvas, click Add Relationship on popup menu. Type a new Property name, and then select "Authors" in Target Entity Type list.

Step 3: Create sample data
Go back to Home page, click "+" on Sample Data tile.
Select "Create" option on creation wizard and select "Authors" from Entity list. Input 3 in "+Add Rows" text box. Type some sample data in author column.

Close the demoapp.Authors.csv file, and then go back to Home page, click "+" on Sample Data tile, select option "Create" on the wizard. Select "Books" from Entity list. Sample Data of Books displays. Input 3 in "+Add Rows" text box. Add some sample data for entity Books. Meanwhile, select associated author from the Authors list for each row. All changes save automatically, close the csv file and go back to Home page view.

Step 4: Create Service Entity
Click "+" On Services tile to launch new service entity window. Select "Demoapp.Books" from Type list. And then click Create to finish the creation process.

select checkbox on Draft Editing for Books service entity. This option admit edit the list report page.

Click Add Entity button on menu, select "Authors" in Type list. And then complete service entity creation of "Authors". The association will be connected automatically.

Step 5: Add User Interface
After all data models, sample data and services created, we need add a user interface for frontend page. Click "+" on User Interfaces tile to launch the UI creation wizard.
Type a new application name, and then next. Select UI Application Type, for this scenario, we select Template-Based, Responsive Application. For UI Application Template, select List Report Object Page. Finish on the wizard, ui development edit page will display after dependencies installed.
| UI Application Details | |
|---|---|
| Application name | MyApp |
| Display name | My Application |
| Description | My SAP application |
| UI Application Type | |
|---|---|
| Application Type | Template-Based, Responsive Application |
| UI Application Template | |
|---|---|
| Application Template | List Report Object Page |
| Data Objects | |
|---|---|
| Main entity | Books |
| Automatically add table columns? | Yes |

Step 6: Accomplish configurations for UI application
The UI pages consists of List Report and Object Page. Click Configure Page icon on List Report tile.

Expand Table/Columns. The entity associates to Author_ID, the third column displays in "Author_ID" by default, we can update to Author in the Properties pane to make the label friendly. Click on the column "Author_ID" to locate to related properties section. Update Text to "Author/Author", the value will display as real author name which instead of Author_ID. Nevertheless, you can edit it quickly and preview the result on browser for debug.

Click Page Map to go back overall view, click Configure Page icon on Object Page. Click Header section, Edit Title in the properties pane. This configuration let Books name as the title displays in the object page header. It's empty or "Unknow" displays on Header if not configured.

Navigate to Sections /General Information /Form /Fields. Click Author row to locate to the properties pane. Update Text, Text Arrangement and Display Type.

With Display Type, the Value Help displays as a drop-down list in real Author name.

Step 7: Preview the UI application
Click Preview button on Home page. There is a message box popup at the right corner, and then click Open to open the preview page. Our new application displays as tile on the preview page. Meanwhile, we can preview our service metadata and service details.

Click MyApp tile to launch our UI application.
Launch the app, click Go to search, sample data lists out as we defined previously. Author show up in real string instead of Author_ID.

Click row one to access Book Details object page. Edit, Author list displays as drop-down list.

Step 8: Deploy my app to Cloud Foundry runtime
- Deploy my sample app to Cloud Foundry runtime
Go back to my application development Home page, click Stop Preview, the cloud foundry related stuff generated automatically. We can click button Deploy complete the deployment, during this, you might be required login your CF account, select org/space.
Login the cockpit, and then navigate to my space verify the application deployed successfully.


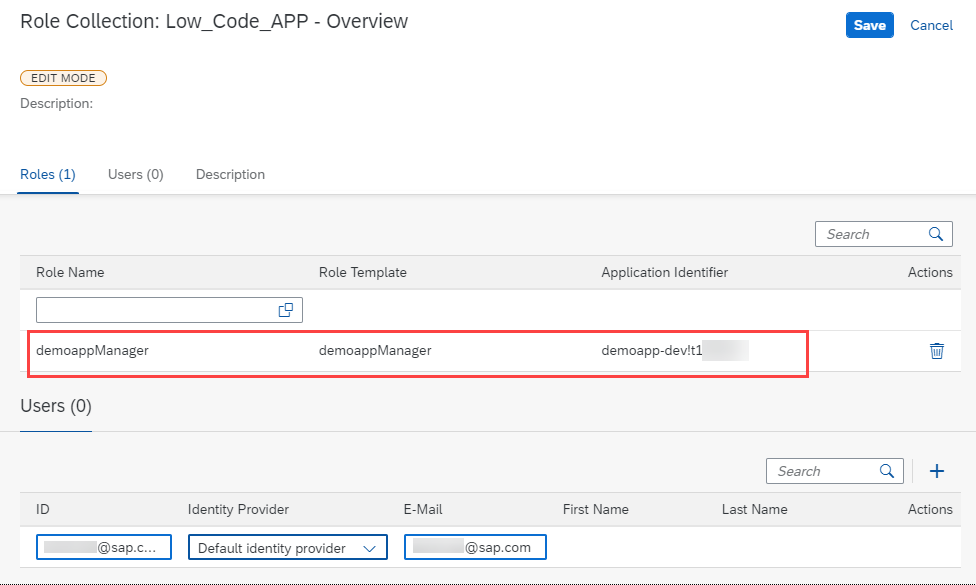
- Assign role to the access user on my application
Navigate to my subaccount view, access to Security / Role Collection page. Click "+" button to Create New Role Collection, type a new name "Low_Code_APP".
Open the role collection, Edit it. Assign the Manager- role to the users who are allowed to access the deloyed application.
- Setup my application in Launchpad
We can add our SAP Fiori app to a launchpad site in the SAP Launch Service. To shrink the blog post size, please refer to this tutorial to release our new app in Launchpad.
Release my new app in Launchpad
Referenced link:
Integrate Your SAP Fiori Elements App into a New Launchpad Site
Labels:
4 Comments
You must be a registered user to add a comment. If you've already registered, sign in. Otherwise, register and sign in.
Labels in this area
-
ABAP CDS Views - CDC (Change Data Capture)
2 -
AI
1 -
Analyze Workload Data
1 -
BTP
1 -
Business and IT Integration
2 -
Business application stu
1 -
Business Technology Platform
1 -
Business Trends
1,658 -
Business Trends
93 -
CAP
1 -
cf
1 -
Cloud Foundry
1 -
Confluent
1 -
Customer COE Basics and Fundamentals
1 -
Customer COE Latest and Greatest
3 -
Customer Data Browser app
1 -
Data Analysis Tool
1 -
data migration
1 -
data transfer
1 -
Datasphere
2 -
Event Information
1,400 -
Event Information
67 -
Expert
1 -
Expert Insights
177 -
Expert Insights
301 -
General
1 -
Google cloud
1 -
Google Next'24
1 -
GraphQL
1 -
Kafka
1 -
Life at SAP
780 -
Life at SAP
13 -
Migrate your Data App
1 -
MTA
1 -
Network Performance Analysis
1 -
NodeJS
1 -
PDF
1 -
POC
1 -
Product Updates
4,577 -
Product Updates
346 -
Replication Flow
1 -
REST API
1 -
RisewithSAP
1 -
SAP BTP
1 -
SAP BTP Cloud Foundry
1 -
SAP Cloud ALM
1 -
SAP Cloud Application Programming Model
1 -
SAP Datasphere
2 -
SAP S4HANA Cloud
1 -
SAP S4HANA Migration Cockpit
1 -
Technology Updates
6,873 -
Technology Updates
430 -
Workload Fluctuations
1
Related Content
- HDI Artifact Recovery Wizard in Technology Blogs by SAP
- Error opening 'Guided development' for analytical list page in Technology Q&A
- Sapphire 2024 user experience and application development sessions in Technology Blogs by SAP
- SAP BW/4 - revamp and true to the line 2024 in Technology Blogs by Members
- Deployment of Seamless M4T v2 models on SAP AI Core in Technology Blogs by SAP
Top kudoed authors
| User | Count |
|---|---|
| 26 | |
| 18 | |
| 15 | |
| 13 | |
| 11 | |
| 9 | |
| 8 | |
| 8 | |
| 8 | |
| 7 |