
- SAP Community
- Products and Technology
- Technology
- Technology Blogs by SAP
- From OData Provisioning (Cloud Foundry) to SAP Int...
Technology Blogs by SAP
Learn how to extend and personalize SAP applications. Follow the SAP technology blog for insights into SAP BTP, ABAP, SAP Analytics Cloud, SAP HANA, and more.
Turn on suggestions
Auto-suggest helps you quickly narrow down your search results by suggesting possible matches as you type.
Showing results for
Advisor
Options
- Subscribe to RSS Feed
- Mark as New
- Mark as Read
- Bookmark
- Subscribe
- Printer Friendly Page
- Report Inappropriate Content
01-11-2022
3:02 PM
As announced in the blog post "SAP BTP, Serverless Runtime to be discontinued and replaced by SAP BTP, Kyma Runtime and SAP Integr... (October 2021) by my colleague Karsten, SAP will discontinue the SAP Serverless Runtime in the Cloud Foundry environment. This decision also affects OData Provisioning (ODP).
ODP helps you to expose Gateway services from SAP ABAP backends to the internet. Many customers asked us about an alternative for ODP in the Cloud Foundry environment. In this blog post, I’ll show you how to expose your services going forward using SAP Integration Suite.
My colleague André Fischer has already written a blog called “SAP Gateway deployment options in a nutshell “. It’s about the different deployment options for Gateway. I’ve modified his overview picture to show you how SAP Integration Suite fits into this story. On the left side, you can see the existing approach using ODP. The three options on the right side show the deployment options when you use SAP Integration Suite.
You might have realized that for all SAP Integration Suite deployment options, you need to expose the backend service on your backend using the Gateway Hub Framework before you can expose it to the internet through SAP Integration Suite.
The good news is that the component (add-on) for this (SAP_GWFND) is already included in your SAP Netweaver system with release 7.40 and higher. If you are on a lower release and you only have installed the component IW_BEP, you need to install the components (add-ons) IW_FND and GW_CORE. See our help page for details.
If you are using SAP OData Provisioning in the Neo environment and you plan to migrate your processes towards Cloud Foundry, be assured that you can run both approaches side-by-side. The exposure of the backend service using the Gateway hub framework will not block the usage of the service implementation through ODP.
To demonstrate the whole process, I have created a simple SEGW project called Z_MY_ODATA_SERVICE. I will first expose the service internally in my backend system and afterwards through SAP Integration Suite to the public internet. You can apply the same approach for your existing Gateway services, no matter if you work with a standalone service on a business system or if a Hub scenario in a plain SAP Netweaver system.
The Service in the Backend
Let’s have a look into the gateway system in which your services are located. In transaction SEGW, you can build your own services or see your existing services. The data model in my SEGW-project Z_MY_ODATA_SERVICE has just one Entity Set called ProductSet containing Products with an ID, a name, and a description. Important for further processing is the service artifact Z_MY_ODATA_SERVICE_SRV
Expose the Backend Service as OData Service
When using transaction /IWFND/MAINT_SERVICE, you can register the SEGW services, both the SAP-shipped services and your custom created ones, as OData services. The latter ones can be consumed by an OData consumer using the ICF nodes /sap/opu/odata/<service name> (in this example /sap/opu/odata/Z_MY_ODATA_SERVICE_SRV).
To expose a service, click on Add Service.
Depending on your deployment model, the service is located in this system or in a remote system. In my case, it’s located in the same system. Therefore, I use the system alias LOCAL. Enter the technical service name and hit return. Your service is now displayed in the list of backend services. Select it and click on Add Selected Services.
Check and confirm the new screen.
You should get a success message like the following:
Once done, your service is displayed in the Service Catalog. By clicking on Call Browser, your browser opens and provides you the internal URL of your OData API.
The internal URL of your OData service is displayed in the browser window.
When replacing the ?$format=xml with $metadata you get the metadata (EDMX) of your OData service.
Keep this URL in a notepad, as you will the host name and the URL path later.
Mass Exposure
You might think that exposing hundreds of services is quite some effort. The good news is that there is a mass exposing function for your services.
First, you need a list of all service names you want to expose. As you have all services that you want to consume already registered in your OData Provisioning instance, you can take it from there.
To do this, go to the ODP UI in Neo and use the Export button to get a list as JSON or XML.
I have selected JSON as export format, therefore, my document looks as follows:
From this document, you can extract the service names into a plain list.
Now, you can refer to the help portal to get a description on how to expose multiple Gateway services using transaction STC01 and the task list SAP_GATEWAY_ACTIVATE_ODATA_SERV.
By the way: If you have to activate the Gateway Foundation components, transaction STC01 and task list SAP_GATEWAY_BASIC_CONFIG might help you.
With these steps the Gateway service is exposed within your local network.
Exposing the Backend System through Cloud Connector
To use the internal OData service in SAP Integration Suite, you need to expose the internal host of your ABAP system to the BTP using Cloud Connector.
If you have not installed the Cloud Connector yet, you find the installation files and documentation under https://tools.hana.ondemand.com/#cloud. Once they are installed, you can reach it via https://locahost:8443.
First, you must establish a new connection to your SAP BTP account on which the SAP Integration Suite is running.
To do this, you need to check out information using SAP BTP cockpit. You can open SAP BTP cockpit using the following address: https://cockpit.[your datacenter].hana.ondemand.com/. In the SAP BTP cockpit, navigate to the subaccount, where you have provisioned the SAP Integration Suite and open the overview page. Here you will find the region and the Subaccount ID.
Keep Subaccount ID and region in a notepad. Using these information and an SAP BTP cockpit user with authorization Cloud Connector Admin in this subaccount, you can go back to the Cloud Connector and click the button Add Subaccount.
Provide the region of your SAP BTP account and the subaccount ID that you had copied into a notepad previously. You can choose the display name yourself. Make sure that the e-mail is assigned to a user with the Cloud Connector Admin role. If you want to connect multiple Cloud Connectors to your BTP account, use a location ID to differentiate the different connectors. To finish click Save.
If the connection was successful, the following popup appears.
After the connection to the SAP BTP account has been established, you see an new table entry . As you don’t have the internal systems exposed yet, the status icon is orange.
In the next step, you expose your system with your gateway services. To do so, go to the menu item Cloud To On-Premise of the created subaccount connection.
Select the + icon to create a new system mapping between the internal, protected system and a virtual, exposed system. Select SAP Gateway as backend type, enter the internal host and the port of your backend system that you got from the browser in the steps above, and choose a virtual host and a port that will be used in the SAP Integration Suite services later. I have used my.virtual.system as my virtual system and 443 as my virtual port.
A virtual system doesn’t expose any endpoints yet. Therefore, select your virtual system in the table and click below under Resources Of <your virtual system> on the + button to add resources.
For the consumption of the gateway services, you need to allow the URL path /sap/opu/odata. Ensure to also allow all sub-paths in the settings.
Notice that the Status of the virtual system turns to green once you have listed resources.
To verify that your BTP subaccount is connected to your Cloud Connector, go to SAP BTP cockpit and navigate to section Cloud Connector under Connectivity. There you see a connected Cloud Connector instance with your location ID (if you have used one). Make sure that your exposed virtual system appears in the list of Exposed Back-End Systems and that it has some resources available.
Exposing the OData Service to the Internet Using API Management
To expose the services to the internet, use API Management . This SAP Integration Suite capability provides you with a powerful tool to govern all your backend APIs like your Gateway services but also any other backend API. On top of the exposed services, you can apply policies to protect your services. Our SAP API Business Hub contains multiple policy templates that will help you in your governance process.
After this, you create an API Proxy as a public wrapper for the internal OData service from your backend system.
Open the SAP Integration Suite landing page and select Design, Develop and Manage APIs to open the API Portal.
As a next step, create an API Provider. The API Provider represents a pre-configured system connection, containing all the details like host name, Cloud Connector details, etc. Once you’ve created such a provider, you will be able to consume the services without re-entering the technical details for every exposed service again.
To create the API Provider, navigate to the Configure section and click on Create in the tab API Providers.
Provide a name for the API Provider, e.g., myGatewaySystem. Add the virtual system details that you have configured in your Cloud Connector. If your gateway client is different than 000, provide the information using the additional properties.
To get an overview of the existing OData Services of your backend (similar to what ODP is offering), add the Service catalog settings under the corresponding tab.
Path prefix must be hard coded “/sap/opu/odata“; the service collection URL needs to be “/IWFND/CATALOGSERVICE;v=2/ServiceCollection”. Provide a backend user for retrieving the service list.
If your service catalogue does not work, skip this part.
Once you are done, click Save in the upper right corner. You should see a confirmation message that the API Provider has been added successfully. You can even test the connection to your backend system to see if the setup was done correctly.
Create the API Proxy
Navigate to the Develop section and create a new API by clicking on Create.
Select the newly created API Provider from the drop down list. If you have added a Service catalog, you can click on Discover to get all services listed.
You should see a list of your OData services. Search for and select your service that you want to expose and confirm with OK.
The fields on the Create API screen are now prefilled by the system. You can change the fields if you want, but you can also leave URL as it is.
If you have skipped the service catalog setup, only select the API Provider and fill in the other fields manually.
Once you click on Create, a summary is displayed. You can adjust all settings if required. After saving, you can also add API policies to strengthen, for example, the security of your service. Otherwise, just deploy your saved API.
After a successful deployment, you see the Deployed status and the API Proxy URL.
Your clients can now use this URL to call your Gateway service.
I hope that this guide enables you to expose your backend systems so that your apps and other OData consumers can consume the services you previously had exposed using SAP ODP in the Cloud-Foundry environment.
If your use case is not covered yet, please use the comment function of this blog to describe what you want to do and I’ll see whether and how we can implement this by using SAP Integration Suite.
ODP helps you to expose Gateway services from SAP ABAP backends to the internet. Many customers asked us about an alternative for ODP in the Cloud Foundry environment. In this blog post, I’ll show you how to expose your services going forward using SAP Integration Suite.
My colleague André Fischer has already written a blog called “SAP Gateway deployment options in a nutshell “. It’s about the different deployment options for Gateway. I’ve modified his overview picture to show you how SAP Integration Suite fits into this story. On the left side, you can see the existing approach using ODP. The three options on the right side show the deployment options when you use SAP Integration Suite.

fig 1: deployment options
You might have realized that for all SAP Integration Suite deployment options, you need to expose the backend service on your backend using the Gateway Hub Framework before you can expose it to the internet through SAP Integration Suite.
The good news is that the component (add-on) for this (SAP_GWFND) is already included in your SAP Netweaver system with release 7.40 and higher. If you are on a lower release and you only have installed the component IW_BEP, you need to install the components (add-ons) IW_FND and GW_CORE. See our help page for details.
If you are using SAP OData Provisioning in the Neo environment and you plan to migrate your processes towards Cloud Foundry, be assured that you can run both approaches side-by-side. The exposure of the backend service using the Gateway hub framework will not block the usage of the service implementation through ODP.
To demonstrate the whole process, I have created a simple SEGW project called Z_MY_ODATA_SERVICE. I will first expose the service internally in my backend system and afterwards through SAP Integration Suite to the public internet. You can apply the same approach for your existing Gateway services, no matter if you work with a standalone service on a business system or if a Hub scenario in a plain SAP Netweaver system.
The Service in the Backend
Let’s have a look into the gateway system in which your services are located. In transaction SEGW, you can build your own services or see your existing services. The data model in my SEGW-project Z_MY_ODATA_SERVICE has just one Entity Set called ProductSet containing Products with an ID, a name, and a description. Important for further processing is the service artifact Z_MY_ODATA_SERVICE_SRV

fig 2: SEGW project Z_MY_ODATA_SERVICE with service Z_MY_ODATA_SERVICE_SRV
Expose the Backend Service as OData Service
When using transaction /IWFND/MAINT_SERVICE, you can register the SEGW services, both the SAP-shipped services and your custom created ones, as OData services. The latter ones can be consumed by an OData consumer using the ICF nodes /sap/opu/odata/<service name> (in this example /sap/opu/odata/Z_MY_ODATA_SERVICE_SRV).
To expose a service, click on Add Service.

fig 3: Register Service
Depending on your deployment model, the service is located in this system or in a remote system. In my case, it’s located in the same system. Therefore, I use the system alias LOCAL. Enter the technical service name and hit return. Your service is now displayed in the list of backend services. Select it and click on Add Selected Services.

fig 4: Add Selected Services
Check and confirm the new screen.

fig 5: Service Summary
You should get a success message like the following:
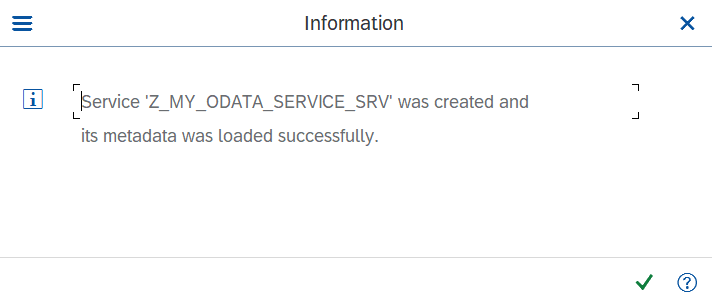
fig 6: Success Message
Once done, your service is displayed in the Service Catalog. By clicking on Call Browser, your browser opens and provides you the internal URL of your OData API.

fig 7: Service added to the Catalog
The internal URL of your OData service is displayed in the browser window.

fig 8: Gateway Service opened n Browser
When replacing the ?$format=xml with $metadata you get the metadata (EDMX) of your OData service.

fig 9: OData Metadata in Browser
Keep this URL in a notepad, as you will the host name and the URL path later.
Mass Exposure
You might think that exposing hundreds of services is quite some effort. The good news is that there is a mass exposing function for your services.
First, you need a list of all service names you want to expose. As you have all services that you want to consume already registered in your OData Provisioning instance, you can take it from there.
To do this, go to the ODP UI in Neo and use the Export button to get a list as JSON or XML.

fig 10: Export of Service List from ODP Neo
I have selected JSON as export format, therefore, my document looks as follows:

fig 11: List of exported ODP Services
From this document, you can extract the service names into a plain list.

fig 12: Shortlist of ODP Service Names
Now, you can refer to the help portal to get a description on how to expose multiple Gateway services using transaction STC01 and the task list SAP_GATEWAY_ACTIVATE_ODATA_SERV.
By the way: If you have to activate the Gateway Foundation components, transaction STC01 and task list SAP_GATEWAY_BASIC_CONFIG might help you.
With these steps the Gateway service is exposed within your local network.
Exposing the Backend System through Cloud Connector
To use the internal OData service in SAP Integration Suite, you need to expose the internal host of your ABAP system to the BTP using Cloud Connector.
If you have not installed the Cloud Connector yet, you find the installation files and documentation under https://tools.hana.ondemand.com/#cloud. Once they are installed, you can reach it via https://locahost:8443.
First, you must establish a new connection to your SAP BTP account on which the SAP Integration Suite is running.
To do this, you need to check out information using SAP BTP cockpit. You can open SAP BTP cockpit using the following address: https://cockpit.[your datacenter].hana.ondemand.com/. In the SAP BTP cockpit, navigate to the subaccount, where you have provisioned the SAP Integration Suite and open the overview page. Here you will find the region and the Subaccount ID.

fig 13: Details of BTP Account
Keep Subaccount ID and region in a notepad. Using these information and an SAP BTP cockpit user with authorization Cloud Connector Admin in this subaccount, you can go back to the Cloud Connector and click the button Add Subaccount.

fig 14: Button to add Subaccount in Cloud Connector
Provide the region of your SAP BTP account and the subaccount ID that you had copied into a notepad previously. You can choose the display name yourself. Make sure that the e-mail is assigned to a user with the Cloud Connector Admin role. If you want to connect multiple Cloud Connectors to your BTP account, use a location ID to differentiate the different connectors. To finish click Save.

fig 15: Subaccount Details
If the connection was successful, the following popup appears.

fig 16: Confirmation of Successful Connection
After the connection to the SAP BTP account has been established, you see an new table entry . As you don’t have the internal systems exposed yet, the status icon is orange.

fig 17: Cloud Connector Subaccount Dashboard
In the next step, you expose your system with your gateway services. To do so, go to the menu item Cloud To On-Premise of the created subaccount connection.

fig 18: Select Coud To On-Premise
Select the + icon to create a new system mapping between the internal, protected system and a virtual, exposed system. Select SAP Gateway as backend type, enter the internal host and the port of your backend system that you got from the browser in the steps above, and choose a virtual host and a port that will be used in the SAP Integration Suite services later. I have used my.virtual.system as my virtual system and 443 as my virtual port.

fig 19: Table of Virtual Systems in Cloud Connector
A virtual system doesn’t expose any endpoints yet. Therefore, select your virtual system in the table and click below under Resources Of <your virtual system> on the + button to add resources.
For the consumption of the gateway services, you need to allow the URL path /sap/opu/odata. Ensure to also allow all sub-paths in the settings.

fig 20: Virtual System with allowed Resources
Notice that the Status of the virtual system turns to green once you have listed resources.
To verify that your BTP subaccount is connected to your Cloud Connector, go to SAP BTP cockpit and navigate to section Cloud Connector under Connectivity. There you see a connected Cloud Connector instance with your location ID (if you have used one). Make sure that your exposed virtual system appears in the list of Exposed Back-End Systems and that it has some resources available.
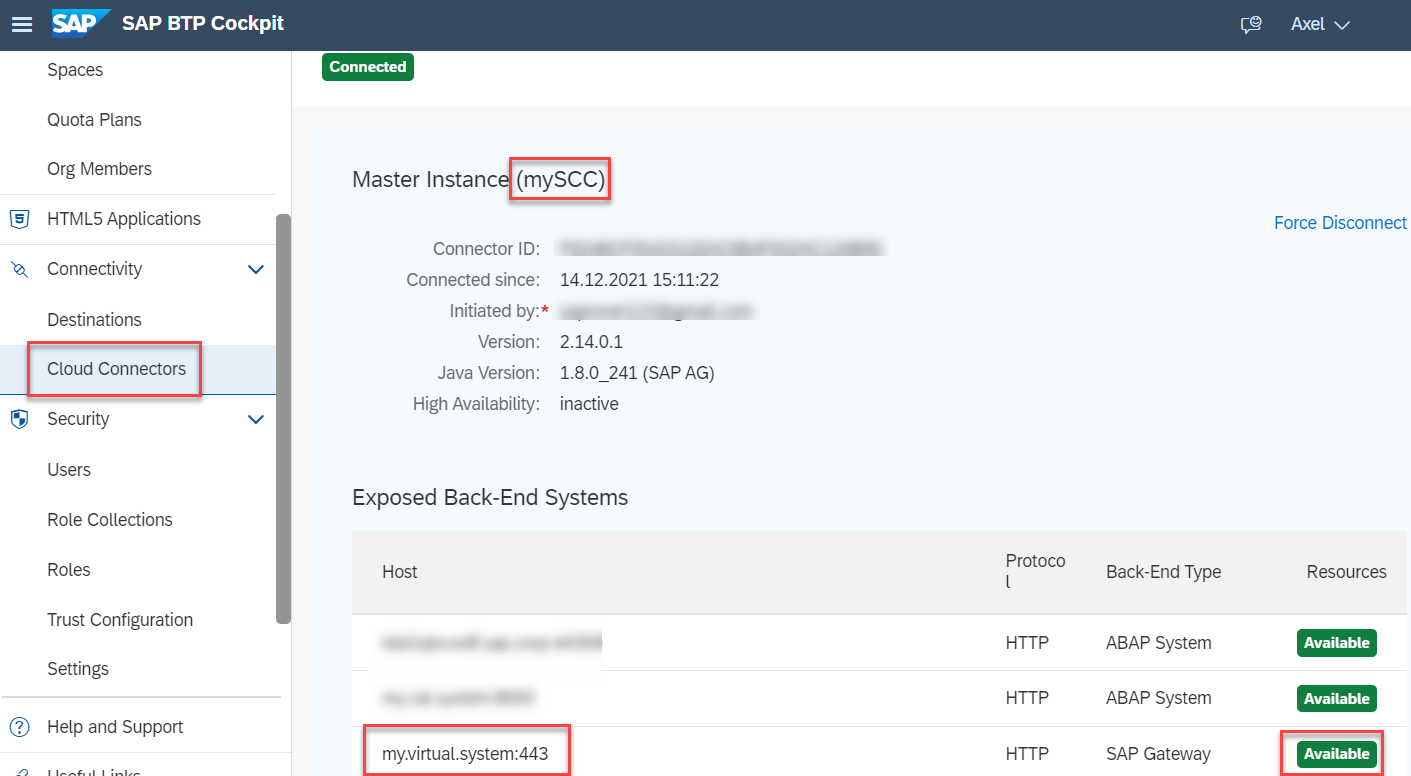
fig 21: Cloud Connector View in SAP BTP Cockpit
Exposing the OData Service to the Internet Using API Management
To expose the services to the internet, use API Management . This SAP Integration Suite capability provides you with a powerful tool to govern all your backend APIs like your Gateway services but also any other backend API. On top of the exposed services, you can apply policies to protect your services. Our SAP API Business Hub contains multiple policy templates that will help you in your governance process.
After this, you create an API Proxy as a public wrapper for the internal OData service from your backend system.
Open the SAP Integration Suite landing page and select Design, Develop and Manage APIs to open the API Portal.

fig 22: SAP Integration Suite Landing Page
As a next step, create an API Provider. The API Provider represents a pre-configured system connection, containing all the details like host name, Cloud Connector details, etc. Once you’ve created such a provider, you will be able to consume the services without re-entering the technical details for every exposed service again.
To create the API Provider, navigate to the Configure section and click on Create in the tab API Providers.

fig 23: API Portal - Configure Space
Provide a name for the API Provider, e.g., myGatewaySystem. Add the virtual system details that you have configured in your Cloud Connector. If your gateway client is different than 000, provide the information using the additional properties.

fig 24: Create an API Provider
To get an overview of the existing OData Services of your backend (similar to what ODP is offering), add the Service catalog settings under the corresponding tab.
Path prefix must be hard coded “/sap/opu/odata“; the service collection URL needs to be “/IWFND/CATALOGSERVICE;v=2/ServiceCollection”. Provide a backend user for retrieving the service list.
If your service catalogue does not work, skip this part.

fig 25: API Provider Catalog Service Settings
Once you are done, click Save in the upper right corner. You should see a confirmation message that the API Provider has been added successfully. You can even test the connection to your backend system to see if the setup was done correctly.
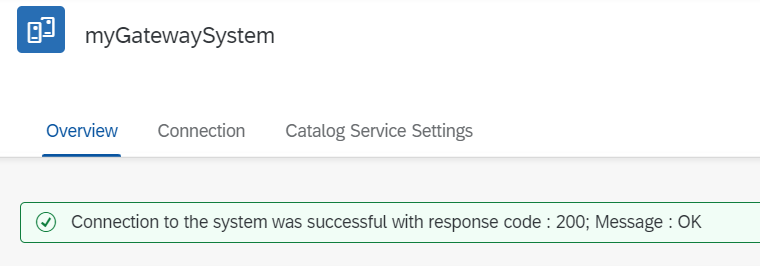
fig 26: Successful API Provider Connection Test
Create the API Proxy
Navigate to the Develop section and create a new API by clicking on Create.

fig 27: API Portal - Develop Space
Select the newly created API Provider from the drop down list. If you have added a Service catalog, you can click on Discover to get all services listed.

fig 28: Create an API by Using the Discover Function
You should see a list of your OData services. Search for and select your service that you want to expose and confirm with OK.

fig 29: List of Discovered Services
The fields on the Create API screen are now prefilled by the system. You can change the fields if you want, but you can also leave URL as it is.
If you have skipped the service catalog setup, only select the API Provider and fill in the other fields manually.
- URL: In one of the previous steps, you were opening the local Gateway endpoint in a browser. Take the URL suffix behind the host and port (without /$metadata).
- Name/Title: the identifier of the endpoint in API Management;
- API Base Path: Your consumers will call your exposed gateway service using the API Management host and the API Base Path. Therefore, select a self-explanatory name.

fig 30 - API Details
Once you click on Create, a summary is displayed. You can adjust all settings if required. After saving, you can also add API policies to strengthen, for example, the security of your service. Otherwise, just deploy your saved API.

fig 31: Save and Deploy the API
After a successful deployment, you see the Deployed status and the API Proxy URL.

fig 32: Details of Deployed API
Your clients can now use this URL to call your Gateway service.
I hope that this guide enables you to expose your backend systems so that your apps and other OData consumers can consume the services you previously had exposed using SAP ODP in the Cloud-Foundry environment.
If your use case is not covered yet, please use the comment function of this blog to describe what you want to do and I’ll see whether and how we can implement this by using SAP Integration Suite.
- SAP Managed Tags:
- SAP Integration Suite,
- API Management,
- NW ABAP Gateway (OData)
Labels:
26 Comments
You must be a registered user to add a comment. If you've already registered, sign in. Otherwise, register and sign in.
Labels in this area
-
ABAP CDS Views - CDC (Change Data Capture)
2 -
AI
1 -
Analyze Workload Data
1 -
BTP
1 -
Business and IT Integration
2 -
Business application stu
1 -
Business Technology Platform
1 -
Business Trends
1,658 -
Business Trends
92 -
CAP
1 -
cf
1 -
Cloud Foundry
1 -
Confluent
1 -
Customer COE Basics and Fundamentals
1 -
Customer COE Latest and Greatest
3 -
Customer Data Browser app
1 -
Data Analysis Tool
1 -
data migration
1 -
data transfer
1 -
Datasphere
2 -
Event Information
1,400 -
Event Information
66 -
Expert
1 -
Expert Insights
177 -
Expert Insights
295 -
General
1 -
Google cloud
1 -
Google Next'24
1 -
Kafka
1 -
Life at SAP
780 -
Life at SAP
13 -
Migrate your Data App
1 -
MTA
1 -
Network Performance Analysis
1 -
NodeJS
1 -
PDF
1 -
POC
1 -
Product Updates
4,577 -
Product Updates
341 -
Replication Flow
1 -
RisewithSAP
1 -
SAP BTP
1 -
SAP BTP Cloud Foundry
1 -
SAP Cloud ALM
1 -
SAP Cloud Application Programming Model
1 -
SAP Datasphere
2 -
SAP S4HANA Cloud
1 -
SAP S4HANA Migration Cockpit
1 -
Technology Updates
6,873 -
Technology Updates
419 -
Workload Fluctuations
1
Related Content
- Consuming SAP with SAP Build Apps - Mobile Apps for iOS and Android in Technology Blogs by SAP
- Exploring Integration Options in SAP Datasphere with the focus on using SAP extractors - Part II in Technology Blogs by SAP
- Top Picks: Innovations Highlights from SAP Business Technology Platform (Q1/2024) in Technology Blogs by SAP
- SAP Enable Now setup in Technology Blogs by Members
- BTP Free Tier SAP Integration Suite (CPI) Cloud Foundry Trial Provision gets stuck then fails in Technology Q&A
Top kudoed authors
| User | Count |
|---|---|
| 35 | |
| 25 | |
| 17 | |
| 13 | |
| 8 | |
| 7 | |
| 6 | |
| 6 | |
| 6 | |
| 6 |