
- SAP Community
- Products and Technology
- Technology
- Technology Blogs by SAP
- Run the Voice Bot on SAP BTP, Kyma runtime
Technology Blogs by SAP
Learn how to extend and personalize SAP applications. Follow the SAP technology blog for insights into SAP BTP, ABAP, SAP Analytics Cloud, SAP HANA, and more.
Turn on suggestions
Auto-suggest helps you quickly narrow down your search results by suggesting possible matches as you type.
Showing results for
f_pavlov
Explorer
Options
- Subscribe to RSS Feed
- Mark as New
- Mark as Read
- Bookmark
- Subscribe
- Printer Friendly Page
- Report Inappropriate Content
12-30-2021
2:22 PM
Hi! In the previous post "Voice Bot powered by SAP Conversational AI" my fellow colleague Dmitry Buslov showed what it takes to introduce a modern voice recognition technology into a chat-bot. Now, in this post I'll show you how to deploy this project to Kyma runtime environment hosted in the Free Tier of SAP Business Technology Platform (meaning, you can go ahead and start your Kyma environment too, at no cost and right now).
In short, Kyma deployment process is as simple as preparing a text file (or two) and uploading it to the Kyma console. But let's start from the very beginning and carefully prepare our deployment step-by-step.
As was shown in the previous post, it's fairly easy to implement voice recognition in a chat-bot by ingesting a proxy app in a middle of data flow between messaging platform (Telegram in this case) and a chat-bot (SAP Conversational AI in this case). The data flow would the following:
Sounds simple? It is, indeed. The proxy app works in "polling" mode as a distinct to "WebHook" mode. That means we don't need to open ingress traffic towards our app, create API rules or Kubernetes Services. Also at SAP Conversational AI side, we don't need to setup any specific Telegram integration, because such integration is effectively implemented by our proxy app.
Before deploying the project, please make sure you've got the following data on hand as a result of working on materials from the previous post:
Useful instructions on how to grab these 3 tokens may be found here: SAP Conversational AI OAuth
My kind ask for you would be to pay careful attention on what exact bot token you hold in your hands. SAP Conversational AI provides your with tokens of two kinds: DEVELOPER and REQUEST. The Developer token is very easy to find (fair enough under "Tokens" menu), but it's used only for developer tasks and it is NOT suitable for our project. The Request token can be found under "Versions" menu (because logically enough it depends on exact version of your bot) and this is exactly the token that allows you to send requests to your bot at SAP Conversational AI platform.
Please, keep these 4 secrets next to you as you'll need them soon at Kubernetes Secret deployment step.
Project "Kyma" is an open-source project based on Kubernetes. Basically, it's a Kubernetes environment plus all sorts of useful open-source components, already pre-integrated for you, that are necessary to make you environment enterprise grade: service mesh, logging and visualization, authentication and so on. For sure, you can re-create Kyma yourself, but that would cost you some significant time to integrate all the components that are need for a modern production-ready infrastructure.
There're three ways how you can get your Kyma infrastructure up and running:
All these deployment options are perfectly described in a series of project "Kyma" videos.
For the purpose our exercise, you can choose any of these options. I personally prefer the third one, and there for all the screenshots below refer to Kyma on SAP BTP as of this post publication date (Dec 2021).
Being effectively a Kubernetes cluster in it's foundation, Kyma runtime deploys Pods and Services from Docker containers, which are downloaded from some Docker registry (by default it's hub.docker.com).
Now you need to grab files with a python code from this post (it should be "voicebot.py" and "cai.py"). Add a new file named "Dockerfile" into the same folder as your *.py files. The content of Dockerfile should be the following:
As your Dockerfile is ready you can build and publish new container to the registry. You may need to setup an account with hub.docker.com if you use this default registry.
After edit these lines may look like this:
Have you noticed a tiny dot at the end of the first command? Yes, this is not a typo! There is actually a dot which means that you run "docker build" command from a folder where your code and Dockerfile reside. Please, don't miss the dot (or update your path accordingly).
Upon your docker image is built and published, you should see it listed on hub.docker.com (or a registry of your choice).
This is always a good practice to separate all credentials necessary for running your app and the app's code itself. I'm sure you don't leave any credentials hardcoded into an app code, do you?
In order to help developers to deal with credentials Kubernetes has a concept of Secrets. Of course this is not a truly secured, encrypted and carefully controlled storage for sensitive data: you still responsible for organizing all of these measures to keep you secrets safe, but Kubernetes Secrets definitely facilitates this job.
Let's prepare a secrets.yml configuration file and collect all required tokens and credentials that you've prepared previously in Section #2 of this post:
This is a regular Kubernetes configuration file which we're going to apply to our Kyma cluster. What's important here:
this tells Kyma to deploy a resource of type "Secret". Please notice the name of our resource:
We will use this name later when attaching secrets to our application. In the stringData section you need to type in all you "secrets" like Telegram bot token and SAP Conversational AI credentials:
If you're not familiar with YAML language, please note the indentation at the beginning of some lines (as well as their absence in others). These spaces are important in YAML, so please keep them as they are.
If you familiar with kubectl command line, then you can just go ahead and run "kubectl apply -f secrets.yml". If not, you can go to your Kyma console GUI, chose your namespace and hit "Deploy new workload" button, chose "Upload YAML". At the moment of writing the Secrets section of GUI doesn't have a button to deploy new secrets from files. But that's not an issue, because deploy buttons from any other sections use kubectl tool underneath, so it doesn't really matter at what section of GUI you upload and deploy a Kubernetes config file.
Here's a screenshot from Kyma console:
When the deployment is finished (should be an instant) you can go to the Secrets section and check if your secrets are stored successfully:
Now we can use required credentials in our app without hardcoding them into code itself or even app config.
So the last step before actually running your app in Kyma is to edit a Deployment config file:
Don't worry too much if you can't just write such file from scratch. I'm sure nobody can 🙂 (at least correctly)
So just copy it as a template and type your docker image name from Section #4 in here:
After edits the result may look similar to this one:
You can leave the rest of the file unchanged. Or you may want to play with some setting to see how Kubernetes works. For instance this line below is quite powerful:
By altering replicas count (even online, while your deployment is up and running on a cluster) you can scale your application up and down dynamically (try click Edit button next to your deployment in Kyma console, alter the config and update it).
Also notice how previously deployed Secrets are bound to the app through environmental variables at env section:
The binding structure should be quite obvious:
Okey, so there's not to so much to do here. Let's deploy this file to the cluster.
This step is similar to deployment of Kubernetes Secrets from the previous section:
At the first sight, you Deployment should be in a fault status. This is OK, and is consistent with the fact that the cluster has 0 instances of our app versus 1 as requested per config file. While deployment process is running, you can go to Pods section and take a look on a pod (or pods) of your application:
Check the "Show Logs" context menu next to a pod. There you can see that Kyma cluster downloads your docker image from repository. Shortly after container is up and running you'll see a message from the Voice Bot saying "Ready!":
That's it! The bot is deployed now to Kyma cluster.
Now, take a look on what you've done in this exercise. Generally speaking, what you need to accomplish in order to deploy a simple voice bot to Kyma cluster is the following:
From here can go further and change the project in the following possible directions:
Please, don't hesitate to share your suggestions, ideas and thoughts in the comments to this post. Thanks for reading!
In short, Kyma deployment process is as simple as preparing a text file (or two) and uploading it to the Kyma console. But let's start from the very beginning and carefully prepare our deployment step-by-step.
1. Short overview of the project architecture
As was shown in the previous post, it's fairly easy to implement voice recognition in a chat-bot by ingesting a proxy app in a middle of data flow between messaging platform (Telegram in this case) and a chat-bot (SAP Conversational AI in this case). The data flow would the following:

- A user records voice message and sends it to your bot via Telegram messenger
- The Voice Bot app constantly polls Telegram API for new messages and events
- If a voice message is received, the proxy app converts it to a text and sends it to SAP Conversational AI for analysis
- If a text message is received, the proxy app doesn't do much and just forwards such request to SAP Conversation AI directly
- SAP Conversational AI does all the job of making chat-bot "alive". Using NLP technologies it understands user's intentions and determines appropriate bot's reactions based on designed dialog flow.
- SAP Conversational AI replies to Voice Bot app with bot's answer, and the app forwards this answer back to the user via Telegram API.
Sounds simple? It is, indeed. The proxy app works in "polling" mode as a distinct to "WebHook" mode. That means we don't need to open ingress traffic towards our app, create API rules or Kubernetes Services. Also at SAP Conversational AI side, we don't need to setup any specific Telegram integration, because such integration is effectively implemented by our proxy app.
2. Prerequisites
Before deploying the project, please make sure you've got the following data on hand as a result of working on materials from the previous post:
- Telegram Bot token. This is a token that you receive from @BotFather upon new bot registration. The process is quite straight forward: just speak to @BotFather bot here, ask for new bot and grab bot's token.
- Conversational AI credentials for your bot:
- OAuth Client ID
- OAuth Client Secret
- Chat-bot's REQUEST token
Useful instructions on how to grab these 3 tokens may be found here: SAP Conversational AI OAuth
My kind ask for you would be to pay careful attention on what exact bot token you hold in your hands. SAP Conversational AI provides your with tokens of two kinds: DEVELOPER and REQUEST. The Developer token is very easy to find (fair enough under "Tokens" menu), but it's used only for developer tasks and it is NOT suitable for our project. The Request token can be found under "Versions" menu (because logically enough it depends on exact version of your bot) and this is exactly the token that allows you to send requests to your bot at SAP Conversational AI platform.
Please, keep these 4 secrets next to you as you'll need them soon at Kubernetes Secret deployment step.
3. Start Kyma runtime
Project "Kyma" is an open-source project based on Kubernetes. Basically, it's a Kubernetes environment plus all sorts of useful open-source components, already pre-integrated for you, that are necessary to make you environment enterprise grade: service mesh, logging and visualization, authentication and so on. For sure, you can re-create Kyma yourself, but that would cost you some significant time to integrate all the components that are need for a modern production-ready infrastructure.
There're three ways how you can get your Kyma infrastructure up and running:
- Install it on your own infrastructure
- Run it on a Hyperscaler
- Enable it as a runtime in your SAP BTP account (sign up for your trial account here)
All these deployment options are perfectly described in a series of project "Kyma" videos.
For the purpose our exercise, you can choose any of these options. I personally prefer the third one, and there for all the screenshots below refer to Kyma on SAP BTP as of this post publication date (Dec 2021).
4. Build your code into a Docker container
Being effectively a Kubernetes cluster in it's foundation, Kyma runtime deploys Pods and Services from Docker containers, which are downloaded from some Docker registry (by default it's hub.docker.com).
Now you need to grab files with a python code from this post (it should be "voicebot.py" and "cai.py"). Add a new file named "Dockerfile" into the same folder as your *.py files. The content of Dockerfile should be the following:
FROM python:3.9

COPY . .

RUN pip3 install torch==1.10.0+cpu torchaudio==0.10.0+cpu -f https://download.pytorch.org/whl/cpu/torch_stable.html

RUN pip3 install python-telegram-bot transformers oauthlib requests-oauthlib

CMD [ "python3", "voicebot.py" ]
As your Dockerfile is ready you can build and publish new container to the registry. You may need to setup an account with hub.docker.com if you use this default registry.
docker build -t <your_docker_id>/<your_image_name>:<your_image_tag> .

docker push <your_docker_id>/<your_image_name>:<your_image_tag>
After edit these lines may look like this:
docker build -t me/mybot:v1 .

docker push me/mybot:v1
Have you noticed a tiny dot at the end of the first command? Yes, this is not a typo! There is actually a dot which means that you run "docker build" command from a folder where your code and Dockerfile reside. Please, don't miss the dot (or update your path accordingly).
Upon your docker image is built and published, you should see it listed on hub.docker.com (or a registry of your choice).
5. Upload your Secrets to Kyma runtime
This is always a good practice to separate all credentials necessary for running your app and the app's code itself. I'm sure you don't leave any credentials hardcoded into an app code, do you?
In order to help developers to deal with credentials Kubernetes has a concept of Secrets. Of course this is not a truly secured, encrypted and carefully controlled storage for sensitive data: you still responsible for organizing all of these measures to keep you secrets safe, but Kubernetes Secrets definitely facilitates this job.
Step 1: secrets.yml
Let's prepare a secrets.yml configuration file and collect all required tokens and credentials that you've prepared previously in Section #2 of this post:
apiVersion: v1

kind: Secret

metadata:

  name: bot-secrets

stringData:

  # Be careful with stringData values: these should be string literals, not numbers.

  # Integers are not supported by underlying Kubernetes engine.

  # If you need to provide a numeric value, please wrap it in a pair of quotes like so: "123"

  CAI_OAUTH_ID: <Your Conversational AI OAuth ID>

  CAI_OAUTH_SECRET: <Your Conversational AI OAuth Secret>

  CAI_REQUEST_TOKEN: <Your Conversational AI REQUEST token> # This is NOT a Developer token! Be careful here, please, and make sure you have a REQUEST token

  TELEGRAM_BOT_TOKEN: <Telegram Bot's token> # This is a token that you have obtained from @BotFather while creating a new bot
This is a regular Kubernetes configuration file which we're going to apply to our Kyma cluster. What's important here:
kind: Secretthis tells Kyma to deploy a resource of type "Secret". Please notice the name of our resource:
metadata:

  name: bot-secrets
We will use this name later when attaching secrets to our application. In the stringData section you need to type in all you "secrets" like Telegram bot token and SAP Conversational AI credentials:
stringData:

  CAI_OAUTH_ID: <Your Conversational AI OAuth ID>

  CAI_OAUTH_SECRET: <Your Conversational AI OAuth Secret>

  CAI_REQUEST_TOKEN: <Your Conversational AI REQUEST token>

  TELEGRAM_BOT_TOKEN: <Telegram Bot's token>
If you're not familiar with YAML language, please note the indentation at the beginning of some lines (as well as their absence in others). These spaces are important in YAML, so please keep them as they are.
Step 2: apply secrets.yml to Kyma cluster
If you familiar with kubectl command line, then you can just go ahead and run "kubectl apply -f secrets.yml". If not, you can go to your Kyma console GUI, chose your namespace and hit "Deploy new workload" button, chose "Upload YAML". At the moment of writing the Secrets section of GUI doesn't have a button to deploy new secrets from files. But that's not an issue, because deploy buttons from any other sections use kubectl tool underneath, so it doesn't really matter at what section of GUI you upload and deploy a Kubernetes config file.
Here's a screenshot from Kyma console:

Kyma, deploying new workload
When the deployment is finished (should be an instant) you can go to the Secrets section and check if your secrets are stored successfully:

Kyma, Secrets section
Now we can use required credentials in our app without hardcoding them into code itself or even app config.
6. Deploying the app to Kyma runtime
Step 1: Prepare deployment configuration
So the last step before actually running your app in Kyma is to edit a Deployment config file:
apiVersion: apps/v1

kind: Deployment

metadata:

  name: voice-bot-deployment

  labels:

    app: voice-bot

spec:

  replicas: 1

  selector:

    matchLabels:

      app: voice-bot

  template:

    metadata:

      labels:

        app: voice-bot

    spec:

      containers:

      - name: voice-bot

        image: <your_docker_account>/<docker_image_name>:<docker_image_tag>

        env:

        - name: oAuthClientID

          valueFrom:

            secretKeyRef:

              name: bot-secrets

              key: CAI_OAUTH_ID

        - name: oAuthClientSecret

          valueFrom:

            secretKeyRef:

              name: bot-secrets

              key: CAI_OAUTH_SECRET

        - name: CAIreqToken

          valueFrom:

            secretKeyRef:

              name: bot-secrets

              key: CAI_REQUEST_TOKEN

        - name: API_KEY

          valueFrom:

            secretKeyRef:

              name: bot-secrets

              key: TELEGRAM_BOT_TOKEN

        - name: id

          value: "1" # This Env variable doens't have any useful function at the moment, but it should be present to run the app code
Don't worry too much if you can't just write such file from scratch. I'm sure nobody can 🙂 (at least correctly)
So just copy it as a template and type your docker image name from Section #4 in here:
    spec:

      containers:

      - name: voice-bot

        image: <your_docker_account>/<docker_image_name>:<docker_image_tag>
After edits the result may look similar to this one:
    spec:

      containers:

      - name: voice-bot

        image: me/mybot:v1
You can leave the rest of the file unchanged. Or you may want to play with some setting to see how Kubernetes works. For instance this line below is quite powerful:
spec:

  replicas: 1
By altering replicas count (even online, while your deployment is up and running on a cluster) you can scale your application up and down dynamically (try click Edit button next to your deployment in Kyma console, alter the config and update it).
Also notice how previously deployed Secrets are bound to the app through environmental variables at env section:
        env:

        - name: oAuthClientID

          valueFrom:

            secretKeyRef:

              name: bot-secrets

              key: CAI_OAUTH_ID
The binding structure should be quite obvious:
- oAuthClientID - that's how env variable is referenced by python code. I've took this name from the bot's code itself (cai.py)
- bot-secrets - that's the name of Secret resource that was defined on the previous step
- CAI_OAUTH_ID - that's the key of corresponding data field in the secret
Okey, so there's not to so much to do here. Let's deploy this file to the cluster.
Step 2: Deploy your configuration to Kyma cluster
This step is similar to deployment of Kubernetes Secrets from the previous section:
- Choose a namespace in Kyma console
- Click on "Deploy new workload" button and chose "Upload YAML"
- Monitor how your deployment is being rollout on the cluster
At the first sight, you Deployment should be in a fault status. This is OK, and is consistent with the fact that the cluster has 0 instances of our app versus 1 as requested per config file. While deployment process is running, you can go to Pods section and take a look on a pod (or pods) of your application:
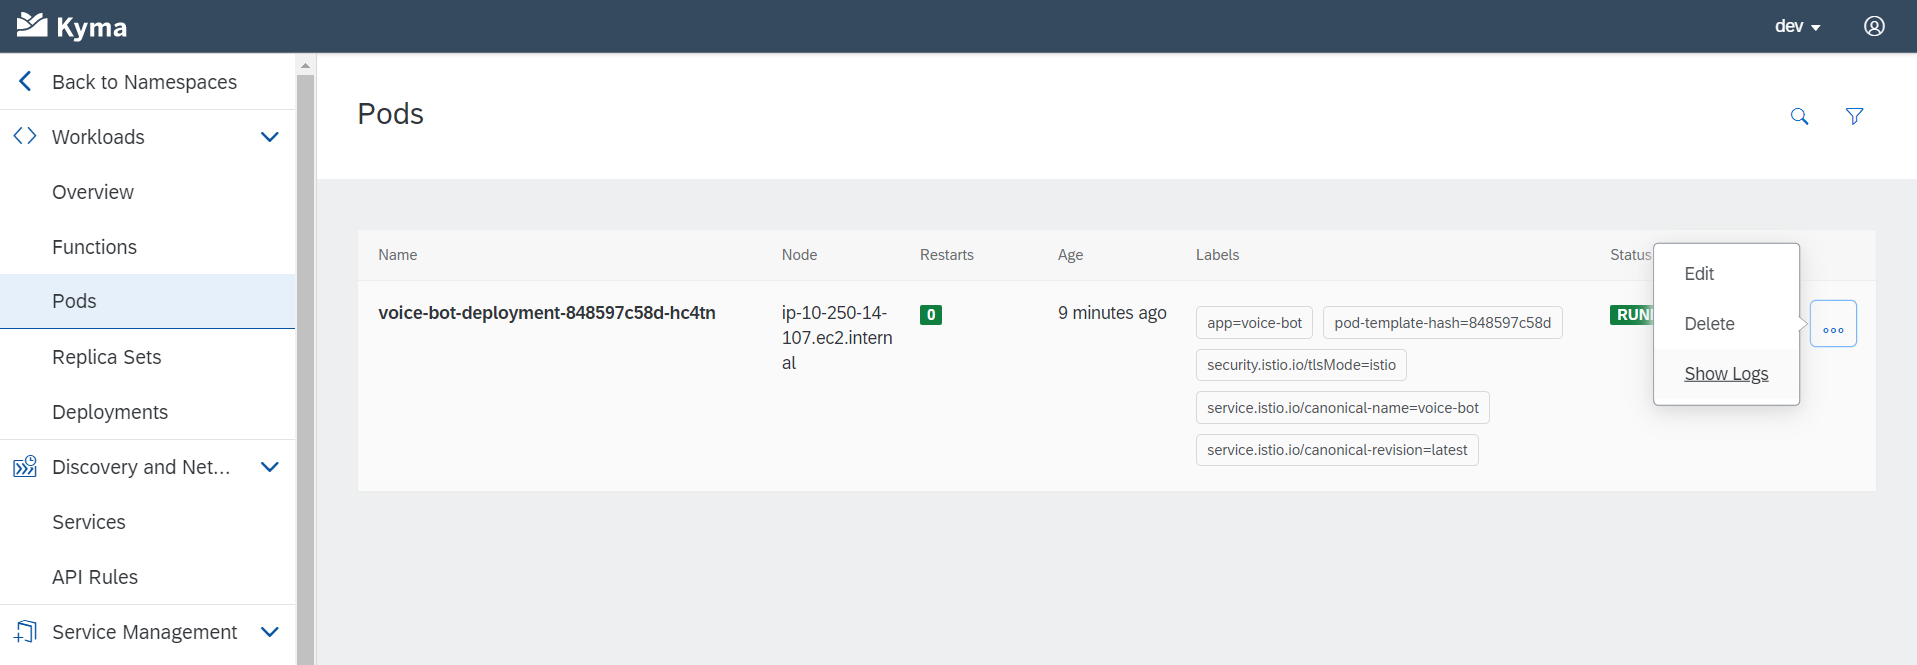
Check the "Show Logs" context menu next to a pod. There you can see that Kyma cluster downloads your docker image from repository. Shortly after container is up and running you'll see a message from the Voice Bot saying "Ready!":

That's it! The bot is deployed now to Kyma cluster.
7. Conclusion and the next steps
Now, take a look on what you've done in this exercise. Generally speaking, what you need to accomplish in order to deploy a simple voice bot to Kyma cluster is the following:
- Have a docker image of your app build and published
- Collect all credentials, tokens and other secrets into "secrets.yml" configuration
- Edit "deployment.yml" configuration to setup your deployment (important settings: your docker image, app name, binding of Secrets to env variables).
- Upload both files ("secrets.yml", "deployment.yml") to a Kyma cluster
From here can go further and change the project in the following possible directions:
- Change how bot works with Telegram API: switch from polling mode to WebHooks. This will require deployment of Kubernetes Service around your app Pod(s) and setting up an API Rule in Kyma. As a result you'll get a series of app instances busy with voice recognition and serving a single API point while Kyma distributes Telegaram requests across them.
- You may also split the bot's code into two logical pieces: (1) a voice recognition and (2) an interaction with SAP Conversational AI. Each of these parts may be deployed to Kyma as inline Functions, so you don't need to build and publish docker images in this case (the images will be build for you implicitly by Kyma).
Please, don't hesitate to share your suggestions, ideas and thoughts in the comments to this post. Thanks for reading!
- SAP Managed Tags:
- SAP BTP, Kyma runtime,
- SAP Conversational AI,
- Kyma Open Source
Labels:
1 Comment
You must be a registered user to add a comment. If you've already registered, sign in. Otherwise, register and sign in.
Labels in this area
-
ABAP CDS Views - CDC (Change Data Capture)
2 -
AI
1 -
Analyze Workload Data
1 -
BTP
1 -
Business and IT Integration
2 -
Business application stu
1 -
Business Technology Platform
1 -
Business Trends
1,658 -
Business Trends
91 -
CAP
1 -
cf
1 -
Cloud Foundry
1 -
Confluent
1 -
Customer COE Basics and Fundamentals
1 -
Customer COE Latest and Greatest
3 -
Customer Data Browser app
1 -
Data Analysis Tool
1 -
data migration
1 -
data transfer
1 -
Datasphere
2 -
Event Information
1,400 -
Event Information
66 -
Expert
1 -
Expert Insights
177 -
Expert Insights
293 -
General
1 -
Google cloud
1 -
Google Next'24
1 -
Kafka
1 -
Life at SAP
780 -
Life at SAP
12 -
Migrate your Data App
1 -
MTA
1 -
Network Performance Analysis
1 -
NodeJS
1 -
PDF
1 -
POC
1 -
Product Updates
4,577 -
Product Updates
340 -
Replication Flow
1 -
RisewithSAP
1 -
SAP BTP
1 -
SAP BTP Cloud Foundry
1 -
SAP Cloud ALM
1 -
SAP Cloud Application Programming Model
1 -
SAP Datasphere
2 -
SAP S4HANA Cloud
1 -
SAP S4HANA Migration Cockpit
1 -
Technology Updates
6,873 -
Technology Updates
417 -
Workload Fluctuations
1
Related Content
- IoT - Ultimate Data Cyber Security - with Enterprise Blockchain and SAP BTP 🚀 in Technology Blogs by Members
- Mistral gagnant. Mistral AI and SAP Kyma serverless. in Technology Blogs by SAP
- Configure Custom SAP IAS tenant with SAP BTP Kyma runtime environment in Technology Blogs by SAP
- SAP BTP, Kyma Runtime internally available on SAP Converged Cloud in Technology Blogs by SAP
- Kyma Integration with SAP Cloud Logging. Part 2: Let's ship some traces in Technology Blogs by SAP
Top kudoed authors
| User | Count |
|---|---|
| 34 | |
| 25 | |
| 12 | |
| 7 | |
| 7 | |
| 6 | |
| 6 | |
| 6 | |
| 5 | |
| 4 |