
- SAP Community
- Products and Technology
- Technology
- Technology Blogs by SAP
- How to call a GUI Transaction in SAP Fiori Launchp...
Technology Blogs by SAP
Learn how to extend and personalize SAP applications. Follow the SAP technology blog for insights into SAP BTP, ABAP, SAP Analytics Cloud, SAP HANA, and more.
Turn on suggestions
Auto-suggest helps you quickly narrow down your search results by suggesting possible matches as you type.
Showing results for
Advisor
Options
- Subscribe to RSS Feed
- Mark as New
- Mark as Read
- Bookmark
- Subscribe
- Printer Friendly Page
- Report Inappropriate Content
12-22-2021
5:36 PM
Introduction
In general, the creation of the GUI Transaction target in ABAP FioriLaunchpad is more or less straightforward:
- Create a new Target Mapping (FLPD) or Business App (FLPAM)
- Add Semantic Object + Action to be able to address the target from a Tile or in CrossApp navigation
- Add App Type Transaction.
- Add Title, Transaction TCODE, and System Alias (if you are using FLP Hub deployment)
- Add required and default parameters, with renaming rules to map from intent parameter names to technical GUI batch input names.
- Add a new Tile (Static Launcher), pointing to the Semantic Object - Action of the new TM above
- You do not need a tile if you design the target for App-to-App navigation only.
- Add Tile and Target Mapping to a Catalog
- Add Catalog to a Role (TR PFCG)
- Add Role to a User (TRs SU01 or PFCG)
And it will work in most cases. But sometimes, when you need to fine granular customize a transaction call (skip selection screen, pass parameters, etc.) you will need more.
The article below describes advanced flags you can apply to GUI transactions when you have problems :).
Works for ABAP FLP and cFLP.
Documentation
- FLPD: Configuring Target Mappings
- FLPAM: Maintain Launchpad App Descriptor Items
- SAP Note 3192857 - Transaction parameters and options
Step-by-Step Guide
- Define new Target Mapping with an Application Type Transaction in Fiori Launchpad Designer or FLP App Manager (TR /ui2/flpam):
- Fiori Launchpad Designer (FLPD)

- FLP App Manager (TR /ui2/flpam)


- Fiori Launchpad Designer (FLPD)
- The Semantic Object and Action define the inbound intent of your target. E.g. how you want to call it.
- The title does not reflect somewhere in UI (FLPD).
- In the Transaction field fill the name of the transaction, you want to call.
- If your transaction is located not on the frontend server (hub deployment, or remote destination) you need to fill in System Alias (FLPD only).
- In FLPAM you need to configure the target in the remote backend catalog and then replicate it to the Front-End server
- Additional parameters ("Allow additional parameters" check box in FLPD or Additional parameters dropdown in FLP AM): it is not recommended to allow the direct passing of additional parameters to GUI transactions. This option allows any intent parameter passed to a target that is not known by the parameter signature will be forwarded to the target app without any adoption. But in the case of the Dynpro app, you may send only the parameters that have a corresponding field on the initial screen, and the name of the parameter shall correspond to a batch input name for that field. So, in most cases, you will need to rename each parameter in the target definition, from its common intent name to the technical batch input name (Target Name). Parameters that are not found in the initial screen (because no such field or they were not renamed) will be in the best case just ignored, but in the worst case, if there are too many parameters sent, they will lead to parameters string overflow and the app will not start.
- Now you can configure the passing of parameters and/or OKCODE:
- You can fill in the parameters only on the initial transaction screen.
- Input fields you want to fill shall be visible.
- You pass parameters to transactions using their batch input names. To find a batch input name:
- Put the cursor on the field you want to fill.
- Press F1
- On the Performance Assistant screen press the Technical Information button
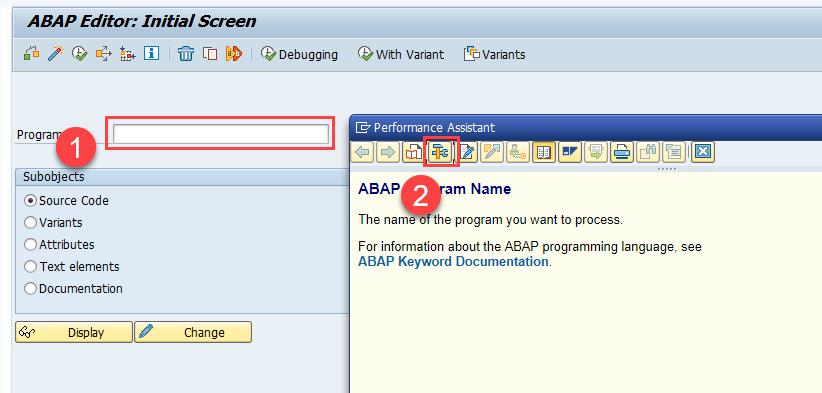
- The batch input name can be found in the Screen Field field.

- Knowing the batch input field would be enough to pass the parameter to the transaction. E.g such IBN call #Action-startReport?RS38M-PROGRAMM=ZZ_AA_TEST would already prefill the value. But that would not be user-friendly and human-readable and would have too much Dynpro technical specific, but no semantic and abstraction, and this we normally try to avoid in FLP and IBN. The good style would be, that we expand the outside parameter in a nice, readable form, and rename it into a technical batch input name on calling a transaction. For this, we use the RenameTo feature of FLP and define the input name in the Name field and the technical name in the Target Name column:

- Now we can call our target like this #Action-startReport?report=ZZ_AA_TEST and get transaction called and field Program pre-filled.
- If you want to ensure, that your target will be always called with the program name (this example), you can set the parameter as Mandatory. In this case, the transaction will be executed after this call #Action-startReport?report=ZZ_AA_TEST but not this #Action-startReport.
- You can also pre-fill some default parameters, that shall always be passed to your transaction (can still be overwritten, when came as part of the call). For this, you define a parameter and configure it for a Default value:

- In the example above, it will set the Source Code option to always be selected. And in this case, we do not need to rename it, because we do not plan to expose this parameter or use it in an IBN call.
- In addition to new abilities given to you by FLP or Dynpro logic, there are still old tricks by which you can control the processing of the input values in Dynpro screens. For example like these:
- … some characters function as special characters by default.
- The "!" character in the initial position of an input field on the screen deletes all characters in the field before the data transport.
- The "=" character in the initial position of an input field on the screen initiates a search using search help.
- If an input field contains only blanks and "_" characters, the latter is transported as blanks.
- However, note that there are additional prerequisites for “!” (a field property such as ‘custom input mask’ will disable the “!” logic). Moreover, there must also be an OK-Code defined that triggers input conversion (post-processing).
- More details can be found in the official documentation.
- … some characters function as special characters by default.
- You can also send SET/GET parameters.
- If you want to fill the input field, you can use either its batch name (see above) or its SET/GET parameter ID:

- Most useful SET/GET parameters for cases when you do not have a corresponding field for it on the initial screen. But if it is not bound to any field on the screen, one needs to know the application logic to find the name. Not so easy. You can scan the program for the SET PARAMETER ID command, but still, you need to know which of them if more than one occurrence is found. An easier way to determine all possible SET/GET parameters is to enter /h as OK-Code before starting the transaction. This opens up the debugger at the very beginning. Then set a breakpoint at GET PARAMETER and continue with F8.
- When passing SET/GET parameters to the target transaction, you need to prefix them with the "@" symbol:

- SET/GET parameters are passed as application start parameters to have a lifespan through the whole security session and will be reused in the next application call.
- SET/GET parameters have a value length limitation of 255 characters! The name of the SET/GETs can be a maximum of 30 characters long.
- If you want to fill the input field, you can use either its batch name (see above) or its SET/GET parameter ID:
- Very often, after the pre-filling of parameters, you would like to execute the transaction, using the pre-filled value, and go directly to the second screen. Here is the way to go depending on the Transaction Type.
- Dialog Transaction. If you see more than one button on the Application Toolbar, it is a Dialog Transaction, with GUI Status and OK CODE processing, and so, you can control it by passing the needed OK CODE as a parameter.
- For this, you need to use the predefined Dynpro parameter DYNP_OKCODE:

- To find the OKCODE, you can also use the Technical Information Screen, and navigate from it to Program Status, by double-clicking on its name:

- In the Manu Painter, you will find a function code corresponding to the button you want to press.

- Be aware, that while FLP does not know the type of transaction, it always adds a skip selection screen indicator ("*" symbol in front of the transaction name) to the transaction call if any parameter is passed. For dialog transactions, it would result in an empty OK code coming to PAI after the transaction starts, which still can result in skipping of selection screen if application logic has such processing for empty OK codes. Details.
- For this, you need to use the predefined Dynpro parameter DYNP_OKCODE:
- Report (Selection Screen) Transaction. If you see only one button Continue or Execute on the toolbar, it is most probably a Section Screen transaction:
- Something like this

- And here you do not have too much freedom. If you pass ANY parameter, FLP will trigger the skip selection screen command and you get the initial screen executed. It is not possible to pass any specific OKCODE, and it is not possible to just pre-fill parameters and stay on the screen. Some more information about it can be found here.
- By default, the processing logic for Report transactions will always skip the initial selection screen as far as you pass any parameter (even if it is defined as the default parameter in TM configuration). To avoid that you can use new controlling flags/parameters:
- DYNP_SKIP_SEL_SCREEN=0 → disable default logic and stay on the selection screen with pre-filled parameters
- DYNP_SKIP_SEL_SCREEN=1 → default, skip selection screen as far as any parameter passed.
- In contrast to other DYNP* parameters, the DYNP_SKIP_SEL_SCREEN parameter is processed directly by FLP but not by WebGUI or Dynpro. Therefore please do not use any renaming for it and use the name directly as it is written (case, underscores, etc). Because it goes about FLP logic, it may differ in different FLPs. It definitely works in ABAP FLP, but in cFLP/SapStart/Workzone or BTP FLP Module, it can be processed differently.
- Something like this
- Dialog Transaction. If you see more than one button on the Application Toolbar, it is a Dialog Transaction, with GUI Status and OK CODE processing, and so, you can control it by passing the needed OK CODE as a parameter.
- DYNP_NO1ST. This parameter prevents back navigation to the initial application screen (e.g. jump over). Make sense only if the initial application screen was prefilled and skipped by start.
- Example: *VA03 VBAK-VBELN=60052798;DYNP_NO1ST=1;DYNP_OKCODE=ENT2.
- DYNP_NOSETGET (>2105). If you combine skipping of the initial screen feature and automatic loading of SET/GETs (always happening), it leads to the issue, that already typed values from previous ABAP sessions for the current user become invisibly mixed into input parameters of the skipped screen, influencing processing logic. This effect is not obvious to the end user and may lead to complaints. To prevent Dynpro from loading SET/GET you can pass parameter DYNP_NOSETGET with value 1. Be aware, that this only works for cases, when SET/GETs are loaded by the Dynpro framework directly, while the SET/GET parameter is assigned to a field in the Screen Painter.
 If the DYNP_NOSETGET parameter does not work in your case, check that you do not set the value of the field programmatically, using the GET PARAMETER command. This way is not controlled by DYNP_NOSETGET=1 and shall be handled explicitly, by, for example, adding a new parameter SKIP with value 1 to the target definition and reacting on it in your code directly.
GET PARAMETER ID ‘SKIP’ FIELD SKIP.
IF SKIP IS INITIAL.
GET PARAMETER ID ‘MAT’ FIELD RC27M-MATNR.
ENDIF.
FAQ
SET/GET parameters from other WebGUI sessions are not reused
While by nature WebGUI transactions are running in single external sessions and do not allow the creation of new internal modes, per default SET/GET parameters from another WebGUI window are not reused in the next window, as it happens typically in WebGUI (e.g fields have not defaulted with previously entered values). From S/4 HC 1806, this gap between different GUI types was closed, and from now on, per default WebGUI also supports persisted SET/GET parameters and can share already typed values between sessions. But this behavior is controllable by the system profile parameter, and it may happen that in your system this parameter is switched off. So, if it does not work, please check that the system profile parameter dynp/shm_setget is set to true on your system for the default profile.
I want navigation from a Tile to behave differently compared to Cross-App Navigation
To achieve that just add additional URL parameters controlling the behavior to the Tile definition. For example, if you can add the parameter DYNP_SKIP_SEL_SCREEN=0 to a tile, that selection screen of the transaction would not be skipped when you navigate to it by clicking on the tile but would be skipped if you navigate to the transaction from another app, pre-filling selection parameters.
I don't want the navigation to HTML GUI but rather to the SAP GUI for Windows, while certain ActiveX control features do not work in the HTML environment.
The proper way here is to use SAP Business Client with a Fiori Launchpad Connection. In this case, ALL GUI transactions will be opened in SAP GUI for Windows. There is currently no way to open only some transactions using SAP GUI for Windows and the rest with SAP GUI for HTML.
Labels:
5 Comments
You must be a registered user to add a comment. If you've already registered, sign in. Otherwise, register and sign in.
Labels in this area
-
ABAP CDS Views - CDC (Change Data Capture)
2 -
AI
1 -
Analyze Workload Data
1 -
BTP
1 -
Business and IT Integration
2 -
Business application stu
1 -
Business Technology Platform
1 -
Business Trends
1,661 -
Business Trends
85 -
CAP
1 -
cf
1 -
Cloud Foundry
1 -
Confluent
1 -
Customer COE Basics and Fundamentals
1 -
Customer COE Latest and Greatest
3 -
Customer Data Browser app
1 -
Data Analysis Tool
1 -
data migration
1 -
data transfer
1 -
Datasphere
2 -
Event Information
1,400 -
Event Information
64 -
Expert
1 -
Expert Insights
178 -
Expert Insights
269 -
General
1 -
Google cloud
1 -
Google Next'24
1 -
Kafka
1 -
Life at SAP
784 -
Life at SAP
10 -
Migrate your Data App
1 -
MTA
1 -
Network Performance Analysis
1 -
NodeJS
1 -
PDF
1 -
POC
1 -
Product Updates
4,578 -
Product Updates
317 -
Replication Flow
1 -
RisewithSAP
1 -
SAP BTP
1 -
SAP BTP Cloud Foundry
1 -
SAP Cloud ALM
1 -
SAP Cloud Application Programming Model
1 -
SAP Datasphere
2 -
SAP S4HANA Cloud
1 -
SAP S4HANA Migration Cockpit
1 -
Technology Updates
6,886 -
Technology Updates
389 -
Workload Fluctuations
1
Related Content
- It has never been easier to print from SAP with Microsoft Universal Print in Technology Blogs by Members
- SAP S/4HANA Structure for Developer in Technology Q&A
- Comprehensive Guideline to SAP VMS in Technology Blogs by Members
- Consuming CAPM Application's OData service into SAP Fiori Application in Business Application Studio in Technology Blogs by Members
- How to call a Rest API in a Fiori App and show the result in a List in Technology Q&A
Top kudoed authors
| User | Count |
|---|---|
| 12 | |
| 11 | |
| 11 | |
| 9 | |
| 9 | |
| 9 | |
| 9 | |
| 8 | |
| 7 | |
| 7 |