
- SAP Community
- Products and Technology
- CRM and Customer Experience
- CRM and CX Blogs by Members
- Understanding Mashups in SAP Cloud for Customer: F...
CRM and CX Blogs by Members
Find insights on SAP customer relationship management and customer experience products in blog posts from community members. Post your own perspective today!
Turn on suggestions
Auto-suggest helps you quickly narrow down your search results by suggesting possible matches as you type.
Showing results for
tokgozatakan
Participant
Options
- Subscribe to RSS Feed
- Mark as New
- Mark as Read
- Bookmark
- Subscribe
- Printer Friendly Page
- Report Inappropriate Content
12-08-2021
10:33 AM
Have you seen tweets outside Twitter that are not just screenshots? Amazing, right? I remember my first time adding (embedding in fancy words) a YouTube video to my HTML-only website. Felt like a hacker! Later on, I have discovered that we can do the same for many websites by simply placing some weird words and symbols (HTML Codes, again in fancy words) and it'd magically turn into the content! Nowadays we don't even need to see the coding side, thanks to the pre-delivered tools inside the platforms. Mashups in SAP Cloud for Customer is one of those tools.
Introduction
In this fundamental guide, you will not just learn about Mashups - a tool that is used in SAP Cloud for Customer but also the basic logic of embedding, underlying technology, and the terminology (i.e parameter, port binding) that is used in this tool.
- What is a mashup?
- How do the Mashups work?
- Navigating Mashup Authoring
- Types of Mashups
- Displaying a Mashup
What is a mashup?
Mashup is a feature that is available in SAP Cloud for Customer. With mashups, we can connect to third-party systems. You can use mashups provided by the system out of the box or you can create your own mashups.
Mashups enable us to generate links with dynamics parameters or embed another system's screens into our own screens or show data from another system. Each bold text actually represents the different types of mashups that are available in C4C.
Examples of Mashups
With mashups, you can...
...get the weather forecast on your visit details page depending on your customer's location via Data Mashups.
(Check out how to blog post by gauravloknath.gera)
...see real-time customer-specific SAC reports in your customer details page via HTML Mashups.
(Check out how to blog post by pooja.bhalla)
...look for news mentioning your customer via URL Mashup.
(We will be covering it together in this blog)
How do the Mashups work?
Essentially, all the mashups are connecting to another system with a link. This link involves some parameters. Utilizing this link with parameters, we are able to make some actions on the other system, whether it is simply displaying required data or updating it - like the unsubscribe links under the e-mails.
URL Structure and Parameters
To understand mashups, we need to understand how the URL and parameters work first. URLs consists of different parts with different roles. In the example below we see a Google News link that will search for news about SAP in English language. This is achieved thanks to the parameters in the link.

While protocol, subdomain & domain calls a specific website, directory navigation opens a specific page. Each parameter added to the link is responsible for functions that are happening in that specific page.
Parameters are also called "query strings" since you query a set of data in the exact way that you want (filtering, sorting, format etc.). In our example parameter "q" is responsible for searching the news including the word "SAP" and "hl" is responsible for only bringing the news that are in English.

Question Mark "?" marks the start point of parameters. After that each specific wording that you use will be treated as a parameter.
Equals sign is used "=" to let the system know that we want to match our value and our parameter.
Each parameter added needs to be separated with a separator. Separators don't necessarily have to be an ampersand "&" but since C4C Mashups only support ampersand as a separator we will continue with that.
Depending on your set up, parameter values can be dynamic (binding) or they can be constant (static). Dynamic Parameters are parameters that are changing per request. Their values are bind to one of your system's values meanwhile Constant Parameters stay the same on each request.
In our example, let's say that we would like to search for news only in English for each customer. Then values of "q" would be dynamically change by binding it to a value in our system while "hl" would stay the same.
Navigating Mashup Authoring
You can look at your custom mashups or the standard mashups by going into Administrator > Mashup Authoring.
If hasn't been enabled already, as a prerequisite you need to answer the scoping question in the Business Configuration to activate the Mashups. Please check out the SAP Help Document.

A. See your mashups by going into Mashup Authoring Work Center View under the Administrator Work Center.
B. ID's of Mashups that have been created via PDI starts with the Solution ID. Standard delivered mashups starts with SM while custom mashups starts with CM.
C. You can look at the General Information about the mashup. Usage tab shows on which screens this mashup is currently in use.
D. To create Mashups click on New then choose the mashup type that you want to create.

No matter which type of Mashup that you will create, the information above is required.
With Port Binding: Enables you to create mashups with dynamic parameters. If you select this option, you need to specify which Port Binding is going to be used.
Without Port Binding: Enables you create a static mashup that can be placed anywhere. If you select this option, you need to select a Mashup Category.
Port Binding: Enables you to match your system values with the selected parameter. Port Bindings are object/screen specific, for example you cannot place a mashup with port binding "Additional Account Information" into the product details.
Mashup Name: Specify a name for your mashup. This will be shown when you add the mashup to a screen so make sure to use a cool name.
Description: Description can be overlooked, but description becomes especially useful when you have a lot of mashups. Mentioning certain features (ie. "used in Tickets, shows the ERP TCode ABC01") will make the search easier.
Handle Parameters in Mashups
To specify which parameters you are going to use and which of them are going to be dynamic or static is maintained in the Request Parameter table.

In Request Parameter table we see 4 columns: Parameter, Constant, Mandatory, Parameter Binding.
Parameter column is for the parameters that is going to be used in the mashup.
Constant is for the static parameters, values added into the constant column will be added to the link for every call. Parameter bindings cannot be added to constant parameters.
Mandatory flag makes the parameter mandatory, also sets it as the first parameter.
Parameter Binding is used when you make the parameter dynamically changed from the values of the screen that you'll add the mashup. Values in the parameter binding will change accordingly with the Port Binding you have chosen.
Values from parameter binding contains standard fields. If you need to bind a parameter to a KUT field leave both constant and parameter binding empty. When you're embedding the parameter you'll see the option to bind parameters with other fields in your object.
Types of Mashups
There are 3 types of mashups available in C4C. These are HTML Mashups, URL Mashups & Data Mashups. Depending on your need, you can create one of them via clicking New in Mashup Authoring.
HTML Mashups
Using HTML Mashups you can embed HTML Codes and iframes into your screen. In the configuration information, you can select URL or HTML Code option.
Selecting HTML Code will open the code editor. Depending on HTML & Javascript limitations and your coding skills, you can embed anything!
Check out this blog by Carolin Hormuth on how to call an ERP TCode with HTML Coding.

URL option only requires the base URL that is going to be embedded as an iframe. You need to make sure that the site is allowed to load as an iframe, otherwise, you will get the infamous "refused to connect" error.
Height will specify at which height this mashup should be loaded. This can be overwritten during adaptation.
Extract Parameters option helps us to strip the long complicated URL into a clean one and adds each of the parameters into the Request Parameter table. When you click Extract Parameter, the system will check for parameters in the URL (whatever thereafter the question mark "?"). Each parameter, divided by an ampersand "&" will be placed as a row in the Request Parameter table.
Preview button displays the iframe that you've embedded. It is basically a health check to see if your mashup is working.
URL Mashups
Using URL Mashups you can produce links that will open the other screen in a new window. In the configuration information, you add the URL that you want to use. Unlike HTML Mashups, URL Mashups can be placed to the detail page header or into a section.
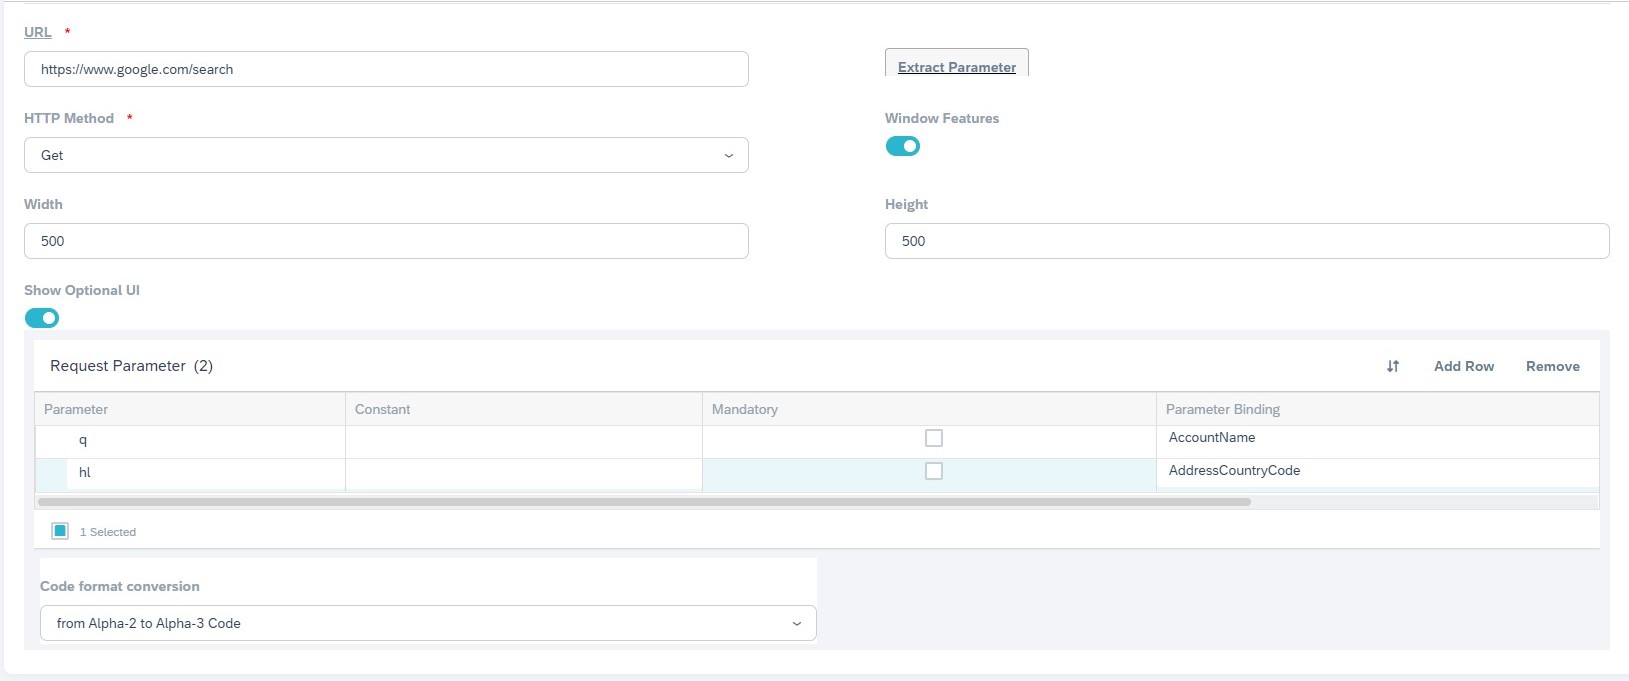
URL is the base URL without parameters. You can paste the full link then click Extract Parameters to have the base URL.
HTTP Method determines what the link should do. Most of the time, to open a link we use the GET method but we can also make a POST request for a specific endpoint if required.
Window Features allows you to set some features (if you would like to specify the size or attributes etc.) in the window.
Code Format Conversion allows you to make alpha conversions in case your parameter requires a conversion. For C4C is using 2 digit country codes but the endpoint might need 3 digit country codes so you can specify the conversion here. Note that it needs to be maintained for each parameter.
Data Mashups
Unlike HTML & URL Mashups, Data Mashups allows you to call and display data directly. You can also combine and display both internal and external sources. You can call web services, add CSV or XML data sources. The main advantage of Data Mashups is that they provide several display options depending on the data.
Once you create a data mashup and define port binding (optionally) you'll be presented with a workflow-like screen where you can configure your mashup.
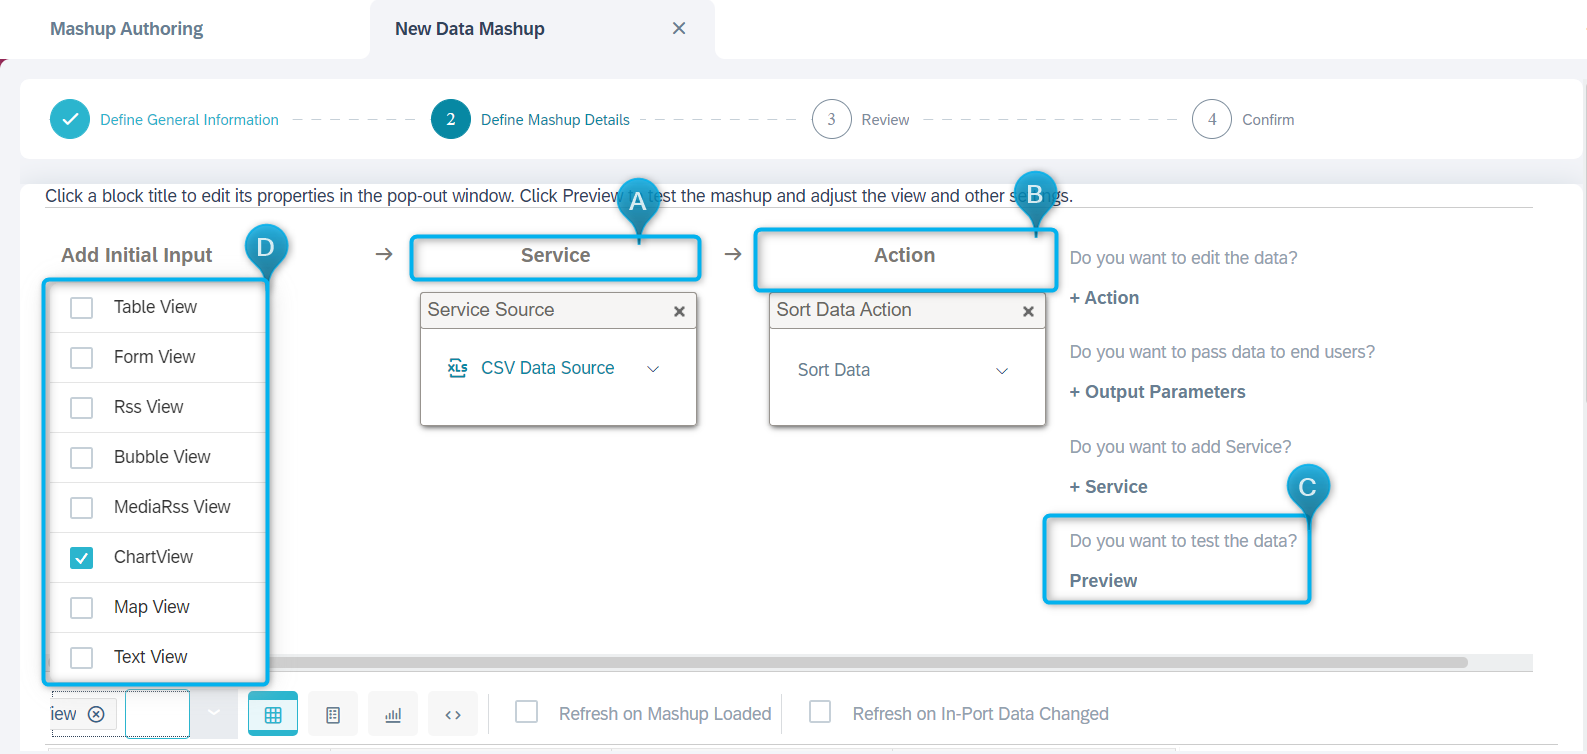
A. Choose a Service Source to feed your mashup. It could be XML, CSV files or it could be a mashup web service such as REST, Atom, or SOAP. By clicking on the Header Label "Service Source" you can define field-specific actions like binding a field.
B. With actions you can do data operations to your service data such as filtering, sorting etc. Clicking on the pop-up shows action-specific configurations.

C. By clicking preview, you're presented with a preview of your mashup.
D. Once you preview your app you can determine how to display your app. You can add or remove fields from your service source and you can determine how to refresh/update the mashup.

Custom Mashups
There's one more Mashup type that we actually can't create. Custom Mashups are delivered by SAP and are more complex than other mashup types. Custom Mashups cannot be edited, it is more like a plug-in approach.
Google Maps mashup is one of the custom mashups and once it is enabled (by entering the API Key, which is provided via an incident) you can utilize map views within objects.
Displaying a Mashup
Mashups can be displayed on:
- Custom Work Center Views
- Object Detail Views like Accounts, Opportunities, etc.
Display HTML Mashup on Custom Work Center
In case you want to display information with no ties to an object (without Port Binding) such as a company info board or a generic dashboard, you can create a custom work center and embed a full-screen mashup.
In this example, we will embed a Customer Portal into our system.
- Go to Administrator --> General Settings --> Custom Work Center
- Create a Work Center View and Assign it to a Work Center (custom or standard)
- From Administrator --> General Settings --> Business Role select your role and click Edit
- Assign the Work Center View to your Business Role and sign in again.
- Go to Your Workcenter, you will see an empty screen.
- Start Adaptation
- Click Add --> Mashup
- Select your Mashup, in my case, it is an HTML mashup (with no port binding) embedded a link to my customer portal.
- In the Properties, you can modify the sizing and add a pane header to your mashup. Since we're making a full-screen mashup and want to make it blend with the screen, we will select full width, no header, and %100 height.
- Click Apply and End Adaptation


In the end, your mashup should be displayed full screen. If you're receiving a "connection refused" error or you cannot click on anything, it means the other system should be configured to allow iframes and/or clickjacking.

Display URL Mashup on Accounts
Mashups can be inserted into an object, and by utilizing the port binding, we could get object-specific information from another system.
In this example, we will create a URL Mashup for google searches, then add our mashup into Accounts.
- Go to Administrator --> Mashup Authoring --> New --> URL Mashup
- Select with Port Binding and choose Additional Account Information.
This port binding will allow you to add mashups not only to accounts but also to Competitors and Contacts as well. You check out what kind of fields which screens are accessible from Port Binding Search help.


- Go to the URL Information and fill out the relevant fields.A quick google search shows me that if I want to make a search about SAP in German, I can use the following link:
https://www.google.com/search?q=SAP&hl=de

- Paste the link to the URL field, then Click Extract Parameters. This will remove the parameters from the URL and add them to our Parameters table.
- HTTP Method should be GET, since we will not send any data to Google, instead we will request it.
- You can modify window features if needed.

- In the Request Parameter table, our extracted parameters will be available. However, the words SAP and DE will be included as constant parameters, which is not something we want. In case you only want to include searches in German, you can keep DE as a constant value.
- Delete the constant values and click on the chain icon to bind our parameters with Account fields.
- After binding HL to AddressCountryCode, I additionally selected the Code Format to be Alpha-2 Code since google is using DE instead of DEU.

- Once everything's done, Save and Activate your mashup.
Now it is time to add our mashup into the account details screen.
- Go to Customers --> Accounts and open any Account that should have the mashup.
- Start Adaptation. Since URL mashups can either be placed on the header pane or in a section. Let's assume that users would like to access this mashup from a section in a specific tab.
- Go to the Tab and Select a Section
- Click Add --> Mashup and select the Mashup you created
- End Adaptation and test your mashup


Conclusion
To summarize shortly, Mashups are a quick way to get information from other systems. Different kinds of mashups can be embedded into different screens and objects. Use mashups if you want to:
- Show data without integration
- Allow users to make changes in the other system directly
That's all from my side about mashups for this blog post. In case you have some additional tips and tricks, feel free to comment about your mashup experience!
- SAP Managed Tags:
- SAP Sales Cloud,
- SAP Service Cloud,
- C4C Extensibility,
- C4C Sales,
- C4C Service
7 Comments
You must be a registered user to add a comment. If you've already registered, sign in. Otherwise, register and sign in.
Labels in this area
-
ABAP
1 -
API Rules
1 -
c4c
1 -
CAP development
1 -
clean-core
1 -
CRM
1 -
Custom Key Metrics
1 -
Customer Data
1 -
Determination
1 -
Determinations
1 -
Introduction
1 -
KYMA
1 -
Kyma Functions
1 -
open SAP
1 -
RAP development
1 -
Sales and Service Cloud Version 2
1 -
Sales Cloud
1 -
Sales Cloud v2
1 -
SAP
1 -
SAP Community
1 -
SAP CPQ
1 -
SAP CRM Web UI
1 -
SAP Customer Data Cloud
1 -
SAP Customer Experience
1 -
SAP CX
1 -
SAP CX extensions
1 -
SAP Integration Suite
1 -
SAP Sales Cloud v2
1 -
SAP Service Cloud v2
1 -
SAP Service Cloud Version 2
1 -
Service Cloud v2
1 -
side-by-side extensions
1 -
Validation
1 -
Validations
1
Related Content
- Where You Go Next After Learning the Technical Basics of SAP Commerce Cloud in CRM and CX Blogs by SAP
- Live Session: SAP Emarsys Customer Engagement Onboarding – July sessions in CRM and CX Blogs by SAP
- Live Session: SAP Emarsys Customer Engagement Onboarding - 9 to 11 May in CRM and CX Blogs by SAP
- LSC (learning.sap.com): Learn SAP Commerce Cloud By Yourself in CRM and CX Blogs by SAP
- Live Session: SAP Emarsys Customer Engagement Onboarding in CRM and CX Blogs by SAP