
- SAP Community
- Products and Technology
- Technology
- Technology Blogs by SAP
- Automatically Capture Document Information with SA...
Technology Blogs by SAP
Learn how to extend and personalize SAP applications. Follow the SAP technology blog for insights into SAP BTP, ABAP, SAP Analytics Cloud, SAP HANA, and more.
Turn on suggestions
Auto-suggest helps you quickly narrow down your search results by suggesting possible matches as you type.
Showing results for
former_member74
Explorer
Options
- Subscribe to RSS Feed
- Mark as New
- Mark as Read
- Bookmark
- Subscribe
- Printer Friendly Page
- Report Inappropriate Content
12-01-2021
11:38 AM
This blog post introduces an end-to-end SAP Intelligent Robotic Process Automation (RPA) workflow that retrieves attachments from Outlook, submits them to Document Information Extraction, and sends extracted data to an external system of your choice.
Document Information Extraction is a powerful tool for extracting businesses critical information from a set of digital documents. Recently, I was using Document Information Extraction for retrieving energy usage data from electricity invoices, with the goal of sending the extracted data to SAP S/4HANA for emissions management.
However, one challenge I came across was the document submission process itself. Although submitting an invoice to Document Information Extraction is simple, manually repeating this whenever a new invoice arrives is not ideal. Thankfully, SAP Intelligent RPA provides an elegant solution for automating the entire process.
In this article, I will walk through the process of creating an SAP Intelligent RPA workflow that automatically submits files to Document Information Extraction. The end-to-end process will start by retrieving email attachments from Outlook and finish by sending extracted data to an external system – I use a Nodejs server, but we can use any suitable API endpoint based on your use-case.
Before proceeding, you will need to install and configure SAP Intelligent RPA on your SAP Business Technology Platform subaccount and local machine. The complete documentation for setup and configuration is found here.
The first thing we will need to do is create a suitable template, which will be used as a basis for extracting data from future documents.
SAP Intelligent RPA 2.0 includes access to Document Information Extraction within Cloud Studio. To enable this, ensure the role ‘Document_Information_Extraction_UI_Templates_Admin’ is added to the IRPA role collection on SAP BTP.
Once the roles are configured, access your Cloud Studio project, and navigate to the '+' on the left side.
Then, select Create and Document Template.
In the subsequent window, you have a few options with selecting pre-built templates and schemas. For today, proceed with creating a new template and select an appropriate file for training. I am using Sample Invoice 2 from this tutorial found on the SAP Developer Center.
Select the Document Type - in this case, it is an invoice.
Finally, proceed with using the pre-built schema. For custom documents, select Create New to create a schema for the header and line items you require. Once completed, select Add.
In the following pop-up, select Open in new tab - this will open the Document Information Extraction UI.
The next step is annotating the required fields from your template document, which can be done through Document Information Extraction UI. Select your document and press Annotations to open the line items for your document.
Then press Edit to begin annotating the relevant fields in your document - drag and highlight a portion of the document and match it with a header or line item. Once completed, press Save and Activate to make the template available for your automations.
The template is now visible in Cloud Studio. Navigate to Document Templates to view all available templates and their annotations.
To start creating an automation, navigate to the '+' icon and select Create, then Automation.
The first phase of the automation is to retrieve and save attachments from an Outlook email. To accomplish this in SAP Intelligent RPA, add the Outlook SDK as a project dependency (if this is your first time using the Outlook SDK, you can acquire it in the SAP Intelligent RPA Factory store).
Insert the following Outlook workflow activities to open, filter and retrieve attachments.
We would like to retrieve attachments from emails that match a specific criterion. In this example, as the invoice is a purchase order from Apple, we can narrow our search to include ‘Apple Store Invoice’ as the email subject.
In the ‘Search Email (Outlook)’ step, enter the following parameters in the ‘searchCriterionList’. Additional criteria can also be added to increase robustness (such as filtering by sender name or date received).
With three simple steps, we can now search through Outlook and retrieves attachments from an email based on a criterion.
The next step is to iterate through those attachments and save them to a local folder. Navigate to Controls, select the For Each component, and insert this in the workflow. Within this step, set the iterable to be the attachmentNamesList from step three.
Proceed with saving attachments by using the Save Mail Attachment (Outlook) activity. Enter a path to a local folder in the destinationPath and set the current attachment name to the attachmentFileName.
Great! We have now extended our automation to save Outlook attachments to a local folder. The next phase is to retrieve these saved attachments and submit them to Document Information Extraction.
The activity for calling Document Information Extraction requires a path to the file, and this path can be generated using a custom script. Insert a custom script control as step six and enter the following JavaScript code:
Ensure you also add input and output parameters for the custom script.
Once saved, update the input and output parameters.
Next, insert the Extract Data With Template activity as step seven and set the Document Template to be our previously created template. Update the documentPath parameter with the filePath generated by our JavaScript code.
With this completed, our automation is updated with the capability of submitting saved attachments to Document Information Extraction.
To test the automation, email yourself a copy of the document you’d like to process (ensure the email subject conforms to your automation’s search criteria). Add a ‘Log Message’ activity in your workflow as step eight, with extractedData as the message. Click Save and then run the automation. The test console should update with the extracted fields.
The final phase of this automation is posting extracted data to an external system. Ideally, we’d like to do something extra with the data we’ve retrieved, such as storing it for reporting or performing some additional analytics. In SAP Intelligent RPA, we can accomplish this by using Call Web Service to send our data to an external system for further work.
To simulate an external service, I used a NodeJS server using Express (a framework that generates boilerplate code required for a Node server). Within your express application, add a new route in the routes folder called irpa.js, and enter the following code:
Then, add the following lines to app.js:
Back in Cloud Studio, place a custom script as step nine and enter the following code:
Ensure you update the input and output parameters for this step as well. Finally, add a Call Web Service activity that uses the generated options to perform a POST request to our Node server.
With this step completed, the full end-to-end automation is ready to be tested!
To test the complete workflow, open a command line session in your Nodejs directory. Use ‘npm init’ to install dependencies and ‘npm start’ to begin the server. Run the complete automation in Cloud Studio. If everything works as intended, there should be an output to your command line session with the extracted data – from here, it’s up to you on how you want to process the data further!
In this blog post, I have shown that SAP Intelligent RPA can simplify the Document Information Extraction process, with the ability to send extracted data to an external service (simulated with Nodejs).
There are numerous applications for such a workflow. For example (based on my original use-case), we can now automatically collect electricity usage data from invoices and send this to an emissions management platform, such as SAP Environment, Health and Safety management. This can further assist companies with meeting and exceeding their sustainability goals.
Thank you for reading this blog post – please try the steps for creating this automation for yourself and leave a comment to share your experience, thoughts or to ask any questions.
Introduction
Document Information Extraction is a powerful tool for extracting businesses critical information from a set of digital documents. Recently, I was using Document Information Extraction for retrieving energy usage data from electricity invoices, with the goal of sending the extracted data to SAP S/4HANA for emissions management.
However, one challenge I came across was the document submission process itself. Although submitting an invoice to Document Information Extraction is simple, manually repeating this whenever a new invoice arrives is not ideal. Thankfully, SAP Intelligent RPA provides an elegant solution for automating the entire process.
In this article, I will walk through the process of creating an SAP Intelligent RPA workflow that automatically submits files to Document Information Extraction. The end-to-end process will start by retrieving email attachments from Outlook and finish by sending extracted data to an external system – I use a Nodejs server, but we can use any suitable API endpoint based on your use-case.
Creating the Automation
Configuring SAP Intelligent RPA
Before proceeding, you will need to install and configure SAP Intelligent RPA on your SAP Business Technology Platform subaccount and local machine. The complete documentation for setup and configuration is found here.
Create a Document Template in Cloud Studio
The first thing we will need to do is create a suitable template, which will be used as a basis for extracting data from future documents.
SAP Intelligent RPA 2.0 includes access to Document Information Extraction within Cloud Studio. To enable this, ensure the role ‘Document_Information_Extraction_UI_Templates_Admin’ is added to the IRPA role collection on SAP BTP.

Role collections in SAP Business Technology Platform to enable Document Information Extraction within SAP Intelligent RPA Cloud Studio.
Once the roles are configured, access your Cloud Studio project, and navigate to the '+' on the left side.
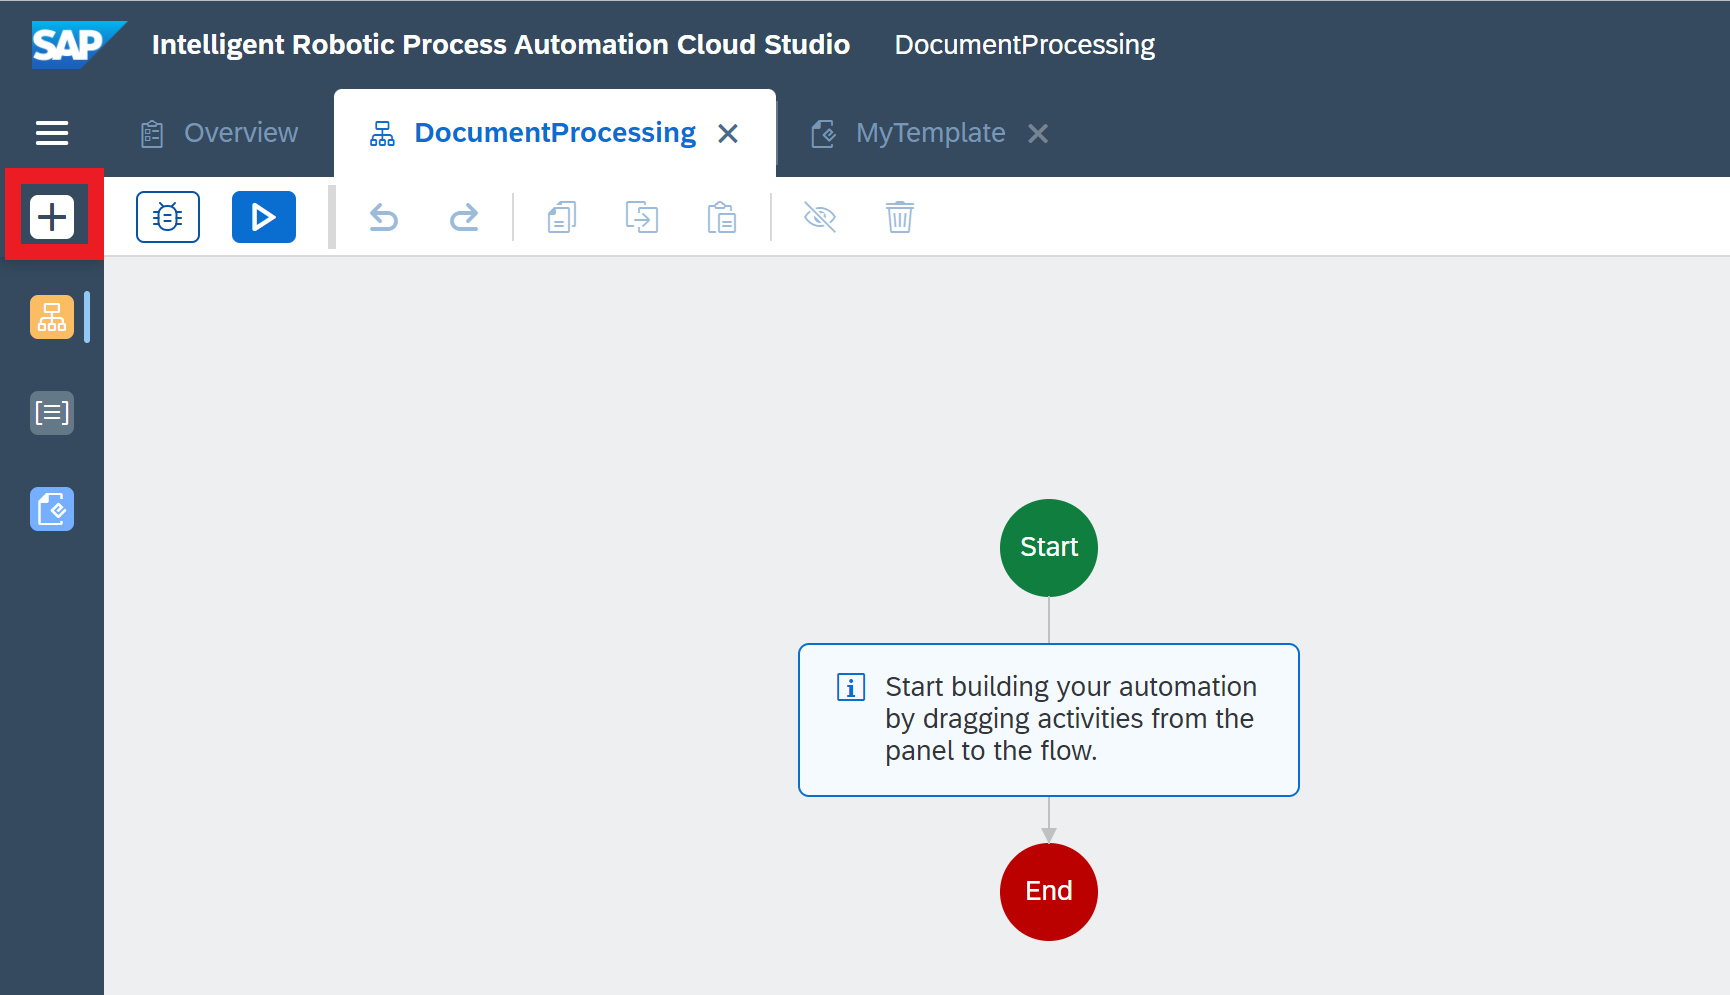
Access options in Cloud Studio
Then, select Create and Document Template.

Document Template
In the subsequent window, you have a few options with selecting pre-built templates and schemas. For today, proceed with creating a new template and select an appropriate file for training. I am using Sample Invoice 2 from this tutorial found on the SAP Developer Center.
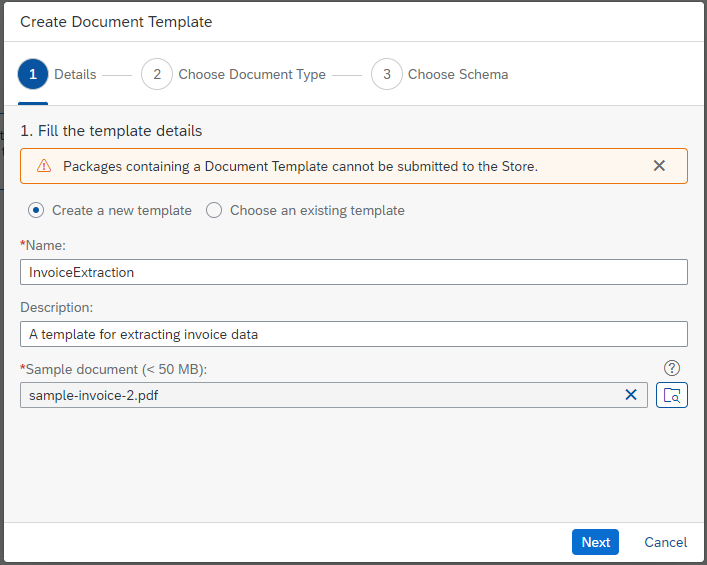
Give your template a name, description and supply a sample document
Select the Document Type - in this case, it is an invoice.

Select Invoice as the document type.
Finally, proceed with using the pre-built schema. For custom documents, select Create New to create a schema for the header and line items you require. Once completed, select Add.

Chose an existing schema, or create a new one if using custom documents
In the following pop-up, select Open in new tab - this will open the Document Information Extraction UI.

Open the Document Information Extraction UI
Annotate your Template in the Document Information Extraction UI
The next step is annotating the required fields from your template document, which can be done through Document Information Extraction UI. Select your document and press Annotations to open the line items for your document.

Select the template document and choose Annotations.
Then press Edit to begin annotating the relevant fields in your document - drag and highlight a portion of the document and match it with a header or line item. Once completed, press Save and Activate to make the template available for your automations.

Press Activate to make this template available for use.
The template is now visible in Cloud Studio. Navigate to Document Templates to view all available templates and their annotations.

Access Document Templates to view your available templates.
Retrieving Attachments from Outlook
To start creating an automation, navigate to the '+' icon and select Create, then Automation.

Create a new Automation
The first phase of the automation is to retrieve and save attachments from an Outlook email. To accomplish this in SAP Intelligent RPA, add the Outlook SDK as a project dependency (if this is your first time using the Outlook SDK, you can acquire it in the SAP Intelligent RPA Factory store).

Add the Outlook SDK to your project to work emails and calendars
Insert the following Outlook workflow activities to open, filter and retrieve attachments.
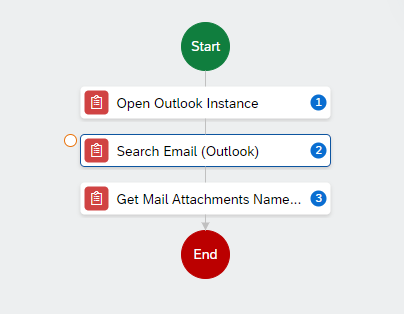
Add the following workflow activities
We would like to retrieve attachments from emails that match a specific criterion. In this example, as the invoice is a purchase order from Apple, we can narrow our search to include ‘Apple Store Invoice’ as the email subject.
In the ‘Search Email (Outlook)’ step, enter the following parameters in the ‘searchCriterionList’. Additional criteria can also be added to increase robustness (such as filtering by sender name or date received).

Add the following searchCriteria to find a specific email in your inbox - in this case, an invoice from Apple
With three simple steps, we can now search through Outlook and retrieves attachments from an email based on a criterion.
The next step is to iterate through those attachments and save them to a local folder. Navigate to Controls, select the For Each component, and insert this in the workflow. Within this step, set the iterable to be the attachmentNamesList from step three.
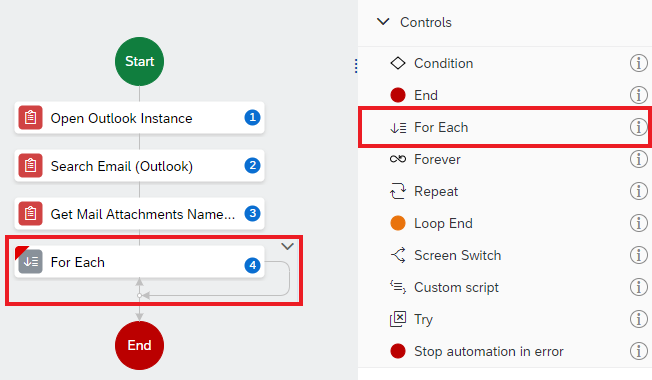
Add the For Each control to your workflow
Proceed with saving attachments by using the Save Mail Attachment (Outlook) activity. Enter a path to a local folder in the destinationPath and set the current attachment name to the attachmentFileName.

Save attachments to a local folder
Great! We have now extended our automation to save Outlook attachments to a local folder. The next phase is to retrieve these saved attachments and submit them to Document Information Extraction.
Submit Attachments to Document Information Extraction
The activity for calling Document Information Extraction requires a path to the file, and this path can be generated using a custom script. Insert a custom script control as step six and enter the following JavaScript code:
const path = '{enter your attachments folder path}';

return path + input;
Ensure you also add input and output parameters for the custom script.

Add input and output parameters for the script
Once saved, update the input and output parameters.
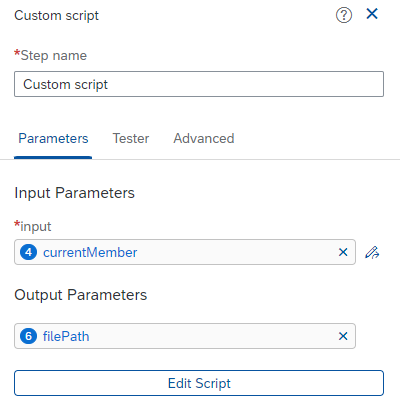
Update the input and output parameters
Next, insert the Extract Data With Template activity as step seven and set the Document Template to be our previously created template. Update the documentPath parameter with the filePath generated by our JavaScript code.
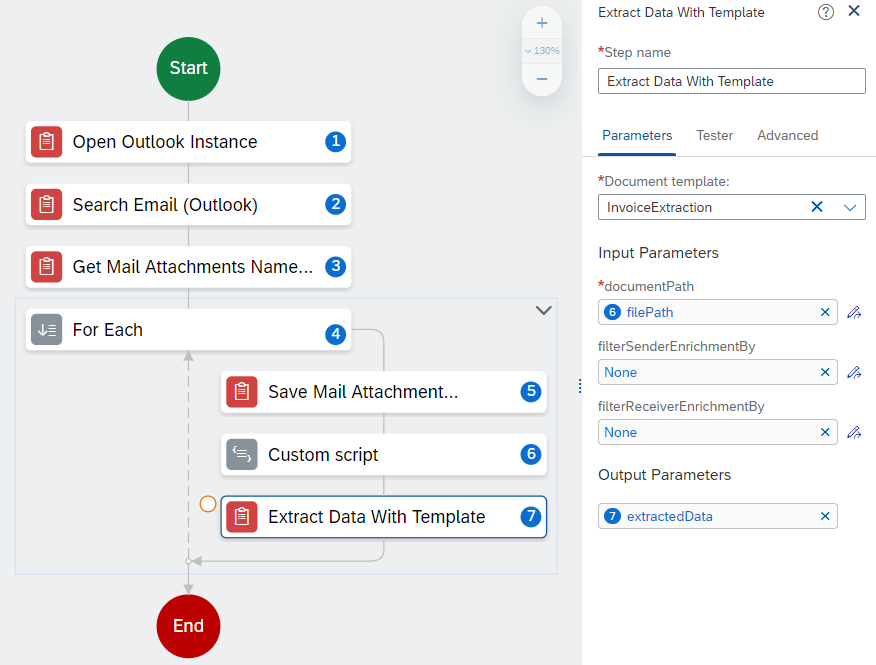
Add the Extract Data with Template activity to submit the current attachment for processing
With this completed, our automation is updated with the capability of submitting saved attachments to Document Information Extraction.
Testing the Automation
To test the automation, email yourself a copy of the document you’d like to process (ensure the email subject conforms to your automation’s search criteria). Add a ‘Log Message’ activity in your workflow as step eight, with extractedData as the message. Click Save and then run the automation. The test console should update with the extracted fields.
Posting Data to an API Endpoint (Nodejs Server Example)
The final phase of this automation is posting extracted data to an external system. Ideally, we’d like to do something extra with the data we’ve retrieved, such as storing it for reporting or performing some additional analytics. In SAP Intelligent RPA, we can accomplish this by using Call Web Service to send our data to an external system for further work.
To simulate an external service, I used a NodeJS server using Express (a framework that generates boilerplate code required for a Node server). Within your express application, add a new route in the routes folder called irpa.js, and enter the following code:
var express = require('express');

var router = express.Router();


router.post('/', function(req, res) {

    console.log(req.body.input.lineItemFields);

    res.end();

});


module.exports = router;
Then, add the following lines to app.js:
var irpa = require('./routes/irpa.js');

app.use('/irpa/', irpa);
Back in Cloud Studio, place a custom script as step nine and enter the following code:
const options = {

    responseType: 'json',

    url: 'http://localhost:3000/irpa',

    method: 'POST',

    headers: {

        'Accept':'application/json',

        'Content-Type':'application/json'

    },

    body : JSON.stringify({input})

};


return options;
Ensure you update the input and output parameters for this step as well. Finally, add a Call Web Service activity that uses the generated options to perform a POST request to our Node server.

Add the Call Web Service activity to execute the POST request
With this step completed, the full end-to-end automation is ready to be tested!
Testing the Final Workflow (Nodejs Server Example)
To test the complete workflow, open a command line session in your Nodejs directory. Use ‘npm init’ to install dependencies and ‘npm start’ to begin the server. Run the complete automation in Cloud Studio. If everything works as intended, there should be an output to your command line session with the extracted data – from here, it’s up to you on how you want to process the data further!
Conclusion
In this blog post, I have shown that SAP Intelligent RPA can simplify the Document Information Extraction process, with the ability to send extracted data to an external service (simulated with Nodejs).
There are numerous applications for such a workflow. For example (based on my original use-case), we can now automatically collect electricity usage data from invoices and send this to an emissions management platform, such as SAP Environment, Health and Safety management. This can further assist companies with meeting and exceeding their sustainability goals.
Thank you for reading this blog post – please try the steps for creating this automation for yourself and leave a comment to share your experience, thoughts or to ask any questions.
- SAP Managed Tags:
- SAP Intelligent Robotic Process Automation,
- Document Information Extraction,
- Sustainability
Labels:
5 Comments
You must be a registered user to add a comment. If you've already registered, sign in. Otherwise, register and sign in.
Labels in this area
-
ABAP CDS Views - CDC (Change Data Capture)
2 -
AI
1 -
Analyze Workload Data
1 -
BTP
1 -
Business and IT Integration
2 -
Business application stu
1 -
Business Technology Platform
1 -
Business Trends
1,661 -
Business Trends
88 -
CAP
1 -
cf
1 -
Cloud Foundry
1 -
Confluent
1 -
Customer COE Basics and Fundamentals
1 -
Customer COE Latest and Greatest
3 -
Customer Data Browser app
1 -
Data Analysis Tool
1 -
data migration
1 -
data transfer
1 -
Datasphere
2 -
Event Information
1,400 -
Event Information
65 -
Expert
1 -
Expert Insights
178 -
Expert Insights
280 -
General
1 -
Google cloud
1 -
Google Next'24
1 -
Kafka
1 -
Life at SAP
784 -
Life at SAP
11 -
Migrate your Data App
1 -
MTA
1 -
Network Performance Analysis
1 -
NodeJS
1 -
PDF
1 -
POC
1 -
Product Updates
4,577 -
Product Updates
330 -
Replication Flow
1 -
RisewithSAP
1 -
SAP BTP
1 -
SAP BTP Cloud Foundry
1 -
SAP Cloud ALM
1 -
SAP Cloud Application Programming Model
1 -
SAP Datasphere
2 -
SAP S4HANA Cloud
1 -
SAP S4HANA Migration Cockpit
1 -
Technology Updates
6,886 -
Technology Updates
408 -
Workload Fluctuations
1
Related Content
- ABAP Cloud Developer Trial 2022 Available Now in Technology Blogs by SAP
- Hack2Build on Business AI – Highlighted Use Cases in Technology Blogs by SAP
- New Machine Learning features in SAP HANA Cloud in Technology Blogs by SAP
- SAP HANA Cloud Vector Engine: Quick FAQ Reference in Technology Blogs by SAP
- Receive a notification when your storage quota of SAP Cloud Transport Management passes 85% in Technology Blogs by SAP
Top kudoed authors
| User | Count |
|---|---|
| 13 | |
| 11 | |
| 10 | |
| 9 | |
| 9 | |
| 7 | |
| 6 | |
| 5 | |
| 5 | |
| 5 |