
- SAP Community
- Products and Technology
- Technology
- Technology Blogs by SAP
- Creation and Use of Change Documents in Solution D...
Technology Blogs by SAP
Learn how to extend and personalize SAP applications. Follow the SAP technology blog for insights into SAP BTP, ABAP, SAP Analytics Cloud, SAP HANA, and more.
Turn on suggestions
Auto-suggest helps you quickly narrow down your search results by suggesting possible matches as you type.
Showing results for
former_member76
Explorer
Options
- Subscribe to RSS Feed
- Mark as New
- Mark as Read
- Bookmark
- Subscribe
- Printer Friendly Page
- Report Inappropriate Content
11-04-2021
8:18 AM
What is a Change Document?
Change documents are change transactions that reflect the change process during development, testing, and implementation. They pass through a series of defined statuses and document the activities of the users that are involved, for example, developers, testers, and system administrators.
Depending on what should be changed, you select the appropriate change document type. If one or more change document types were defined in the scope of a request for change, the change documents are created automatically when the request for change is released to development.
Types of Change Document
Normal Change
Standard Change
Urgent Change
Administrative Change
General Change
How to create Change Document and assign it in Solution Documentation?
At first you will be needing a branch which should be under Change Control. To activate Change Control, no changes should be in that branch. So, if there are, release or discard them. If Change Control is enabled, then no change without a Change Document / Work Item is possible.
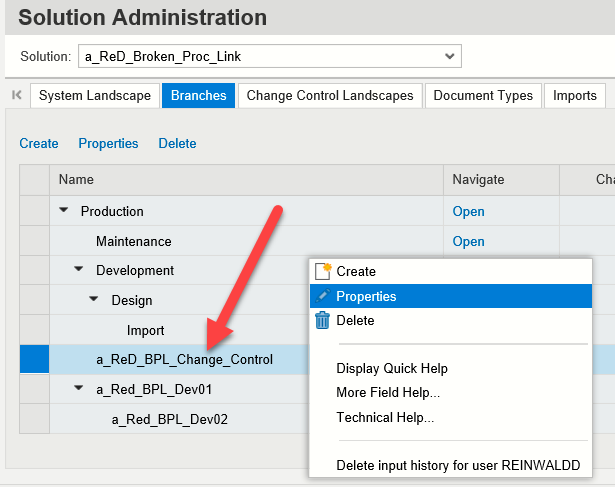
In transaction SOLADM right click as shown below:
You will get the below popup:
To create a Change Document, you need a Change Cycle. This Change Cycle refers to a branch. To create such entities, use transaction SM_CRM.
Lifecycle of a General Change Document
To conclude, a change document is a transaction that documents the activities of the users that are involved in the change process, for example, developers, testers, and system administrators. A change document is created automatically by the system when a change manager or another employee responsible approves a request for change, and the status is set to “Being Implemented".
Change Document functionality allows you to track the changes of Solution Documentation artifacts including all the relevant information like the changed objects, old & new values, date & time of change along with the person who made the changes.
In the work steps following the approval of the request for change, the change document forms the operational basis for developers, testers, and IT administrators. The document passes through a series of statuses, which depend on the type of the change document.
Change documents are change transactions that reflect the change process during development, testing, and implementation. They pass through a series of defined statuses and document the activities of the users that are involved, for example, developers, testers, and system administrators.
Depending on what should be changed, you select the appropriate change document type. If one or more change document types were defined in the scope of a request for change, the change documents are created automatically when the request for change is released to development.
Types of Change Document
Normal Change
Standard Change
Urgent Change
Administrative Change
General Change
How to create Change Document and assign it in Solution Documentation?
At first you will be needing a branch which should be under Change Control. To activate Change Control, no changes should be in that branch. So, if there are, release or discard them. If Change Control is enabled, then no change without a Change Document / Work Item is possible.
In transaction SOLADM right click as shown below:
You will get the below popup:

To create a Change Document, you need a Change Cycle. This Change Cycle refers to a branch. To create such entities, use transaction SM_CRM.
- Change Documents can be created from SolDoc directly or from running transaction CRM_UI from the hotfix system
- Enter transaction CRM_UI
- Select Business Role - SOLMANPRO-Solution Manager ITSM

- If you want to create from SolDoc click on “Go to change document”

- For a Change Document to be created you need to first create a Change Cycle
- Click on Change Request Management from left pane and Create -> Change Cycle

- Select Continual Cycle in the pop up displayed
- Enter Description or change cycle name
- Select the Solution and Branch for which you need to create a Change Document
- Save and note down the change cycle number which is ID

- Click on Change Request Management again from the left pane
- Create -> General Change to create a Change Document
- Select General Change in the pop up displayed
- Enter Change Document name in Description field
- Open Change cycle/Phase field using F4 help/input help icon provided

- Enter Change cycle ID and select the displayed change cycle

- Open Configuration Item field

- Click on Search and select a random value. You may select the first one.

- Open Current Processor field and enter your user id.

- You can assign Developer, Tester and provide access to other users who want to access this Change Document. Based on the assigned users the Change Document can be accessed in SolDoc and changes to Process and Diagrams can be made and released.
- Save the Change Document and it will be created

- Open the SolDoc Solution and Branch where you have created this Change Document or refresh the already opened SolDoc session and you can see the newly created Change Document.

Lifecycle of a General Change Document
Depending on the type of change, the processor who is responsible selects the change document in his or her worklist or in the Web Client UI search. It has the status
Created
.
The processor documents that he or she is making the change by choosing
Actions
>Set to > "In Process
in the change document.
Once the processor has made the change, he or she releases it for testing and chooses
Actions
>Pass General Change to Test
The processor documents the change and the successful test and sets the status by choosing >
Actions
>Set to “To be Documented
. Following that, the processor enters the reporting person as the next processor in the change document. If the change is not ready, the processor can reset the document toIn Process
underActions
, and test it again later.
The reporting person chooses >
Actions
>Set to “Change Analysis
to check whether the changes were made according to the requirements.
If the change was successful, he or she chooses >
Actions
>Confirm General Change
. The process is thus complete and the general change has the statusConfirmed
.
If the change was not successful, he or she chooses
Actions
>Failed
.
In case of a failed modification, it is possible to search for an alternative solution. To do so, the processor chooses
Actions
>Set to “Restore Source
.
The processor marks the change as canceled by choosing
Actions
>Set to “Canceled
.
The change document is closed and cannot be edited further.
To conclude, a change document is a transaction that documents the activities of the users that are involved in the change process, for example, developers, testers, and system administrators. A change document is created automatically by the system when a change manager or another employee responsible approves a request for change, and the status is set to “Being Implemented".
Change Document functionality allows you to track the changes of Solution Documentation artifacts including all the relevant information like the changed objects, old & new values, date & time of change along with the person who made the changes.
In the work steps following the approval of the request for change, the change document forms the operational basis for developers, testers, and IT administrators. The document passes through a series of statuses, which depend on the type of the change document.
Important Links and Resources
- SAP Managed Tags:
- SAP Solution Manager,
- SOLMAN Change Control Management,
- SOLMAN Process Management
Labels:
You must be a registered user to add a comment. If you've already registered, sign in. Otherwise, register and sign in.
Labels in this area
-
ABAP CDS Views - CDC (Change Data Capture)
2 -
AI
1 -
Analyze Workload Data
1 -
BTP
1 -
Business and IT Integration
2 -
Business application stu
1 -
Business Technology Platform
1 -
Business Trends
1,661 -
Business Trends
87 -
CAP
1 -
cf
1 -
Cloud Foundry
1 -
Confluent
1 -
Customer COE Basics and Fundamentals
1 -
Customer COE Latest and Greatest
3 -
Customer Data Browser app
1 -
Data Analysis Tool
1 -
data migration
1 -
data transfer
1 -
Datasphere
2 -
Event Information
1,400 -
Event Information
64 -
Expert
1 -
Expert Insights
178 -
Expert Insights
273 -
General
1 -
Google cloud
1 -
Google Next'24
1 -
Kafka
1 -
Life at SAP
784 -
Life at SAP
11 -
Migrate your Data App
1 -
MTA
1 -
Network Performance Analysis
1 -
NodeJS
1 -
PDF
1 -
POC
1 -
Product Updates
4,577 -
Product Updates
326 -
Replication Flow
1 -
RisewithSAP
1 -
SAP BTP
1 -
SAP BTP Cloud Foundry
1 -
SAP Cloud ALM
1 -
SAP Cloud Application Programming Model
1 -
SAP Datasphere
2 -
SAP S4HANA Cloud
1 -
SAP S4HANA Migration Cockpit
1 -
Technology Updates
6,886 -
Technology Updates
403 -
Workload Fluctuations
1
Related Content
- SAP Document and Reporting Compliance - 'Colombia' - Contingency Process in Technology Blogs by SAP
- CIG transaction tracker handling in Technology Q&A
- SAP Enable Now setup in Technology Blogs by Members
- Comprehensive Guideline to SAP VMS in Technology Blogs by Members
- Data Flows - The Python Script Operator and why you should avoid it in Technology Blogs by Members
Top kudoed authors
| User | Count |
|---|---|
| 12 | |
| 10 | |
| 10 | |
| 7 | |
| 7 | |
| 7 | |
| 6 | |
| 6 | |
| 5 | |
| 4 |