
- SAP Community
- Products and Technology
- Financial Management
- Financial Management Blogs by SAP
- A simple dashboard using SAP CPQ's Custom Table AP...
Financial Management Blogs by SAP
Get financial management insights from blog posts by SAP experts. Find and share tips on how to increase efficiency, reduce risk, and optimize working capital.
Turn on suggestions
Auto-suggest helps you quickly narrow down your search results by suggesting possible matches as you type.
Showing results for
Product and Topic Expert
Options
- Subscribe to RSS Feed
- Mark as New
- Mark as Read
- Bookmark
- Subscribe
- Printer Friendly Page
- Report Inappropriate Content
10-28-2021
7:38 PM
This blog post will give you an overview of how you can make use of CPQ's Custom Table API to build your own custom dashboard using python programming.
Use case:
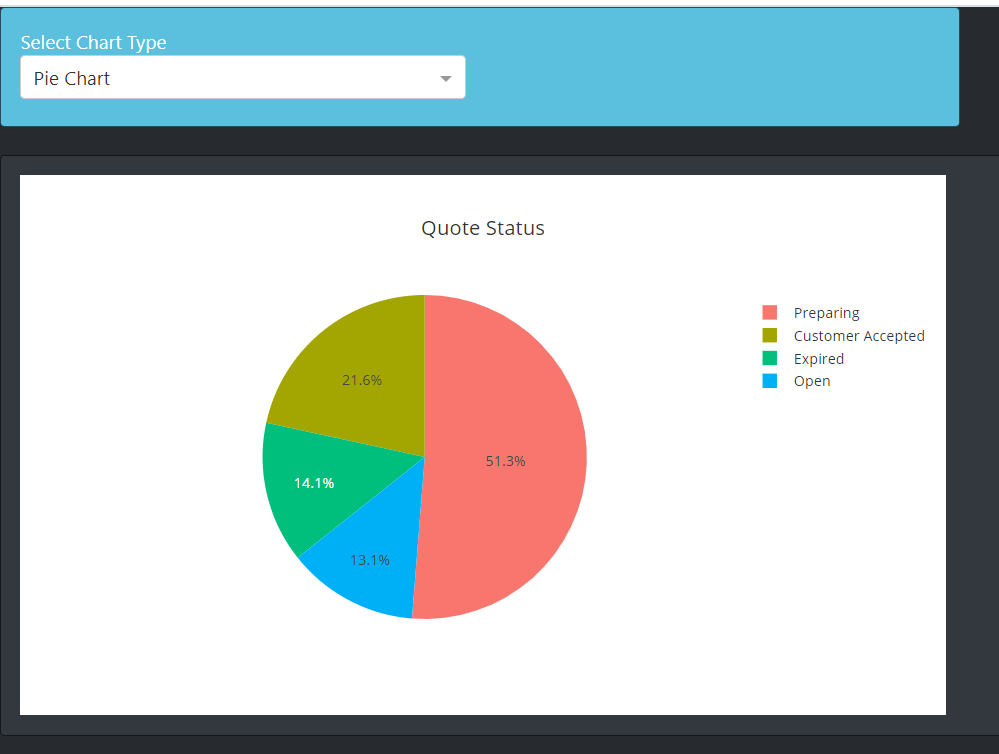
Consider a simple use case wherein we have a list of of quotes stored in some custom table and the requirement is to create a graphical representation for the total count of quotes for each status. So we will be using a bar and a pie chart for this example.
The blog post will be divided into 3 sections:
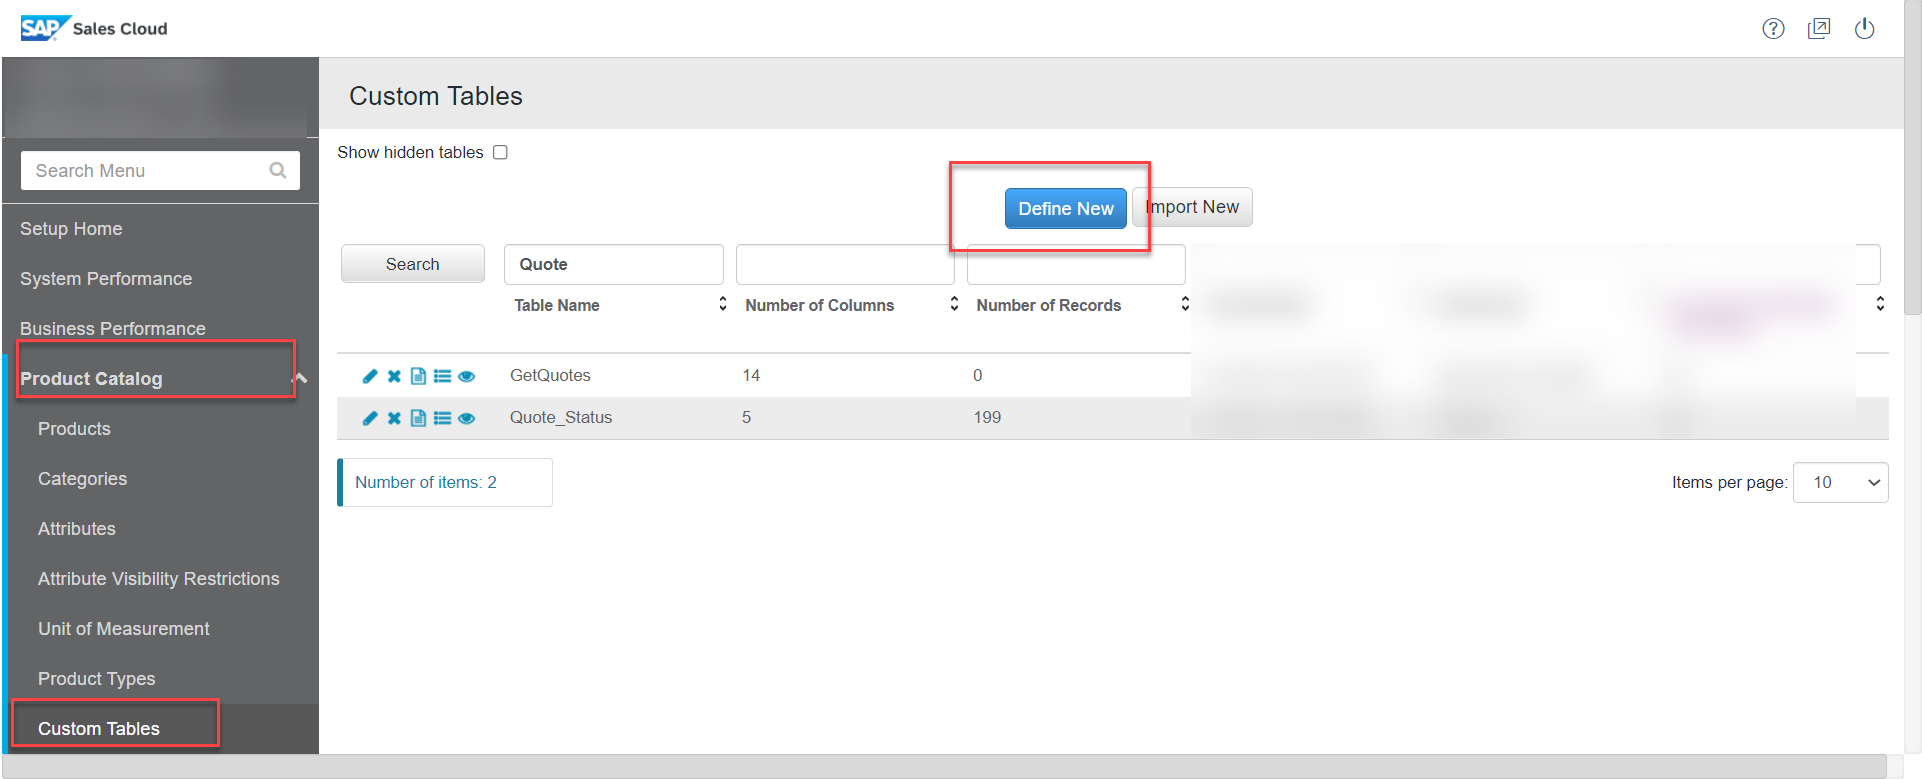
For this example to work we will need to create a custom table which holds the list of quotes along with it's status. Create a custom table by the name Quote_Status.
Go to Setup ->Product Catalog->Custom Tables and Define a new table
The table structure should be as shown below.
Download the below data set and save it as a .xls or .xlsx file. Then import the same into the newly created Quote_Status table.
The below link has a demonstration of how you can create a custom table in CPQ
https://microlearning.opensap.com/media/How+to+Create+Custom+Tables+-+SAP+CPQ/1_qie9hpkd
Once the custom table has been created and loaded with quote information, the next step is to build and deploy the python app.
Below is the python app that will be used make REST API call to CPQ and also to design the UI for the dashboard. Download and save the below code as App.py
Please note that you have to provide your SAP CPQ tenant's url ,domain and credentials(basic auth with rest api user) in the App.py file before pushing this app to SAP BTP.
We get the custom table data using the below API endpoint in our python code.
/api/custom-table/v1/customTables/Quote_Status/entries
In order to deploy this app to SAP BTP you will need 4 other files along with the App.py file.
All of these files will have to be saved in the same directory as the App.py file.
Save the below as Procfile
Save the below as manifest.yaml
Save the below as requirements.txt
Save the below as runtime.txt
Once you're done you should be able to see all your files in the same folder, something like this as shown below. I've saved all my files under the directory CPQ_QuoteStatus_Dropdown. Now that you have all the required files we can now push this to SAP BTP.
cf login
cf push quote-status-dash
Once successfully hosted, you can login to your SAP BTP cockpit and check if the app is up and running. Once the app is deployed successfully you should get an Application route url.
Click on the above link and you should be able to view your dashboard.
We were able to successfully build a simple dashboard by making use of SAP CPQ's custom table API and a python app which was hosted on SAP's BTP.
Please drop in your comments, questions if any and also share your feedback. Thanks for reading and happy learning.

Use case:
Consider a simple use case wherein we have a list of of quotes stored in some custom table and the requirement is to create a graphical representation for the total count of quotes for each status. So we will be using a bar and a pie chart for this example.
Prerequisites:
- SAP Business Technology Platform(BTP) Account
- SAP Cloud Foundry CLI
- SAP CPQ user. I have used the CPQ sandbox tenant for this example
The blog post will be divided into 3 sections:
- Creating custom table in CPQ
- Creating a python app to make REST API calls
- Host app in SAP BTP
Creating a custom table in CPQ
For this example to work we will need to create a custom table which holds the list of quotes along with it's status. Create a custom table by the name Quote_Status.
Go to Setup ->Product Catalog->Custom Tables and Define a new table
The table structure should be as shown below.

Download the below data set and save it as a .xls or .xlsx file. Then import the same into the newly created Quote_Status table.
QUOTENUMBER,STATUS

1234,Preparing

1235,Preparing

1236,Preparing

1237,Preparing

1238,Preparing

1239,Preparing

1240,Preparing

1241,Preparing

1242,Preparing

1243,Preparing

1244,Preparing

1245,Preparing

1246,Preparing

1247,Preparing

1248,Preparing

1249,Preparing

1250,Preparing

1251,Preparing

1252,Preparing

1253,Preparing

1254,Preparing

1255,Preparing

1256,Preparing

1257,Preparing

1258,Preparing

1259,Preparing

1260,Preparing

1261,Preparing

1262,Preparing

1263,Preparing

1264,Preparing

1265,Preparing

1266,Preparing

1267,Preparing

1268,Preparing

1269,Preparing

1270,Preparing

1271,Preparing

1272,Preparing

1273,Preparing

1274,Preparing

1275,Preparing

1276,Preparing

1277,Preparing

1278,Preparing

1279,Preparing

1280,Preparing

1281,Preparing

1282,Preparing

1283,Preparing

1284,Preparing

1285,Preparing

1286,Preparing

1287,Preparing

1288,Preparing

1289,Preparing

1290,Preparing

1291,Preparing

1292,Preparing

1293,Preparing

1294,Preparing

1295,Preparing

1296,Preparing

1297,Preparing

1298,Preparing

1299,Preparing

1300,Preparing

1301,Preparing

1302,Preparing

1303,Preparing

1304,Preparing

1305,Preparing

1306,Preparing

1307,Preparing

1308,Preparing

1309,Preparing

1310,Preparing

1311,Preparing

1312,Preparing

1313,Preparing

1314,Preparing

1315,Preparing

1316,Preparing

1317,Preparing

1318,Preparing

1319,Preparing

1320,Preparing

1321,Preparing

1322,Preparing

1323,Preparing

1324,Preparing

1325,Preparing

1326,Preparing

1327,Preparing

1328,Preparing

1329,Preparing

1330,Preparing

1331,Preparing

1332,Preparing

1333,Preparing

1334,Preparing

1335,Preparing

1336,Customer Accepted

1337,Customer Accepted

1338,Customer Accepted

1339,Customer Accepted

1340,Customer Accepted

1341,Customer Accepted

1342,Customer Accepted

1343,Customer Accepted

1344,Customer Accepted

1345,Customer Accepted

1346,Customer Accepted

1347,Customer Accepted

1348,Customer Accepted

1349,Customer Accepted

1350,Customer Accepted

1351,Customer Accepted

1352,Customer Accepted

1353,Customer Accepted

1354,Customer Accepted

1355,Customer Accepted

1356,Customer Accepted

1357,Customer Accepted

1358,Customer Accepted

1359,Customer Accepted

1360,Customer Accepted

1361,Customer Accepted

1362,Customer Accepted

1363,Customer Accepted

1364,Customer Accepted

1365,Customer Accepted

1366,Customer Accepted

1367,Customer Accepted

1368,Customer Accepted

1369,Customer Accepted

1370,Customer Accepted

1371,Customer Accepted

1372,Customer Accepted

1373,Customer Accepted

1374,Customer Accepted

1375,Customer Accepted

1376,Customer Accepted

1377,Customer Accepted

1378,Customer Accepted

1379,Expired

1380,Expired

1381,Expired

1382,Expired

1383,Expired

1384,Expired

1385,Expired

1386,Expired

1387,Expired

1388,Expired

1389,Expired

1390,Expired

1391,Expired

1392,Expired

1393,Expired

1394,Expired

1395,Expired

1396,Expired

1397,Expired

1398,Expired

1399,Expired

1400,Expired

1401,Expired

1402,Expired

1403,Expired

1404,Expired

1405,Expired

1406,Expired

1407,Open

1408,Open

1409,Open

1410,Open

1411,Open

1412,Open

1413,Open

1414,Open

1415,Open

1416,Open

1417,Open

1418,Open

1419,Open

1420,Open

1421,Open

1422,Open

1423,Open

1424,Open

1425,Open

1426,Open

1427,Open

1428,Open

1429,Open

1430,Open

1431,Open

1432,Open
The below link has a demonstration of how you can create a custom table in CPQ
https://microlearning.opensap.com/media/How+to+Create+Custom+Tables+-+SAP+CPQ/1_qie9hpkd
Creating a python app to design the UI and make API calls
Once the custom table has been created and loaded with quote information, the next step is to build and deploy the python app.
Below is the python app that will be used make REST API call to CPQ and also to design the UI for the dashboard. Download and save the below code as App.py
from dash_bootstrap_components._components.Card import Card

import pandas as pd

from collections import Counter

from dash import html,dcc

from dash.dependencies import Input, Output

import plotly.express as px

import requests

import json

import dash

import dash_bootstrap_components as dbc

from jupyter_dash import JupyterDash

from flask import request

import os


tenant_url='YOUR_TENANT_URL'

cf_port = os.getenv("PORT")


data = {

    "username":'YOUR_USER_NAME',

    #DO_NOT_CHANGE THE value of GRANT_TYPE. The value has to be 'password' and NOT your password

    "grant_type":"password",

    "password":'YOUR_PASSWORD',

    "domain":'YOUR_DOMAIN'


}

#Get API token using basic auth

def getApiToken():

    base_url=tenant_url+"/basic/api/token"

    #my_headers={"Authorization" : "Bearer "+token}

    r= requests.post(base_url, data=data)

    response= json.loads(r.text)

    #print(response['access_token'])

    access_token=response['access_token']

    # print(jwt_token)

    return access_token


api_token=getApiToken()


#Get JWT token using api token

def getJWT(token):

    base_url=tenant_url+"/api/rd/v1/core/GenerateJWT"

    my_headers={"Authorization" : "Bearer "+token}

    r= requests.post(base_url, headers=my_headers)

    response= json.loads(r.text)

    jwt_token=response['token']

    #print(jwt_token)

    return jwt_token


jwt_token=getJWT(api_token)

#print('Jwt Token is : ' +jwt_token)


#Quote_Status is the name of the custom table that was created in CPQ

#Ensure the table has data

# use the jwt token to get data from custom table

base_url = tenant_url+"/api/custom-table/v1/customTables/Quote_Status/entries"

# #my_headers = {"Authorization" : "Bearer "+jwt_token}

my_headers = {"Authorization" : jwt_token}

response = requests.get(base_url, headers=my_headers)

data = json.loads(response.text)

print(data)


cnt = Counter()

for i in data['value']:

    cnt[i['STATUS']] += 1


df=pd.DataFrame(cnt.items(),columns=['Status', 'Count'])

print(df)

app = JupyterDash(external_stylesheets=[dbc.themes.SLATE])


#----------------------------------APP LAYOUT---------------------------#

app.layout = html.Div([

        dbc.Card(

        [


        dbc.CardBody(

            [

        dbc.Row([

                dbc.Col([html.Label(['Select Chart Type'],style={"font-size":"200 px", "color":"white"}),

        dcc.Dropdown(

            id='my_dropdown',

            options=[

                     {'label': 'Bar Chart', 'value':'Bar Chart' },

                     {'label': 'Pie Chart', 'value': 'Pie Chart'},


            ],

            value='Bar Chart',

            multi=False,

            clearable=False,

            style={"width": "100%","color":"black"},


        )], width=6, align='start', style={"font-size":"200 px","height":"30px"})   ,


    ])

        ])]


        ,style={"width": "50%", "height":"100px"}, color='info', inverse=True),

    html.Br(),

    html.Div([

        dbc.Card(

        dbc.CardBody([

        dbc.Row([

                dbc.Col([

                    dcc.Graph(id='the_graph')

                ], width=6)

    ])

        ])

        )

    ])

])


#----------------------------------------App Callback Decorators--------------------------------------#


@app.callback(

    Output(component_id='the_graph', component_property='figure'),

    [Input(component_id='my_dropdown', component_property='value')]

)

def update_output_div(my_dropdown):

    if my_dropdown:

        if my_dropdown == 'Pie Chart':

            piechart=px.pie(

                        df, values=df.Count, names=df.Status, title='Quote Status'

                    ).update_layout(

                        template='ggplot2'

                    )

            return piechart


        elif my_dropdown == 'Bar Chart':

            barchart=px.bar(

                        df, x=df.Count, y=df.Status, title='Quote Status'

                    ).update_layout(

                        template='ggplot2'

                    )

            return barchart

    else:

        return  dash.no_update, dash.no_update


if __name__ == '__main__':

	if cf_port is None:

		app.run_server(host='0.0.0.0', port=5000, debug=True)

	else:

		app.run_server(host='0.0.0.0', port=int(cf_port), debug=True)
Please note that you have to provide your SAP CPQ tenant's url ,domain and credentials(basic auth with rest api user) in the App.py file before pushing this app to SAP BTP.
We get the custom table data using the below API endpoint in our python code.
/api/custom-table/v1/customTables/Quote_Status/entries
In order to deploy this app to SAP BTP you will need 4 other files along with the App.py file.
- Procfile
- manifest.yaml
- requirements.txt
- runtime.txt
All of these files will have to be saved in the same directory as the App.py file.
Save the below as Procfile
web: python App.pySave the below as manifest.yaml
applications:

- name: quote-status-dash

  random-route: true

  memory: 1024M

  command: python App.py

  timeout: 300
Save the below as requirements.txt
pandas

dash

plotly

requests

dash_auth

jupyter_dash

flask

dash_bootstrap_components
Save the below as runtime.txt
3.xOnce you're done you should be able to see all your files in the same folder, something like this as shown below. I've saved all my files under the directory CPQ_QuoteStatus_Dropdown. Now that you have all the required files we can now push this to SAP BTP.

Host app in SAP BTP
Go to the directory/folder where you have saved the above files using your command line or code editor(like VS Code) and login to your CF using your email id and password.
cf login

Push the app to SAP BTP using the below command
cf push quote-status-dash

Once successfully hosted, you can login to your SAP BTP cockpit and check if the app is up and running. Once the app is deployed successfully you should get an Application route url.

Click on the above link and you should be able to view your dashboard.

Conclusion:
We were able to successfully build a simple dashboard by making use of SAP CPQ's custom table API and a python app which was hosted on SAP's BTP.
Please drop in your comments, questions if any and also share your feedback. Thanks for reading and happy learning.
- SAP Managed Tags:
- API,
- Python,
- SAP BTP, Cloud Foundry runtime and environment,
- SAP CPQ
Labels:
2 Comments
You must be a registered user to add a comment. If you've already registered, sign in. Otherwise, register and sign in.
Labels in this area
Related Content
- SAP ECC Conversion to S/4HANA - Focus in CO-PA Costing-Based to Margin Analysis in Financial Management Blogs by SAP
- What’s New in S/4HANA 2023 for IS-Oil and Gas in Financial Management Blogs by Members
- How to access Model Table in CPE environment of SCT in Financial Management Q&A
- Think Twice: The Pitfalls of Outsourcing SAP GRC Reporting to External Analytics Tools in Financial Management Blogs by Members
- GRC Tuesdays: Hidden Gems - Risk Assessment from Qualitative to Quantitative and Everything In-Between in Financial Management Blogs by SAP
Top kudoed authors
| User | Count |
|---|---|
| 5 | |
| 3 | |
| 2 | |
| 1 | |
| 1 | |
| 1 | |
| 1 | |
| 1 | |
| 1 | |
| 1 |