
- SAP Community
- Products and Technology
- Enterprise Resource Planning
- ERP Blogs by SAP
- Clock In Clock Out in SAP SuccessFactors Time Trac...
Enterprise Resource Planning Blogs by SAP
Get insights and updates about cloud ERP and RISE with SAP, SAP S/4HANA and SAP S/4HANA Cloud, and more enterprise management capabilities with SAP blog posts.
Turn on suggestions
Auto-suggest helps you quickly narrow down your search results by suggesting possible matches as you type.
Showing results for
Product and Topic Expert
Options
- Subscribe to RSS Feed
- Mark as New
- Mark as Read
- Bookmark
- Subscribe
- Printer Friendly Page
- Report Inappropriate Content
10-12-2021
9:59 AM
Hello SAP SuccessFactors Time Management Community,
let me introduce the new Clock In Clock Out feature of SAP SuccessFactors Time Tracking we have build for you in the H2 2021 release. This blog post will help you to understand how the solution works and what steps need to be done to set it up.
Table of content:
The new Clock In Clock Out feature in SAP SuccessFactors Time Tracking is a powerful and easy-to-use application that enables customers to track employees' times, recorded via a clock terminal or our web/mobile quick punch action.
The feature is seamlessly integrated with the existing Time Sheet processes. With this, we close the last gap to cover all relevant steps from the physical punch at the terminal to the payment of the employee.
Of course, role-based permissions and workflows are supported in Clock In Clock Out as well as you already know it from SAP SuccessFactors Employee Central Time Management.
Note: The Clock In Clock Out solution is not available in all data centers yet. To check whether your datacenter already has Clock In Clock Out enabled please check our SAP SuccessFactors Employee Central Time Management community page for the Clock In Clock Out data center rollout plan.
Clock In Clock Out is only available in our SAP SuccessFactors Time Tracking solution. For the basic time sheet solution this is not available.
First, I would like to describe the main entities used in the context of Clock In Clock Out and for what they are used.
A Time Event is a data record, which holds:
The attributes, which describe the Time Event, usually hold some sort of location identifier, sometimes called the 'terminal id' and the purpose of the Time Event, the Time Event Type. Without any other attributes, such a Time Event merely describes the fact 'I was here'.
Those Time Events are typically captured via a physical terminal or by a web or mobile punch application.
A Time Event Pair is a data record created out of two Time Events that are recorded for an employee in sequence, for example for a clock-in at 8 am and a clock-out at 4 pm. The Time Event Pair does not have only the timestamp when something happens, but it holds:
For time management purposes, the Time Event usually holds at least one more attribute to specify what happened: the Time Event Type. Typical Time Event Types are for example:
Many systems work with exactly this set of Time Event Types. Some use less Time Event Types, say, only clock-in and clock-out, others use more Time Event Types depending on the business use cases. Some Time Event Types are irrelevant from a time valuation point of view, like Time Events when entering a specific building. As you know from SAP SuccessFactors Employee Central Time Management, you can configure this also depending on your business needs.
A Time Event Type can be defined as Start (start an activity for the company) or Stop (end an activity for the company) type. More details can be found in the Pairing Engine section.
A Clock In Clock Out group combines a set of Time Event Types. The Clock In Clock Out Group can be assigned to the employees Job Information and is used for:
You could for example define a Clock In Clock Out Group ‘Basic Puncher’ which has only the clock-in and clock-out Time Event Type and a group ‘Consultant Puncher’ which has the Time Event Types clock-in, lunch, business trip and clock-out.
The following diagram visualizes all main entities of Clock In Clock Out and their relation to each other.
There are several ways to record a Time Event in Clock In Clock Out. Based on the source, a Time Event is categorized with a specific entry type to show from where it was created.
As we have now learned what the main entities in Clock In Clock Out are and for what they are used, we can step a little further and look at the main processes of Clock In Clock Out.
The validation engine is executed directly after a new Time Event was recorded. It validates the Time Event for its structural and semantical correctness based on the defined master data (Time Event Type, Clock In Clock Out Groups etc.). The following business validations are executed, for example:
In case an invalid Time Event is created, the system shows a detailed validation error, and the save will be prevented. But when a Time Event is recorded via a physical Terminal, only structural validation will prevent the save. If a business validation fails, the Time Event is saved with a validation error and needs human interaction by a time admin for example. Those mistaken Time Events are highlighted by the validation status and the detailed error in the Time Admin and even in the employees Time Sheet.
For time valuation, we need to transform Time Events with specific Time Event Types into Time Event Pairs with a specific Time Type. Since we usually need two Time Events (like clock-in and clock-out) to combine them into one Time Event Pair, this process is called pairing.
In principle, the pairing arranges individual Time Events on a timeline.
Consequently, all Time Events fall into two major categories: during a period, a person is either:
In standard configurations, there will usually exist several Start Time Events (clock-in, break, short business trip etc.) but only one Stop Time Event (clock-out). This, of course, corresponds to the fact that different Start Time Events can be mapped to different Time Types of the following period, but every Stop Time Event always corresponds to merely the 'not there'-information.
For the automated pairing, the Event attribute in the Time Event Type is important. A Time Event Type can be defined as Start (start an activity for the company) or Stop (end an activity for the company) type.
With the two basic categories, we can lay down the pairing rules for incoming Time Events:
In simple words, the Clock In Clock Out solution in SAP SuccessFactors Time Tracking will always create a Time Event Pair if a valid Time Event is recorded at most 24 hours after a valid Time Event of type Start for the same employee/employment.
Those automatically created Time Event Pairs will be published to SAP SuccessFactors Time Tracking and converted to an External Time Data which will result in a Time Sheet entry.
There might be situations where a Time Event must be created in the past (missing punch) or an already paired Time Event must be deleted (wrong punch). If this happens, the Time Event Pairs must be re-created, and the latest pairing information must be sent to SAP SuccessFactors Time Tracking again.
This could result in:
The following example shows this. Let us assume the following data already exists for Employee A.
The employee clocked in at 8 in the morning and clocked out at 4 in the evening. But Time Events have been successfully paired and 10 hours of working time have been recorded in SAP SuccessFactors Time Tracking.
On the next day, the employee realized that he was for a break from 2 pm until 4 pm but had forgotten to record this break.
Due to the manual correction scenario Clock In Clock Out provides in the Manage Clock In Clock Out and Time Sheet UI this missing punch can be added easily.
The Clock In Clock Out application detects such scenarios that require re-pairing and makes sure that always consistent data will be stored for the employee.
In the example above the system will update the end time of the Time Event Pair 1 from 4 pm to 2 pm and create a new Time Event Pair from 2 pm to 4 pm. This information is immediately sent to SAP SuccessFactors Time Tracking and the External Time Data 1 is also updated with the new end time and a new External Time Data created with time type Break from 2 pm to 4 pm.
If for example, the Break was recorded by mistake and it will be deleted manually, the system detects again that a re-pairing is needed and will do the following.
The system will automatically update the Time Event Pair 1 and External Time Data 1 to end time 4 pm again and it will delete the Time Event Pair 2 and External Time Data 2.
With these automated processes it is always guaranteed that the data in the employee’s Time Sheet corresponds with the Clock In Clock Out data.
To derive the correct Time Type for the External Time Data, the MDF object Clock In Clock Out Time Type Derivation Configuration can be used. With this configuration object, the Time Event Type of the “opening” Time Event of the Time Event Pair defines the Time Type to be used.
For example, you can define that the Time Type “Working Time” should be used each time a Time Event Pair is received that was paired with an opening Time Event using the Time Event Type Clock In.
Or you could define that the Time Type “Break” should be used in case a Time Event Pair is received which was paired with an opening Time Event using the Time Event Type Break.
See section Time Type Derivation for more details.
The Time Type Derivation logic would find the to be used Time Type in the following order:
The next screenshot highlights each step in the end 2 end process from the creation of a time Event (for example via a punch at the terminal) to the generation of the Time Valuation Results.
In the following diagram the pairing engine and time type derivation is illustrated based on a daily work scenario.
In this example, the employee has punched four times on the working day using Clock In (Start), Break (Start) and Clock Out (Stop). This results in:
Clock In Clock Out is part of the SAP SuccessFactors Time Tracking solution. Once you have bought it, the feature must be enabled in provisioning.
To be able to create master data for Clock In Clock Out, the following permissions must be assigned to the admin:
Admin Center -> Manage Permission Roles -> Manage Roles for Clock In Clock Out -> Administrator Permissions
Once this is done, you can navigate to Admin Center -> Configure Clock In Clock Out.
On the first tab, you can maintain the Time Event Types. Here you need to enter the Code, the Event, and the Status. The Title and Description are optional fields.
In the following example, the typical Clock In Time Event Type is created.
Note: The code of the Time Event Type must be used by the terminal and the 3rd party integration using the REST API in field typeCode. See example in section Supported Sources to Record a Time Event.
On the second tab, you can maintain the Clock In Clock Out Groups. Here you need to enter the Code and assign the Time Event Types. The Title is an optional field.
A Clock In Clock Out Group is used to identify an employee as Clock In Clock Out employee and define what types of Time Events those employees are allowed to record, for example Clock In, Break or Clock Out.
In the following example, a Clock In Clock Out Group is created in which the Clock In, Break and Clock Out is allowed.
In the settings page you can configure the behavior and switch on/off features of Clock In Clock Out.
Only employees who are assigned to a Clock In Clock Out Group can record Time Events.
For this, a new field “time-event-group-id" is available in the Job Information which needs to be enabled in Admin Center -> Manage Business Configuration
As a second step, this field needs to be made accessible via permissions in Admin Center -> Manage Permission Roles -> Employee Central Effective Dated Entities -> Job information
Once this is done you can assign employees to Clock In Clock Out Groups via New Hire, MSS or Import.
Note: Only employees which have a Time Recording Variant = Clock Times and a Time Recording Profile with Time Recording Method = Positive can be assigned to a Clock In Clock Out Group.
You can use the Admin Center –> Time Management Configuration Search to see all employees assigned to a specific Clock In Clock Out group on a specific date.
Employees that are assigned to a Clock In Clock Out Group must be replicated to the Clock In Clock Out application. This is done event-based each time the Clock In Clock Out Group is added, removed, or changed on an employee’s Job Information.
Even though this event-based replication process is reliable there can be situations which require a fresh full replication of those employees.
This can be triggered with the MDF object Clock In Clock Out Employee Full Synchronization Details.
To enable access, the corresponding permission to the object via Admin Center -> Manage Permission Roles -> Time Management Object Permission needs to be granted.
With the field Trigger Full Synchronization, the full sync can be triggered. After the sync has finished, the details can be found in the read-only fields.
To be able to find such employee inconsistencies between Employee Central and Clock In Clock Out there are Check Tool checks available which can also be used to fix those automatically. See section Check Tool for Clock In Clock Out for more details.
This step is optional and if not configured all External Time Data created from Clock In Clock Out are using the Default Import Attendance Time Type defined in the Time Profile of the employee.
The Time Type Derivation Logic can be defined in MDF object Clock In Clock Out Time Type Derivation Configuration
To enable access, the corresponding object permission via Admin Center -> Manage Permission Roles -> Time Management Object Permissions needs to be granted.
In the following example, all Time Event Pairs that are created due to an opening Clock In Event will be mapped to the Time Type Working Time. All Time Event Pairs created due to an opening Break Time Event will be mapped to Time Type Break Time Type. All others will use the Default Import Attendance Time Type defined in the Time Profile of the employee.
Typically, Time Events are recorded via a physical terminal or via a web or mobile based punch application. In such scenarios the employee cannot specify the date and time, the Time Event is recorded at the time at which the employee swiped the card or pushed the punch button. For such scenarios, a Time Event workflow is not needed.
But there might be scenarios an employee or admin must create a Time Event manually due to a missing punch or a wrong Time Event must be deleted. For such manual interactions, Clock In Clock Out supplies a powerful workflow configuration, so that those Time Events will only be processed after the approval happens.
The following diagram illustrates the possible approval status and actions on Time Events.
All Time Events that are created with Entry Type Terminal, Web or Mobile will not trigger a workflow and will be saved directly with Approval Status = Approved.
Note: Time Events with approval status other than Approved cannot be deleted. A Time Event in with approval Status Pending Deletion can only be deleted when the corresponding workflow is approved.
The following steps need to be taken to configure a workflow for Time Events:
In the business rule you can decide whether, and if so, which workflow should be triggered by the If-Condition on Time Event fields.
Below are some examples of such a workflow rule:
Trigger the same workflow for any manual creation and deletion of Time Events.
Trigger different workflows for any manual creation of Time Events and deletion of Time Events which were created via terminal.
Trigger a workflow only for deletion of Time Events that are successfully validated and were created on or before the previous working day of the employee.
As you can see, the workflows for Time Events are highly configurable and powerful.
The Time Event is fully secured by role-based permissions, and it supports the definition of a target criteria. With this you can define the employees who can view, edit, create and delete Time Events for which employees.
The permissions are granted in Admin Center -> Manage Permission Roles -> Manage Roles for Clock In Clock Out -> Administrator Permissions
As you can see, you can define fine granular permissions for the deletion of Time Events based on the entry type. So, you can have only some administrators which are allowed to delete Time Events that are coming from a terminal, but employees could be able to delete own Time Events which were created manually.
As the next step, you can assign this role to either:
In the last step you need to define the target population of the employees for whom the employees can view, create or delete the Time Events. This depends on the choice of the previous steps
The supported target populations for Time Events will be enhanced in future releases.
Once you have assigned employees to such a Time Event permission, they will be able to view, delete or create those, for example in the Time Sheet or Manage Clock In Clock Out UI.
Note: On the new Time Sheet UI you can only view and create Time Events for your own even if you have other employees defined in the target criteria. (In case you proxy, you can view or create Time Events for the proxied user if allowed)
To allow access to the Manage Clock In Clock Out UI you need to grant the permission Manage Clock In Clock Out in Admin Center -> Manage Permission Roles -> Manage Roles for Clock In Clock Out -> Administrator Permissions.
To allow access to the Clock Time quick action on the new homepage (homepage 4) you need to grant the permission Clock Time in Admin Center -> Manage Permission Roles -> Manage Roles for Clock In Clock Out -> User Permissions.
Note: For the Clock Time quick action, the employee does not need to have the permission Create Manual Time Events. Once the permission to access the Clock Time quick action is granted, the employee is allowed to record Time Events for its own automatically. Only the View Time Events permission is respected in this UI.
Sometimes it requires a comment and the choice of a reason to describe why a Time Event was created manually.
If this is needed, you can enable those fields in the Settings page of Clock In Clock Out application as described above.
The possible reasons must be defined in MDF object Reason for Manual Time Event
To enable access, the corresponding object permission via Admin Center -> Manage Permission Roles -> Time Management Object Permissions needs to be granted.
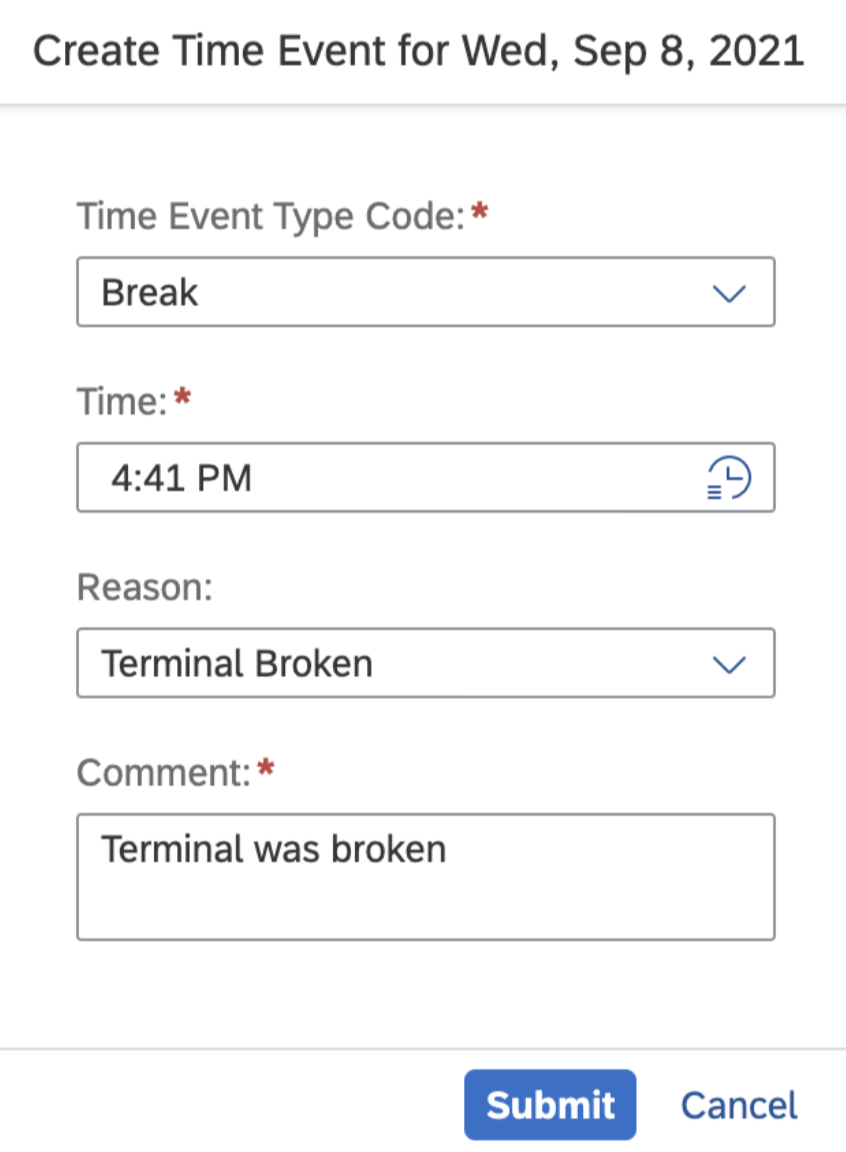
Here you can specify the code and the translated name of such a reason. This could be, for example, Terminal Broken or Missing Punch.

Those reasons can also be used in the workflow rule to trigger different workflows based on the selected reason.
This configuration step is not done by SAP. For this, you need to follow the guide provided by the terminal vendors which already support the integration with Clock In Clock Out.
But the following examples might help you in replicating the employee data from SuccessFactors to your (terminal) system.
Those are only examples, and the real implementation might vary based on the business requirement of the customer.
The terminal needs as minimum the following data in the payload of the Time Event REST API:
To be able to derive the correct user Id it must be replicated from SAP SuccessFactors Employee Central to your (terminal) system.
This user Id can be stored in the physical card but usually there is a mapping between the card Id and the user Id stored in the terminal system.
As only employees that are assigned to a Clock In Clock Out Group can record Time Events, it is not necessary to replicate all employees. Only employees who have a Clock In Clock Out Group assigned need to be replicated.
For this, the OData API on EmpJob entity can be used which is explained by a few examples.
OData call:
This will return the user Id and the Clock In Clock Out Group code of all active employees that are assigned to a Clock In Clock Out Group valid today. One result item could look like this:
In case today is the 01/01/2021 and an employee is assigned to a Clock In Clock Out Group from 01/01/2000 - 12/31/2020, this record would not be returned.
This can be used to replicate the first initial load of all employees assigned to a Clock In Clock Out Group from a specified start date until end of time.
OData call:
This will return the user Id, the Clock In Clock Out Group code and the start and end date of the Job Information record of all active employees that are assigned to a Clock In Clock Out Group from 01/01/2005 until 12/31/9999. The result could look like this:
As you can see, this will also return the record of the employeeB which is assigned to group G2 only until 12/31/2020.
Those OData calls (especially the first one) need to be executed regularly to also replicate data that was changed after the last synchronization, for example new hires, terminations, or changes in the Clock In Clock Out Group assignment of employees.
In case you want to replicate the balance of an employee, the OData APIon entity EmpTimeAccountBalance can be used. See details: https://api.sap.com/api/ECTimeOff/tryout
The following example will return the balance of -12 hours for the employee with userId (assignmentId) 106002 and Time Account Type WTDIFF on the 23rd of August 2021.
OData call:
Response:
Note: If you do not specify a balanceAsOfDate, the balance as of today is returned.
You can view and maintain Time Events based on granted permissions in the Clock Time quick action or the Time Sheet UI (used by employees) and Manage Clock In Clock Out UI (used by admins).
The Manage Clock In Clock Out UI is built for (Time) Admins that need to have an overview of Time Events of multiple employees. In this UI you can filter the Time Events and see all relevant data such as Terminal ID, Approval Status, Validation Status and so on.
You can also create and delete Time Events if the corresponding permission is granted.
Note: Time Events created in the Manage Clock In Clock Out UI are saved with Entry Type = Manual and will trigger a workflow if configured.
The easiest way for an employee to use Clock In Clock Out within SAP SuccessFactors Time Tracking is the quick action Clock Time on the new Homepage 4. Here you can create and view own Time Events.
As an employee, the new Time Sheet UI can also be used to view, create or delete your own Time Events. This UI respects the defined permissions, and employees can only view, create or delete their own Time Events once the corresponding permission is assigned.
Note: Time Events created in the Time Sheet UI are saved with Entry Type = Manual and will trigger a workflow if configured.
A new application Clock In Clock Out has been added to the check tool. In this you find 3 checks which report any issue of the master data and employee synchronization between Clock In Clock Out and SAP SuccessFactors Time Tracking.
All checks are executed automatically daily, so you will always find the latest results.
To enable access, the following permission via Admin Center -> Manage Permission Roles -> Check Tool -> Access Check Tool needs to be granted.
Additionally, all 3 checks supply a quick fix which automatically fixes the found inconsistencies.
To allow the execution of a quick fix, the following permission via Admin Center -> Manage Permission Roles -> Check Tool -> Allow Check Tool Quick Fix needs to be granted.
The following features are supported by Clock In Clock Out as well. Detailed information can be found in the official documentation.
That's it. I hope you like the new Clock In Clock Out feature and this blog post was useful to you and you have learned about the basic concepts and how it can be configured.
If you have any questions or feedback, leave me a comment or ask them in the SAP community or the SAP SuccessFactors community.
Best Regards,
Steffen Dubetz
let me introduce the new Clock In Clock Out feature of SAP SuccessFactors Time Tracking we have build for you in the H2 2021 release. This blog post will help you to understand how the solution works and what steps need to be done to set it up.
Table of content:
- Overview
- Main Entities In Clock In Clock Out
- Supported Sources to Record a Time Event
- Main Processes in Clock In Clock Out
- Setup Clock In Clock Out
- View and Maintain Time Events
- Check Tool for Clock In Clock Out
- Additional Features
- Conclusion
1. Overview
The new Clock In Clock Out feature in SAP SuccessFactors Time Tracking is a powerful and easy-to-use application that enables customers to track employees' times, recorded via a clock terminal or our web/mobile quick punch action.
The feature is seamlessly integrated with the existing Time Sheet processes. With this, we close the last gap to cover all relevant steps from the physical punch at the terminal to the payment of the employee.
Of course, role-based permissions and workflows are supported in Clock In Clock Out as well as you already know it from SAP SuccessFactors Employee Central Time Management.
Note: The Clock In Clock Out solution is not available in all data centers yet. To check whether your datacenter already has Clock In Clock Out enabled please check our SAP SuccessFactors Employee Central Time Management community page for the Clock In Clock Out data center rollout plan.
Clock In Clock Out is only available in our SAP SuccessFactors Time Tracking solution. For the basic time sheet solution this is not available.
2. Main Entities in Clock In Clock Out
First, I would like to describe the main entities used in the context of Clock In Clock Out and for what they are used.
Time Event
A Time Event is a data record, which holds:
- the identifier of an employee/employment - who did it
- the point in time - when did it happen
- attributes describing the event - what happened
The attributes, which describe the Time Event, usually hold some sort of location identifier, sometimes called the 'terminal id' and the purpose of the Time Event, the Time Event Type. Without any other attributes, such a Time Event merely describes the fact 'I was here'.
Those Time Events are typically captured via a physical terminal or by a web or mobile punch application.
Time Event Pair
A Time Event Pair is a data record created out of two Time Events that are recorded for an employee in sequence, for example for a clock-in at 8 am and a clock-out at 4 pm. The Time Event Pair does not have only the timestamp when something happens, but it holds:
- the identifier for an employee/employment - who did it
- the period – how long was the activity
- several attributes describing the pair – what happened in this period
Time Event Type
For time management purposes, the Time Event usually holds at least one more attribute to specify what happened: the Time Event Type. Typical Time Event Types are for example:
- Coming to work - clock in
- Leaving work - clock out
- Going away but still working - short business trip
- Going for a break – break
Many systems work with exactly this set of Time Event Types. Some use less Time Event Types, say, only clock-in and clock-out, others use more Time Event Types depending on the business use cases. Some Time Event Types are irrelevant from a time valuation point of view, like Time Events when entering a specific building. As you know from SAP SuccessFactors Employee Central Time Management, you can configure this also depending on your business needs.
A Time Event Type can be defined as Start (start an activity for the company) or Stop (end an activity for the company) type. More details can be found in the Pairing Engine section.
Clock In Clock Out Group
A Clock In Clock Out group combines a set of Time Event Types. The Clock In Clock Out Group can be assigned to the employees Job Information and is used for:
- specifying an employee as a Clock In Clock Out employee
- defining which Time Event Types the employee is allowed to record
You could for example define a Clock In Clock Out Group ‘Basic Puncher’ which has only the clock-in and clock-out Time Event Type and a group ‘Consultant Puncher’ which has the Time Event Types clock-in, lunch, business trip and clock-out.
The following diagram visualizes all main entities of Clock In Clock Out and their relation to each other.
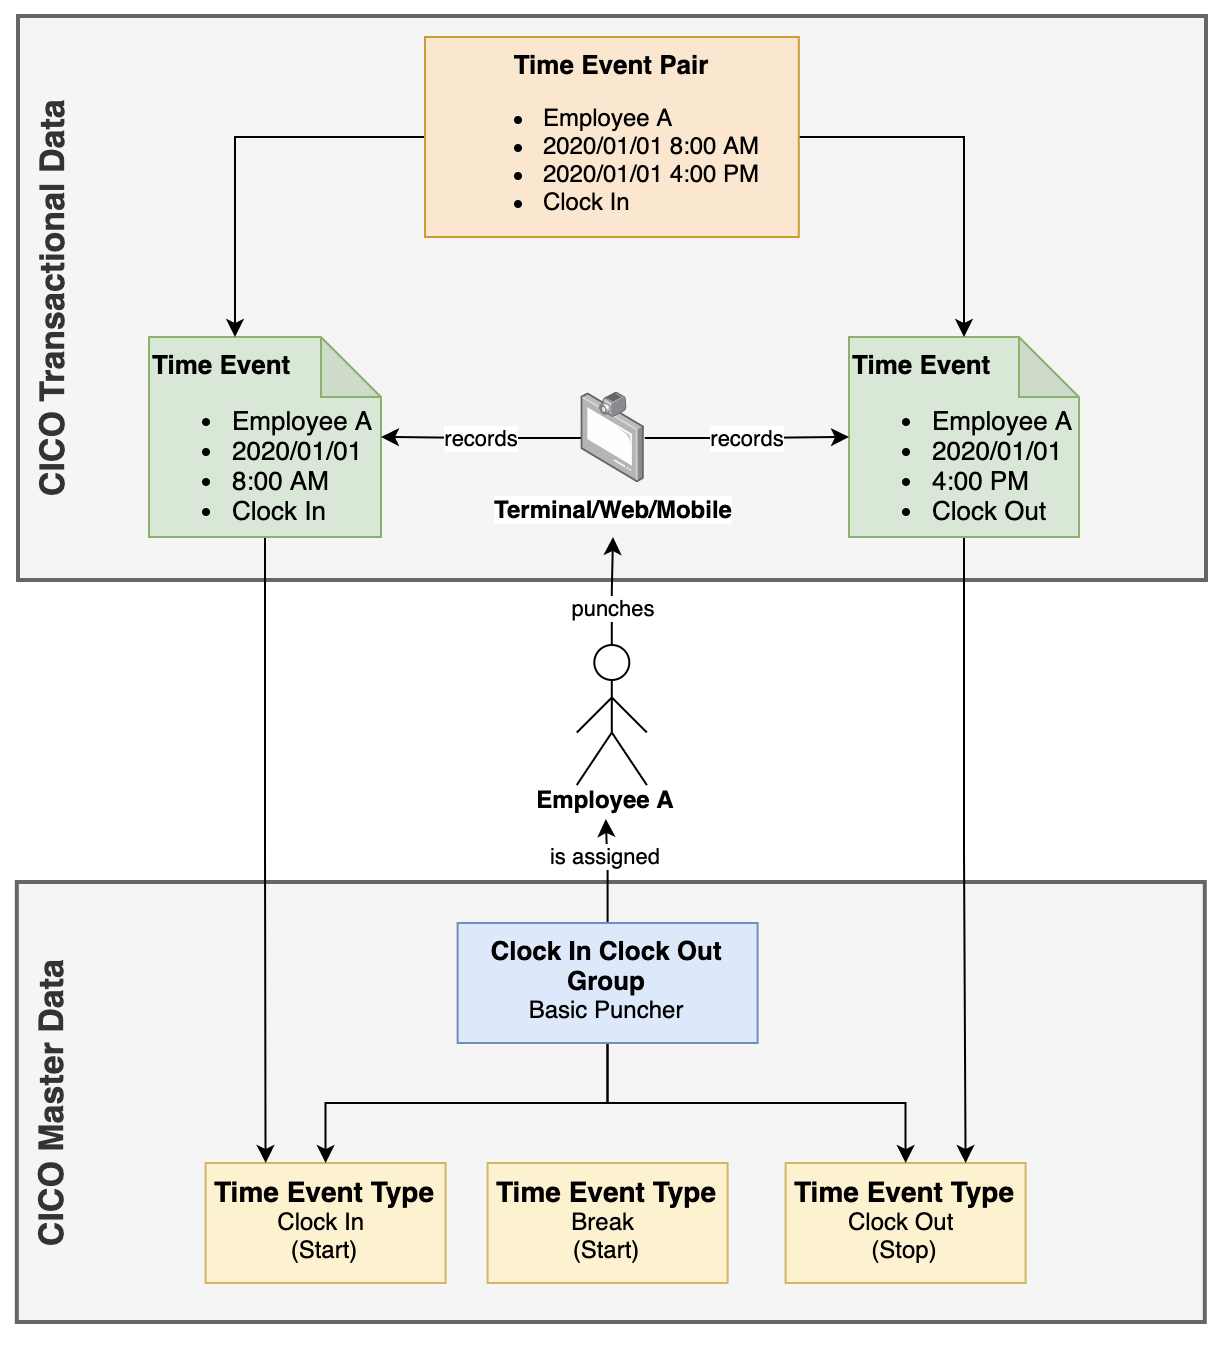
Overview Main Entities in Clock In Clock Out
3. Supported Sources to Record a Time Event
There are several ways to record a Time Event in Clock In Clock Out. Based on the source, a Time Event is categorized with a specific entry type to show from where it was created.
Physical Terminal
The most common source to capture a Time Event is via a physical terminal by swiping a card. We have been working with a few partners to confirm our setup. But our service is vendor agnostic and can be used by any clock terminal vendor if they can work with our APIs. Time Events recorded via terminal are stored with Entry Type = Terminal
Clock Time Punch via Web or Mobile
Clock In Clock Out already includes an easy-to-use and employee-centric designed clock time quick action on the latest homepage (homepage 4) for Web and Mobile. With this, an employee can record Time Events with few clicks. Time Events recorded via clock time punch are stored with Entry Type = Web or Mobile

Time Sheet UI
Time Events can also be maintained in the Time Sheet UI. In this UI, the employee can enter a specific date and time for the new Time Event. This can be helpful to record, for example, missing punches. Time Events recorded via the Time Sheet UI are stored with Entry Type = Manual
Manage Clock In Clock Out UI
The Manage Clock In Clock Out UI is designed for the admin use case. In this UI, an admin can maintain Time Events with all supported fields for who they have permissions for. Time Events recorded via the Manage Clock In Clock Out UI are stored also with Entry Type = Manual

Third Party/Custom Application
Clock In Clock Out offers a simple public REST API which can be used to push Time Events in single or bulk mode to the Clock In Clock Out application. Details about this API can be found in the SAP Help Portal. This Rest API is also used for the terminal integration, therefore Time Events recorded via the REST API are stored with Entry Type = Terminal as well. The structure of the API body looks like this:
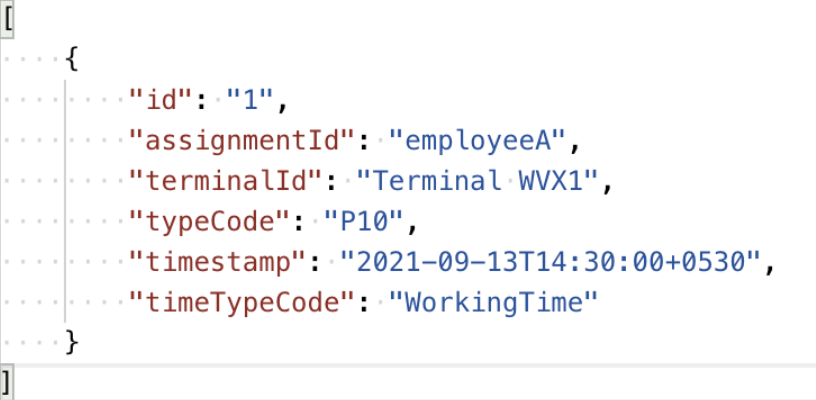
API Example of a Time Event
As you can see, it is also possible to specify the Id of the terminal at which the punch happened and the external code of the Time Type to be used in Time Sheet for this punch. Both attributes are optional.
4. Main Processes in Clock In Clock Out
As we have now learned what the main entities in Clock In Clock Out are and for what they are used, we can step a little further and look at the main processes of Clock In Clock Out.
Validation Engine
The validation engine is executed directly after a new Time Event was recorded. It validates the Time Event for its structural and semantical correctness based on the defined master data (Time Event Type, Clock In Clock Out Groups etc.). The following business validations are executed, for example:
- Employees do exist and is assigned to a Clock In Clock Out Group
- Recorded Time Event Type exists and is present in the assigned Clock In Clock Out Group
In case an invalid Time Event is created, the system shows a detailed validation error, and the save will be prevented. But when a Time Event is recorded via a physical Terminal, only structural validation will prevent the save. If a business validation fails, the Time Event is saved with a validation error and needs human interaction by a time admin for example. Those mistaken Time Events are highlighted by the validation status and the detailed error in the Time Admin and even in the employees Time Sheet.

Display of Validation Error in Manage Clock In Clock Out UI
Pairing Engine
For time valuation, we need to transform Time Events with specific Time Event Types into Time Event Pairs with a specific Time Type. Since we usually need two Time Events (like clock-in and clock-out) to combine them into one Time Event Pair, this process is called pairing.
In principle, the pairing arranges individual Time Events on a timeline.
Consequently, all Time Events fall into two major categories: during a period, a person is either:
- attendant (start something for the company) or
- non-attendant (end something for the company)
In standard configurations, there will usually exist several Start Time Events (clock-in, break, short business trip etc.) but only one Stop Time Event (clock-out). This, of course, corresponds to the fact that different Start Time Events can be mapped to different Time Types of the following period, but every Stop Time Event always corresponds to merely the 'not there'-information.
For the automated pairing, the Event attribute in the Time Event Type is important. A Time Event Type can be defined as Start (start an activity for the company) or Stop (end an activity for the company) type.
With the two basic categories, we can lay down the pairing rules for incoming Time Events:
- Start following Stop: the standard clock-in event. A new period of attendance starts => no pairing
- Start following Start: the person is still at work, but the nature of the attendance has changed. This implies the end of the earlier attendance => pairing of earlier attendance period
- Stop following Start: the standard clock-out event. The earlier attendance period ends => pairing of ended attendance period
- Stop following Stop: this cannot be used for pairing, and needs human intervention (shown as mistaken Time Event in Clock In Clock Out UIs)
In simple words, the Clock In Clock Out solution in SAP SuccessFactors Time Tracking will always create a Time Event Pair if a valid Time Event is recorded at most 24 hours after a valid Time Event of type Start for the same employee/employment.
Those automatically created Time Event Pairs will be published to SAP SuccessFactors Time Tracking and converted to an External Time Data which will result in a Time Sheet entry.
Re-Pairing Engine
There might be situations where a Time Event must be created in the past (missing punch) or an already paired Time Event must be deleted (wrong punch). If this happens, the Time Event Pairs must be re-created, and the latest pairing information must be sent to SAP SuccessFactors Time Tracking again.
This could result in:
- Creating new Time Event Pairs
- Updating existing Time Event Pairs
- Deleting existing Time Event Pairs
The following example shows this. Let us assume the following data already exists for Employee A.

Initial State Before Re-Pairing
The employee clocked in at 8 in the morning and clocked out at 4 in the evening. But Time Events have been successfully paired and 10 hours of working time have been recorded in SAP SuccessFactors Time Tracking.
On the next day, the employee realized that he was for a break from 2 pm until 4 pm but had forgotten to record this break.
Due to the manual correction scenario Clock In Clock Out provides in the Manage Clock In Clock Out and Time Sheet UI this missing punch can be added easily.

Insert Missing Time Event
The Clock In Clock Out application detects such scenarios that require re-pairing and makes sure that always consistent data will be stored for the employee.
In the example above the system will update the end time of the Time Event Pair 1 from 4 pm to 2 pm and create a new Time Event Pair from 2 pm to 4 pm. This information is immediately sent to SAP SuccessFactors Time Tracking and the External Time Data 1 is also updated with the new end time and a new External Time Data created with time type Break from 2 pm to 4 pm.
If for example, the Break was recorded by mistake and it will be deleted manually, the system detects again that a re-pairing is needed and will do the following.

Delete Time Event
The system will automatically update the Time Event Pair 1 and External Time Data 1 to end time 4 pm again and it will delete the Time Event Pair 2 and External Time Data 2.
With these automated processes it is always guaranteed that the data in the employee’s Time Sheet corresponds with the Clock In Clock Out data.
Time Type Derivation
To derive the correct Time Type for the External Time Data, the MDF object Clock In Clock Out Time Type Derivation Configuration can be used. With this configuration object, the Time Event Type of the “opening” Time Event of the Time Event Pair defines the Time Type to be used.
For example, you can define that the Time Type “Working Time” should be used each time a Time Event Pair is received that was paired with an opening Time Event using the Time Event Type Clock In.
Or you could define that the Time Type “Break” should be used in case a Time Event Pair is received which was paired with an opening Time Event using the Time Event Type Break.
See section Time Type Derivation for more details.
The Time Type Derivation logic would find the to be used Time Type in the following order:
- Time Type Code specified by the terminal
- Time Type derived based on Clock In Clock Out Time Type Derivation Configuration object
- Default Import Attendance Time Type defined in the Time Profile of the employee
The next screenshot highlights each step in the end 2 end process from the creation of a time Event (for example via a punch at the terminal) to the generation of the Time Valuation Results.

End 2 End Process Steps
In the following diagram the pairing engine and time type derivation is illustrated based on a daily work scenario.

Pairing in Clock In Clock Out by a Typical Working Day
In this example, the employee has punched four times on the working day using Clock In (Start), Break (Start) and Clock Out (Stop). This results in:
- 4 Time Events
- 3 Time Event Pairs
- 3 External Time Data
- 3 Time Sheet Entries
5. Setup Clock In Clock Out
Clock In Clock Out is part of the SAP SuccessFactors Time Tracking solution. Once you have bought it, the feature must be enabled in provisioning.
Maintain Master Data
To be able to create master data for Clock In Clock Out, the following permissions must be assigned to the admin:
Admin Center -> Manage Permission Roles -> Manage Roles for Clock In Clock Out -> Administrator Permissions

Permissions Required for Master Data Setup
Once this is done, you can navigate to Admin Center -> Configure Clock In Clock Out.
Create Time Event Types
On the first tab, you can maintain the Time Event Types. Here you need to enter the Code, the Event, and the Status. The Title and Description are optional fields.
In the following example, the typical Clock In Time Event Type is created.

Create Time Event Types
Note: The code of the Time Event Type must be used by the terminal and the 3rd party integration using the REST API in field typeCode. See example in section Supported Sources to Record a Time Event.
Create Clock In Clock Out Groups
On the second tab, you can maintain the Clock In Clock Out Groups. Here you need to enter the Code and assign the Time Event Types. The Title is an optional field.
A Clock In Clock Out Group is used to identify an employee as Clock In Clock Out employee and define what types of Time Events those employees are allowed to record, for example Clock In, Break or Clock Out.
In the following example, a Clock In Clock Out Group is created in which the Clock In, Break and Clock Out is allowed.

Create Clock In Clock Out Groups
Maintain Clock In Clock Out Settings
In the settings page you can configure the behavior and switch on/off features of Clock In Clock Out.

Clock In Clock Out Settings
Time Events Pairing
With this flag enabled, the pairing engine will create a Time Event Pair when two Time Events with the same Start Time Event Type are recorded after each other. If, for example, an employee records a clock in at 8:00 am and another clock in at 10:00 am, the system will pair those Time Events and a Time Sheet entry with 2 hours working time is created. If this feature is disabled, the Time Event will not pair and the first Time Event is highlighted with an error.
Overdue Time Events
In most of the cases a Time Event will remain unpaired for more than 12 hours. To highlight those “long” unpaired Time Events, this setting can be used. Note: This setting has only an effect on Time Events recorded with a Start Time Event Type. Unpaired StopTime Events are immediately highlighted with an error.
Workflow Processes
With this flag enabled, workflows defined on MDF object Manual Time Event are executed whenever a Time Event is manual created or deleted. See more details in section Define Workflows for Time Events.- Time Events CreationWith this setting you can define whether the field reason and comment should be shown on the manual creation popup for Time Events in the Time Sheet and Manage Clock In Clock Out UI and if so, whether those fields should be mandatory or not. See more details in section Define Reasons for Manual Time Event Creation.
Assign Employees to Clock In Clock Out Groups
Only employees who are assigned to a Clock In Clock Out Group can record Time Events.
For this, a new field “time-event-group-id" is available in the Job Information which needs to be enabled in Admin Center -> Manage Business Configuration

Enable Field Clock In Clock Out Group in Job Information
As a second step, this field needs to be made accessible via permissions in Admin Center -> Manage Permission Roles -> Employee Central Effective Dated Entities -> Job information
Once this is done you can assign employees to Clock In Clock Out Groups via New Hire, MSS or Import.
Note: Only employees which have a Time Recording Variant = Clock Times and a Time Recording Profile with Time Recording Method = Positive can be assigned to a Clock In Clock Out Group.
You can use the Admin Center –> Time Management Configuration Search to see all employees assigned to a specific Clock In Clock Out group on a specific date.

Time Management Configuration Search
Synchronize Clock In Clock Out Employees
Employees that are assigned to a Clock In Clock Out Group must be replicated to the Clock In Clock Out application. This is done event-based each time the Clock In Clock Out Group is added, removed, or changed on an employee’s Job Information.
Even though this event-based replication process is reliable there can be situations which require a fresh full replication of those employees.
This can be triggered with the MDF object Clock In Clock Out Employee Full Synchronization Details.
To enable access, the corresponding permission to the object via Admin Center -> Manage Permission Roles -> Time Management Object Permission needs to be granted.
With the field Trigger Full Synchronization, the full sync can be triggered. After the sync has finished, the details can be found in the read-only fields.

Clock In Clock Out Employee Full Synchronization Details
To be able to find such employee inconsistencies between Employee Central and Clock In Clock Out there are Check Tool checks available which can also be used to fix those automatically. See section Check Tool for Clock In Clock Out for more details.
Define Time Type Derivation Logic
This step is optional and if not configured all External Time Data created from Clock In Clock Out are using the Default Import Attendance Time Type defined in the Time Profile of the employee.
The Time Type Derivation Logic can be defined in MDF object Clock In Clock Out Time Type Derivation Configuration
To enable access, the corresponding object permission via Admin Center -> Manage Permission Roles -> Time Management Object Permissions needs to be granted.
In the following example, all Time Event Pairs that are created due to an opening Clock In Event will be mapped to the Time Type Working Time. All Time Event Pairs created due to an opening Break Time Event will be mapped to Time Type Break Time Type. All others will use the Default Import Attendance Time Type defined in the Time Profile of the employee.

Time Type Derivation Example
Define Workflows for Time Events
Typically, Time Events are recorded via a physical terminal or via a web or mobile based punch application. In such scenarios the employee cannot specify the date and time, the Time Event is recorded at the time at which the employee swiped the card or pushed the punch button. For such scenarios, a Time Event workflow is not needed.
But there might be scenarios an employee or admin must create a Time Event manually due to a missing punch or a wrong Time Event must be deleted. For such manual interactions, Clock In Clock Out supplies a powerful workflow configuration, so that those Time Events will only be processed after the approval happens.
The following diagram illustrates the possible approval status and actions on Time Events.

Workflow Status for Time Events
All Time Events that are created with Entry Type Terminal, Web or Mobile will not trigger a workflow and will be saved directly with Approval Status = Approved.
Note: Time Events with approval status other than Approved cannot be deleted. A Time Event in with approval Status Pending Deletion can only be deleted when the corresponding workflow is approved.
The following steps need to be taken to configure a workflow for Time Events:
- Enable Workflow Processes in Admin Center -> Configure Clock In Clock Out -> Settings
- Create a Workflow in Admin Center -> Manage Organization, Pay and Job Structures
- Create a Business Rule for Metadata Framework with purpose = Workflow for object Manual Time Event. In this rule the workflow to be triggered from the previous step will be set. See examples of such a workflow rule below.
- Assign this rule in Admin Center -> Configure Object Definition -> Manual Time Event at the Save Step
In the business rule you can decide whether, and if so, which workflow should be triggered by the If-Condition on Time Event fields.
Below are some examples of such a workflow rule:
Trigger the same workflow for any manual creation and deletion of Time Events.

Workflow Rule 1
Trigger different workflows for any manual creation of Time Events and deletion of Time Events which were created via terminal.

Workflow Rule 2
Trigger a workflow only for deletion of Time Events that are successfully validated and were created on or before the previous working day of the employee.

Workflow Rule 3
As you can see, the workflows for Time Events are highly configurable and powerful.
Grant Permissions for Viewing and Maintaining Time Events in Clock In Clock Out
The Time Event is fully secured by role-based permissions, and it supports the definition of a target criteria. With this you can define the employees who can view, edit, create and delete Time Events for which employees.
The permissions are granted in Admin Center -> Manage Permission Roles -> Manage Roles for Clock In Clock Out -> Administrator Permissions

Time Event Permissions
As you can see, you can define fine granular permissions for the deletion of Time Events based on the entry type. So, you can have only some administrators which are allowed to delete Time Events that are coming from a terminal, but employees could be able to delete own Time Events which were created manually.
As the next step, you can assign this role to either:
- All Employees
- All Managers
- Specific Employees defined in a Dynamic Group
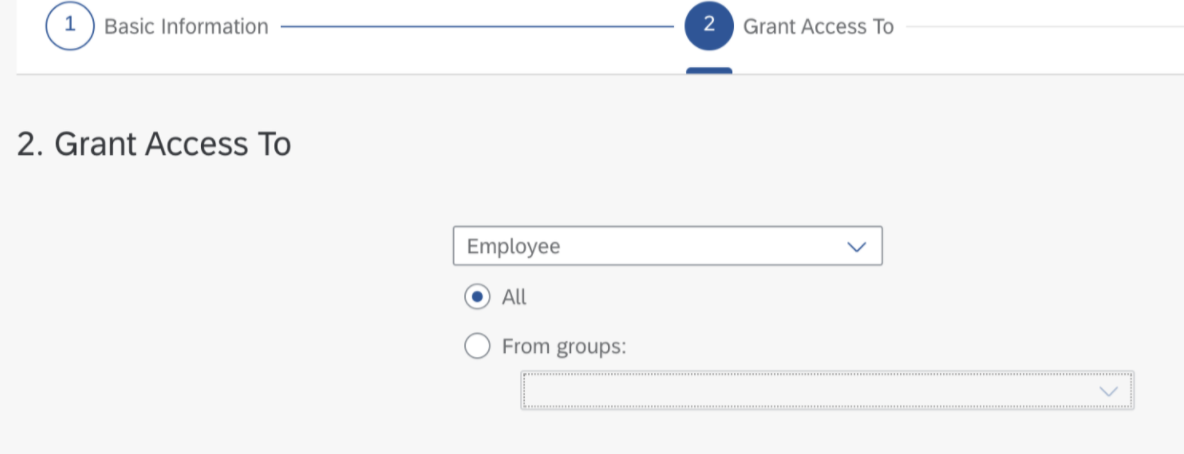
Granting for Time Event Permission Role
In the last step you need to define the target population of the employees for whom the employees can view, create or delete the Time Events. This depends on the choice of the previous steps
- Assigned to All Employees => only Self is supported
- Assigned to All Managers => only Direct Reports is supported
- Assigned to Dynamic Groups => Everyone or specific Dynamic Groups
The supported target populations for Time Events will be enhanced in future releases.
Once you have assigned employees to such a Time Event permission, they will be able to view, delete or create those, for example in the Time Sheet or Manage Clock In Clock Out UI.
Note: On the new Time Sheet UI you can only view and create Time Events for your own even if you have other employees defined in the target criteria. (In case you proxy, you can view or create Time Events for the proxied user if allowed)
To allow access to the Manage Clock In Clock Out UI you need to grant the permission Manage Clock In Clock Out in Admin Center -> Manage Permission Roles -> Manage Roles for Clock In Clock Out -> Administrator Permissions.
To allow access to the Clock Time quick action on the new homepage (homepage 4) you need to grant the permission Clock Time in Admin Center -> Manage Permission Roles -> Manage Roles for Clock In Clock Out -> User Permissions.
Note: For the Clock Time quick action, the employee does not need to have the permission Create Manual Time Events. Once the permission to access the Clock Time quick action is granted, the employee is allowed to record Time Events for its own automatically. Only the View Time Events permission is respected in this UI.
Define Reasons for Manual Time Event Creation
Sometimes it requires a comment and the choice of a reason to describe why a Time Event was created manually.

Reason and Comment on Create Time Event Popup
If this is needed, you can enable those fields in the Settings page of Clock In Clock Out application as described above.
The possible reasons must be defined in MDF object Reason for Manual Time Event
To enable access, the corresponding object permission via Admin Center -> Manage Permission Roles -> Time Management Object Permissions needs to be granted.
Here you can specify the code and the translated name of such a reason. This could be, for example, Terminal Broken or Missing Punch.
Reason for Manual Time Event Example
Those reasons can also be used in the workflow rule to trigger different workflows based on the selected reason.
Configure Terminals for Clock In Clock Out
This configuration step is not done by SAP. For this, you need to follow the guide provided by the terminal vendors which already support the integration with Clock In Clock Out.
But the following examples might help you in replicating the employee data from SuccessFactors to your (terminal) system.
Those are only examples, and the real implementation might vary based on the business requirement of the customer.
Replicate Employee Data
The terminal needs as minimum the following data in the payload of the Time Event REST API:
- Employee's assignment Id (userId)
- The code of the Time Event Type
- The timestamp when the punch happened
To be able to derive the correct user Id it must be replicated from SAP SuccessFactors Employee Central to your (terminal) system.
This user Id can be stored in the physical card but usually there is a mapping between the card Id and the user Id stored in the terminal system.
As only employees that are assigned to a Clock In Clock Out Group can record Time Events, it is not necessary to replicate all employees. Only employees who have a Clock In Clock Out Group assigned need to be replicated.
For this, the OData API on EmpJob entity can be used which is explained by a few examples.
Get Employee Data that is valid today
OData call:
<SERVER>/odata/v2/EmpJob?$expand=emplStatusNav&$filter=(timeEventTypeGroupId ne null and effectiveLatestChange eq 'Y' and emplStatusNav/externalCode eq 'A')&$select=userId,timeEventTypeGroupId This will return the user Id and the Clock In Clock Out Group code of all active employees that are assigned to a Clock In Clock Out Group valid today. One result item could look like this:
<userId>employeeA</userId>
<timeEventTypeGroupId>G1</timeEventTypeGroupId>
In case today is the 01/01/2021 and an employee is assigned to a Clock In Clock Out Group from 01/01/2000 - 12/31/2020, this record would not be returned.
Get Employee Data that is valid from a certain date
This can be used to replicate the first initial load of all employees assigned to a Clock In Clock Out Group from a specified start date until end of time.
OData call:
<SERVER>/odata/v2/EmpJob?$expand=emplStatusNav&$filter=(timeEventTypeGroupId ne null and effectiveLatestChange eq 'Y' and emplStatusNav/externalCode eq 'A')&$select=userId,startDate,endDate,timeEventTypeGroupId&fromDate=2005-01-01 This will return the user Id, the Clock In Clock Out Group code and the start and end date of the Job Information record of all active employees that are assigned to a Clock In Clock Out Group from 01/01/2005 until 12/31/9999. The result could look like this:
<userId>employeeA</userId>
<timeEventTypeGroupId>G1</timeEventTypeGroupId>
<startDate m:type="Edm.DateTime">2014-01-01T00:00:00</startDate>
<endDate m:type="Edm.DateTime">9999-12-31T00:00:00</endDate>
<userId>employeeB</userId>
<timeEventTypeGroupId>G2</timeEventTypeGroupId>
<startDate m:type="Edm.DateTime">2000-01-01T00:00:00</startDate>
<endDate m:type="Edm.DateTime">2020-12-31T00:00:00</endDate>
As you can see, this will also return the record of the employeeB which is assigned to group G2 only until 12/31/2020.
Those OData calls (especially the first one) need to be executed regularly to also replicate data that was changed after the last synchronization, for example new hires, terminations, or changes in the Clock In Clock Out Group assignment of employees.
Replicate Employee Balance
In case you want to replicate the balance of an employee, the OData APIon entity EmpTimeAccountBalance can be used. See details: https://api.sap.com/api/ECTimeOff/tryout
The following example will return the balance of -12 hours for the employee with userId (assignmentId) 106002 and Time Account Type WTDIFF on the 23rd of August 2021.
OData call:
<SERVER>/odata/v2/EmpTimeAccountBalance?$filter=userId eq '106002' and timeAccountType eq 'WTDIFF'&balanceAsOfDate=2021-09-23Response:
<m:properties>
<d:timeAccount>a8940d57b9184a81a65268ff582d6dbe</d:timeAccount>
<d:balance m:type="Edm.Decimal">-12</d:balance>
<d:timeAccountType>WTDIFF</d:timeAccountType>
<d:userId>106002</d:userId>
<d:accountClosed m:type="Edm.Boolean">false</d:accountClosed>
<d:timeUnit>HOURS</d:timeUnit>
</m:properties>
Note: If you do not specify a balanceAsOfDate, the balance as of today is returned.
That’s it! Now you have configured Clock In Clock Out and it can be used.
6. View and Maintain Time Events
You can view and maintain Time Events based on granted permissions in the Clock Time quick action or the Time Sheet UI (used by employees) and Manage Clock In Clock Out UI (used by admins).
Manage Clock In Clock Out UI
The Manage Clock In Clock Out UI is built for (Time) Admins that need to have an overview of Time Events of multiple employees. In this UI you can filter the Time Events and see all relevant data such as Terminal ID, Approval Status, Validation Status and so on.

Manage Clock In Clock Out UI
You can also create and delete Time Events if the corresponding permission is granted.
Note: Time Events created in the Manage Clock In Clock Out UI are saved with Entry Type = Manual and will trigger a workflow if configured.

Create Time Event in Manage Clock In Clock Out UI
Clock Time Punch
The easiest way for an employee to use Clock In Clock Out within SAP SuccessFactors Time Tracking is the quick action Clock Time on the new Homepage 4. Here you can create and view own Time Events.
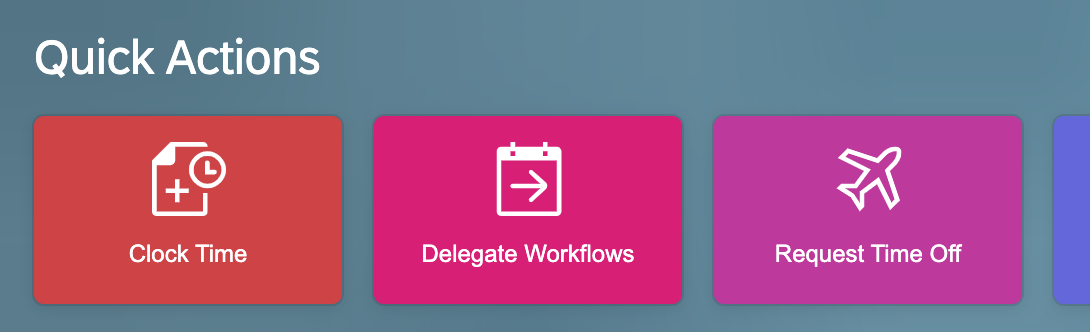
Clock Time Quick Action on Homepage 4

Clock Time Popup on Homepage 4
Time Sheet UI
As an employee, the new Time Sheet UI can also be used to view, create or delete your own Time Events. This UI respects the defined permissions, and employees can only view, create or delete their own Time Events once the corresponding permission is assigned.

Time Sheet UI

Create Time Event in Time Sheet UI
Note: Time Events created in the Time Sheet UI are saved with Entry Type = Manual and will trigger a workflow if configured.
7. Check Tool for Clock In Clock Out
A new application Clock In Clock Out has been added to the check tool. In this you find 3 checks which report any issue of the master data and employee synchronization between Clock In Clock Out and SAP SuccessFactors Time Tracking.
All checks are executed automatically daily, so you will always find the latest results.
To enable access, the following permission via Admin Center -> Manage Permission Roles -> Check Tool -> Access Check Tool needs to be granted.

Check Tool for Clock In Clock Out
Additionally, all 3 checks supply a quick fix which automatically fixes the found inconsistencies.

Quick Fix for Check Tool Error
To allow the execution of a quick fix, the following permission via Admin Center -> Manage Permission Roles -> Check Tool -> Allow Check Tool Quick Fix needs to be granted.
8. Additional Features
The following features are supported by Clock In Clock Out as well. Detailed information can be found in the official documentation.
- Clock In Clock Out change audit logging
- Clock In Clock Out data purge
- Clock In Clock Out data purge during master data purge
- Clock In Clock Out audit data purge
- Restricting creation of Time Events in purged period
- Support DRTM legal hold on Clock In Clock Out data during data purge
- Alerts notifying the admin that Time Event Pairs from Clock In Clock Out could not be saved as External Time Data in SAP SuccessFactors Time Tracking
9. Conclusion
That's it. I hope you like the new Clock In Clock Out feature and this blog post was useful to you and you have learned about the basic concepts and how it can be configured.
If you have any questions or feedback, leave me a comment or ask them in the SAP community or the SAP SuccessFactors community.
Best Regards,
Steffen Dubetz
- SAP Managed Tags:
- SAP Timesheet,
- HCM Time Management
Labels:
78 Comments
- « Previous
-
- 1
- 2
- Next »
You must be a registered user to add a comment. If you've already registered, sign in. Otherwise, register and sign in.
Labels in this area
-
Artificial Intelligence (AI)
1 -
Business Trends
363 -
Business Trends
21 -
Customer COE Basics and Fundamentals
1 -
Digital Transformation with Cloud ERP (DT)
1 -
Event Information
461 -
Event Information
23 -
Expert Insights
114 -
Expert Insights
151 -
General
1 -
Governance and Organization
1 -
Introduction
1 -
Life at SAP
415 -
Life at SAP
2 -
Product Updates
4,685 -
Product Updates
205 -
Roadmap and Strategy
1 -
Technology Updates
1,502 -
Technology Updates
85
Related Content
- Portfolio Management – Enhanced Financial Planning integration in Enterprise Resource Planning Blogs by SAP
- Enterprise Portfolio and Project Management in SAP S/4HANA Cloud, Private Edition 2023 FPS1 in Enterprise Resource Planning Blogs by SAP
- The Role of SAP Business AI in the Chemical Industry. Overview in Enterprise Resource Planning Blogs by SAP
- CK40N costing level doesn't show materials costed without errors in Enterprise Resource Planning Q&A
- Quick Start guide for PLM system integration 3.0 Implementation/Installation in Enterprise Resource Planning Blogs by SAP
Top kudoed authors
| User | Count |
|---|---|
| 5 | |
| 4 | |
| 4 | |
| 3 | |
| 3 | |
| 3 | |
| 2 | |
| 2 | |
| 2 | |
| 2 |