
- SAP Community
- Products and Technology
- Human Capital Management
- HCM Blogs by Members
- Beginner’s Guide for Qualtrics Survey and SAP Succ...
Human Capital Management Blogs by Members
Gain valuable knowledge and tips on SAP SuccessFactors and human capital management from member blog posts. Share your HCM insights with a post of your own.
Turn on suggestions
Auto-suggest helps you quickly narrow down your search results by suggesting possible matches as you type.
Showing results for
DavidRod
Explorer
Options
- Subscribe to RSS Feed
- Mark as New
- Mark as Read
- Bookmark
- Subscribe
- Printer Friendly Page
- Report Inappropriate Content
10-01-2021
7:35 PM
There have been many blogs on integrating SAP SuccessFactors employees into Qualtrics project. Although most of these blogs are well written, I find that many details are missing and an average SuccessFactors / Qualtrics consultant needs to spend hours reading and understanding Help documents from both Qualtrics and SuccessFactors Support sites to piece together the right solution.
In this blog, I will list all the relevant steps needed when integrating SuccessFactors users to the Qualtrics survey platform.
Prerequisites
SuccessFactors configuration
Start by enabling Qualtrics integration:
In SuccessFactors click upgrade Centre.
Then search and click for Qualtrics Employee experience.
Click upgrade now.
Make sure that you have your Qualtrics’ instance URL, then paste it into dialog and press Validate.
The address should look like that: https://instancename.qualtrics.com.
When validated, click Yes.
When finished, click OK.

Now, go to platform feature setting and make sure that Enable Qualtrics feature is checked.
In the following steps you will set the RBP permission in SuccessFactors.
Open your Super Admin permission roll, under Admin Center Permission and check the following:
Click Done and Save Changes
Object definitions
Before continuing, you should check that that the Qualtrics object definitions are correctly configured.
In most of the cases you do not need to change any configuration in this part.
Go to Configure Object Definitions and find 3 objects: QualtricsProjectAndSiteData, QualtricsEmailSurveyJobRespons, and QualtricsEmailSurveyData
For all 3 Qualtrics objects, make sure the following:
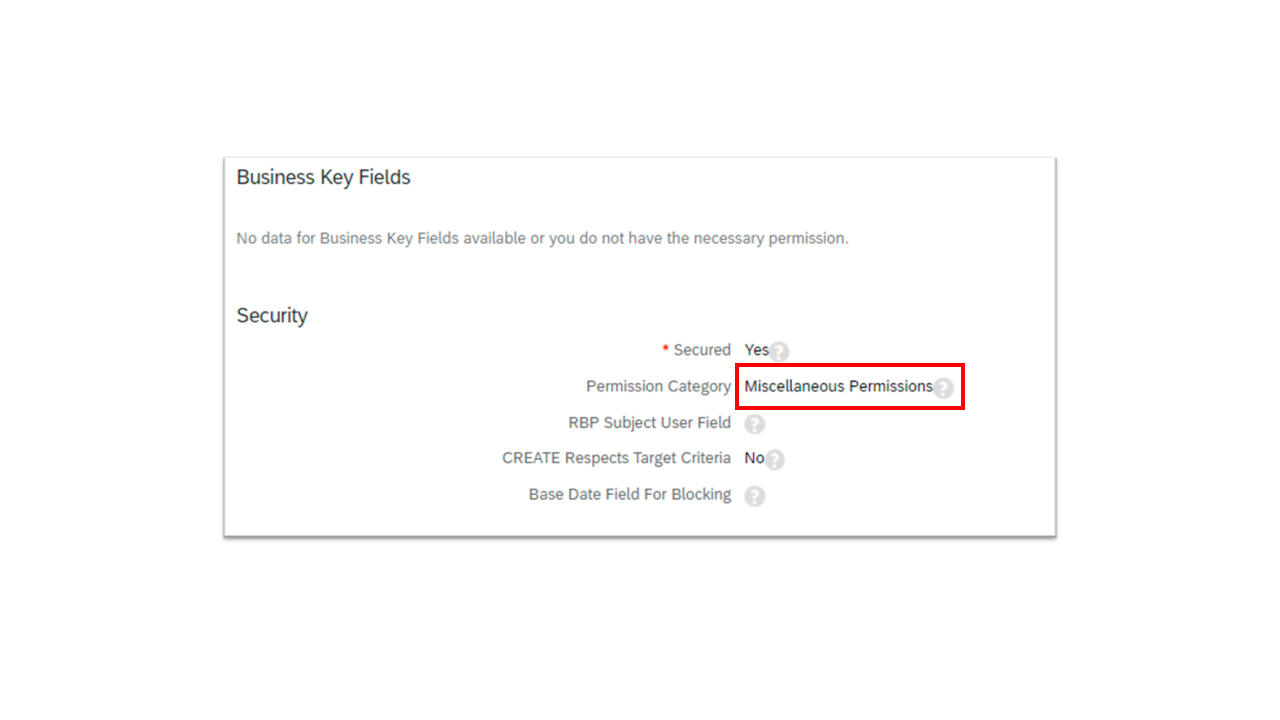
Under Security, permission category: Miscellaneous Permissions.
If all objects’ configurations are set, you can continue to the next step.
Under Miscellaneous Permissions find QualtricsEmailSurveyData to enable access to Email Survey Integrations.
Assign users with View permission.
Assign administrators with Edit permission.
Find QualtricsProjectAndSiteData to enable access to in-app survey
Assign users with View permission.
Assign administrators with Edit and Import/Export permissions.
When finish, Click Done and Save Changes
That’s it, all permissions are set, and you finally can start configuring the integration.
If you plan to setup In-app feedback of SuccessFactors performance evaluation process with Qualtrics Surveys, you can stop now
Configuring the integration
Search for Business Scenarios and look for Qualtrics Integration Definition - EC User Export to SFTP, and activate the integration.
Click the pencil icon to edit the integration
In the following screens you will configure the integration
Set the Output file type to True SCV
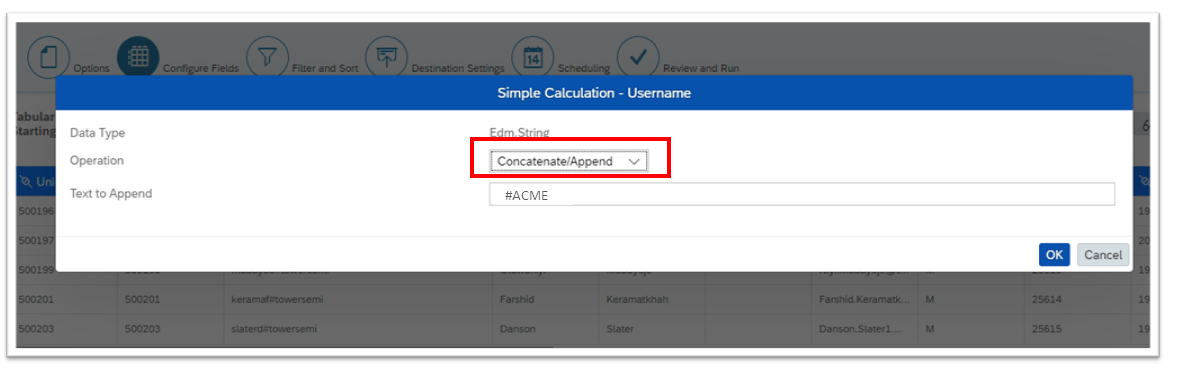
Click Next to go to Configure Fields, find Username column, right click on Username. Then select Edit Calculation
Select Concatenate/Append and then add # following by your Qualtrics instance name.
Example: if your Qualtrics instance URL is https://acme.qualtrics.com, then in text to append is “#acme”
Please note that this is important only If you want to set up SSO between Qualtrics and SuccessFactors.
You can add more fields to your integration such as language or business units or any other by applying standard integration center practice.
In the next step, Destination Setting, fill the relevant SFTP credentials.
You only need to feel the SFTP Username.
Do not forget to Enable Server-Side Pagination.
Click Next to move to the next step and schedule the integration then run the integration once.
Login to the SFTP and make sure that the user file correctly exported.
Download the integration file and save it. You will need it in the next step.
Tips:
You may find that the integration has some errors due to incorrect field mapping. This can be corrected by changing and correcting the fields associations. you can also add new fields to the integration by requirements.
This is the last step in SuccessFactors integration, let’s move on to Qualtrics.
Qualtrics configuration
In the following steps you will configure the integration in Qualtrics side.
Open Qualtrics instance and go to Directories and click on Employee Directory.
Click on New Automation
Name the automation then click Create Automation.
Start by scheduling the automation. For example, once or two times per day.
Click Continue.
In the next step, set the SFTP credentials. In this example you will use SFTP server.
Click Continue
Insert SuccessFactors SFTP server credentials.
Note: Do not encrypt the file.
When finish click Continue
Mapping SuccessFactors exported file to Qualtrics automation
Now map SuccessFactors exported file to Qualtrics automation.
Make sure that the fields map according to the following list:
When finish click Continue
When done, the following screen displays the automation summary
Click Enable Automation
Run Start Manual Run or Resume Automation
Conclusion
In this blog I listed all the necessary steps for configuring both SuccessFactors and Qualtrics users’ integration to create XM Qualtrics projects.

In this blog, I will list all the relevant steps needed when integrating SuccessFactors users to the Qualtrics survey platform.
Prerequisites
- Super Admin privilege in SuccessFactors instance.
- SuccessFactors SFTP login credentials.
- Qualtrics instance URL (it looks like: https://instancename.qualtrics.com)
- Qualtrics employee experience license is required.
- In Qualtrics, Brand Administrator permission.
SuccessFactors configuration
Start by enabling Qualtrics integration:
In SuccessFactors click upgrade Centre.

Then search and click for Qualtrics Employee experience.

Click upgrade now.

Make sure that you have your Qualtrics’ instance URL, then paste it into dialog and press Validate.
The address should look like that: https://instancename.qualtrics.com.

When validated, click Yes.

When finished, click OK.
Now, go to platform feature setting and make sure that Enable Qualtrics feature is checked.

In the following steps you will set the RBP permission in SuccessFactors.
Open your Super Admin permission roll, under Admin Center Permission and check the following:
- Access Qualtrics Integration
- Show Qualtrics in Main Navigation menu (check only if you want to see link to Qualtrics in the SuccessFactors menu)
Click Done and Save Changes

Object definitions
Before continuing, you should check that that the Qualtrics object definitions are correctly configured.
In most of the cases you do not need to change any configuration in this part.
Go to Configure Object Definitions and find 3 objects: QualtricsProjectAndSiteData, QualtricsEmailSurveyJobRespons, and QualtricsEmailSurveyData

For all 3 Qualtrics objects, make sure the following:
Under Security, permission category: Miscellaneous Permissions.
If all objects’ configurations are set, you can continue to the next step.
Under Miscellaneous Permissions find QualtricsEmailSurveyData to enable access to Email Survey Integrations.
Assign users with View permission.
Assign administrators with Edit permission.

Find QualtricsProjectAndSiteData to enable access to in-app survey
Assign users with View permission.
Assign administrators with Edit and Import/Export permissions.
When finish, Click Done and Save Changes

That’s it, all permissions are set, and you finally can start configuring the integration.
If you plan to setup In-app feedback of SuccessFactors performance evaluation process with Qualtrics Surveys, you can stop now
Configuring the integration
Search for Business Scenarios and look for Qualtrics Integration Definition - EC User Export to SFTP, and activate the integration.
Click the pencil icon to edit the integration

In the following screens you will configure the integration
Set the Output file type to True SCV

Click Next to go to Configure Fields, find Username column, right click on Username. Then select Edit Calculation

Select Concatenate/Append and then add # following by your Qualtrics instance name.
Example: if your Qualtrics instance URL is https://acme.qualtrics.com, then in text to append is “#acme”
Please note that this is important only If you want to set up SSO between Qualtrics and SuccessFactors.
You can add more fields to your integration such as language or business units or any other by applying standard integration center practice.
In the next step, Destination Setting, fill the relevant SFTP credentials.
You only need to feel the SFTP Username.


Do not forget to Enable Server-Side Pagination.
Click Next to move to the next step and schedule the integration then run the integration once.
Login to the SFTP and make sure that the user file correctly exported.
Download the integration file and save it. You will need it in the next step.
Tips:
You may find that the integration has some errors due to incorrect field mapping. This can be corrected by changing and correcting the fields associations. you can also add new fields to the integration by requirements.

This is the last step in SuccessFactors integration, let’s move on to Qualtrics.
Qualtrics configuration
In the following steps you will configure the integration in Qualtrics side.
Open Qualtrics instance and go to Directories and click on Employee Directory.

Click on New Automation

Name the automation then click Create Automation.

Start by scheduling the automation. For example, once or two times per day.

Click Continue.
In the next step, set the SFTP credentials. In this example you will use SFTP server.

Click Continue
Insert SuccessFactors SFTP server credentials.

Note: Do not encrypt the file.

When finish click Continue
Mapping SuccessFactors exported file to Qualtrics automation
Now map SuccessFactors exported file to Qualtrics automation.
- Download EMPLOYEE_EXPORT from SuccessFactors SFTP server.
- Click Select File and upload EMPLOYEE_EXPORT file to start mapping the fields.

Make sure that the fields map according to the following list:
| Field name | Field type |
| UniqueID | Person Unique ID Field |
| Person Field | |
| Username | Person Field |
| ManagerID | Person Field (important!) |
| All rest of the fields | Metadata Field |

When finish click Continue
When done, the following screen displays the automation summary
Click Enable Automation

Run Start Manual Run or Resume Automation

Conclusion
In this blog I listed all the necessary steps for configuring both SuccessFactors and Qualtrics users’ integration to create XM Qualtrics projects.
- SAP Managed Tags:
- SAP SuccessFactors HXM Suite,
- User Experience
You must be a registered user to add a comment. If you've already registered, sign in. Otherwise, register and sign in.
Labels in this area
-
1H 2024 Product Release
5 -
2H 2023 Product Release
1 -
ACCRUAL TRANSFER
1 -
Advanced Workflow
1 -
Anonymization
1 -
BTP
1 -
Business Rules
1 -
Canvas Report
1 -
Career Development
1 -
Certificate-Based Authentication
1 -
Cloud Platform Integration
1 -
Compensation
1 -
Compensation Information Management
1 -
Compensation Management
1 -
Compliance
2 -
Content
1 -
Conversational AI
2 -
Custom Data Collection
1 -
custom portlet
1 -
Data & Analytics
1 -
Data Integration
1 -
Dayforce
1 -
deep link
1 -
deeplink
1 -
Delimiting Pay Components
1 -
Deprecation
1 -
Employee Central
1 -
Employee Central Global Benefits
1 -
Employee Central Payroll
1 -
employee profile
1 -
Employee Rehires
1 -
external terminal
1 -
external time events
1 -
Generative AI
2 -
Getting Started
1 -
Global Benefits
1 -
Guidelines
1 -
H2 2023
1 -
HR
2 -
HR Data Management
1 -
HR Transformation
1 -
ilx
1 -
Incentive Management Setup (Configuration)
1 -
Integration Center
2 -
Integration Suite
1 -
internal mobility
1 -
Introduction
1 -
learning
3 -
LMS
2 -
LXP
1 -
Massively MDF attachments download
1 -
Mentoring
1 -
Metadata Framework
1 -
Middleware Solutions
1 -
OCN
1 -
OData APIs
1 -
ONB USA Compliance
1 -
Onboarding
2 -
Opportunity Marketplace
1 -
Pay Component Management
1 -
Platform
1 -
portlet
1 -
POSTMAN
1 -
Predictive AI
2 -
Recruiting
1 -
recurring payments
1 -
Role Based Permissions (RBP)
2 -
SAP CPI (Cloud Platform Integration)
1 -
SAP HCM (Human Capital Management)
2 -
SAP HR Solutions
2 -
SAP Integrations
1 -
SAP release
1 -
SAP successfactors
5 -
SAP SuccessFactors Customer Community
1 -
SAP SuccessFactors OData API
1 -
SAP Workzone
1 -
SAP-PAYROLL
1 -
skills
1 -
Skills Management
1 -
sso deeplink
1 -
Stories in People Analytics
3 -
Story Report
1 -
SuccessFactors
2 -
SuccessFactors Employee central home page customization.
1 -
SuccessFactors Onboarding
1 -
successfactors onboarding i9
1 -
Table Report
1 -
talent
1 -
Talent Intelligence Hub
2 -
talents
1 -
Tax
1 -
Tax Integration
1 -
Time Accounts
1 -
Workflows
1 -
XML Rules
1
Related Content
- New 1H 2024 SAP Successfactors Time (Tracking) Features in Human Capital Management Blogs by SAP
- First Half 2024 Release: What’s New for Work Tech? in Human Capital Management Blogs by SAP
- INTEGRATION CENTER | SFTP DESTINATION without port number 22 can't be selected in Integration Center in Human Capital Management Q&A
- 1H 2024 - Release highlights of SuccessFactors Career Development Planning in Human Capital Management Blogs by Members
- First Half 2024 Release: What’s New in SAP SuccessFactors HCM in Human Capital Management Blogs by SAP
Top kudoed authors
| User | Count |
|---|---|
| 12 | |
| 10 | |
| 5 | |
| 3 | |
| 3 | |
| 2 | |
| 2 | |
| 1 | |
| 1 | |
| 1 |