
- SAP Community
- Products and Technology
- Technology
- Technology Blogs by SAP
- Develop Calculation View in BAS and consume in SAC
Technology Blogs by SAP
Learn how to extend and personalize SAP applications. Follow the SAP technology blog for insights into SAP BTP, ABAP, SAP Analytics Cloud, SAP HANA, and more.
Turn on suggestions
Auto-suggest helps you quickly narrow down your search results by suggesting possible matches as you type.
Showing results for
former_member68
Participant
Options
- Subscribe to RSS Feed
- Mark as New
- Mark as Read
- Bookmark
- Subscribe
- Printer Friendly Page
- Report Inappropriate Content
09-27-2021
3:45 AM
SAP Business Application Studio could help us develop Calculation Views. SAC released connecting SAP HANA Cloud by live data mode. This article explains how to use SAC connect SAP HANA Cloud to illustrate Calculation Views.
✔️ How to create a CAP model on SAP Cloud Platform, Cloud Foundry environment
✔️ How to create HANA tables by CDS
✔️ How to create Calculation View in BAS
✔️ How to consume Calculation View in SAC
Entire package.json file for your reference, memorize the hana instance name mycapdemo-db, it will be invoked later.
Create an SAP Cloud Application Programming Model Project for SAP HANA Cloud
Create Calculation View in BAS
What you will learn
✔️ How to create a CAP model on SAP Cloud Platform, Cloud Foundry environment
✔️ How to create HANA tables by CDS
✔️ How to create Calculation View in BAS
✔️ How to consume Calculation View in SAC
Prerequisites
- Setup environment BAS (SAP Business Application Studio)
- Setup SAP HANA Cloud (Setup SAP HANA Cloud)
- Access permission on SAP Analytics Cloud landscape
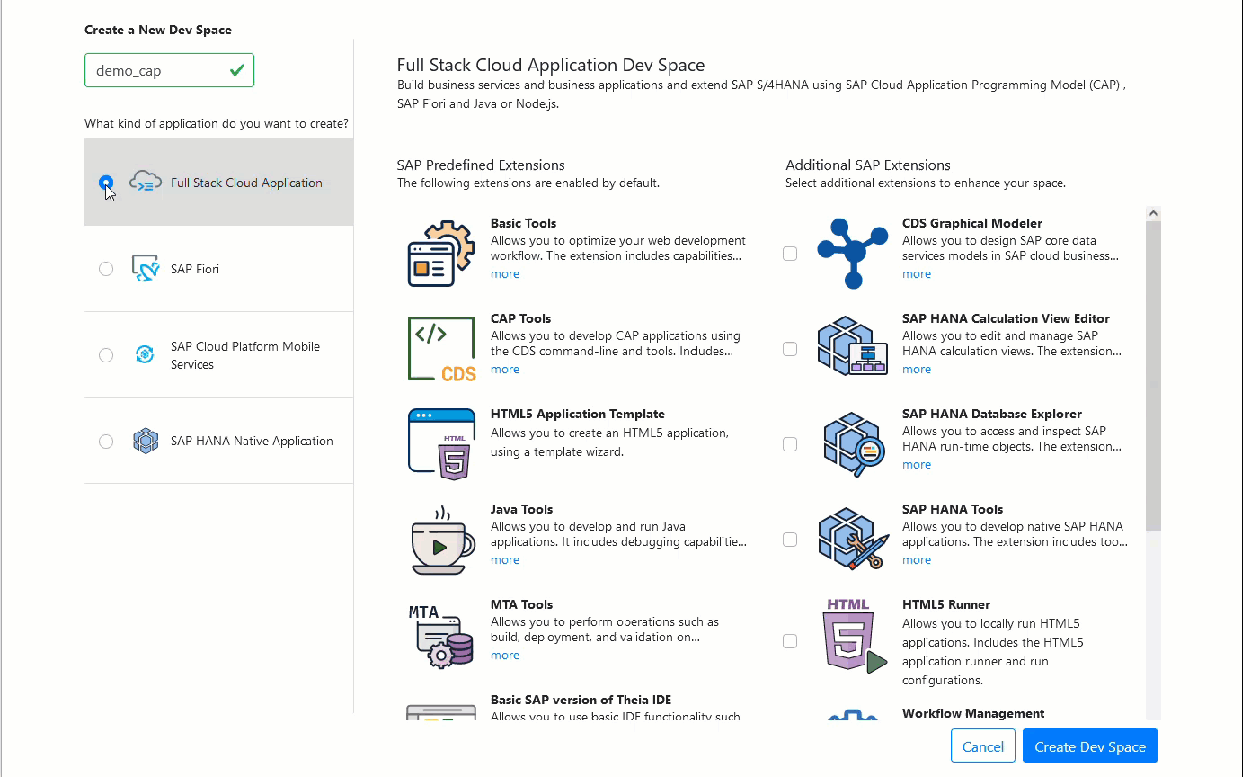
Step1: Create new dev space for CAP
Type a new space name, select Full Stack Cloud Application, check CDS Graphical Modeler, SAP HANA Calculation View Editor, SAP HANA Database Explorer and SAP HANA Tools.
Step2: New CAP project in SAP Application Studio
Select menu Create project from template on Welcome page.
Select CAP tile and then Next. Type your project name, and then select features hana, mta and samples.

Step3: Config CDS in workspace
- Update value for @Sap/hana-client
"@sap/hana-client": "^2.6.61"- Update scripts section
    "start": "cds run",

    "hana": "cds deploy --to hana:mycapdemo-db --auto-undeploy",

"build": "cds build/all --clean"- Add new section hana into cds chapter
"hana": {

      "deploy-format": "hdbtable"

}- update db kind to hana
"kind": "hana"Entire package.json file for your reference, memorize the hana instance name mycapdemo-db, it will be invoked later.
NOTES: Keep the segment "name": "mycapdemo" and hana instance name "mycapdemo-db" mapping. It will avoid much manual job in subsequent steps.
{

  "name": "mycapdemo",

  "version": "1.0.0",

  "description": "A simple CAP project.",

  "repository": "<Add your repository here>",

  "license": "UNLICENSED",

  "private": true,

  "dependencies": {

    "@sap/cds": "^5",

    "express": "^4",

    "@sap/hana-client": "^2.6.61"

  },

  "devDependencies": {

    "@sap/hdi-deploy": "^4.2.0",

    "sqlite3": "^5.0.2"

  },

  "scripts": {

    "start": "cds run",

    "hana": "cds deploy --to hana:mycapdemo-db --auto-undeploy",

    "build": "cds build/all --clean"

  },

  "cds": {

    "hana": {

      "deploy-format": "hdbtable"

    },

    "requires": {

      "db": {

        "kind": "hana"

      }

    }

  }

}- Add new entity Authors
To perform data join query in subsequent calculation view development, add a new table Authors here
Navigate to mycapdemo/db/src/data-model.cds, add a new entity in the file and setup AUTHOR_ID as foreign key in books table.
namespace my.bookshop;


entity Books {

  key ID : Integer;

  title  : String;

  stock  : Integer;

  author : Association to Authors;

}


entity Authors {

  key ID : Integer;

  name  : String;

  Address  : String;

  books  : Association to many Books on books.author = $self;

}
- Add initial data for the tables
if you want to your table including data after table creation, navigate to file mycapdemo/db/data/my.bookshop-Authors.csv and my.bookshop-Books.csv to filling your demo data.
Note: Create the CSV file manually if related file not existing

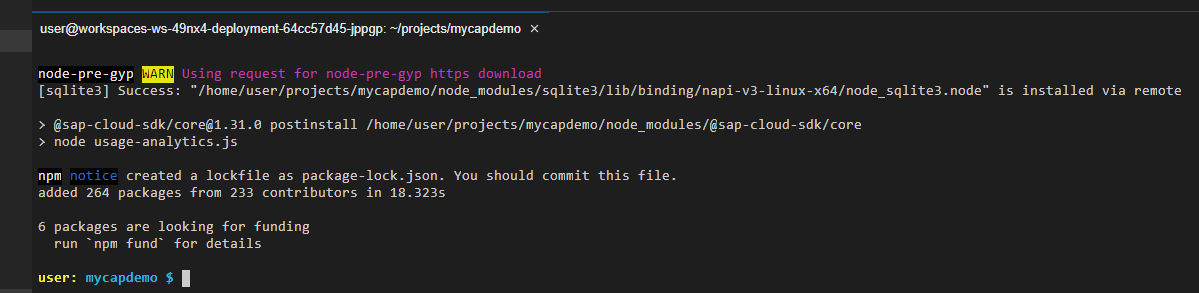
- Pick up node dependencies
Open terminal from menu, and then execute command line:
npm install
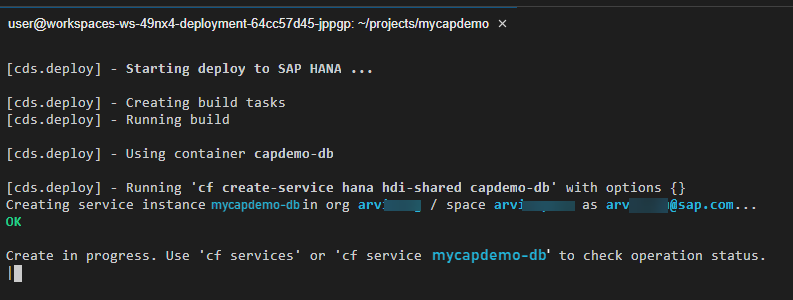
- Create hdi-container and initiate the tables
Login your org/space
Open menu View->Find Command->Login to Cloud Foundry, input your own credential to complete org/space targeting.
This command line will create the hana instance mycapdemo-db here, the creation process will persist several minutes. Execute command line:
npm run hana
- Check OData service availability Execute command:
npm start
After command line execute finished. Click "Open in new tab" to test my cds.services. If you can see following page, that means your cds.service works fine.

Step4: Create Calculation View project in BAS
Open menu View -> Find Command, search item "artifact" in search box.
Open wizard Create SAP HANA Database Artifact
Select Calculation View in Artifact Type drop-down list, and then type a new artifact name

Step5: Develop calculation view
Click new created file event_calc_view.hdbcalculationview to open calculation view editor.
Click "Create Join" from left frame, and then add Data Source "MY_BOOKSHOP_AUTHORS" and "MY_BOOKSHOP_BOOKS"

Double click the join node, and then open the join_1 settings. Drag and drop the ID to BOOKs.AUTHOR_ID

Click Mapping tab in the join_1 setting, drag and drop the column from left Data Source to right Output Columns, and then drag the arrow connect to Aggregation node, click "X" to close the join_1 settings page

Click "Create Rank" to add a new rank node to Calculation View
![]()
Double click on the Rank_1 node to open rank settings, switch to Mapping tab. Make sure all related columns list out in the left Data Sources list
![]()
Switch to Definition tab, add new sort ID in Sort Column.
![]()
Click Aggregation node to navigate to aggregation settings, drag and drop all columns to the Output Columns list

Step6: Deploy Calculation View
Click the Rocket icon to deploy your calculation view to SAP HANA Cloud

Note: Make sure your dev space has already connected to CF correctly. If not, you can run command cf login to login CFStep7: Check Calculation View in SAP HANA Database Explorer
Click cubic icon under the DB Connection node to open the HDI container in SAP HANA Database Explorer. Please bind HDI container manually if your DB connection is empty

Click Column Views under HDI container "mycapdemo-db". Select the calculation view, and then click Open Data
Drag and drop measures to Value Axis, check the preview. If preview displays correctly, which means the calculation view deployed successfully.

Step8: Consume Calculation View in SAC
- Create Connection Login BTP Cockpit, Open Instances and Subscriptions, click the instance mycapdemo-db from the list, and then open "mycapdemo-db-key", copy these values for creating SAC connection

| Required Parameters |
|---|
| host |
| user |
| password |
Login SAC, create new connection to connecting SAP HANA Cloud, input the parameters into the connection wizard

- Create Modeler
Open Create Modeler wizard, click Live Data Model to launch wizard Create Model From Live Data Connection.

- Create new Story
Open Create Story wizard page, select Canvas, Click Chart icon, select new created modeler from the list.
Select Chart Orientation Vertical, Add Measures
 The Calculation View will display on canvas.

Referenced link:
Create an SAP Cloud Application Programming Model Project for SAP HANA Cloud
Create Calculation View in BAS
- SAP Managed Tags:
- SAP HANA Cloud, SAP HANA database
Labels:
You must be a registered user to add a comment. If you've already registered, sign in. Otherwise, register and sign in.
Labels in this area
-
ABAP CDS Views - CDC (Change Data Capture)
2 -
AI
1 -
Analyze Workload Data
1 -
BTP
1 -
Business and IT Integration
2 -
Business application stu
1 -
Business Technology Platform
1 -
Business Trends
1,658 -
Business Trends
92 -
CAP
1 -
cf
1 -
Cloud Foundry
1 -
Confluent
1 -
Customer COE Basics and Fundamentals
1 -
Customer COE Latest and Greatest
3 -
Customer Data Browser app
1 -
Data Analysis Tool
1 -
data migration
1 -
data transfer
1 -
Datasphere
2 -
Event Information
1,400 -
Event Information
66 -
Expert
1 -
Expert Insights
177 -
Expert Insights
295 -
General
1 -
Google cloud
1 -
Google Next'24
1 -
Kafka
1 -
Life at SAP
780 -
Life at SAP
13 -
Migrate your Data App
1 -
MTA
1 -
Network Performance Analysis
1 -
NodeJS
1 -
PDF
1 -
POC
1 -
Product Updates
4,577 -
Product Updates
341 -
Replication Flow
1 -
RisewithSAP
1 -
SAP BTP
1 -
SAP BTP Cloud Foundry
1 -
SAP Cloud ALM
1 -
SAP Cloud Application Programming Model
1 -
SAP Datasphere
2 -
SAP S4HANA Cloud
1 -
SAP S4HANA Migration Cockpit
1 -
Technology Updates
6,873 -
Technology Updates
419 -
Workload Fluctuations
1
Related Content
- Developing & Deploying the UI5 App to Cloud Foundry and Accessing from App-router End-to-End Steps in Technology Blogs by Members
- ABAP Cloud Developer Trial 2022 Available Now in Technology Blogs by SAP
- Developer extendibility for custom table and publish oDATA in Technology Q&A
- Consuming SAP with SAP Build Apps - Connectivity options for low-code development - part 2 in Technology Blogs by SAP
- Consume Ariba APIs using Postman in Technology Blogs by SAP
Top kudoed authors
| User | Count |
|---|---|
| 36 | |
| 25 | |
| 16 | |
| 13 | |
| 7 | |
| 7 | |
| 6 | |
| 6 | |
| 6 | |
| 6 |