
- SAP Community
- Products and Technology
- Technology
- Technology Blogs by SAP
- Step-By-Step Guide to Pay-As-You-Go for Partners
Technology Blogs by SAP
Learn how to extend and personalize SAP applications. Follow the SAP technology blog for insights into SAP BTP, ABAP, SAP Analytics Cloud, SAP HANA, and more.
Turn on suggestions
Auto-suggest helps you quickly narrow down your search results by suggesting possible matches as you type.
Showing results for
Product and Topic Expert
Options
- Subscribe to RSS Feed
- Mark as New
- Mark as Read
- Bookmark
- Subscribe
- Printer Friendly Page
- Report Inappropriate Content
09-21-2021
4:40 PM
Updated: November 2022
This guide presents a detailed step-by-step procedure for enabling a Pay-As-You-Go service type global BTP account as an Open Ecosystem PartnerEdge Build program member. In addition it describes how to investigate the potential costs of using free services. And finally, it details the provisioning, framing-up, building, deploying and testing of a simple reference multitenant example application without using any services that require a fee.
There will be a lot of screen-shots in this post in order to give you confirmation that things are progressing as expected. If you find you get stuck, don't be afraid to reach out to the SAP Community if you are an Open Ecosystem partner or your Partner Service Administrator(PSA) if you are a paid PartnerEdge member for assistance. The contact information for your PSA can be found in the Manage My Partnership application.
A more generalized document describing this process can be found in the PAYGO quick guide.
Also you can find a lot of detail in the PAYGO FAQ document.
Right click on Company & Contacts and select My Company and Contacts.
Scroll down to the Partner Types and Contacts section are visible.
Scroll down to the Partner Types and Contacts section are visible. If you are an Open Ecosystem partner, you won't have a PSA so check with the community.
Start by going to the PartnerEdge Portal and logging in with your S-User account. Under News find What's new or go to Pay-As-You-Go with Free Tier Services.
Scroll down until you see the steps.
Pay attention to the when to use "Pay-As-You-Go" and the note since this will help you plan for when you want you want to move your solution from a test and development mode into a production mode. The costs and capabilities can differ significantly and you need to be able to gage the viability of your solution from a cost perspective. Select Order Service to get started. This will launch the Manage My Services application. Click Add Service.
Click on the Select Service dropdown.
Type in 8009282 to narrow the list and click on Pay-As-You-Go... Notice there is no fee per month.
Click the Step 2 button.
Now select your Technical Admin by pulling down the list. Proceed to Step 3.
Likewise select your Invoice Contact. You can leave the PO Number field blank.
Do review the Terms & Conditions since again these will affect your decisions when you move from test and development to production.
Check the checkbox and click Order.
You will get a confirmation screen with a Request ID. Make a note of it and check the status of the request in the Manage My Services application.
Initially the status will be In Progress. You'll likely need to wait for a EU business day to pass for processing.
The status should change to Service Booked once it's been processed.
You should see two emails from SAP pertaining to your service order. The first is informational.
The second will contain account details.
Scroll down to the link to your new BTP cloud account.
Check the links on the initial notice popup.
Congratulations, you have a BTP cloud account. The first thing to do is to create a subaccount. Click Create -> Subaccount.
Fill in the display name as Provider to distinguish it from other subaccount we'll create later. Use a short subdomain name with lowercase characters and no dashes etc. Pick a region that makes sense for your location/preference. Enter a brief description and click on Create.
Click on the Provider subaccount.
Click on the Cloud Foundry Environment and then click Enable Cloud Foundry button.
Select the "free" plan. Enter instance name and org name. Use lowercase but don't use whitespace chars. Click Create.
As long as there are no name conflicts, the system will start creating the cloud foundry instance.
Once created, click on the Create Space button.
Give your space a name and check Space Manager and Developer. Click Create.
Once created, click on the space name.
Pay-As-You-Go does not necessarily mean free. You need to be careful how you use BTP services if your goal is to avoid SAP generating an invoice that you'll be obligated to pay(remember that little checkbox above?).
The easiest way to find out what prices of various services is to use the Discovery Center.
You can filter the services shown by clicking on the filter icon.
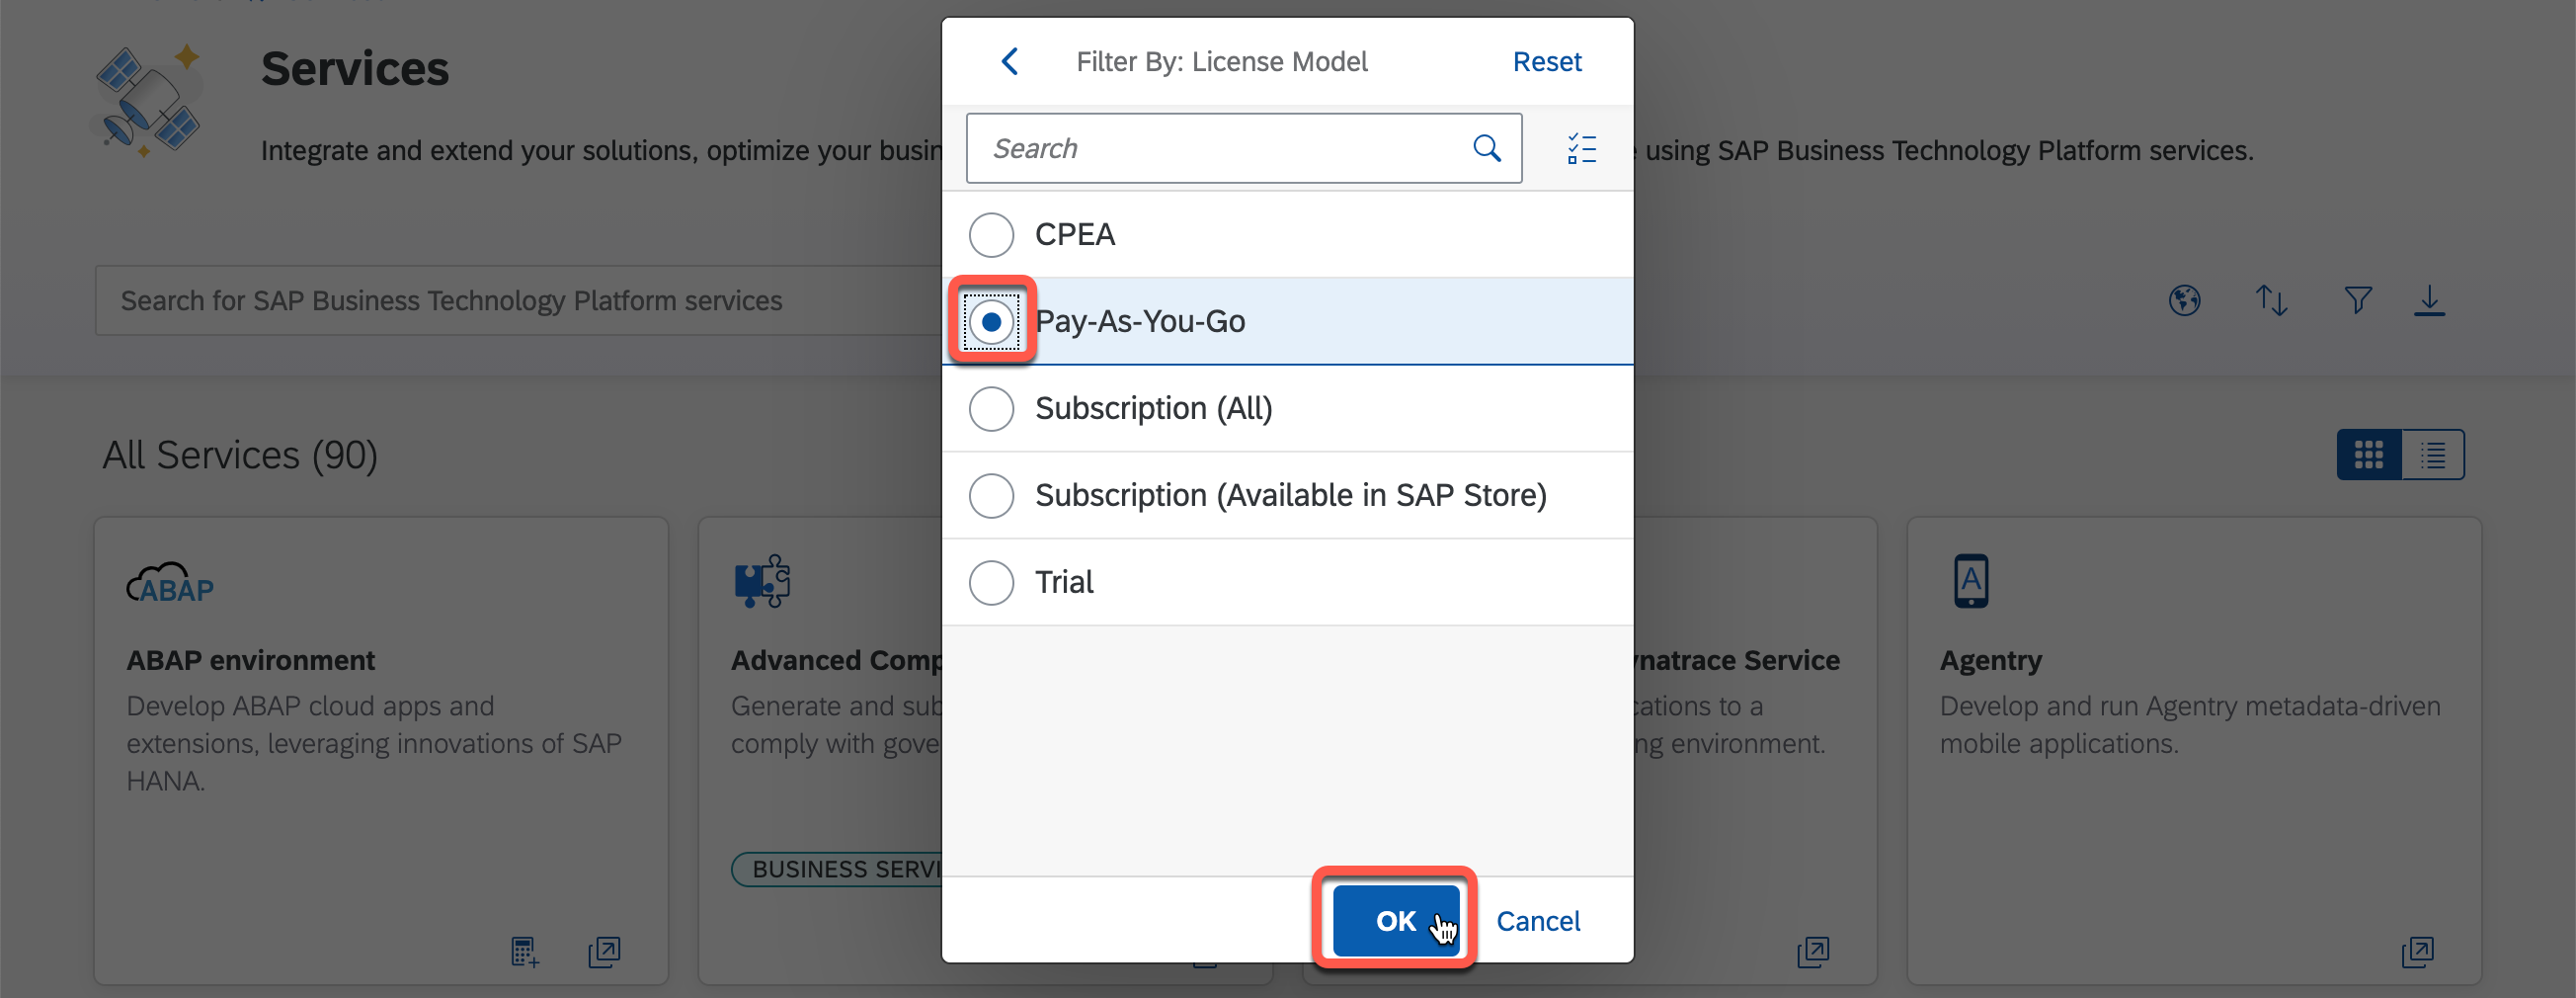
Pick by License Model.
Select Pay-As-You-Go and OK.
Now pay particular attention to the services labeled FREE TIER. These can be safely used without incurring a cost IF you pick the proper free plan. Other non-free plans may exist for a particular service and they will be at a discounted rate compared to production pricing.
Another way to explore services and their costs is to consult the Pay-As-You-Go Partner Price List.
You will undoubtedly need some runtime capability if your intention is to run even the smallest application. Let's find the service by searching for "runtime". Click on the Cloud Foundry Runtime tile.
There are two plans available free and standard. Looking at the free plan, notice that you will get 4GM of RAM at a price of 0.00 USD per month. So you can safely use this without incurring a cost.
Jumping back to the BTP Cockpit, if we want to use SAP's Business Application Studio(BAS) to develop an application, we'll need to subscribe to it. Before being able to subscribe to BAS, you have to allocate a quota to the subaccount where you want to create an instance. At the top level of the account, click on Entitlement -> Entity Assignments and select the Provider subaccount and Select.
Click the Go button.
Click Configure Entitlements.
Click Add Service Plans.
Add entitlement for BAS free plan.
Add entitlement for Cloud Foundry Runtime free plan.
Increase the Cloud Foundry Runtime to 3 by clicking the "+". It is very important that you click Save after adding and/or adjusting the quotas.
Now that the needed quotas are assigned to the Provider subaccount we can subscribe to BAS. Navigate to the Provider subaccount. To create a new subscription, click Create.
Click Save.
See that BAS is now Subscribed.
Now before we can use the BAS, our logged in user must have the right security role collection assigned to it. Do this by going to Security -> Trust Configuration. Click on the Default identity provider link.
Now type in the email address of the S-User you're logged in with then click Show Assignments.
This load your current assignments and enables the Assign Role Collection button. Click it now.
Check the two BAS role collections and click Assign Role Collection.
Confirm that the role collections are properly listed.
Now go back to Instances and Subscriptions and click on the "Go to Application" icon next to the BAS link. You should get the BAS Welcome screen. Click the Create Dev Space button.
Give your Dev Space the name "Main", select Full Stack Cloud Application" and click the Create Dev Space button.
It takes a few minutes for a new Dev Space to start. Keep an eye on the status.
When it changes to RUNNING, click on the Dev Space name(Main).
Once it's open, click on the Open Folder button.
Select the project folder and click Open.
After BAS reloads, click on the Extensions icon.
Read the disclaimer and click OK.
Now use the search field and search for BAS. Click Install next to the "BAS Extras" extension.
The button will change to Uninstall. What this extension does is add a bunch of commands to the command palette. You can open it from the menu with View -> Find Command...
Select the BAS: Install HANA Academy yeoman generators.
Use the Command Palette to search for and launch the Template Wizard.
Scroll to the Saphanaacademy Sassa wizard and click on Start.
Fill out the wizard fields that are visible selecting the choices below then scroll down.
Make the remaining selections as below and then click Next to frame-up the project files.
In the file tree, expand the newly created project saastest.
Right click on the mta.yaml file and then select Build MTA Project from the context menu.
A new mta_archives folder will be created. Expand it and then right click on the saastest_0.0.1.mtar file and select Deploy MTA Archive from the context menu.
If you are not already logged into Cloud Foundry, you'll be prompted to login now. Verify the landscape is correct and press enter.
Enter the email associated with your S-User, then press enter.
Enter your password, press enter. Select the org(not shown), press enter, Select the space(not shown), and press enter. You will see a bunch of build messages flash by in the console. When it's finished you'll see the Process finished message. The app url is in the prior lines.
Open this URL in a new browser tab.
Notice that the links don't work for you. You are accessing the application from the provider subaccount. In order to facilitate subscribing to the application(creating a route for the new subscription), a user must be defined in the application's environment. Open up a terminal window and enter these commands substituting your email and password.
Now let's create a subaccount from which we can subscribe to our new multitenant application. Return to the BTP Cockpit and the global account level. Create a new subaccount.
Create the subaccount like this. Be careful to select the same region as your provider subaccount.
Click on the new subaccount SubA tile.
Click on Instances and Subscriptions and Create.
Select the saastest app from the drop-down.
And then click the Create button.
Your subscription should show Processing...
...then Subscribed.
Before we go to our application as a subscribed user, we first must give our user the proper permissions of the newly subscribed application. This can be automated when the subscriber is using their own identity provider, but when using the default identity provider we must do this manually. Go to Trust Configuration and click on the Default identity provider link.
Enter the email associated with your S-User account and click on Show Assignments.
Click on Assign Role Collectionl
Check the checkboxes for Role Collections associated with the app and then click Assign Role Collection.
Verify that the Roll Collections are assigned.
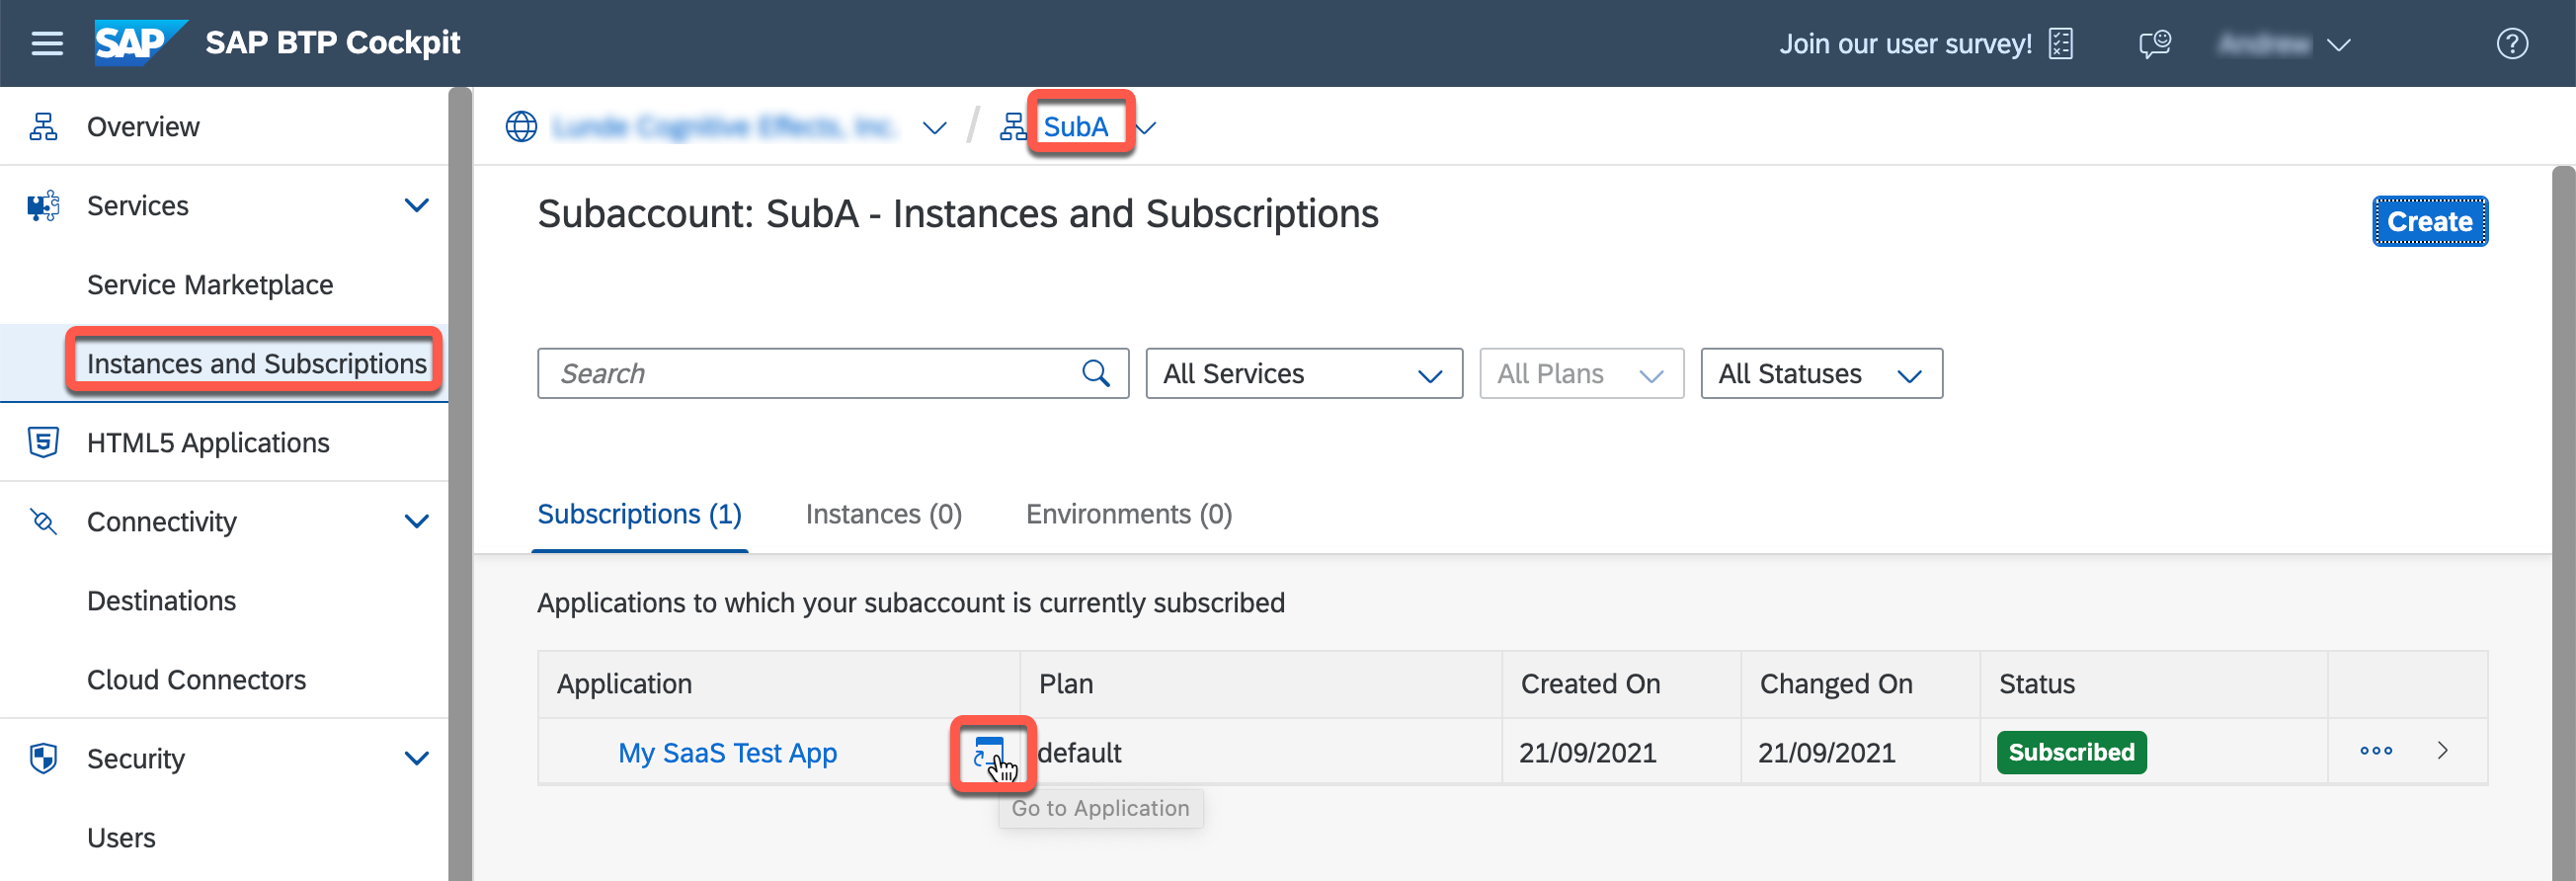
Return to the SubA subaccount's Instances and Subscriptions and click on the Go To Application.
Now notice the suba in the url. If you get an error it's likely that the route wasn't created properly. You can check this with the "cf routes" command (not shown).
If everything is correct and your user has the right permissions, you'll get some text output with the logged in users details.
The Subscriptions link shows subscription details.
You now have a simple multitenant application running on BTP at zero cost to you.
After you've got a few days of history built up in your account, you can check the Usage Analytics in order to keep tabs on your activity and see if you've done anything that might incur a charge.
Check broader account details at your Me@SAP page.
For more information on multitenant application development, please check out the highly recommended HANA Academy YouTube series on the topic.
https://youtu.be/Oj0f9BSRh08?list=PLkzo92owKnVwQ-0oT78691fqvHrYXd5oN&t=125
https://www.youtube.com/playlist?list=PLkzo92owKnVx3Sh0nemX8GoSNzJGfsWJM
This blog post has been long but I hope it has sufficient detail to get you started on your road to BTP application development as a new partner. Good Luck!
Let me know if you have and questions or issues by leaving me a question below or better yet, asking it on the SAP community.
-Andrew
This guide presents a detailed step-by-step procedure for enabling a Pay-As-You-Go service type global BTP account as an Open Ecosystem PartnerEdge Build program member. In addition it describes how to investigate the potential costs of using free services. And finally, it details the provisioning, framing-up, building, deploying and testing of a simple reference multitenant example application without using any services that require a fee.
NOTE: The Pay-As-You-Go service type for partners is for Test, Demonstration, and Development only. Offering a solution for productive customers is not allowed from this service type. You will need a plan to move your solution to a productive service type account once it is ready to do so. For more details on PLS licensing, see sappartneredge.com | Test, Demonstration, and Development
There will be a lot of screen-shots in this post in order to give you confirmation that things are progressing as expected. If you find you get stuck, don't be afraid to reach out to the SAP Community if you are an Open Ecosystem partner or your Partner Service Administrator(PSA) if you are a paid PartnerEdge member for assistance. The contact information for your PSA can be found in the Manage My Partnership application.
A more generalized document describing this process can be found in the PAYGO quick guide.
Also you can find a lot of detail in the PAYGO FAQ document.
Right click on Company & Contacts and select My Company and Contacts.

Scroll down to the Partner Types and Contacts section are visible.

Scroll down to the Partner Types and Contacts section are visible. If you are an Open Ecosystem partner, you won't have a PSA so check with the community.

If you are a PE Build, PE Sell, or PE Service member, find your contacts in the SAP Contacts tab.

Note: If you are a PE Service or PE Sell member you may find that additional steps/approvals are required in the following steps.
Start by going to the PartnerEdge Portal and logging in with your S-User account. Under News find What's new or go to Pay-As-You-Go with Free Tier Services.

Scroll down until you see the steps.
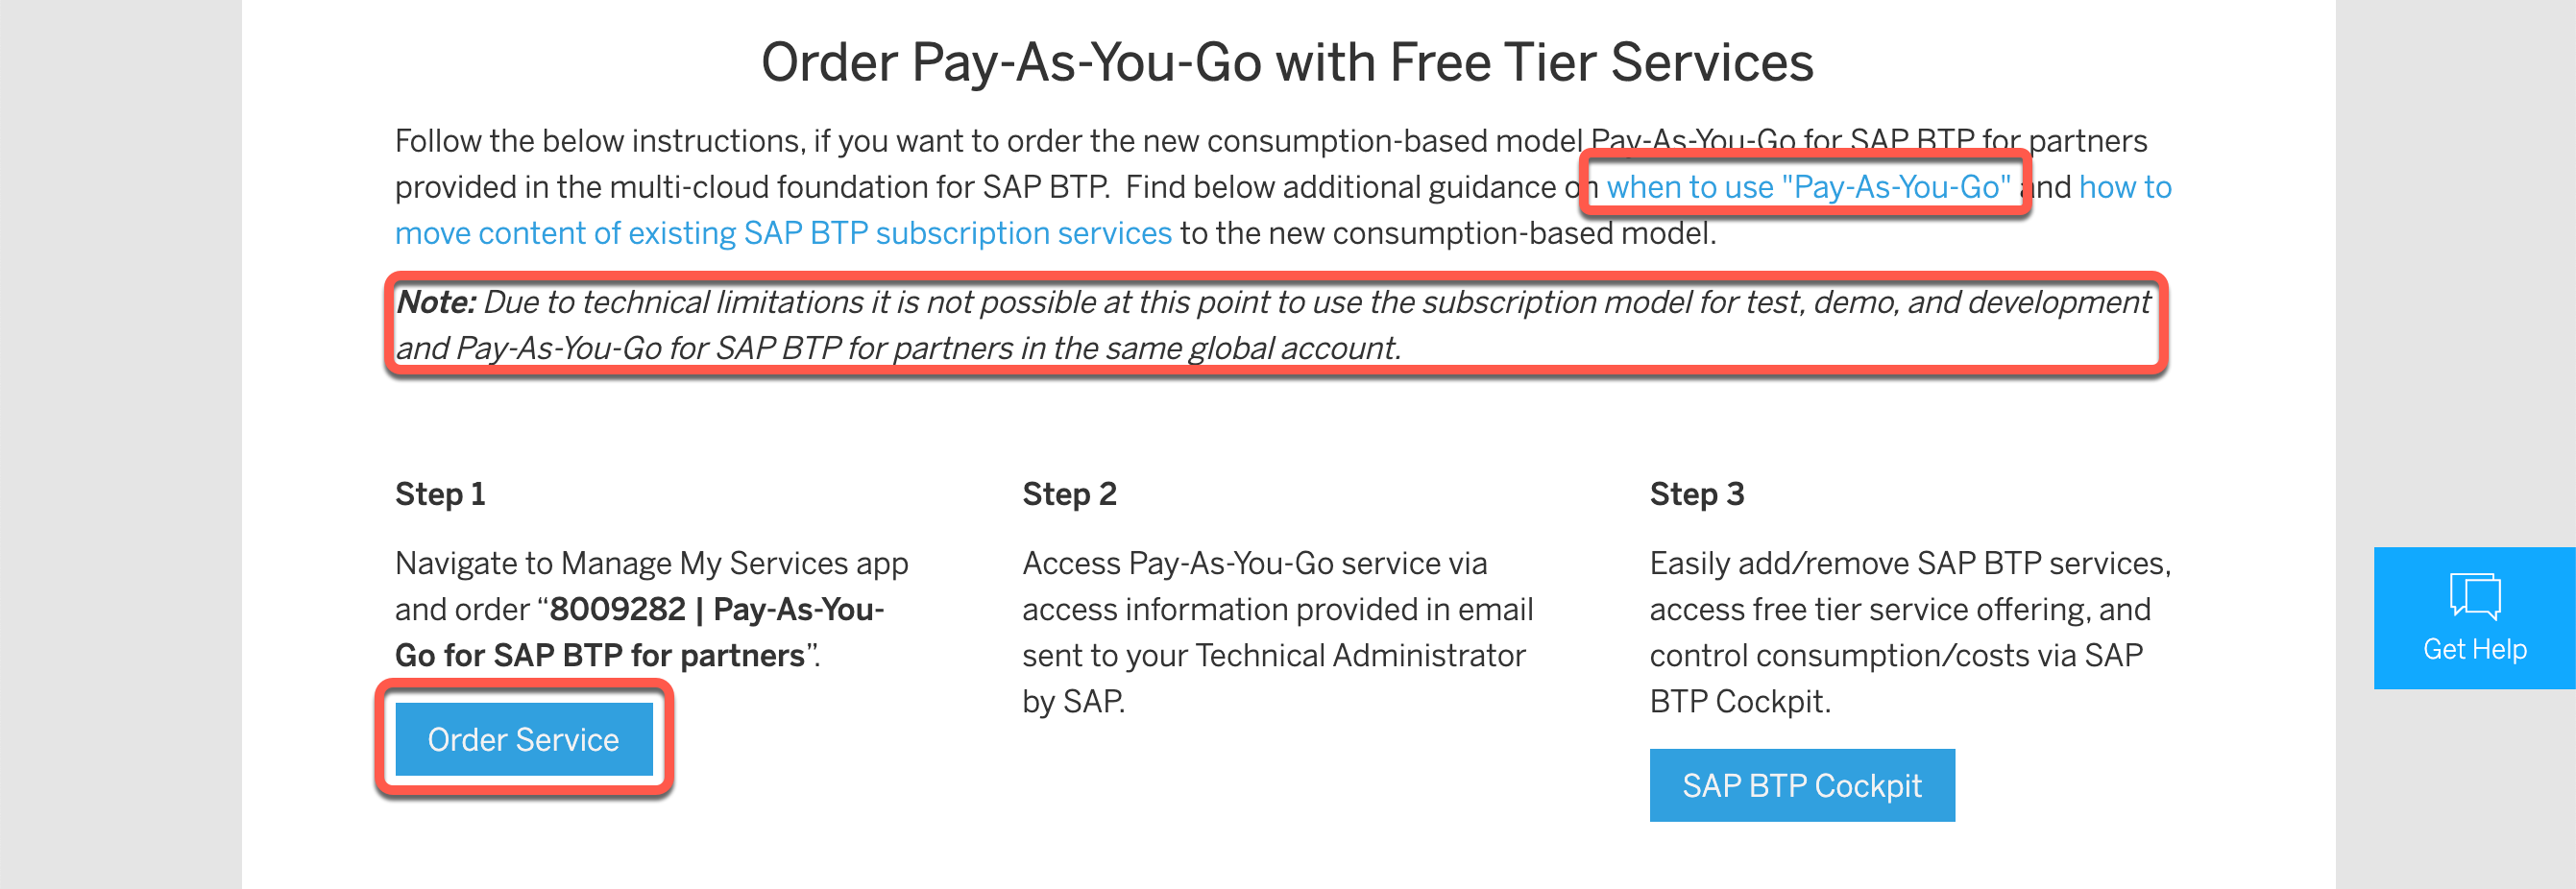
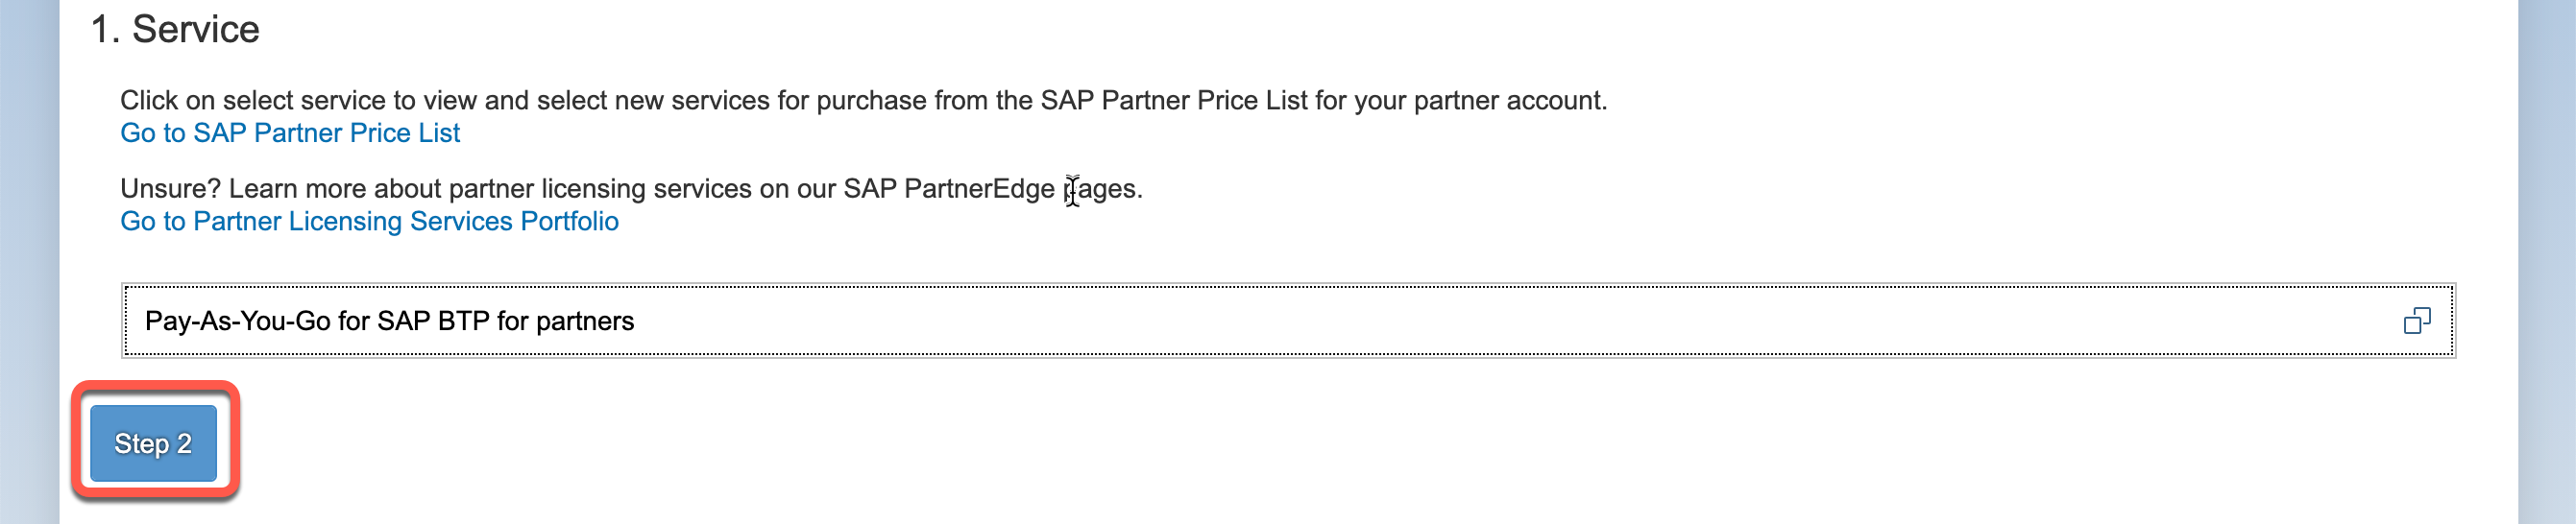
Pay attention to the when to use "Pay-As-You-Go" and the note since this will help you plan for when you want you want to move your solution from a test and development mode into a production mode. The costs and capabilities can differ significantly and you need to be able to gage the viability of your solution from a cost perspective. Select Order Service to get started. This will launch the Manage My Services application. Click Add Service.

Click on the Select Service dropdown.

Type in 8009282 to narrow the list and click on Pay-As-You-Go... Notice there is no fee per month.

Click the Step 2 button.
Now select your Technical Admin by pulling down the list. Proceed to Step 3.

Likewise select your Invoice Contact. You can leave the PO Number field blank.

Do review the Terms & Conditions since again these will affect your decisions when you move from test and development to production.
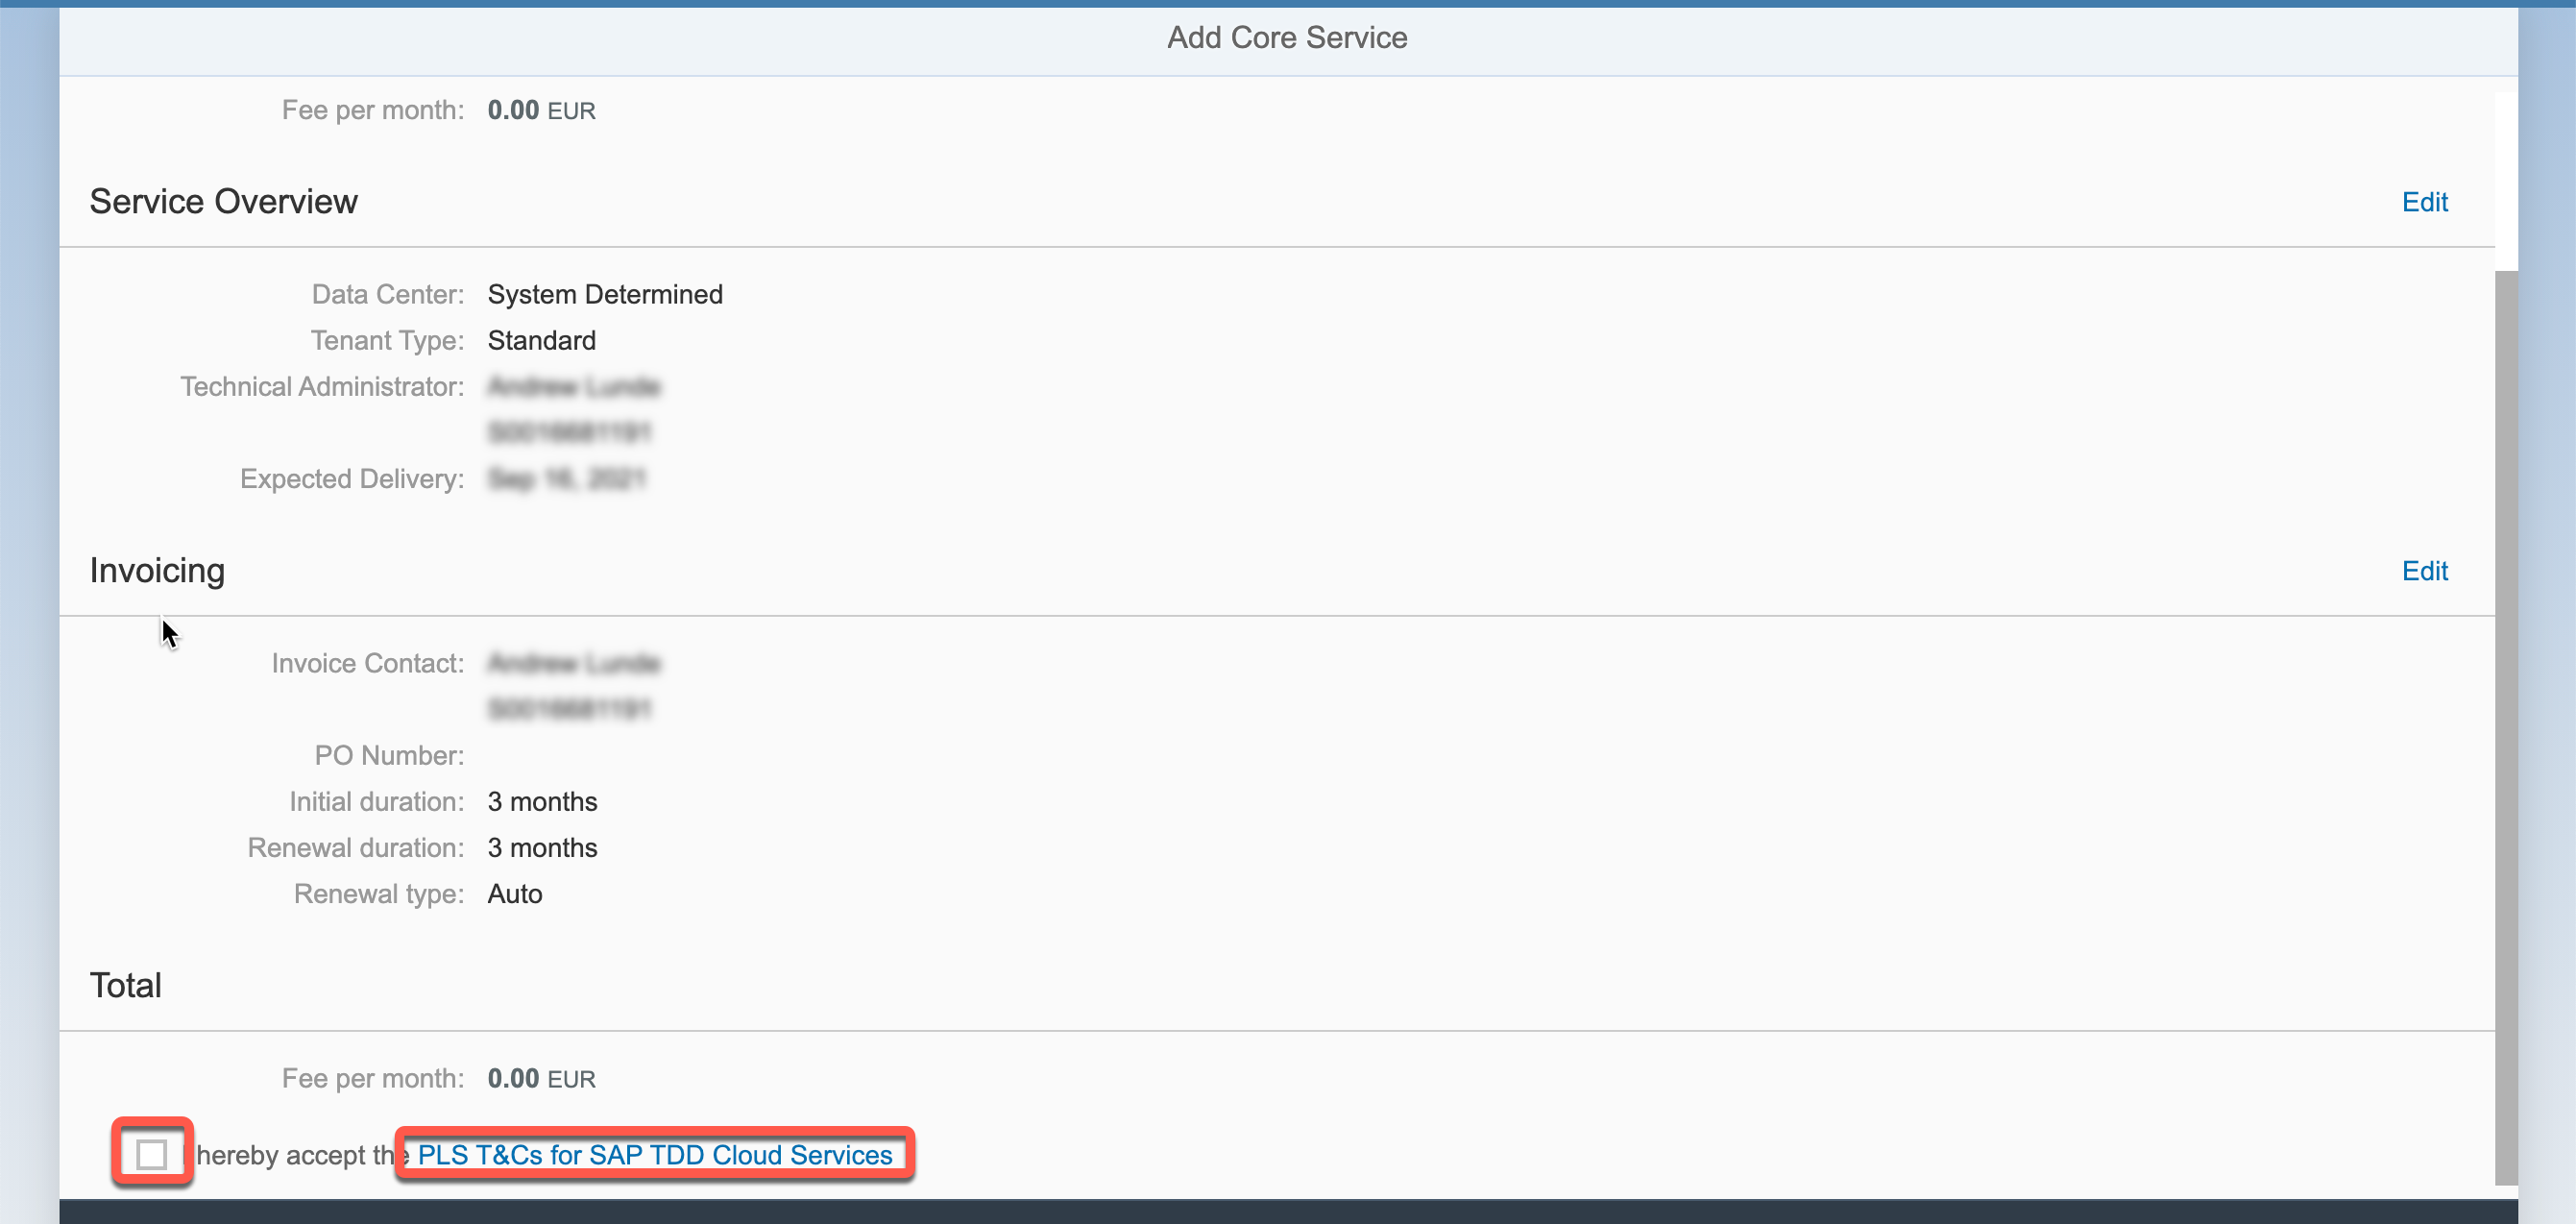
Check the checkbox and click Order.

You will get a confirmation screen with a Request ID. Make a note of it and check the status of the request in the Manage My Services application.

Initially the status will be In Progress. You'll likely need to wait for a EU business day to pass for processing.

The status should change to Service Booked once it's been processed.

You should see two emails from SAP pertaining to your service order. The first is informational.

The second will contain account details.

Scroll down to the link to your new BTP cloud account.

Check the links on the initial notice popup.

Congratulations, you have a BTP cloud account. The first thing to do is to create a subaccount. Click Create -> Subaccount.

Fill in the display name as Provider to distinguish it from other subaccount we'll create later. Use a short subdomain name with lowercase characters and no dashes etc. Pick a region that makes sense for your location/preference. Enter a brief description and click on Create.

Click on the Provider subaccount.

Click on the Cloud Foundry Environment and then click Enable Cloud Foundry button.

Select the "free" plan. Enter instance name and org name. Use lowercase but don't use whitespace chars. Click Create.

As long as there are no name conflicts, the system will start creating the cloud foundry instance.

Once created, click on the Create Space button.

Give your space a name and check Space Manager and Developer. Click Create.

Once created, click on the space name.

Pay-As-You-Go does not necessarily mean free. You need to be careful how you use BTP services if your goal is to avoid SAP generating an invoice that you'll be obligated to pay(remember that little checkbox above?).
The easiest way to find out what prices of various services is to use the Discovery Center.
You can filter the services shown by clicking on the filter icon.

Pick by License Model.

Select Pay-As-You-Go and OK.
Now pay particular attention to the services labeled FREE TIER. These can be safely used without incurring a cost IF you pick the proper free plan. Other non-free plans may exist for a particular service and they will be at a discounted rate compared to production pricing.
Another way to explore services and their costs is to consult the Pay-As-You-Go Partner Price List.
You will undoubtedly need some runtime capability if your intention is to run even the smallest application. Let's find the service by searching for "runtime". Click on the Cloud Foundry Runtime tile.
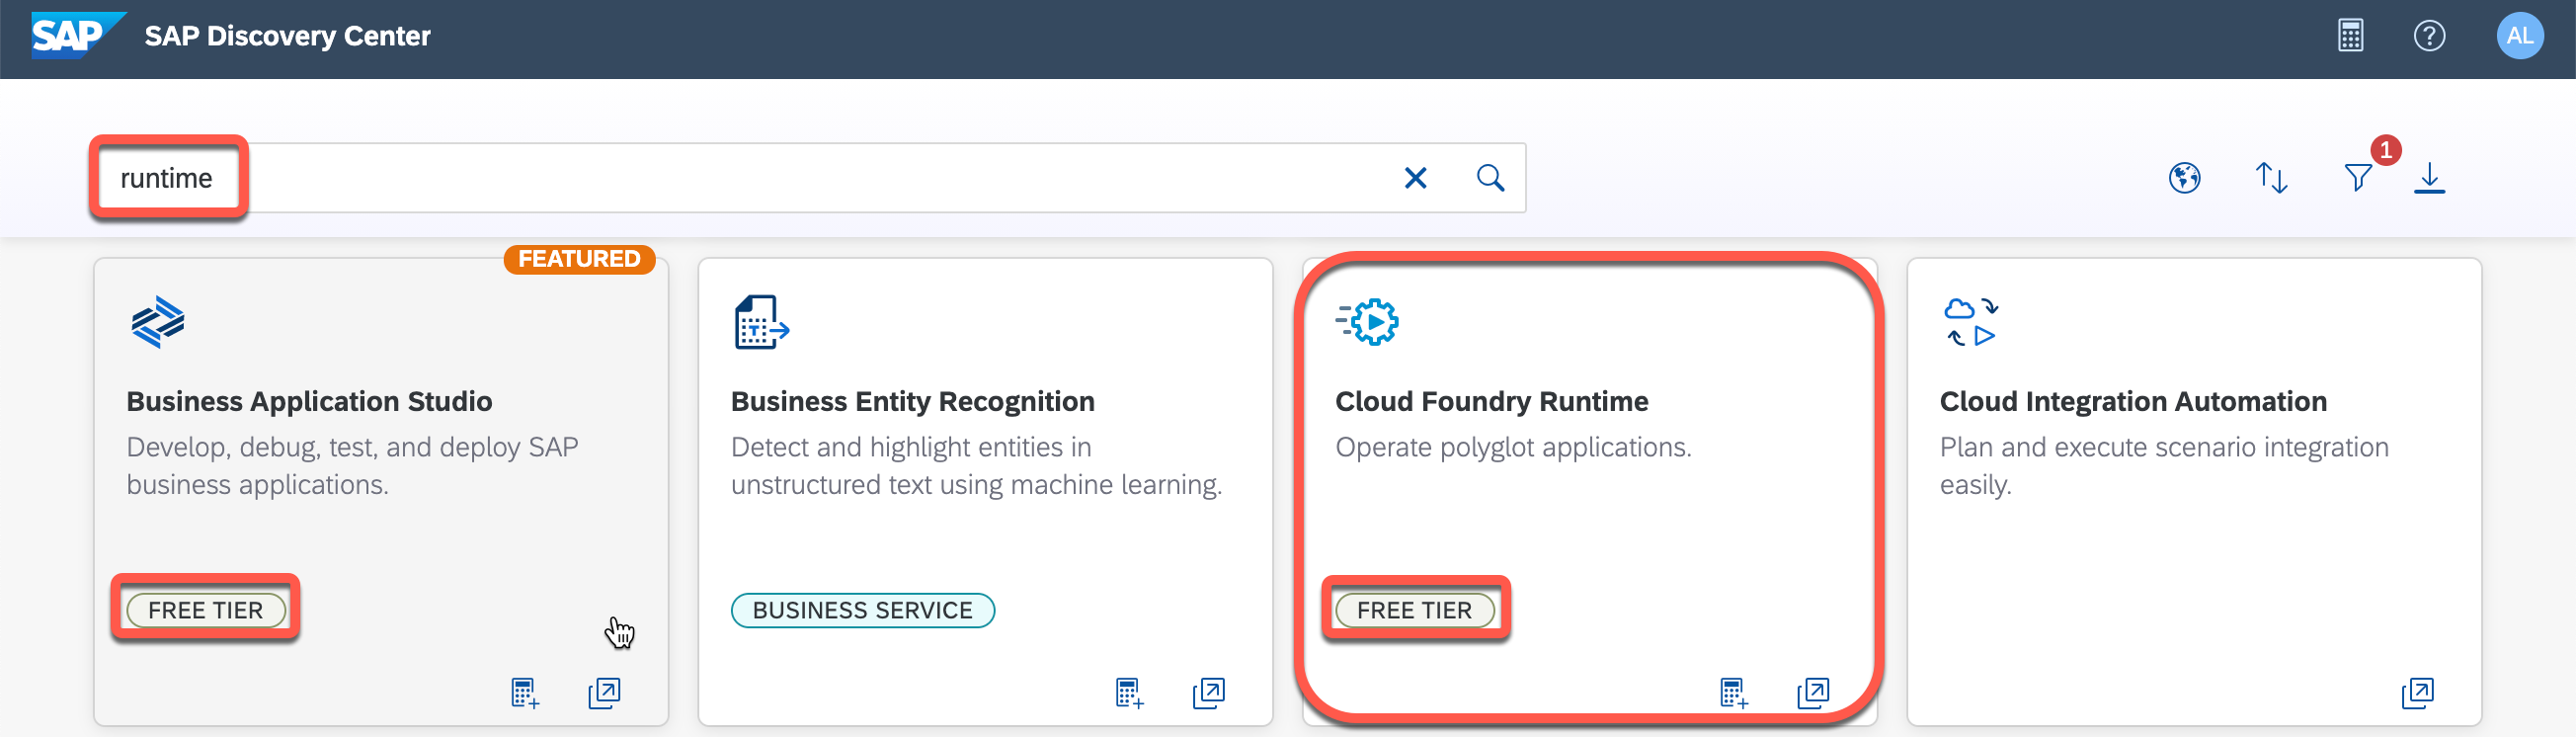
There are two plans available free and standard. Looking at the free plan, notice that you will get 4GM of RAM at a price of 0.00 USD per month. So you can safely use this without incurring a cost.

Jumping back to the BTP Cockpit, if we want to use SAP's Business Application Studio(BAS) to develop an application, we'll need to subscribe to it. Before being able to subscribe to BAS, you have to allocate a quota to the subaccount where you want to create an instance. At the top level of the account, click on Entitlement -> Entity Assignments and select the Provider subaccount and Select.
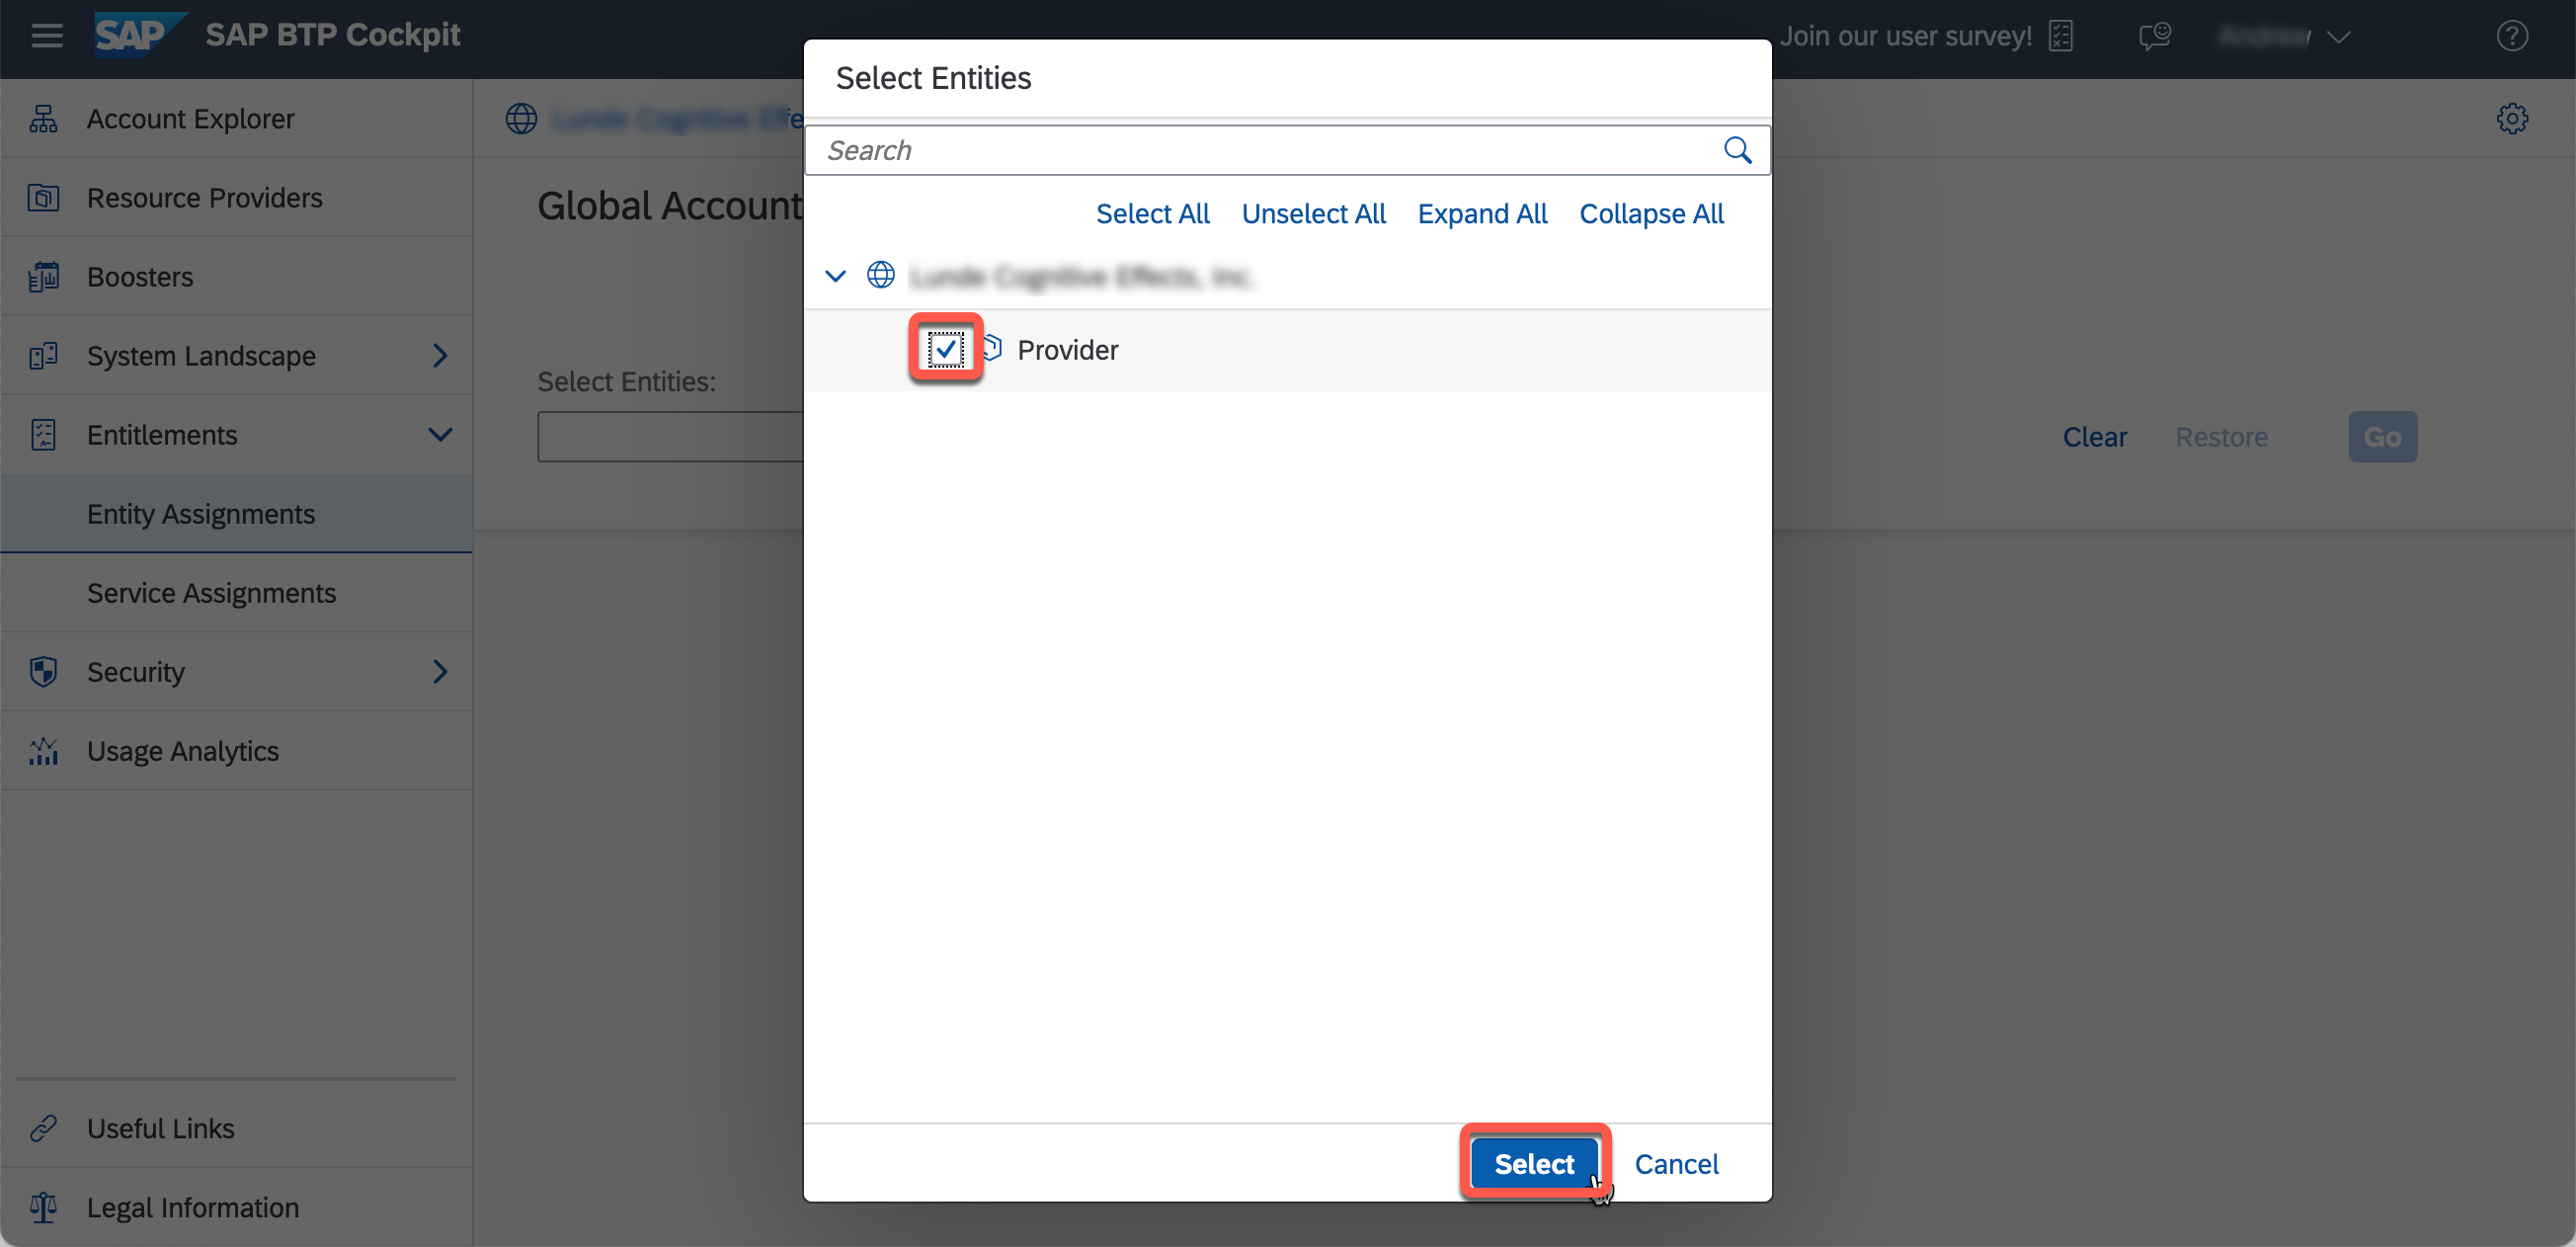
Click the Go button.

Click Configure Entitlements.

Click Add Service Plans.

Add entitlement for BAS free plan.

Add entitlement for Cloud Foundry Runtime free plan.

Increase the Cloud Foundry Runtime to 3 by clicking the "+". It is very important that you click Save after adding and/or adjusting the quotas.

Now that the needed quotas are assigned to the Provider subaccount we can subscribe to BAS. Navigate to the Provider subaccount. To create a new subscription, click Create.

Select the SAP Business Application Studio from the pull-down.

Click Save.

See that BAS is now Subscribed.

Now before we can use the BAS, our logged in user must have the right security role collection assigned to it. Do this by going to Security -> Trust Configuration. Click on the Default identity provider link.

Now type in the email address of the S-User you're logged in with then click Show Assignments.

This load your current assignments and enables the Assign Role Collection button. Click it now.

Check the two BAS role collections and click Assign Role Collection.

Confirm that the role collections are properly listed.

Now go back to Instances and Subscriptions and click on the "Go to Application" icon next to the BAS link. You should get the BAS Welcome screen. Click the Create Dev Space button.

Give your Dev Space the name "Main", select Full Stack Cloud Application" and click the Create Dev Space button.

It takes a few minutes for a new Dev Space to start. Keep an eye on the status.

When it changes to RUNNING, click on the Dev Space name(Main).

Once it's open, click on the Open Folder button.

Select the project folder and click Open.

After BAS reloads, click on the Extensions icon.

Read the disclaimer and click OK.

Now use the search field and search for BAS. Click Install next to the "BAS Extras" extension.

The button will change to Uninstall. What this extension does is add a bunch of commands to the command palette. You can open it from the menu with View -> Find Command...

Select the BAS: Install HANA Academy yeoman generators.

Use the Command Palette to search for and launch the Template Wizard.

Scroll to the Saphanaacademy Sassa wizard and click on Start.

Fill out the wizard fields that are visible selecting the choices below then scroll down.

Make the remaining selections as below and then click Next to frame-up the project files.

In the file tree, expand the newly created project saastest.

Right click on the mta.yaml file and then select Build MTA Project from the context menu.

A new mta_archives folder will be created. Expand it and then right click on the saastest_0.0.1.mtar file and select Deploy MTA Archive from the context menu.

If you are not already logged into Cloud Foundry, you'll be prompted to login now. Verify the landscape is correct and press enter.

Enter the email associated with your S-User, then press enter.

Enter your password, press enter. Select the org(not shown), press enter, Select the space(not shown), and press enter. You will see a bunch of build messages flash by in the console. When it's finished you'll see the Process finished message. The app url is in the prior lines.

Open this URL in a new browser tab.

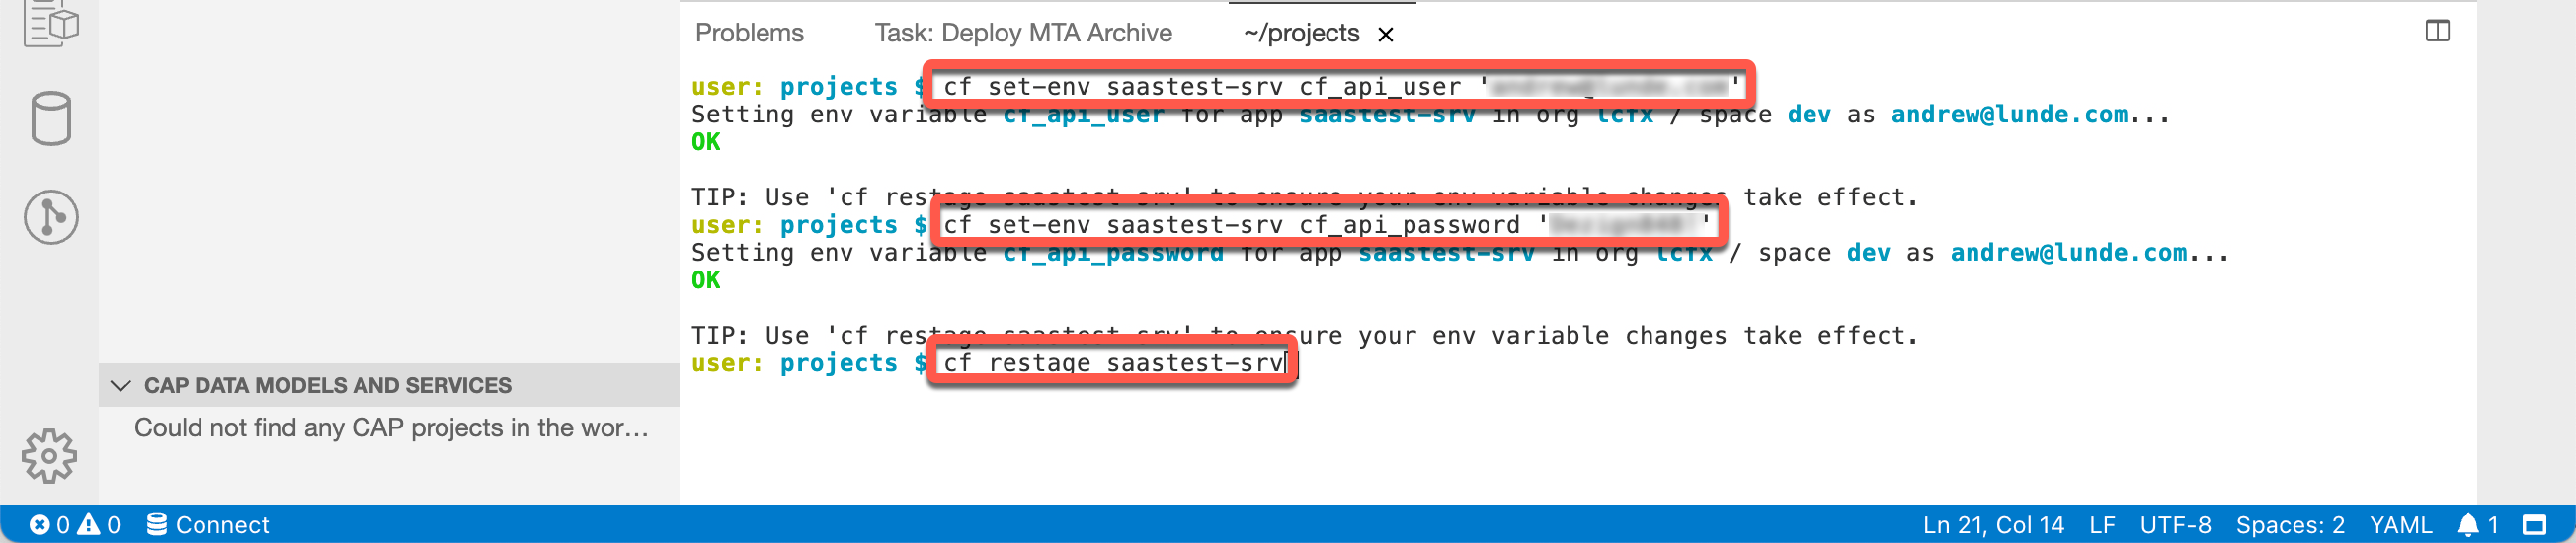
Notice that the links don't work for you. You are accessing the application from the provider subaccount. In order to facilitate subscribing to the application(creating a route for the new subscription), a user must be defined in the application's environment. Open up a terminal window and enter these commands substituting your email and password.

cf set-env saastest-srv cf_api_user '<email>'

cf set-env saastest-srv cf_api_password '<password>'

cf restage saastest-srv
Now let's create a subaccount from which we can subscribe to our new multitenant application. Return to the BTP Cockpit and the global account level. Create a new subaccount.

Create the subaccount like this. Be careful to select the same region as your provider subaccount.

Click on the new subaccount SubA tile.

Click on Instances and Subscriptions and Create.

Select the saastest app from the drop-down.

And then click the Create button.

Your subscription should show Processing...

...then Subscribed.

Before we go to our application as a subscribed user, we first must give our user the proper permissions of the newly subscribed application. This can be automated when the subscriber is using their own identity provider, but when using the default identity provider we must do this manually. Go to Trust Configuration and click on the Default identity provider link.

Enter the email associated with your S-User account and click on Show Assignments.

Click on Assign Role Collectionl

Check the checkboxes for Role Collections associated with the app and then click Assign Role Collection.

Verify that the Roll Collections are assigned.

Return to the SubA subaccount's Instances and Subscriptions and click on the Go To Application.
Now notice the suba in the url. If you get an error it's likely that the route wasn't created properly. You can check this with the "cf routes" command (not shown).

If everything is correct and your user has the right permissions, you'll get some text output with the logged in users details.


The Subscriptions link shows subscription details.


You now have a simple multitenant application running on BTP at zero cost to you.
After you've got a few days of history built up in your account, you can check the Usage Analytics in order to keep tabs on your activity and see if you've done anything that might incur a charge.

Check broader account details at your Me@SAP page.
For more information on multitenant application development, please check out the highly recommended HANA Academy YouTube series on the topic.
https://youtu.be/Oj0f9BSRh08?list=PLkzo92owKnVwQ-0oT78691fqvHrYXd5oN&t=125
https://www.youtube.com/playlist?list=PLkzo92owKnVx3Sh0nemX8GoSNzJGfsWJM
This blog post has been long but I hope it has sufficient detail to get you started on your road to BTP application development as a new partner. Good Luck!
Let me know if you have and questions or issues by leaving me a question below or better yet, asking it on the SAP community.
-Andrew
| Partners: If you have a question, click here to ask it in the SAP Community . Be sure to tag it with Partnership and leave your company name in the question so that we can better assist you. |
- SAP Managed Tags:
- SAP BTP, Cloud Foundry runtime and environment,
- Partnership
Labels:
You must be a registered user to add a comment. If you've already registered, sign in. Otherwise, register and sign in.
Labels in this area
-
ABAP CDS Views - CDC (Change Data Capture)
2 -
AI
1 -
Analyze Workload Data
1 -
BTP
1 -
Business and IT Integration
2 -
Business application stu
1 -
Business Technology Platform
1 -
Business Trends
1,661 -
Business Trends
91 -
CAP
1 -
cf
1 -
Cloud Foundry
1 -
Confluent
1 -
Customer COE Basics and Fundamentals
1 -
Customer COE Latest and Greatest
3 -
Customer Data Browser app
1 -
Data Analysis Tool
1 -
data migration
1 -
data transfer
1 -
Datasphere
2 -
Event Information
1,400 -
Event Information
66 -
Expert
1 -
Expert Insights
178 -
Expert Insights
293 -
General
1 -
Google cloud
1 -
Google Next'24
1 -
Kafka
1 -
Life at SAP
784 -
Life at SAP
12 -
Migrate your Data App
1 -
MTA
1 -
Network Performance Analysis
1 -
NodeJS
1 -
PDF
1 -
POC
1 -
Product Updates
4,577 -
Product Updates
337 -
Replication Flow
1 -
RisewithSAP
1 -
SAP BTP
1 -
SAP BTP Cloud Foundry
1 -
SAP Cloud ALM
1 -
SAP Cloud Application Programming Model
1 -
SAP Datasphere
2 -
SAP S4HANA Cloud
1 -
SAP S4HANA Migration Cockpit
1 -
Technology Updates
6,886 -
Technology Updates
415 -
Workload Fluctuations
1
Top kudoed authors
| User | Count |
|---|---|
| 29 | |
| 21 | |
| 10 | |
| 7 | |
| 7 | |
| 6 | |
| 6 | |
| 5 | |
| 5 | |
| 5 |