
- SAP Community
- Products and Technology
- Technology
- Technology Blogs by SAP
- New Command-Line Interface for SAP Datasphere - co...
Technology Blogs by SAP
Learn how to extend and personalize SAP applications. Follow the SAP technology blog for insights into SAP BTP, ABAP, SAP Analytics Cloud, SAP HANA, and more.
Turn on suggestions
Auto-suggest helps you quickly narrow down your search results by suggesting possible matches as you type.
Showing results for
Advisor
Options
- Subscribe to RSS Feed
- Mark as New
- Mark as Read
- Bookmark
- Subscribe
- Printer Friendly Page
- Report Inappropriate Content
09-21-2021
7:41 AM
This blog post is part of a series of blogs I published about @sap/datasphere-cli. Find all blog posts related to this topic in my overview blog post here.
Update: I released another blog "Automatically Add Members to Spaces in SAP Datasphere Using @sap/datasphere-cli" describing how to automatically retrieve passcodes and do mass-member assignments to spaces in SAP Datasphere.
Although nice-looking and easy-to-use user interfaces are more important than ever for a software product to be willingly accepted by the market, enabling good automation and programmatic access to the solution is equally important. With good APIs at hand repetitive tasks can be easily automated and developers embed the solution in the company's CI/CD automated setups and external applications.
Introduction
This blog is part of a blog post series about the Command-Line Interface (CLI) for SAP Datasphere. Find the full overview of all available blogs in the overview blog post here.
The SAP Datasphere Command-Line Interface (CLI) is available on npmjs.com as a standalone Node.js module. Starting with a small functional scope in the domain of space management, the CLI enables you as a user of SAP Datasphere to access your tenants programmatically, allowing you to automate and speed up recurring tasks which otherwise require lots of manual, repetitive work (and we, the digital natives of today, don't like repetitive, manual work, eh?)

Using the command-line interface
A little story to tell ...
To provide you with some hands-on experience while reading this blog, I'm using the example of mass user assignment to spaces for demonstrating the power of the CLI.
Imagine the following situation: You're the administrator of your company's SAP Datasphere tenant and are asked to prepare the tenant for a new project that's about to start soon. The project requires you to set up three spaces with slightly different settings regarding the space's storage resources, and 1000 users assigned to each of the spaces. The list of users is available in an Excel sheet.
Now, you start navigating to your tenant and creating the first space. It takes a few seconds to load the UI and navigate to the space management, because, well, rendering the UI and loading the required resources isn't done as quickly as that (do I really get the promised 100Mbit/s?). You configure the available resources and start adding the first user. Then the second user, third user, fourth user, ... you know the drill. A quick look at the clock tells you that you already spent 5 minutes to only create one space and assigning 10 users. You quickly do the math and check your calendar whether there's something up for the rest of the week. Luckily it's Friday and it seems you'll enjoy a quiet afternoon and not much planned for the weekend, so enough time to continue the fun task at hand! 🙂
You stop assigning users as you start thinking that this task probably starts boring you within the next minute, open google.com and start typing "datasphere automate space creation user assignment". There's one interesting hit that talks about the SAP Datasphere CLI. As you start making yourself familiar with the topic, you are keen to learn all about the new tool and how it will save you a tremendous amount of time when working with your SAP Datasphere tenant in the future.
Installation
The CLI is available on npmjs.com as a node module named @sap/datasphere-cli. To install the tool, you require a node environment on the machine where you install the module. To figure out whether node is already installed in your environment, just run the following command:
$ node -v

v12.21.0
If installed, you should receive a response like v12.21.0 as above, returning the currently installed version. Otherwise, you can download the current node version from the node.js website and follow the installation instructions according to your environment.
Node modules are installed through the node package manager (npm). To install the @Sap/datasphere-cli module, run
$ npm install -g @sap/datasphere-cliThe -g option is optional and installs the module globally in your environment, so you can call it from any place. If you want to install it locally into the current directory, omit the -g option.
To check whether the CLI is correctly installed, run
$ datasphere -v

2021.20.0
Same as when checking the installed Node.js version, this command returns the currently installed CLI version. Don't worry if a different version number is displayed. To get help on any available command, you can always add the -h or --help option to any command, and it will return more human-friendly information.
$ datasphere -h

Usage: datasphere [options] [command]


Command-Line Interface for SAP Datasphere.


Options:

  -v, --version   output the version number

  -h, --help      display help for command


Commands:

  spaces          manage and orchestrate spaces

  help [command]  display help for command
If you receive a similar output, you're good to go!
Versioning
If you already have some experience with Node.js modules, npm, and the like, you'll probably wonder why we start with version 2021.20.0 instead of 1.0.0 like you normally do with new modules. Well, technically it doesn't matter which version you start with. However, since Datasphere is also delivered in waves and you need an easy way to figure out whether the CLI version you use is compatible with the current wave deployed into your tenant, we decided to stay in sync with the wave versioning.
We will not ship a new CLI version with every new wave deployed into your tenant every other week, simply for the fact that there's not always a change applied to the CLI only because a new wave is deployed. That approach causes the most recent CLI version available on npmjs.com to probably be lower than the currently deployed wave in your tenant. That doesn't matter, because you simply need to ensure that you use the most recent CLI version which is equal to or lower than the wave version deployed in your tenant. In case there are multiple CLI versions to which this statement applies, use the one with the highest version. Here's a quick example:
Wave currently in the roll out process,

but not yet available in all tenants: 2021.24


CLI versions available on nmpjs.com (in descending order,

we didn't ship a new version for wave 2021.23 and 2021.20):

2021.24

2021.22

2021.19

2021.18
In case your tenant still uses wave 2021.23, you want to use version 2021.22 of the CLI, because the version is lower than the wave version, which also applies to versions 2021.19 and 2021.18, but from the list of these three versions, we use the highest available one: 2021.22 (please note that this version actually does not exist, this is just an artificial example 🙂You can find all versions on npmjs.com). If your tenant already received wave 2021.24, you want to use version 2021.24 of the CLI. Installing a specific version is as simple as running
$ npm install -g @sap/datasphere-cli@2021.24.0Add the version to be installed after the second @. To install the latest version, use the term latest:
$ npm install @sap/datasphere-cli@latestUsage
With the initially delivered version, the CLI supports creating and updating space definitions, reading definitions of, and deleting existing spaces. Following the use case described above, let's take a close look at how the CLI enables us to set up everything within 5 minutes or less.
User Permissions
To create, read, or update spaces in your SAP Datasphere tenant the user you use to retrieve the passcode has to have the following privileges assigned in SAP Datasphere:
Space: Create, Read, Update, Manage
Team: Create, Read, Update
Creating Spaces
We start by creating an empty space without connections or members assigned. We call the space MYSPACE with the description "This is my space" and assign some storage and computing resources to it. The file to define the space looks like this:
// MYSPACE.json


{

    "MYSPACE": {

        "spaceDefinition": {

            "version": "1.0.4",

            "label": "This is my space",

            "assignedStorage": 10000000, // 100 MB

            "assignedRam": 10000000, // 100 MB

            "priority": 1

        }

    }

}
We save the file as MYSPACE.json. All properties except the version are optional, meaning you can omit them when creating or updating a space. When omitting a property, in case it's already defined by the tenant it is not touched. When creating a new space the default value is used. For your reference, all default values are documented in SAP Help. Thus, the least minimal file looks like this:
{

    "MYSPACE": {

        "spaceDefinition": {

            "version": "1.0.4"

        }

    }

}
We then need to know how we can supply the information to our SAP Datasphere tenant to create a new space. To figure out which command to run to create a space, we run datasphere spaces -h to see which commands are available:
$ datasphere spaces -h

Usage: datasphere spaces [options] [command]


manage and orchestrate spaces


Options:

  -h, --help               display help for command


Commands:

  create [options]         creates/updates space details based on an import file

  delete [options] <name>  delete an existing space

  read [options] <name>    fetches space details for a specified space

  help [command]           display help for command
According to this output to create a space we shall run datasphere spaces create:
$ datasphere spaces create

error: required option -H, --host not specified
Do'h seems like we're missing something. What does the help say?
$ datasphere spaces create -h

Usage: main spaces create [options]


creates/updates space details based on an import file


Options:

  -f, --filePath <filePath>  path to definition file

  -V, --verbose              print detailed log information to console (optional)

  -H, --host <host>          specifies the url host where the tenant is hosted

  -p, --passcode <passcode>  passcode for interactive session authentication (optional)

  -h, --help                 display help for command
Ah, we have to mention which host (tenant) we'd like to connect to and create the space in (makes sense!), and an optional passcode for authenticating our own user. We already know the tenant URL which typically follows the pattern https://<your company's Datasphere prefix>.<region>.hcs.cloud.sap/, for example, https://datasphere-my-example-company.eu10.hcs.cloud.sap/. We don't yet know what the passcode option is exactly, so let's try running the CLI with the host and filePath option, pointing to the file we defined earlier, and omitting the passcode option.
$ datasphere spaces create -H https://datasphere-my-example-company.eu10.hcs.cloud.sap/ -f MYSPACE.json

 Do you want to retrieve a passcode from https://datasphere-my-example-company.authentication.eu10.hana.ondemand.com/passcode? … yes
Sweet, the CLI prompts us for a passcode because we didn't provide one through the CLI options. When responding with Y (for Yes), it also opens the browser automatically and navigates to the mentioned URL:

Retrieving the passcode
Let's copy the passcode and continue:
Enter your temporary authentication code: … **********Alright, the CLI didn't return any errors. Let's check our tenant whether the space exists. Et voilà, there we have it!
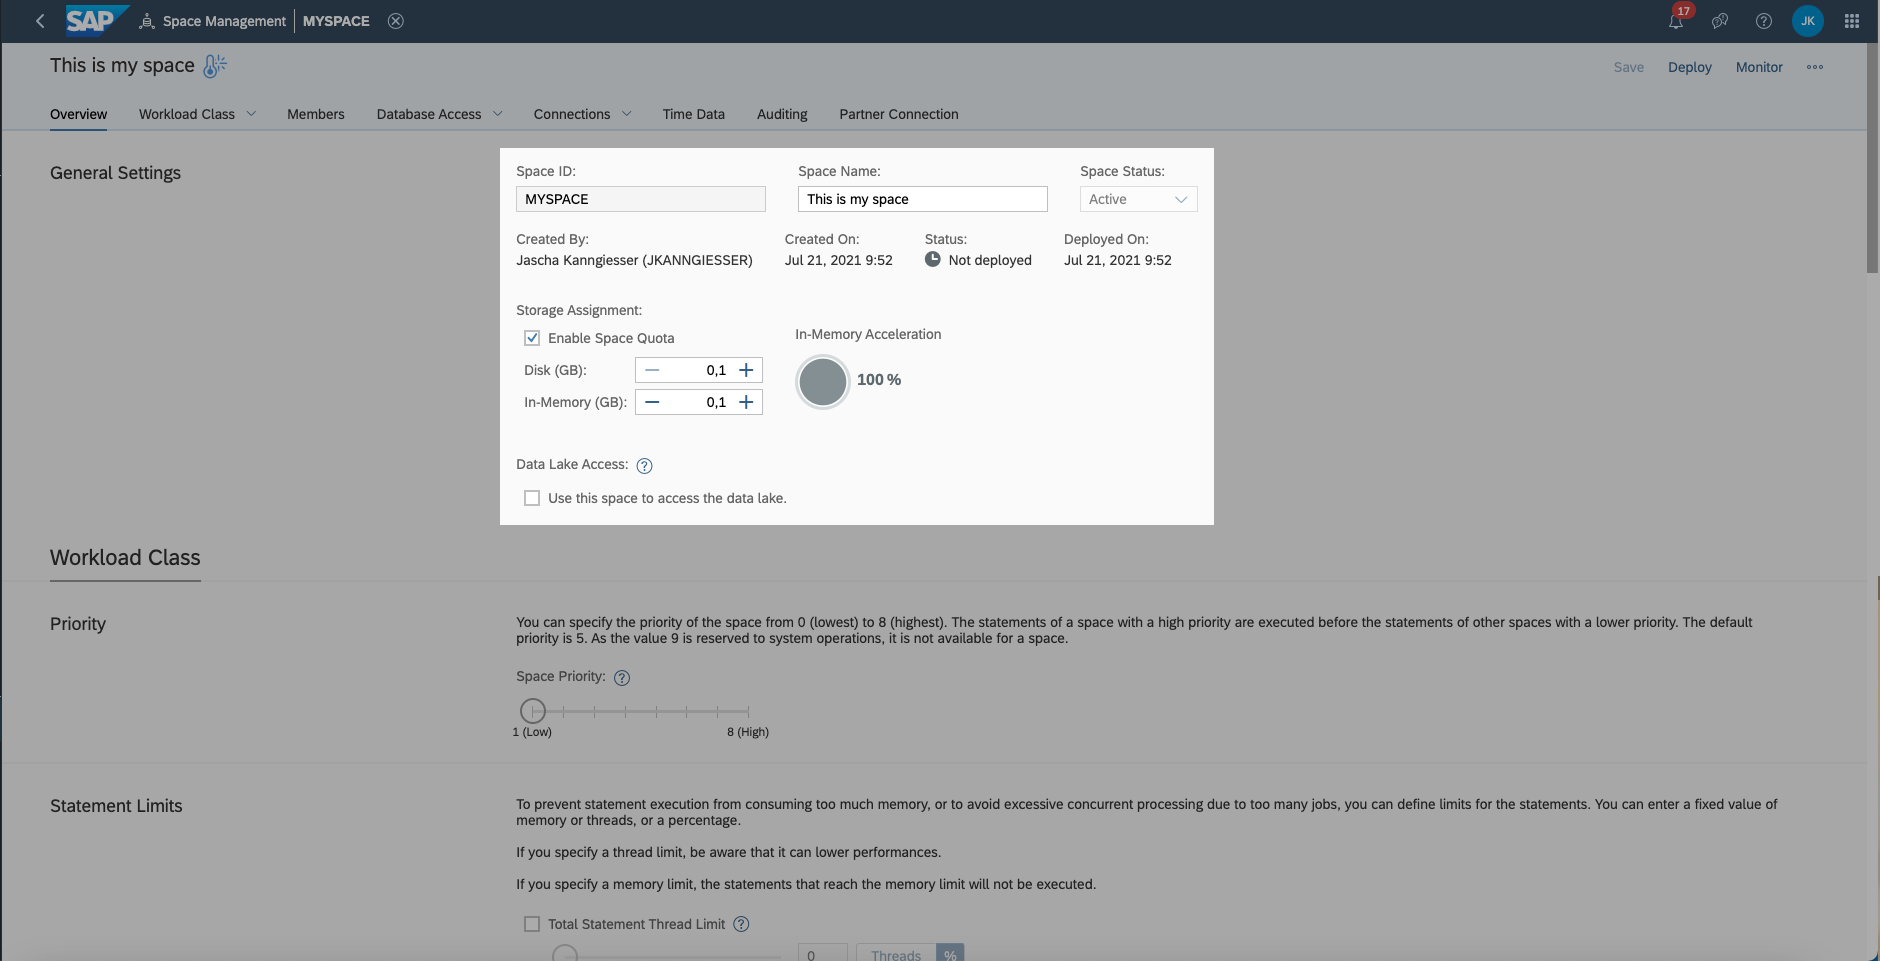
The newly created space
Reading Space Definitions
Now we'd like to check whether the definition we deployed to our tenant can be retrieved as well. We use the datasphere spaces read command for this. Let's see what the required arguments and options are by running the command using the -h, --help option.
$ datasphere spaces read MYSPACE -H https://datasphere-my-example-company.eu10.hcs.cloud.sap/

 Do you want to retrieve a passcode from https://datasphere-my-example-company.authentication.eu10.hana.ondemand.com/passcode? … yes

 Enter your temporary authentication code: … **********

{

  "MYSPACE": {

    "spaceDefinition": {

      "version": "1.0.4",

      "label": "This is my space",

      "assignedStorage": 100000000,

      "assignedRam": 100000000,

      "priority": 1,

      "auditing": {

        "dppRead": {

          "retentionPeriod": 30,

          "isAuditPolicyActive": false

        },

        "dppChange": {

          "retentionPeriod": 30,

          "isAuditPolicyActive": false

        }

      },

      "members": [],

      "hdicontainers": {},

      "dbusers": {},

      "workloadClass": {

        "totalStatementMemoryLimit": {

          "value": 0,

          "unit": "Percent"

        },

        "totalStatementThreadLimit": {

          "value": 0,

          "unit": "Percent"

        }

      },

      "allowConsumption": false

    }

  }

}
Great, we successfully retrieved the definition of our space and can view it in the terminal. Also, we can see that for those properties we didn't supply respective default values that were set. If we want to use this definition as a template to create another space, adjust it to our needs and push it back to our tenant, we can also save it in a file and continue from there. The help mentioned a -o or --output option, let's try that.
$ datasphere spaces read -S MYSPACE -H https://datasphere-my-example-company.eu10.hcs.cloud.sap/ -o ./MYSPACE_NEW.json

 Do you want to retrieve a passcode from https://datasphere-my-example-company.authentication.eu10.hana.ondemand.com/passcode? … yes

 Enter your temporary authentication code: … **********
The command didn't return any errors, so let's see whether a file named samplespace.json exists in the current directory and contains the definition we already saw in the terminal.
$ ls -la

total 20856

.

..

MYSPACE.json

MYSPACE_NEW.json
There it is, so we can use it now to update properties or as a template for another space.
Updating Spaces
Now, going back to our little story at the start of the blog. How do we continue for example if we want to add a list of users to our space? Before, when reading the space definition using the datasphere spaces read command, we saw that there's a property called members, which is an array including all users which are assigned to our space. It was empty when reading the space definition, meaning that no users are assigned to our spaces. To change this we need to send another space definition to our tenant and define the list of members to add to our space.
{

  "MYSPACE": {

    "spaceDefinition": {

      "version": "1.0.4",

      "members": [

        {

          "name": "FIRST_USER",

          "type": "user"

        },

        {

          "name": "SECOND_USER",

          "type": "user"

        },

        {

          "name": "THIRD_USER",

          "type": "user"

        },

        {

          "name": "FOURTH_USER",

          "type": "user"

        },

        {

          "name": "FITH_USER",

          "type": "user"

        }

      ]

    }

  }

}
For each user to add to our space we have to add an object to the array with properties name and type. The value for the property name equals a user ID existing in our tenant. The value for property type is always the constant value "user". As you rightly guessed I'm using artificial user IDs here. When replacing the dummy IDs FIRST_USER, SECOND_USER, ... with actual user IDs from our tenant and using the datasphere spaces create command to send the updated definition to our tenant like so:
$ datasphere spaces create -H https://datasphere-my-example-company.eu10.hcs.cloud.sap/ -f ./MYSPACE_UPDATED.json -p somepasscodeWe see that the users were added. Yay! We just saved ourselves at least a few seconds of our precious time compared to achieving the same through the UI. Image how this scales (and saves you enough time for another relaxing week off this year) when doing this for hundreds or thousands of users (assuming you find a smart way to generate the members array from an available list of users programmatically, but I trust in you, trust me).

Users added to a space
Pay attention to the list of users you mention in the file sent to our tenant. The list is not merged with the previously assigned members, but any member not part of the new list is removed from the space. So, if you want to add some users and keep all previously assigned users in your space, be sure to include both lists in your space definition file.
Deleting Spaces
We can also delete spaces through the CLI using the delete command. The drill is similar to reading space definitions. We specify the space to be deleted and confirm the deletion either by passing the -f, --force flag or by answering the prompt in the terminal. Let's try the latter by deleting the space we created earlier so that our tenant is cleaned up when we're finished reading this blog:
$ datasphere spaces delete MYSPACE -H https://datasphere-my-example-company.eu10.hcs.cloud.sap/

 Do you want to retrieve a passcode from https://datasphere-my-example-company.authentication.eu10.hana.ondemand.com/passcode? … yes

 Enter your temporary authentication code: … **********

 Do you really want to delete space MYSPACE? … yes
As the command finished without any errors, the space was deleted successfully. When providing the -f or --force option, the CLI won't prompt us to confirm the deletion but only asks for the passcode if not provided using the -p, --passcode option.
Conclusion
The new CLI is a great addition to the existing tooling around SAP Datasphere for all people who spend a lot of their time working with the solution. Working on tasks that are repetitive and tedious and take a long time to accomplish when using the graphical user interface, like assigning many users to one or more spaces, can be easily automated and scaled. The mass-user assignment is only one of many examples of how the CLI can improve your experience when working with SAP Datasphere to the next level.
I’d be happy to hear your thoughts, ideas, and comments on this tool and what you think would be a nice-to-have enhancement to the CLI, making your life and work with SAP Datasphere easier. Let me know in the comments!
Further Reading
Blog: "Automatically Add Members to Spaces in SAP Datasphere Using @sap/datasphere-cli"
Command-Line Interface for SAP Datasphere on npmjs.com
Command-Line Interface for SAP Datasphere on SAP Help
Get your SAP Datasphere 30 Days Trial Account
- SAP Managed Tags:
- SAP Datasphere
Labels:
29 Comments
You must be a registered user to add a comment. If you've already registered, sign in. Otherwise, register and sign in.
Labels in this area
-
ABAP CDS Views - CDC (Change Data Capture)
2 -
AI
1 -
Analyze Workload Data
1 -
BTP
1 -
Business and IT Integration
2 -
Business application stu
1 -
Business Technology Platform
1 -
Business Trends
1,661 -
Business Trends
91 -
CAP
1 -
cf
1 -
Cloud Foundry
1 -
Confluent
1 -
Customer COE Basics and Fundamentals
1 -
Customer COE Latest and Greatest
3 -
Customer Data Browser app
1 -
Data Analysis Tool
1 -
data migration
1 -
data transfer
1 -
Datasphere
2 -
Event Information
1,400 -
Event Information
66 -
Expert
1 -
Expert Insights
178 -
Expert Insights
293 -
General
1 -
Google cloud
1 -
Google Next'24
1 -
Kafka
1 -
Life at SAP
784 -
Life at SAP
12 -
Migrate your Data App
1 -
MTA
1 -
Network Performance Analysis
1 -
NodeJS
1 -
PDF
1 -
POC
1 -
Product Updates
4,577 -
Product Updates
340 -
Replication Flow
1 -
RisewithSAP
1 -
SAP BTP
1 -
SAP BTP Cloud Foundry
1 -
SAP Cloud ALM
1 -
SAP Cloud Application Programming Model
1 -
SAP Datasphere
2 -
SAP S4HANA Cloud
1 -
SAP S4HANA Migration Cockpit
1 -
Technology Updates
6,886 -
Technology Updates
416 -
Workload Fluctuations
1
Related Content
- New Machine Learning features in SAP HANA Cloud in Technology Blogs by SAP
- Top Picks: Innovations Highlights from SAP Business Technology Platform (Q1/2024) in Technology Blogs by SAP
- Deliver Real-World Results with SAP Business AI: Q4 2023 & Q1 2024 Release Highlights in Technology Blogs by SAP
- How Data Anonymization in SAP HANA secure Generative AI applications through SAP Datasphere in Technology Blogs by SAP
- A Comprehensive Guide to the Sustainability Control Tower (SCT) Inbound API in Technology Blogs by Members
Top kudoed authors
| User | Count |
|---|---|
| 30 | |
| 23 | |
| 10 | |
| 7 | |
| 6 | |
| 6 | |
| 5 | |
| 5 | |
| 5 | |
| 4 |