
- SAP Community
- Products and Technology
- Technology
- Technology Blogs by SAP
- Calling an External REST API using OAuth2.0 "Beare...
Technology Blogs by SAP
Learn how to extend and personalize SAP applications. Follow the SAP technology blog for insights into SAP BTP, ABAP, SAP Analytics Cloud, SAP HANA, and more.
Turn on suggestions
Auto-suggest helps you quickly narrow down your search results by suggesting possible matches as you type.
Showing results for
Employee
Options
- Subscribe to RSS Feed
- Mark as New
- Mark as Read
- Bookmark
- Subscribe
- Printer Friendly Page
- Report Inappropriate Content
09-09-2021
11:23 PM
Introduction
As enterprise usage of cloud applications is getting more and more popular, it is becoming equally challenging to keep the data between those applications in sync considering each cloud application is using its own technology stack for communication, own data persistency model, data access mechanism etc.
In the following write-up, I would like to share my experience of working on a PoC where I integrated my SAP Cloud for Customer(C4C) tenant with the Cost Center data being pulled from SAP Master Data Integration (MDI) service. This data was then stored in the custom business object at C4C. As it was a custom integration setup, hence we did everything via SAP Cloud Application Studio (SDK/PDI)
Challenge
For those who are not familiar with MDI, it is a service hosted on the SAP Business Technology Platform (BTP). For more information, please check out the following Official Documentation.
MDI communicates with external parties via via OAuth2.0 Client Credentials Flow, which works seamlessly, like any other API simulation, when using postman or any other REST client for testing. But when I was asked to perform the same operation via C4C SDK, I wasn’t sure if I will be able to achieve it, considering C4C does not expose the OAuth2.0 type in Communication Arrangement. So how did I solve it? Let’s see it in action below🙂
Implementation
Pre-Requisite/Assumptions
- You have a fair understanding of how SAP C4C communicates with the external applications via SDK REST protocol.
- You have SAP Cloud Application Studio Installed on your laptop machine.
- A REST API that uses OAuth2.0 Client Credentials flow for communication
- (Optional) REST API testing clients like Postman
Preparation
In this blog, I am going to use MDI REST API endpoints which are exposed via “Service Key” in BTP Cockpit. For more details please check HELP. Our MDI “Service Key” looks like this:
{

    "serviceInstanceId": "c79f2607-931d-403f-9ba5-03d398ee5c5f",

    "systemId": "fdb137b6-9b9d-456e-8189-ae9ed73823c4",

    "uaa": {

        "clientid": "sb-c79f2607-931d-403f-9ba5-03d398ee5c5f!b35376|one-mds-master!b9046",

        "clientsecret": "420be2d1**************w4JRJ1R027WM=",

        "url": "https://jb1-lite-unboxing.authentication.sap.hana.ondemand.com",

        "identityzone": "jb1-lite-unboxing",

        "identityzoneid": "56b08215-0226-4126-9385-39f4c1d7dbb0",

        "tenantid": "56b08215-0226-4126-9385-39f4c1d7dbb0",

        "tenantmode": "dedicated",

        "sburl": "https://internal-xsuaa.authentication.sap.hana.ondemand.com",

        "apiurl": "https://api.authentication.sap.hana.ondemand.com",

        "verificationkey": "-----BEGIN PUBLIC KEY-----MII********dsaeDF==----END PUBLIC KEY-----",

        "xsappname": "c79f2607-931d-403f-9ba5-03d398ee5c5f!b35376|one-mds-master!b9046",

        "subaccountid": "328d4989-43b5-4f00-865a-da05a2eb4f19",

        "uaadomain": "authentication.sap.hana.ondemand.com",

        "zoneid": "56b08215-0226-4126-9385-39f4c1d7dbb0",

        "credential-type": "binding-secret"

    },

    "uri": "https://one-mds.cfapps.sap.hana.ondemand.com"

}
From the above service key, clientid depicts username and clientsecret is password. “uaa.uri” property is the OAuth server where I will get the token of type “bearer” and then use this as an authorization parameter against “uri” property to request the data(Cost Center) from MDI.
Simulate API calls using Postman
Before we put things in SDK let’s try to simulate via postman if all the APIs are working as desired. Also, this will help to find the data model of the response body from where we need to read “costCenterId” property.
PS: If you don’t have postman client then you can get it for free from HERE. Or you can use any other REST client of your choice like Insomnia or nightingale etc.
Let’s simulate the API calls.
- Make a call to OAuth Token endpoints(refer to the explanation in the “Preparation” section) and get the “token” for the next call.

- Use the “access_token” from the last call as an authorization parameter for retrieving the data using MDI endpoints(refer to the explanation in the “Preparation” section.

SDK Implementation
Enough of theory, so let’s jump straight into a little bit of coding
- Right-click on the C4C solution and add a new “External Web Service Integration”.

- Give it some meaningful name and select web service type as “REST”. Click “Next”.
- Give the “Token Endpoint” as URL. (This is your OAuth server endpoint to request an access token.). Click “Next”.
- Select the “Create Communication Scenario” checkbox and give a name. Keep rest as default and click “Next”.
- Review the entries done so far and hit “Finish”. In my case finally, it looks following:

- Now 2 files are generated in “Solution Explorer”. Save and activate them one by one.

.csd file contains the communication scenario definition whereas the .wsid file contains the web service endpoints. Make sure that checkbox against the “Custom Outbound Service” is selected in the .csd file.

- Now, right-click on the .csd file and click the “Maintain Communication Arrangement” option. This will open a new C4C UI. In case you are already logged on to C4C UI in the browser using a business user then, please log off and re-login. Communication Arrangement created via SDK should be maintained in UI via SDK user.

- Now maintain the arrangement in UI as per your need. Click the “New” button to select the newly created communication scenario. Click “Next”.

- In this step, select the Communication System which is already generated by SDK and has “solution ID” as the suffix. Click “Next”.

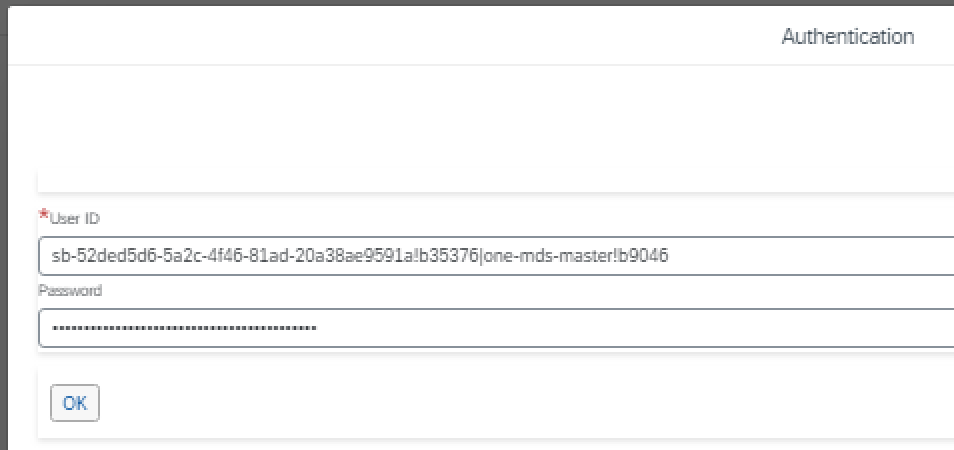
- In this step, maintain the user credentials for communication. Click “Edit Credentials” in outbound communication basic settings.

- A pop will appear. Put the user credentials for your OAuth server here. In my case, it is “clientid” and “clientsecret” from the service key of MDI that we saw in the earlier section. Click “OK”.
- In the same UI, click “Edit Advanced Settings” and validate if everything is as per your need. If so then click “Next”.

- Review the settings and hit “Finish”. In my case, it looks like follow. With this, We are done with changes for OAuth token fetching. Let’s move back to SDK and configure another external API call for MDI data retrieval using the OAuth/bearer token fetched.

- Back to SDK, add another “External Web Service Integration” for calling the MDI log API to retrieve the Cost Center data.

- Give it some meaningful name and select web service type as “REST”. Click “Next”.
- Give the actual data fetching endpoint URL. In my case, it is MDI “log” API endpoints. Click “Next”.
- Select the “Create Communication Scenario” checkbox and give a name. Keep rest as default and click “Next”.
- Review the entries done so far and hit “Finish”. In my case finally, it looks as follow:

- As earlier, “Save and Activate” the generated .csd file and .wsid file. As mentioned in point 6, make sure outbound service is appropriately selected in .csd.

- Now, right-click on the .csd file and click the “Maintain Communication Arrangement” option. Again, it opens a new C4C UI. Logon with SDK user in UI.

- In the UI for communication arrangement, click the “New” button and select the newly created communication arrangement. Click “Next”.

- Select the communication system which was generated by SDK as well as has a suffix of solution ID. Click “Next”.

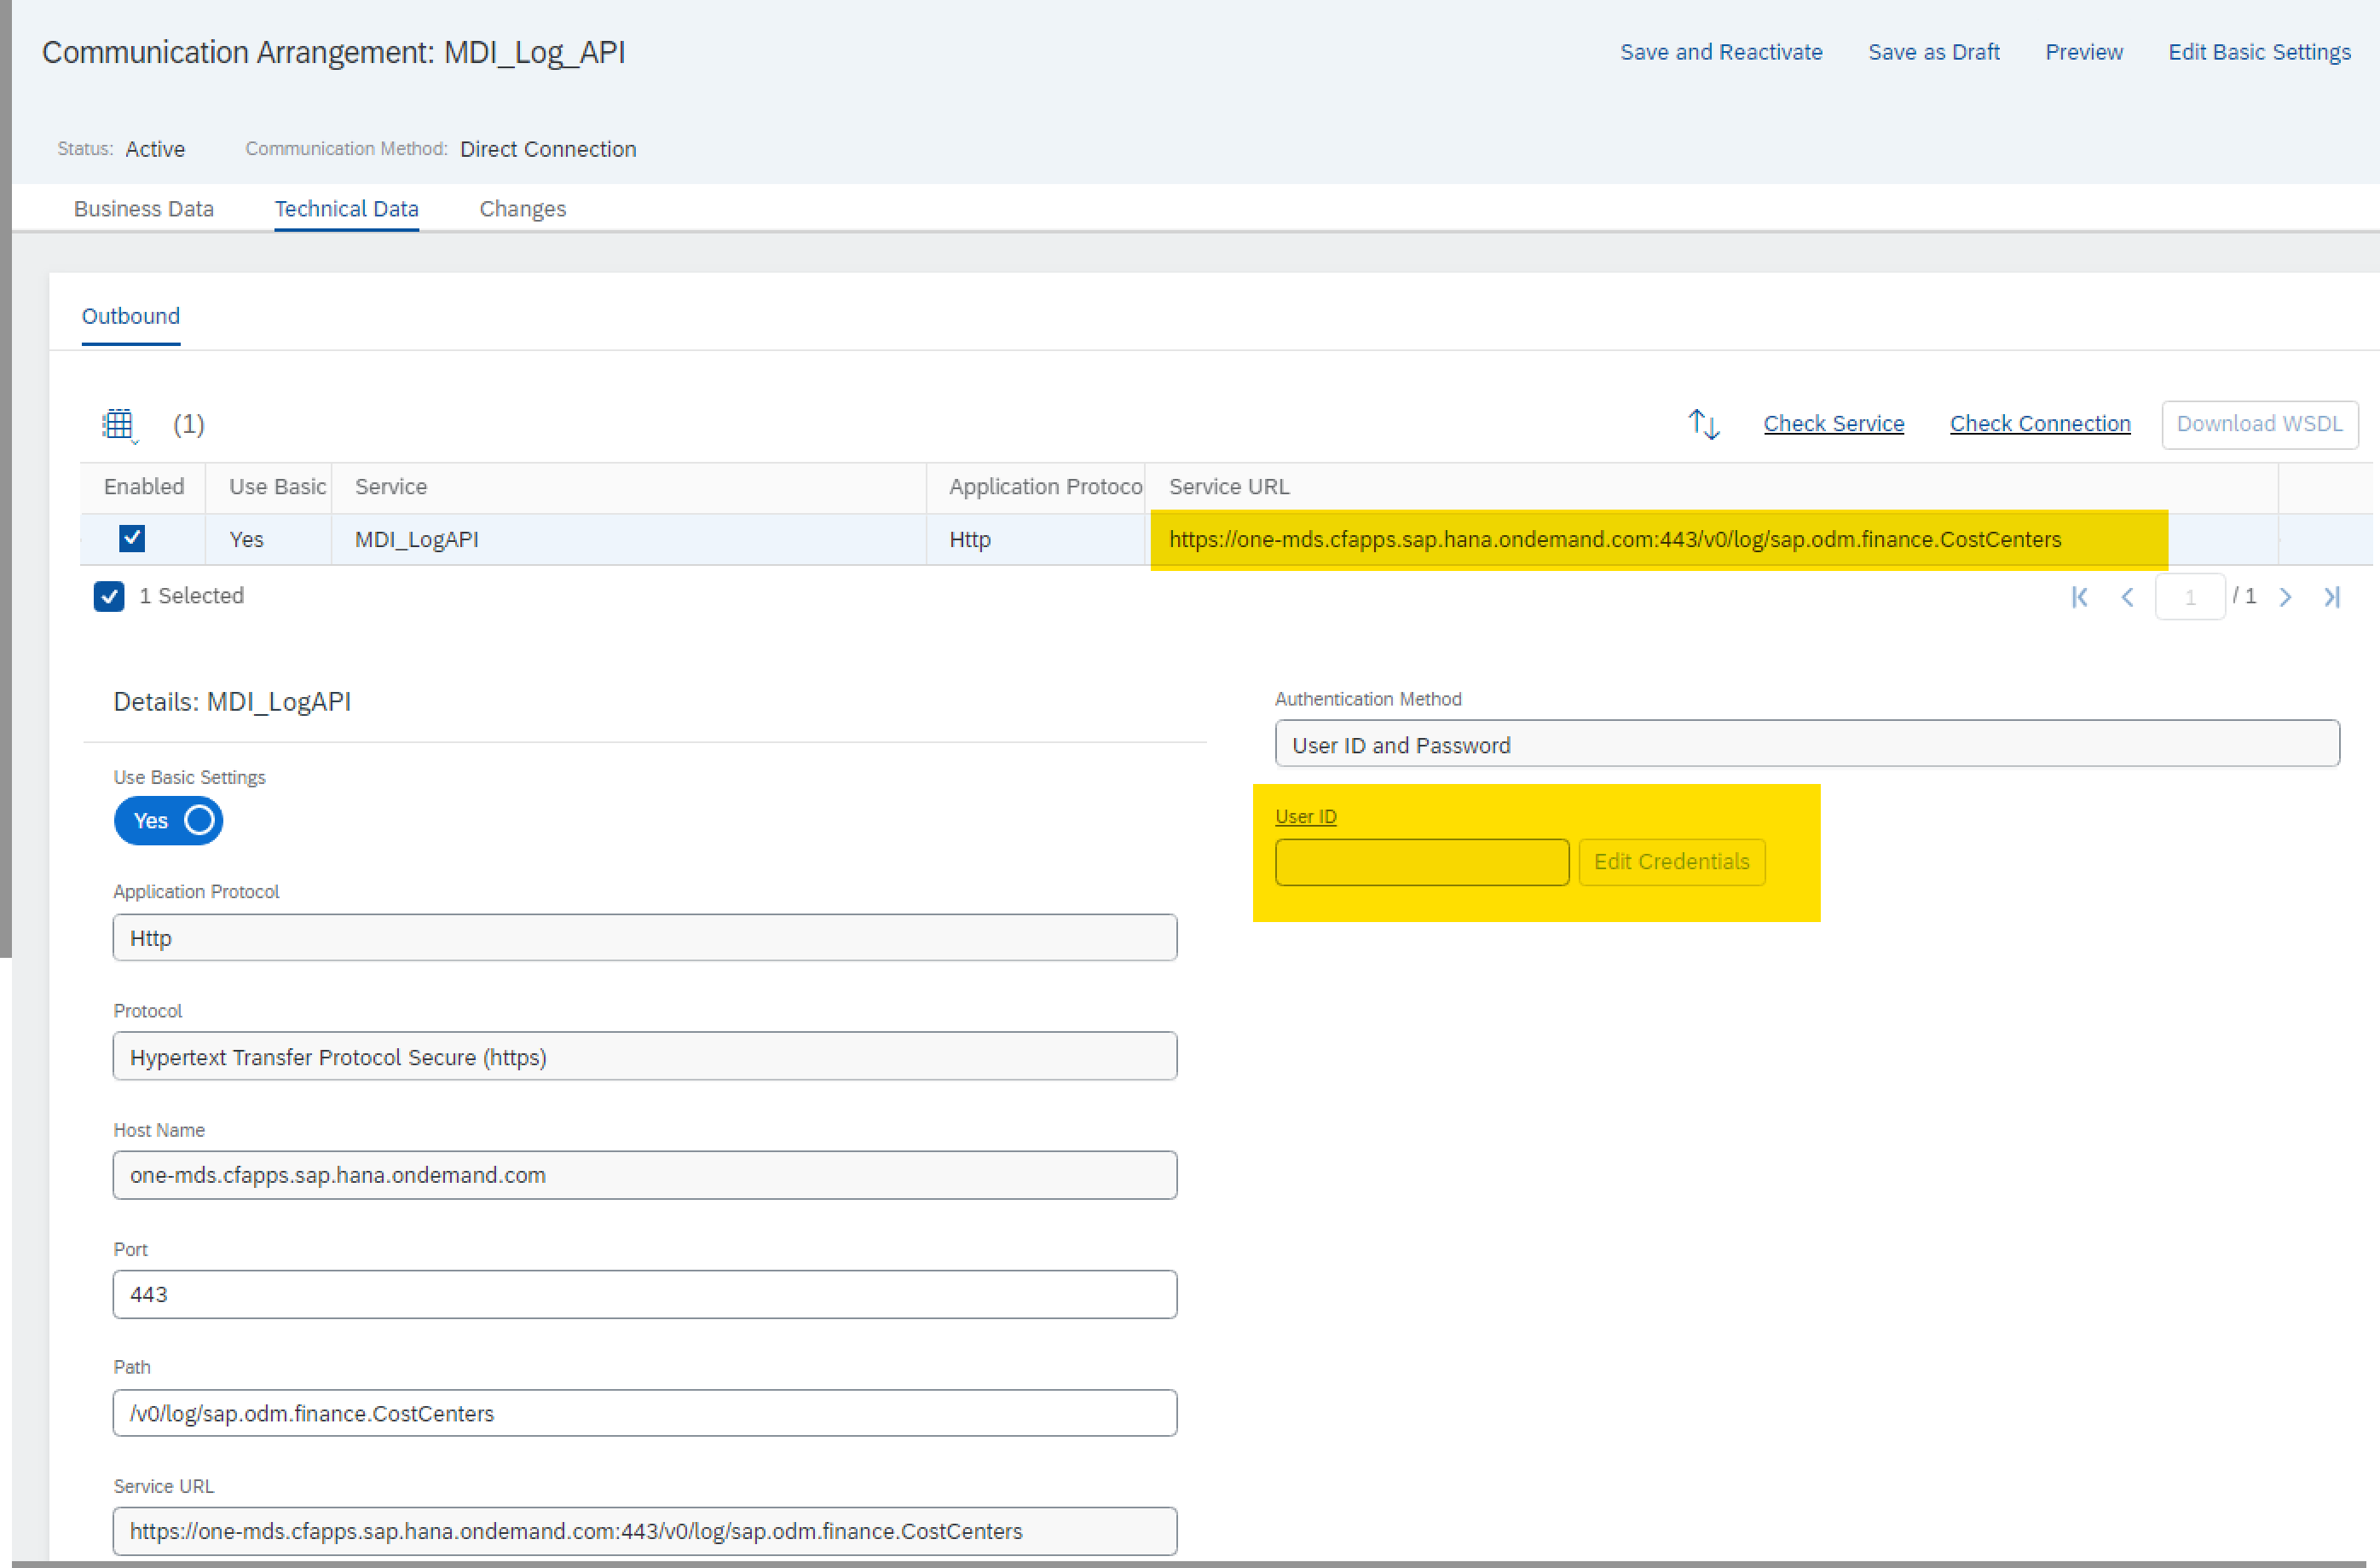
- As we are going to use the “bearer” token from the OAuth server as an authorization parameter, hence skip the credentials configuration and click “Next” until you finished the setup of the service. Without user credentials, your advanced settings will look something like this.
- Back to SDK. Let’s write the following ABSL code to Call the OAuth End Points. The output of this call will be a “bearer” token which will be used for the MDI log API call in the next step.
var body = "grant_type=client_credentials&client_id=sb-52ded5d6-5a2c-4f46-81ad-20a38ae9591a!b35376|one-mds-master!b9046";

var response = WebServiceUtilities.ExecuteRESTService("MDI_BearerToken","MDI_Bearer","POST","",urlParams,headerParams,"application/x-www-form-urlencoded",body);
25. Use the “bearer” token from the last step as a request header and poll the cost center data.
headerParam.Name = "Authorization";

		var tmp_type = result.Where(n=>n.Key == "token_type");

		var tmp_token = result.Where(n=>n.Key == "access_token");

		if(tmp_type.Count() > 0 && tmp_token.Count() > 0)

		{

			headerParam.Value = tmp_type.GetFirst().Value + " " + tmp_token.GetFirst().Value;

			headerParams.Add(headerParam);

		}


var mdi_response = WebServiceUtilities.ExecuteRESTService("MDI_Log_API","MDI_LogAPI","GET","",urlParams,headerParams,"","");
26. Based on the response of log API perform business action/logic. In my case, I needed to create an entry in custom BO. Therefore, my entire business logic looks like this:
import ABSL;

import AP.PDI.Utilities;

import AP.PDI.bo;

import AP.Common.GDT;


var headerParams:collectionof NameAndValue;

var headerParam: NameAndValue;

var urlParams :collectionof NameAndValue;

var keyValues : collectionof String;


// Passing body as "x-www-form-urlencodeed". In case of MDI it is, clientId and grant_type

var body = "grant_type=client_credentials&client_id=sb-52ded5d6-5a2c-4f46-81ad-20a38ae9591a!b35376|one-mds-master!b9046";


// Call MDI bearer token/OAuth endpoint

var response = WebServiceUtilities.ExecuteRESTService("MDI_BearerToken ","MDI_Bearer","POST","",urlParams,headerParams,"application/x-www-form-urlencoded",body);

// Check if http response code is 200(OK)

if(!response.IsInitial() && response.Code.Contains("200"))

{

// Prepare a tabkle collection to parse the JSON response for token endpoint

	keyValues.Add("access_token");

	keyValues.Add("token_type");


// Parse JSON response

	var result;

	var tmp_KeyValue = Json.ParseKeyValues(keyValues,response.Content);

	keyValues.Clear();

	if(!tmp_KeyValue.IsInitial())

	{

		result = tmp_KeyValue.KeyValue;

	}


	if(result.Count()>0)

	{

		headerParam.Name = "Authorization";

		var tmp_type = result.Where(n=>n.Key == "token_type");

		var tmp_token = result.Where(n=>n.Key == "access_token");

		if(tmp_type.Count() > 0 && tmp_token.Count() > 0)

		{

			headerParam.Value = tmp_type.GetFirst().Value + " " + tmp_token.GetFirst().Value;

			headerParams.Add(headerParam);

		}


// Call MDI log API endpoint

		var mdi_response = WebServiceUtilities.ExecuteRESTService("MDI_Log_API","MDI_LogAPI","GET","",urlParams,headerParams,"","");

// Check if http response code is 200(OK)

		if(!mdi_response.IsInitial() && mdi_response.Code.Contains("200"))

		{

// Again, Prepare a collection to parse the JSON response for log API

			keyValues.Add("nextDeltaToken");

			keyValues.Add("log[1].instance.displayName");

			keyValues.Add("log[1].instance.localIdS4.costCenterId");

			keyValues.Add("log[1].instance.localIdS4.controllingArea");

			keyValues.Add("log[1].instance.localIdS4.companyCode");


// Parse MDI log API JSON reponse

			var mdi_data;

			tmp_KeyValue.Clear();

			tmp_KeyValue = Json.ParseKeyValues(keyValues,mdi_response.Content);

			if(!tmp_KeyValue.IsInitial())

			{

				mdi_data = tmp_KeyValue.KeyValue;

			}


			if(mdi_data.Count()>0)

			{

				// Write your business logic


				//Example Logic : replace/adapt it to your business need

				var element: elementsof ZCostCenter;

				foreach(var inst in mdi_data)

				{

					if(inst.Key == "log[1].instance.localIdS4.costCenterId")

					{

						element.CC_ID = inst.Value;

					}

					else if(inst.Key == "log[1].instance.localIdS4.companyCode")

					{

						element.CompanyCode = inst.Value;

					}

					else if(inst.Key == "log[1].instance.displayName")

					{

						element.Text.content = inst.Value;

					}

					else if(inst.Key == "log[1].instance.localIdS4.controllingArea")

					{

						element.ControllingArea = inst.Value;

					}

					else if(inst.Key == "nextDeltaToken")

					{

						element.deltaToken.content = inst.Value;

					}

				}

				if(!element.IsInitial())

				{

					ZCostCenter.Create(element);

				}


			}

		}

	}

}
And that’s it 😎You can now test your changes.
Final Words
So, with all the steps above you should be able to make a call to external API using bearer token generated by OAuth2.0 Client Credentials flow.
I hope you liked the content. Please feel free to drop a comment, in case of any feedback or suggestion.
#HappyLearning
Thanks
Saurabh
Labels:
4 Comments
You must be a registered user to add a comment. If you've already registered, sign in. Otherwise, register and sign in.
Labels in this area
-
ABAP CDS Views - CDC (Change Data Capture)
2 -
AI
1 -
Analyze Workload Data
1 -
BTP
1 -
Business and IT Integration
2 -
Business application stu
1 -
Business Technology Platform
1 -
Business Trends
1,658 -
Business Trends
93 -
CAP
1 -
cf
1 -
Cloud Foundry
1 -
Confluent
1 -
Customer COE Basics and Fundamentals
1 -
Customer COE Latest and Greatest
3 -
Customer Data Browser app
1 -
Data Analysis Tool
1 -
data migration
1 -
data transfer
1 -
Datasphere
2 -
Event Information
1,400 -
Event Information
66 -
Expert
1 -
Expert Insights
177 -
Expert Insights
299 -
General
1 -
Google cloud
1 -
Google Next'24
1 -
Kafka
1 -
Life at SAP
780 -
Life at SAP
13 -
Migrate your Data App
1 -
MTA
1 -
Network Performance Analysis
1 -
NodeJS
1 -
PDF
1 -
POC
1 -
Product Updates
4,577 -
Product Updates
344 -
Replication Flow
1 -
RisewithSAP
1 -
SAP BTP
1 -
SAP BTP Cloud Foundry
1 -
SAP Cloud ALM
1 -
SAP Cloud Application Programming Model
1 -
SAP Datasphere
2 -
SAP S4HANA Cloud
1 -
SAP S4HANA Migration Cockpit
1 -
Technology Updates
6,873 -
Technology Updates
423 -
Workload Fluctuations
1
Related Content
- Consuming on-Premise Service in CAP Project in Technology Q&A
- SAP Cloud ALM and Identity Authentication Service (IAS) in Technology Blogs by SAP
- SAP LICENSE RENEWAL FROM BASIS END #ATR in Technology Blogs by Members
- JSON Web Encryption in SAP CPI using public Key in Technology Q&A
- Configuring SAP CI/CD pipeline for Deploying ReactJS application in Cloud Foundry in Technology Q&A
Top kudoed authors
| User | Count |
|---|---|
| 40 | |
| 25 | |
| 17 | |
| 14 | |
| 8 | |
| 7 | |
| 7 | |
| 7 | |
| 6 | |
| 6 |