
- SAP Community
- Products and Technology
- Human Capital Management
- HCM Blogs by Members
- Working with Foreign Locales in Manage Languages –...
Human Capital Management Blogs by Members
Gain valuable knowledge and tips on SAP SuccessFactors and human capital management from member blog posts. Share your HCM insights with a post of your own.
Turn on suggestions
Auto-suggest helps you quickly narrow down your search results by suggesting possible matches as you type.
Showing results for
christosetti
Explorer
Options
- Subscribe to RSS Feed
- Mark as New
- Mark as Read
- Bookmark
- Subscribe
- Printer Friendly Page
- Report Inappropriate Content
09-07-2021
11:27 AM
Introduction:
SuccessFactors 'Manage Languages' (Tier 3 Language support) is a widely used tool across environments. It is perhaps, the most efficient and effective method to customise system labels and expressions throughout the SuccessFactors suite. In addition, this functionality can be used across all locales an environment has enabled. However, at times, managing foreign languages such as Chinese, Japanese, or Arabic can make this process more complex. If done incorrectly, your custom labels can become corrupted and therefore, redundant in your instance.
In this blog, I will outline a simple, yet effective solution to get around this obstacle. It is a method I use myself after becoming stuck managing certain locales via manage languages (tier 3 language support).
The Issue:
As you can see from the below example, this is how an incorrect translation may appear. Furthermore, if you try to export the labels to correct, a standard CSV file will show random characters.
I had previously tried a convoluted process of using Open Office to first format the new custom labels and then transferring the file to a standard CSV. However, during this process, there are many occasions where this could go wrong, and the file becomes corrupted.
The Solution:
Step 1:
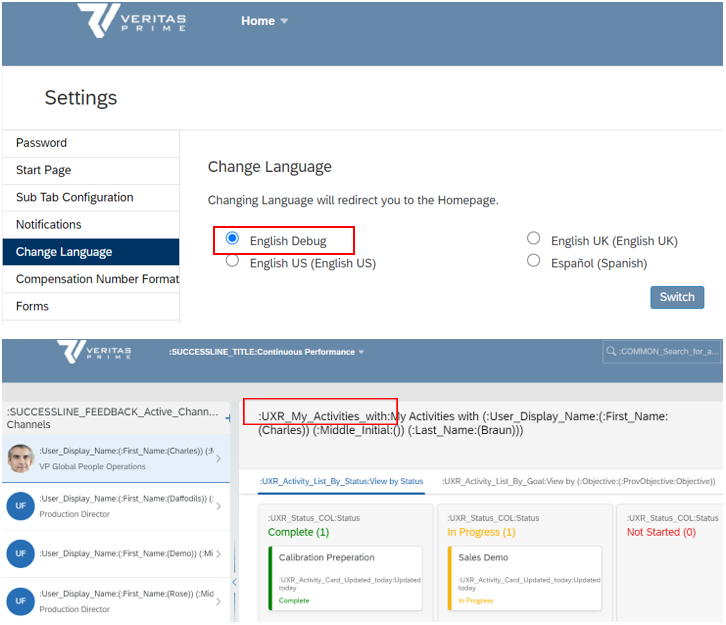
Gather your language tags by using the English DEBUG locale as a system admin. Below is an example from Continuous Performance Management, but tags can be retrieved from any label in the instance.
Step 2:
Once you have gathered the correct language tags, retrieve the updated custom labels in whichever locale you are working with, in this example, I will be using Japanese. We will need these to complete the import.
Step 3:
Enter the language tags in a CSV file. You can use the template which can be downloaded from “Manage Languages” via the Admin Centre. Once you have entered the correct tags, save and close the CSV file.
Step 4:
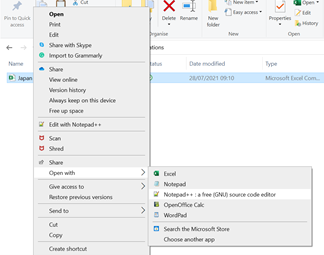
Download an XML editor, I would recommend “Notepad++”. Right-click on the previous file and “Open With” Notepad++.
Step 5:
Enter your custom labels in the assigned tier 3 language tag directly into the Notepad++ file. Keep in mind the comma-separated value format applied in a CSV file. If you need guidance, please refer to the example below.
Step 6:
Save and close the XML editor file. When you view this in your folder, it should still display as a CSV file.
Step 7:
Import the CSV file into your custom locale via “Manage Languages” in SuccessFactors. Please note, opening the CSV file may corrupt the translations, so keep this closed until the import is complete.
Step 8:
Validate your translation in SuccessFactors. The text should appear in the specific language you are translating, instead of corrupted characters.
Before:
After:
SuccessFactors 'Manage Languages' (Tier 3 Language support) is a widely used tool across environments. It is perhaps, the most efficient and effective method to customise system labels and expressions throughout the SuccessFactors suite. In addition, this functionality can be used across all locales an environment has enabled. However, at times, managing foreign languages such as Chinese, Japanese, or Arabic can make this process more complex. If done incorrectly, your custom labels can become corrupted and therefore, redundant in your instance.
In this blog, I will outline a simple, yet effective solution to get around this obstacle. It is a method I use myself after becoming stuck managing certain locales via manage languages (tier 3 language support).
The Issue:
As you can see from the below example, this is how an incorrect translation may appear. Furthermore, if you try to export the labels to correct, a standard CSV file will show random characters.
I had previously tried a convoluted process of using Open Office to first format the new custom labels and then transferring the file to a standard CSV. However, during this process, there are many occasions where this could go wrong, and the file becomes corrupted.


The Solution:
Step 1:
Gather your language tags by using the English DEBUG locale as a system admin. Below is an example from Continuous Performance Management, but tags can be retrieved from any label in the instance.
Step 2:
Once you have gathered the correct language tags, retrieve the updated custom labels in whichever locale you are working with, in this example, I will be using Japanese. We will need these to complete the import.
Step 3:
Enter the language tags in a CSV file. You can use the template which can be downloaded from “Manage Languages” via the Admin Centre. Once you have entered the correct tags, save and close the CSV file.

Step 4:
Download an XML editor, I would recommend “Notepad++”. Right-click on the previous file and “Open With” Notepad++.
Step 5:
Enter your custom labels in the assigned tier 3 language tag directly into the Notepad++ file. Keep in mind the comma-separated value format applied in a CSV file. If you need guidance, please refer to the example below.

Step 6:
Save and close the XML editor file. When you view this in your folder, it should still display as a CSV file.

Step 7:
Import the CSV file into your custom locale via “Manage Languages” in SuccessFactors. Please note, opening the CSV file may corrupt the translations, so keep this closed until the import is complete.

Step 8:
Validate your translation in SuccessFactors. The text should appear in the specific language you are translating, instead of corrupted characters.
Before:

After:

- SAP Managed Tags:
- SAP SuccessFactors Employee Central,
- SAP SuccessFactors HXM Suite
You must be a registered user to add a comment. If you've already registered, sign in. Otherwise, register and sign in.
Labels in this area
-
2H 2023 Product Release
1 -
ACCRUAL TRANSFER
1 -
Advanced Workflow
1 -
Anonymization
1 -
BTP
1 -
Business Rules
1 -
Career Development
1 -
Certificate-Based Authentication
1 -
Cloud Platform Integration
1 -
Compensation
1 -
Compensation Information Management
1 -
Compensation Management
1 -
Compliance
2 -
Content
1 -
Conversational AI
2 -
Custom Data Collection
1 -
custom portlet
1 -
Data & Analytics
1 -
Data Integration
1 -
Dayforce
1 -
deep link
1 -
deeplink
1 -
Delimiting Pay Components
1 -
Deprecation
1 -
Employee Central
1 -
Employee Central Global Benefits
1 -
Employee Central Payroll
1 -
employee profile
1 -
Employee Rehires
1 -
external terminal
1 -
external time events
1 -
Generative AI
2 -
Getting Started
1 -
Global Benefits
1 -
Guidelines
1 -
H2 2023
1 -
HR
2 -
HR Data Management
1 -
HR Transformation
1 -
ilx
1 -
Incentive Management Setup (Configuration)
1 -
Integration Center
2 -
Integration Suite
1 -
internal mobility
1 -
Introduction
1 -
learning
3 -
LMS
2 -
LXP
1 -
Massively MDF attachments download
1 -
Mentoring
1 -
Metadata Framework
1 -
Middleware Solutions
1 -
OCN
1 -
OData APIs
1 -
ONB USA Compliance
1 -
Onboarding
2 -
Opportunity Marketplace
1 -
Pay Component Management
1 -
Platform
1 -
portlet
1 -
POSTMAN
1 -
Predictive AI
2 -
Recruiting
1 -
recurring payments
1 -
Role Based Permissions (RBP)
2 -
SAP CPI (Cloud Platform Integration)
1 -
SAP HCM (Human Capital Management)
2 -
SAP HR Solutions
2 -
SAP Integrations
1 -
SAP release
1 -
SAP SuccessFactors
5 -
SAP SuccessFactors Customer Community
1 -
SAP SuccessFactors OData API
1 -
SAP Workzone
1 -
SAP-PAYROLL
1 -
skills
1 -
Skills Management
1 -
sso deeplink
1 -
Stories in People Analytics
2 -
SuccessFactors
2 -
SuccessFactors Employee central home page customization.
1 -
successfactors onboarding i9
1 -
talent
1 -
Talent Intelligence Hub
2 -
talents
1 -
Tax
1 -
Tax Integration
1 -
Time Accounts
1 -
Workflows
1 -
XML Rules
1
Related Content
- Controlling the Visibility of SAP Enable Now and SAP Companion Content in Human Capital Management Blogs by SAP
- Recruiting Marketing – How to create a Landing Page (Data Capture Form) from Scratch till Reports. in Human Capital Management Blogs by Members
- New Hire Onboarding Survey using Custom Task in Onboarding 2.0 in Human Capital Management Blogs by Members
- Does SAP works with project TRIPLE on open classification ? in Human Capital Management Q&A
- What are best practices for deactivating a language locale in Human Capital Management Q&A
Top kudoed authors
| User | Count |
|---|---|
| 4 | |
| 4 | |
| 2 | |
| 2 | |
| 1 | |
| 1 | |
| 1 | |
| 1 | |
| 1 | |
| 1 |