
- SAP Community
- Products and Technology
- Technology
- Technology Blogs by SAP
- SAP BTP Integration Suite - Enrich data
Technology Blogs by SAP
Learn how to extend and personalize SAP applications. Follow the SAP technology blog for insights into SAP BTP, ABAP, SAP Analytics Cloud, SAP HANA, and more.
Turn on suggestions
Auto-suggest helps you quickly narrow down your search results by suggesting possible matches as you type.
Showing results for
Product and Topic Expert
Options
- Subscribe to RSS Feed
- Mark as New
- Mark as Read
- Bookmark
- Subscribe
- Printer Friendly Page
- Report Inappropriate Content
09-01-2021
9:53 AM
The first game I used to play on a PC (my father's 286) was SimCity. After that I continued playing similar simulations like Transport Tycoon, Cities XL, Factorio, ... never really getting bored of them. I could also have added SAP Cloud Integration to that list: indeed, there are many similarities between city/transport/factory simulations and SAP Cloud Integration: they both are based on connecting, orchestrating and adapting stuff between multiples places: resources, people, data....
Hence, when I have some spare minutes, I like to play in my Cloud Integration UI, dragging and dropping arrows and predefined flow steps in order to process data as I need it.
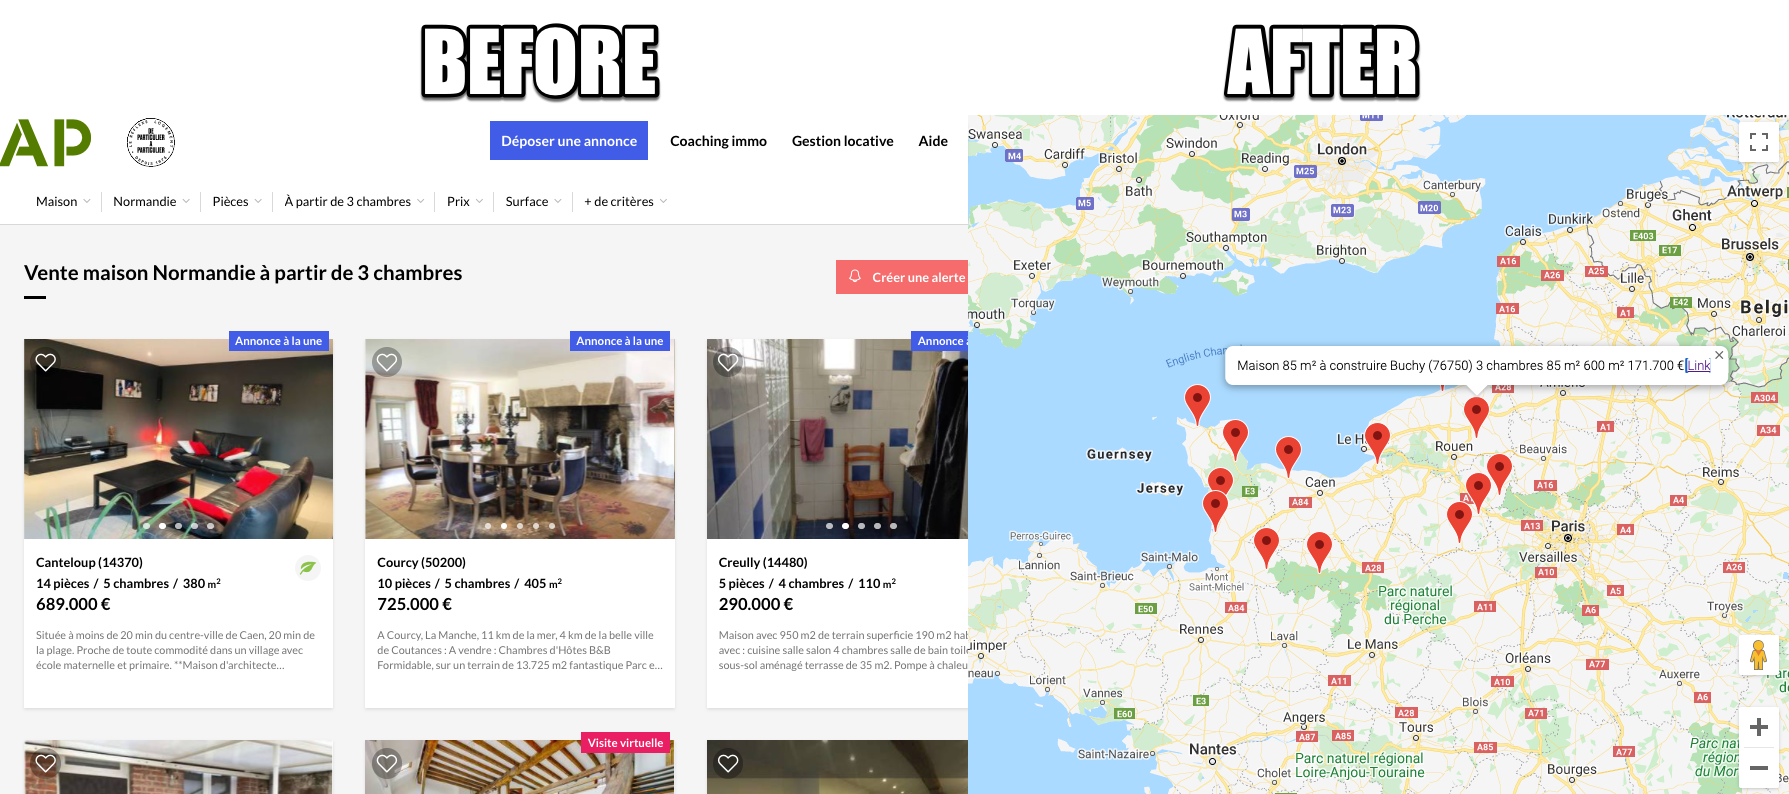
My last project was based on the idea that some websites are missing basic features like geolocalization of data on a map. Especially when you are searching for hotels, shops or houses it is nice to see where they are: a list with the name of the cities is usually not very useful.
The same idea actually applies to any system and its data within your company: it may hold basic information, which you want to enrich at runtime.
In this blog, I will show how to enrich data, record after record, and eventually build a nice page for a web browser. Normally, the enriched data should only be "served" by SAP Cloud Integration, to be used by any application. For demo purposes, I will build a small web page to show the results at the end of the integration flow (iflow).
To sum it up, we will go from this (left) to this (right):
Note that I won't write down all the detailed steps but will give you a high-level view of how I did it, including some code for specific tasks like formatting HTML or building a small Google Maps page.
This blog implies that you are quite familiar with SAP BTP and SAP Cloud Integration already. If not, you can still read on to see how easily you could do these kind of little projects.
Also: I am by no means an integration specialist so there may be better/other ways to do all this. 🙂
To start with, let's have a high-level overview of what we want to achieve.
This is all feasible within the SAP Business Technology Platform. We will be using the Integration Suite - specifically the Cloud Integration service - and the Data Quality Management service.
The end-result will look like this:
I will now detail all the steps above.
As you may know, whenever you drag'n'drop an arrow from a sender to a "Start message" step, you can chose the protocol you want to use for talking to your iflow. In our case we chose "HTTPS". Indeed, we want the iflow to be called from a browser.
So go ahead and create a connection between the "Sender" and the "Start" flow step and select "HTTPS" as adapter type. Give this connection the address you want, for instance "/FormatDataFromWebpage".
Also, leave the "Authorization" to "User Role" in order to allow for basic authentication using the service key of the process integration instance (not recommended for production scenarios though!).
Using a typical EAI pattern called "Request Reply" - available as predefined flow step in Cloud Integration - we will now call the web page whose data we want to format.
To do so, position a "Request Reply" flow step after the "Start" of your iflow (menu point "Call", "External Call").
Now add a "Receiver" under your iflow and connect it to the "Request Reply" step. While doing so, chose the "HTTP" adapter.
Now configure the adapter to call the web page.
In my case, I am calling (GET) a french website which will return all houses for sale in Normandie with at least 3 rooms using the following URL:
Obviously, you are free to make this URL dynamic or use your own URL, but you would need to change various parts of the iflow and iflow the code as well.
Now that we have the response of the web page in our iflow, we need to make it "machine-readable": HTML is fine for browsers and people, not for machines and iflows.
Add a "Groovy Script" flow step after the previously created step.
The interesting thing in this part is not that you can look at how bad my scripting skills are, but see how you can use external Groovy libraries in Cloud Integration. 😊
Indeed, I need some help with parsing HTML: I do not want to do it per string functions anymore (like I did before) but in an optimized and easy way. I present to you: JSoup.
"jsoup is a Java library for working with real-world HTML. It provides a very convenient API for fetching URLs and extracting and manipulating data, using the best of HTML5 DOM methods and CSS selectors."
To use this library in an iflow, simply download its latest version and add that archive into the resources of your iflow (click on any empty part of you iflow canvas to do so).
Now go back to your "Groovy Script" step and create a new script.
The code I am using to parse the HTML of my website is a follows:
Note that I am building a very simple XML document out of all the HTML element with the class "a.item-title".
Basically Jsoup reads all elements with the class "item-title" and will extract:
These extracted values are now used to build the XML document, which in turn is then set as message of the iflow. The message now looks something like this:
Now that we have all the results in an XML message, we want to do something for each of them. This is why we use an "Iterating Splitter".
"The Iterating Splitter splits a composite message into a series of smaller messages without copying the enveloping elements of the composite message".
Again, a predefined flow step that perfectly fits our needs!
Go ahead and add an "Iterating Splitter" to your iflow and connect it to the previous step.
Configure it to split the message on the "record" node of the message we created just before.
In this iterating loop, we will first store postal code, description and URL to be used later, when we will reconstruct the complete data structure. But we will also build the request to the SAP Data Quality Management service.
To perform these 2 steps, we only need one "Content Modifier" which lets you store and write data during iflow runtime.
Add a "Content Modifier" flow step after the "Iterating Splitter".
Create the 3 exchange properties as depicted below.
Remember that we will overwrite the iflow message body with the one we'll create in a second, so we need to store the data before. Also, SAP Cloud Integration executes the "Exchange Property" tab before the "Message Body" tab so we can use the exchange properties below when configuring the body of the iflow message later.
Now move to the "Message Body" tab and create the body of the message that will be sent to SAP Data Quality Management.
For your convenience, you can copy/paste it from here.
For more information on how to use the REST API of SAP DQM, you can head to the API Business Hub.
Now we can make the call the geolocation service to get the coordinates of a city, represented by it's postal code. SAP Data Quality Management is protected by OAuth so we first need to create OAuth credentials in our Cloud Integration tenant.
Save your iflow and head over to the "Operate and Monitor" menu. In the "Security Material" tile, create "Oauth 2 Client Credentials". Name it, for instance, "DQM_CREDS".
If you haven't got the information to create the credentials yet, go to your BTP Cockpit and display/download the service key of your DQM service. This is where all the relevant information are stored (Token Service URL, client id and client secret).
Go back to our iflow and add a "Request Reply" step after the "Content Modifier" step. Also add a "Receiver" that will represent the SAP Data Quality Management service.
Connect the "Request Reply" step with the "Receiver" and chose "HTTPS". Configure the adapter to format the HTTP call as follows:
Note that the "Request Reply" will be sent using the body which you have properly configured in step 5.
You can have a look at the SAP DQM documentation in case you want to understand this service in more detail.
Because SAP Cloud Integration really feels at home with XML data structures (it also supports JSON, but not yet thoroughly), let's convert the JSON response into XML.
Simply add an "JSON to XML Converter" flow step after the "Request Reply" one.
The response of SAP DQM has replaced the message body of our iflow (we used a "Request Reply") so we need to rebuild the original XML record, in which we will inject the geocoordinates.
Add a "Content Modifier" step after the "JSON to XML Converter" and configure it to:
Now that we have processed every single record to get the coordinates, let's put all these records back together into one message.
To do so, add a "Gather" step after the "Content Modifier".
Because browsers are much better at working with JSON data structures (JavaScript Object Notation), we will transform the XML message into JSON now.
Add a "XML to JSON Converter" step after the "Gather" step.
Let's now misuse our Cloud Integration service to generate some HML with Javascript dynamically. This is typically not in the functional scope of an EIPaaS (ie. an integration service), but more in the scope of a web server. In our case, it is just a technical demo/exercise, so let's do it here.
Add a "JavaScript" flow step after the "JSON to XML Converter".
The groovy script will now generate the web page to be displayed by the browser.
Note that it will get a little messy since we are generating code in our code. However, thanks to the Groovy Multiline String feature, you can format complex strings very easily (eg. using expressions), making the exercise not too painful.
Make sure to have your own Google Map API key ready and replace it in the code above.
Please note that the code above could be optimized, simplified, changed, etc., but it just serves as example.
Save your integration flow and deploy it.
In order to get it's URL, go to the "Operate and Monitor" page using the menu on the left, and locate your iflow using the "Manage Integration Content" tiles.
Locate your own iflow and click on the "copy" button to get the URL.
Start up you favorite browser and enter the URL you have just copied.
NB: make sure you don't have a company managed browser where the certificate is automatically send during any web interaction. This would result in a certificate error since you will need to authenticate with the client id and client secret of the service key.
Your browser prompts you to enter the credentials, which are the client id and client secret from your service key (see Step 1).
Congratulations if you are seeing something like the below!
Putting all the technical details aside, I hope you have understood how SAP BTP let's you easily implement integration patterns like enrichment of data. Also, the modularity, openness and support of standards really simplify the way you work with the SAP BTP services, where the only limiting factor is your - or your company's - creativity!

Hence, when I have some spare minutes, I like to play in my Cloud Integration UI, dragging and dropping arrows and predefined flow steps in order to process data as I need it.
My last project was based on the idea that some websites are missing basic features like geolocalization of data on a map. Especially when you are searching for hotels, shops or houses it is nice to see where they are: a list with the name of the cities is usually not very useful.
The same idea actually applies to any system and its data within your company: it may hold basic information, which you want to enrich at runtime.
In this blog, I will show how to enrich data, record after record, and eventually build a nice page for a web browser. Normally, the enriched data should only be "served" by SAP Cloud Integration, to be used by any application. For demo purposes, I will build a small web page to show the results at the end of the integration flow (iflow).
To sum it up, we will go from this (left) to this (right):
Note that I won't write down all the detailed steps but will give you a high-level view of how I did it, including some code for specific tasks like formatting HTML or building a small Google Maps page.
This blog implies that you are quite familiar with SAP BTP and SAP Cloud Integration already. If not, you can still read on to see how easily you could do these kind of little projects.
Also: I am by no means an integration specialist so there may be better/other ways to do all this. 🙂
Overview
To start with, let's have a high-level overview of what we want to achieve.

This is all feasible within the SAP Business Technology Platform. We will be using the Integration Suite - specifically the Cloud Integration service - and the Data Quality Management service.
The end-result will look like this:

- Establish a simple HTTP service for the iflow.
- Call the web page containing the data you want to enrich.
- Format the HTML data into structured data.
- For each record:
- Write down the data.
- Make a call to the SAP Data Quality Management (specifically the Microservices for Location Data) to get the geo-coordinates.
- Convert the JSON response into XML.
- Create the new record which includes the geo-coordinates.
- Put everything back together in one data structure.
- Convert the data into JSON so we can easily use it with JavaScript.
- Generate the HTML page.
I will now detail all the steps above.
1. Establish a simple HTTP service
As you may know, whenever you drag'n'drop an arrow from a sender to a "Start message" step, you can chose the protocol you want to use for talking to your iflow. In our case we chose "HTTPS". Indeed, we want the iflow to be called from a browser.
So go ahead and create a connection between the "Sender" and the "Start" flow step and select "HTTPS" as adapter type. Give this connection the address you want, for instance "/FormatDataFromWebpage".
Also, leave the "Authorization" to "User Role" in order to allow for basic authentication using the service key of the process integration instance (not recommended for production scenarios though!).

2. Call the web page containing the data to enrich
Using a typical EAI pattern called "Request Reply" - available as predefined flow step in Cloud Integration - we will now call the web page whose data we want to format.
To do so, position a "Request Reply" flow step after the "Start" of your iflow (menu point "Call", "External Call").

Now add a "Receiver" under your iflow and connect it to the "Request Reply" step. While doing so, chose the "HTTP" adapter.
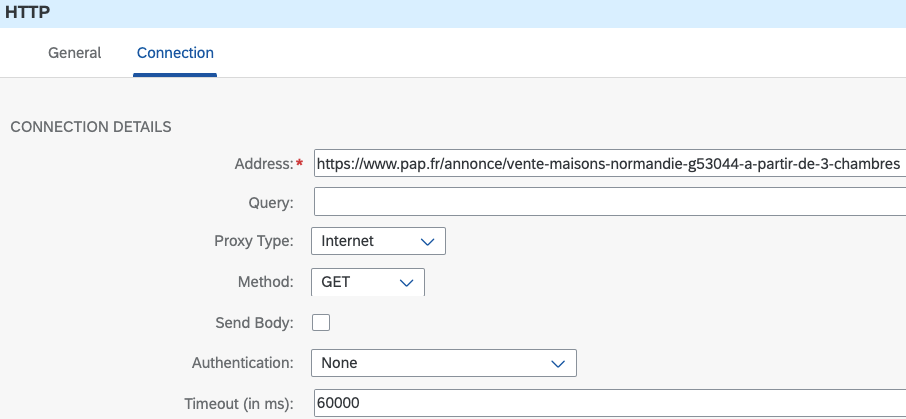
Now configure the adapter to call the web page.
In my case, I am calling (GET) a french website which will return all houses for sale in Normandie with at least 3 rooms using the following URL:
https://www.pap.fr/annonce/vente-maisons-normandie-g53044-a-partir-de-3-chambresObviously, you are free to make this URL dynamic or use your own URL, but you would need to change various parts of the iflow and iflow the code as well.
3. Format the HTML data into structured data
Now that we have the response of the web page in our iflow, we need to make it "machine-readable": HTML is fine for browsers and people, not for machines and iflows.
Add a "Groovy Script" flow step after the previously created step.
The interesting thing in this part is not that you can look at how bad my scripting skills are, but see how you can use external Groovy libraries in Cloud Integration. 😊
Indeed, I need some help with parsing HTML: I do not want to do it per string functions anymore (like I did before) but in an optimized and easy way. I present to you: JSoup.
"jsoup is a Java library for working with real-world HTML. It provides a very convenient API for fetching URLs and extracting and manipulating data, using the best of HTML5 DOM methods and CSS selectors."
To use this library in an iflow, simply download its latest version and add that archive into the resources of your iflow (click on any empty part of you iflow canvas to do so).

Now go back to your "Groovy Script" step and create a new script.
The code I am using to parse the HTML of my website is a follows:
import com.sap.gateway.ip.core.customdev.util.Message;

import java.util.HashMap;

import java.util.Iterator;

import org.jsoup.Jsoup;

import org.jsoup.nodes.Document;

import org.jsoup.nodes.Element;

import org.jsoup.select.Elements;

import wslite.rest.*


def Message processData(Message message) {

    //Body

    def String payload = message.getBody(java.lang.String);

    def String response = "";

    def String postalCode = "";

    def String url = "";

    def String description = "";

    def String webPageBody = "";


    // Parse HTML page response

    Document doc = Jsoup.parse(payload);

    Elements annonce = doc.select("a.item-title");


    response = "<?xml version=\"1.0\" ?><records>";

    for (Element el : annonce){

        //Getting and formatting the data

        //URL

        url = "";

        if (el.attr("href").indexOf("https") == -1){

            url = el.attr("href");

            url = "https://www.pap.fr" + url;

        }

        //DESCRIPTION

        description = el.text();

        //POSTALCODE (00000 if none found)

        if ((el.text().indexOf("(") != -1) && (el.text().indexOf(")") != -1)){

            postalCode = el.text().substring(el.text().indexOf("(")+1, el.text().indexOf(")"));

        } else {

            postalCode = "00000";

        }

        // Set the response

        response = response +

        "<record>" +

            "<url>" + url + "</url>\n" +

            "<description>" + description + "</description>\n" +

            "<postalCode>" + postalCode + "</postalCode>\n" +

        "</record>"

    }

    response = response + "</records>";

    message.setBody(response);


    // Logging for debugging purpose

    def messageLog = messageLogFactory.getMessageLog(message);

    messageLog.addAttachmentAsString("XML-formatted results", response, "application/xml");


    return message;

}
Note that I am building a very simple XML document out of all the HTML element with the class "a.item-title".
<a class="item-title" href="https://blogs.sap.com/annonces/maison-acquigny-27400-r438400221" name="438400221" onclick="gtag('event', 'Consulter', {'event_category': 'LISTE VENTE', 'event_label': 'Resume Titre'});">
<span class="h1">Acquigny (27400) </span>
<ul class="item-tags">
<li>14 pièces</li>
<li>7 chambres</li>
<li>260 <small>m<sup>2</sup></small></li>
</ul>
<span class="item-price">470.000 €</span>
</a>Basically Jsoup reads all elements with the class "item-title" and will extract:
- the URL from the "href" property
- the text of the element
- the postal code which is in the text of the element, always in brackets
These extracted values are now used to build the XML document, which in turn is then set as message of the iflow. The message now looks something like this:
<?xml version="1.0" ?>

<records>

  <record>

    <url>https://www.pap.fr/annonces/maison-acquigny-27400-r438400221</url>

    <description>Acquigny (27400) 14 pièces 7 chambres 260 m2 470.000 €</description>

    <postalCode>27400</postalCode>

  </record>

...

</records>
4. For each record...
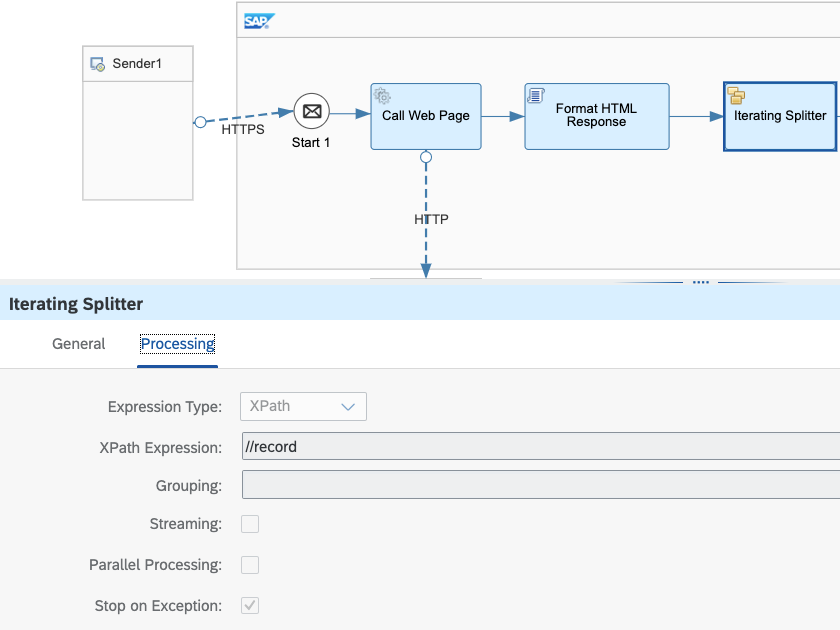
Now that we have all the results in an XML message, we want to do something for each of them. This is why we use an "Iterating Splitter".
"The Iterating Splitter splits a composite message into a series of smaller messages without copying the enveloping elements of the composite message".
Again, a predefined flow step that perfectly fits our needs!
Go ahead and add an "Iterating Splitter" to your iflow and connect it to the previous step.
Configure it to split the message on the "record" node of the message we created just before.
5. Write down the data
In this iterating loop, we will first store postal code, description and URL to be used later, when we will reconstruct the complete data structure. But we will also build the request to the SAP Data Quality Management service.
To perform these 2 steps, we only need one "Content Modifier" which lets you store and write data during iflow runtime.
Add a "Content Modifier" flow step after the "Iterating Splitter".
Store the Description, URL and PostalCode
Create the 3 exchange properties as depicted below.
Remember that we will overwrite the iflow message body with the one we'll create in a second, so we need to store the data before. Also, SAP Cloud Integration executes the "Exchange Property" tab before the "Message Body" tab so we can use the exchange properties below when configuring the body of the iflow message later.

Build the SAP DQM request
Now move to the "Message Body" tab and create the body of the message that will be sent to SAP Data Quality Management.

For your convenience, you can copy/paste it from here.
{

  "addressInput": {

    "postcode": "${property.postalCode}",

    "country": "FR"

  },

  "outputFields": [

    "addr_latitude",

    "addr_longitude"

  ],

  "addressSettings": {

    "processingMode": "both",

    "casing": "mixed",

    "diacritics": "include",

    "streetFormat": "countryCommonStyle",

    "postalFormat": "countryCommonStyle",

    "regionFormat": "countryCommonStyle",

    "scriptConversion": "none",

    "minAssignmentLevel": "none",

    "geoAssign": "best",

    "suggestionSuppressLevel": "none"

  }

}
For more information on how to use the REST API of SAP DQM, you can head to the API Business Hub.
6. Make a call to the SAP Data Quality Management to get the geo-coordinates
Now we can make the call the geolocation service to get the coordinates of a city, represented by it's postal code. SAP Data Quality Management is protected by OAuth so we first need to create OAuth credentials in our Cloud Integration tenant.
Save your iflow and head over to the "Operate and Monitor" menu. In the "Security Material" tile, create "Oauth 2 Client Credentials". Name it, for instance, "DQM_CREDS".

If you haven't got the information to create the credentials yet, go to your BTP Cockpit and display/download the service key of your DQM service. This is where all the relevant information are stored (Token Service URL, client id and client secret).

Go back to our iflow and add a "Request Reply" step after the "Content Modifier" step. Also add a "Receiver" that will represent the SAP Data Quality Management service.
Connect the "Request Reply" step with the "Receiver" and chose "HTTPS". Configure the adapter to format the HTTP call as follows:

Note that the "Request Reply" will be sent using the body which you have properly configured in step 5.
You can have a look at the SAP DQM documentation in case you want to understand this service in more detail.
7. Convert the JSON response into XML.
Because SAP Cloud Integration really feels at home with XML data structures (it also supports JSON, but not yet thoroughly), let's convert the JSON response into XML.
Simply add an "JSON to XML Converter" flow step after the "Request Reply" one.

8. Create the new record which includes the geo-coordinates.
The response of SAP DQM has replaced the message body of our iflow (we used a "Request Reply") so we need to rebuild the original XML record, in which we will inject the geocoordinates.
Add a "Content Modifier" step after the "JSON to XML Converter" and configure it to:
- read and store the latitude and longitude of SAP DQM's response
- build an aggregated record of all the data


<record>

   <url>${property.url}</url>

   <description>${property.description}</description>

   <latitude>${property.lat_response}</latitude>

   <longitude>${property.long_response}</longitude>

</record>
9. Put everything back together in one data structure.
Now that we have processed every single record to get the coordinates, let's put all these records back together into one message.
To do so, add a "Gather" step after the "Content Modifier".

10. Convert the data into JSON so we can easily use it with JavaScript.
Because browsers are much better at working with JSON data structures (JavaScript Object Notation), we will transform the XML message into JSON now.
Add a "XML to JSON Converter" step after the "Gather" step.

11. Generate the HTML page.
Let's now misuse our Cloud Integration service to generate some HML with Javascript dynamically. This is typically not in the functional scope of an EIPaaS (ie. an integration service), but more in the scope of a web server. In our case, it is just a technical demo/exercise, so let's do it here.
Add a "JavaScript" flow step after the "JSON to XML Converter".

The groovy script will now generate the web page to be displayed by the browser.
Note that it will get a little messy since we are generating code in our code. However, thanks to the Groovy Multiline String feature, you can format complex strings very easily (eg. using expressions), making the exercise not too painful.
import com.sap.gateway.ip.core.customdev.util.Message;

import java.util.HashMap;

import groovy.json.*;


def Message processData(Message message) {

    def HTMLresponse = """

        <!DOCTYPE html>

        <html>

        <head>

        <meta http-equiv="content-type" content="text/html; charset=UTF-8" />

        <title>Google Maps - Annonces PAP</title>

        <script src="https://maps.googleapis.com/maps/api/js?key=YOURAPIKEY"></script>

        </head>

        <body>

        <div id="map" style="width: 1000px; height: 700px;"></div>


        <script type="text/javascript">

            var locations = [

    """


    // Getting the coordinates from the JSON payload

    def String payload = message.getBody(java.lang.String)

	def json = new JsonSlurper().parseText(payload)

    // Formatting the array of locations to be displayed on GMaps

    for (int i=0; i<json.Message1.record.size(); i++){

        def description = json.Message1.record[i].description + " <a href=\\'" + json.Message1.record[i].url + "\\' target=\\'_blank\\'>Link</a>";

        def url = json.Message1.record[i].url

        def latitude = json.Message1.record[i].latitude

        def longitude = json.Message1.record[i].longitude


        HTMLresponse += """["${description}", ${latitude}, ${longitude}, 4]"""

        if (i < json.Message1.record.size() - 1){

            HTMLresponse += ","

        }else{

            HTMLresponse += "];"

        }

    }

    // Getting the coordinates to center the map

    def centerLatitude = json.Message1.record[0].latitude

    def centerLongitude = json.Message1.record[0].longitude


    HTMLresponse += """

        var map = new google.maps.Map(document.getElementById('map'), {

        zoom: 7,

        center: new google.maps.LatLng(${centerLatitude}, ${centerLongitude}),

        mapTypeId: google.maps.MapTypeId.ROADMAP

        });


        var infowindow = new google.maps.InfoWindow();


        var marker, i;


        for (i = 0; i < locations.length; i++) {

        marker = new google.maps.Marker({

            position: new google.maps.LatLng(locations[i][1], locations[i][2]),

            map: map

        });


        google.maps.event.addListener(marker, 'click', (function(marker, i) {

            return function() {

            infowindow.setContent(locations[i][0]);

            infowindow.open(map, marker);

            }

        })(marker, i));

        }

        </script>

        </body>

        </html>

    """


    message.setBody(HTMLresponse);

    message.setHeader("Content-Type", "text/html" + "; charset=utf-8" );

    return message;

}
Make sure to have your own Google Map API key ready and replace it in the code above.
Please note that the code above could be optimized, simplified, changed, etc., but it just serves as example.
Last steps
Save your integration flow and deploy it.
In order to get it's URL, go to the "Operate and Monitor" page using the menu on the left, and locate your iflow using the "Manage Integration Content" tiles.

Locate your own iflow and click on the "copy" button to get the URL.

Start up you favorite browser and enter the URL you have just copied.
NB: make sure you don't have a company managed browser where the certificate is automatically send during any web interaction. This would result in a certificate error since you will need to authenticate with the client id and client secret of the service key.
Your browser prompts you to enter the credentials, which are the client id and client secret from your service key (see Step 1).

Congratulations if you are seeing something like the below!

Conclusion
Putting all the technical details aside, I hope you have understood how SAP BTP let's you easily implement integration patterns like enrichment of data. Also, the modularity, openness and support of standards really simplify the way you work with the SAP BTP services, where the only limiting factor is your - or your company's - creativity!
- SAP Managed Tags:
- SAP Integration Suite,
- API Management,
- Cloud Integration,
- SAP Data Quality Management
Labels:
1 Comment
You must be a registered user to add a comment. If you've already registered, sign in. Otherwise, register and sign in.
Labels in this area
-
ABAP CDS Views - CDC (Change Data Capture)
2 -
AI
1 -
Analyze Workload Data
1 -
BTP
1 -
Business and IT Integration
2 -
Business application stu
1 -
Business Technology Platform
1 -
Business Trends
1,661 -
Business Trends
88 -
CAP
1 -
cf
1 -
Cloud Foundry
1 -
Confluent
1 -
Customer COE Basics and Fundamentals
1 -
Customer COE Latest and Greatest
3 -
Customer Data Browser app
1 -
Data Analysis Tool
1 -
data migration
1 -
data transfer
1 -
Datasphere
2 -
Event Information
1,400 -
Event Information
65 -
Expert
1 -
Expert Insights
178 -
Expert Insights
280 -
General
1 -
Google cloud
1 -
Google Next'24
1 -
Kafka
1 -
Life at SAP
784 -
Life at SAP
11 -
Migrate your Data App
1 -
MTA
1 -
Network Performance Analysis
1 -
NodeJS
1 -
PDF
1 -
POC
1 -
Product Updates
4,577 -
Product Updates
330 -
Replication Flow
1 -
RisewithSAP
1 -
SAP BTP
1 -
SAP BTP Cloud Foundry
1 -
SAP Cloud ALM
1 -
SAP Cloud Application Programming Model
1 -
SAP Datasphere
2 -
SAP S4HANA Cloud
1 -
SAP S4HANA Migration Cockpit
1 -
Technology Updates
6,886 -
Technology Updates
408 -
Workload Fluctuations
1
Related Content
- SAP HANA Cloud Vector Engine: Quick FAQ Reference in Technology Blogs by SAP
- 10+ ways to reshape your SAP landscape with SAP Business Technology Platform - Blog 7 in Technology Blogs by SAP
- Integration Suite trial - cannot access API proxy in Technology Q&A
- Top Picks: Innovations Highlights from SAP Business Technology Platform (Q1/2024) in Technology Blogs by SAP
- BTP Free Tier SAP Integration Suite (CPI) Cloud Foundry Trial Provision gets stuck then fails in Technology Q&A
Top kudoed authors
| User | Count |
|---|---|
| 13 | |
| 10 | |
| 10 | |
| 9 | |
| 8 | |
| 7 | |
| 6 | |
| 5 | |
| 5 | |
| 5 |