Hello Everyone,
In my previous
blog, we have discussed about few FAQs #2 on the
SAP S/4HANA Cloud Test Automation Tool. In this blog, we will have a look at few more FAQs during Test Preparation in Realize phase when
creating test processes.
Today, we will discuss on the following questions-
How can I make use of existing custom action's without re-recording? And how can I copy action/actions from different process steps?
Why is my custom script not visible while creating test plan?
Move Action – how can I change the user action number?
Can you help me to better understand the action logs and what they mean?
1. How can I make use of existing custom actions without re-recording? And how can I copy action/actions from different process steps?
- Some of the actions are being made available without the use of re-recording. Below are the existing action.
- And, these actions can be seen in your custom Test Procedure to use them.

- ENTER: Instead of recording a new action for the key stroke Enter action can be used.
- Click: When you want to perform click on any button (here you had to make use of underlying property of the field (say, for ex: ID of the button, using XPath).
- Double-Click: Since, the tool captures the actions of single user actions that may be enter or click or performing any read value, Whenever there is a use of double-click on the field and that is your major action to be performed, you have to make the use of Double-click action. (here also you had to add this action and use the underlying property of the field. (say, for ex: ID of the label, using XPath).
In this tutorial we would like to show how to make use of
“Double-Click”-
- Convert your process step to Custom process step.
- Go to step (before or after) where you want to use “double-click”. And then click on Add Action like below:

Add Action

Click Add Action
- Choose what action you require, in this case it’s a double-click and Click on Submit.

Choose Double Click
- Now, you can see the new action step is added with “Double-click at 21step"

Action/Step added
- Now you can give any logical “label” name that describes this field or action
- In this case, the label given as 1: Quantity

Input Label
- Now we had to define underlying property that tool identifies at specific location.
- We will use XPath here, by clicking “Edit Details"

Edit Details
- Give the XPath value like below-

Enter XPath
- Click on “Ok”
- NOTE: You had to identify these XPath value from a different screen and input the value here.
- Save the step.
The Double-Click action is a ready for the use.
2. Why is my custom script not visible while creating test plan?

Custom script not visible
- Whenever we create a custom test script, we need to enable that script to be visible while creating test plan. When your custom test script shows an info ‘Not Visible in Test Plan’ that means it is not enabled. Please check the below screenshot-
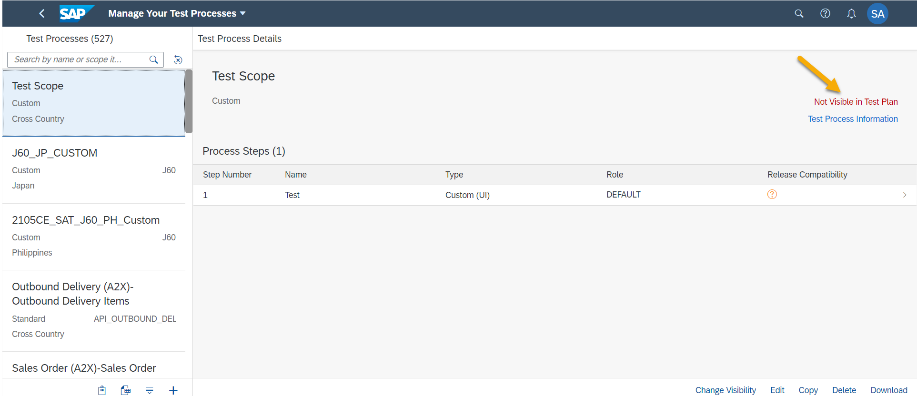
Not visible in Test Plan
- To enable the script, Click on Change Visibility option. Now, the visibility of the test process changes to ‘Visible in Test Plan’

Change Visibility
- Now, the script is visible for you to add for your test plan.

Visible in test plan
3. Move Action – how can I change the user action number?
- If you want to change a particular action in your custom process, the Move Feature can be utilized.
- Select the action you want to move (Action ID 6 in this example) => click on Move Actions Button.

Select Action and Move the action
- Enter the action ID you want to move the selected action to (moving Action 6 to Action 8 in this example) and Click OK. You can save once you have made the desired changes.
- Note: You can move multiple actions at once to the desired action step.

Move Action
4. Can you help me to better understand the action logs and what they mean?
The action logs are the most important part of the tool, they give you insight of the data being captured and success messages for that step. If something fails be it an application issue or a functional issue the logs should be checked thoroughly based on that the screen shot further trouble shooting becomes easier. It is good guidance to rectify issues-
- In your failed test plan, click on the logs section and select the log id for which you need to make necessary corrections.

Logs
- Expand the failed process step check at which action the automate failed-

Expand the failed process step
- Open the screenshot to check the error message and the screenshot where the automate failed-

Open screenshot

Error screenshot
- In the screenshot, check where and why your automate failed, fix the issue in the Manage your test process application and re-run the automate again.
Find out more:
SAP S/4HANA Cloud Test Automation Tool- FAQs Blog Series #1
SAP S/4HANA Cloud Test Automation Tool- FAQs Blog Series #2
SAP S/4HANA Cloud Test Automation Tool- FAQs Blog Series #4
Thanks & Regards,
Sonam
-Topic Expert, Expertise Services Team.
