
- SAP Community
- Products and Technology
- Human Capital Management
- HCM Blogs by SAP
- How to use OAuth2 SAML Bearer Assertion in SAP Clo...
Human Capital Management Blogs by SAP
Get insider info on HCM solutions for core HR and payroll, time and attendance, talent management, employee experience management, and more in this SAP blog.
Turn on suggestions
Auto-suggest helps you quickly narrow down your search results by suggesting possible matches as you type.
Showing results for
Product and Topic Expert
Options
- Subscribe to RSS Feed
- Mark as New
- Mark as Read
- Bookmark
- Subscribe
- Printer Friendly Page
- Report Inappropriate Content
07-29-2021
5:50 PM
Hello SAP community,
During the 2H 2020 release of SAP SuccessFactors application was announced the sunset (planned retirement) of HTTP Basic Authentication for API calls (both SFAPI & OData), you can find more details in this link.
Recently (26th July 2021) our SAP Cloud Integration engineering colleagues also enhanced the CPI SF Adapter to support OAuth2 SAML Bearer Assertion in the SFAPI (SOAP).
Please check the details in the handbook:
Objective of this blog post:
Let's check the steps:
1)
Starting with SuccessFactors configuration side.
If you are not familiar with OAuth, please check this page Authentication Using OAuth 2.0 - SAP Help Portal
Your SF user will need two permissions. Please add these in your role:
Access the Admin center > Manage OAuth2 Client Applications
Click on "Register Client Application" button and start writing down the fields *Application Name and *Application URL
Keep this page open (don't save or close yet) and let's continue with the subsequent steps.
In another browser tab, open your CPI tenant > Monitor > Manage Security > Keystore
Click on the "Create" button > Key Pair
Fill out the fields Alias, Common Name (CN) and Country/Region (C), the other fields you can keep the default values, but some could be changed too if you want, like Valid Until.
After that, click in "Create".
After that, open the line you just created > click on Download button > Certificate.
This will generate one file with .cer extension and will be stored in your default download folder of your browser, in my sample the file generated was:
Opening this .cer file with your preferable text software editor, we will find the certificate value.
Caution, don't copy the ---BEGIN CERTIFICATE---- and ----END CERTIFICATE---- part, just copy the value in the middle.
Copy this value and add inside the field *X.509 Certificate field of your SuccessFactors browser tab that we opened initially.
Then, click on "Register".
Later you will see your entry created and you can click in "View"
Copy the value of the field "API Key"
2)
Let's back to CPI to complete the steps there.
Open your CPI tenant > Monitor > Manage Security > Security Material
Click on the "Create" button > OAuth2 SAML Bearer Assertion
Fill out the fields:
Deploy!
3)
We are ready to start using this Key inside CPI development.
Creating your Request Reply, select the SuccessFactors Adapter Type
After step above, Message protocol select SOAP
In the Connection > Address field > you will select your SF datacenter API url
In the Connection > Credential Name field > you will type the Name of the Security Material we created in the step 2.
In the Processing tab, you can click on the button "Select" in the right side of the field "Entity".
Once the screen load, click in the plus ("+") button.
Then click on "Connect".
In the Entity Selection, we can type the entity we want, like the SFAPI CompoundEmployee:
After selecting your entity, your Query Editor will be ready to be used, selecting the fields you want, applying your filter criteria, etc.
You can click in OK (right side top of the screen, not visible in the above screenshot) and deploy your CPI custom process to validate.
My CPI process was very simple and the query used was:
Once the process is deployed and executed, we can see the calls reaching the SF side under Admin center > SFAPI Audit logs:
As you can see above, the calls used authorization: Bearer ********** (SFAPI and OAuth2).
That's it, all set!
Happy implementations.
Find below one additional comment from the product manager:
If you are interested to see one working sample in CPI for OAuth2 and OData, please find more details in the links below:
Troubleshooting:
If you are getting issues like "Failed to connect to system" in the query editor, one common mistake can be that your API user is not allowlisted correctly in the SF side to accept calls from NEO and CF.
To fix that, you can get the list of IP addresses of your NEO or CF under the links:
Let's take a sample, if your NEO is hosted in the jp1 your range is 157.133.150.0/24 and 130.214.245.32/29
Other common mistake is customers doing allowlisting like this:
Use some website (sample here) to calculate the IP range, for example 157.133.150.0/24 is actually:
When you know your IP range from NEO or CF, please maintain the same under:
These 3 places above can control IPs allowlisting inside SF and needs to be revisited in case your are keeping IP allow-listings.
Other good troubleshooting is testing your OAuth keys in Postman (outside CPI) just to see if you did the steps correctly. For that you can follow the KBA 2800150 - How to test OAuth authentication via Postman - SuccessFactors Integrations in the step 7 onwards. To get the key to be used in postman, you can go to your CPI tenant > Keystore > find your entry created > click in the line > Download Certificate > open the CER file in notepad++ and copy the key inside of the file to be used in Postman for validation too.
If the call works in postman too, it is one good indicator that something else can be wrong in CPI config side.
Conclusion:
Using the instructions of this blog posting, you will be able to set up the SAP Cloud Integration (CPI) connecting vs SuccessFactors SFAPI (SOAP) with OAuth.
I hope this blog post can help your team doing the same implementation faster.
If you find this blog post helpful – please press like button 🙂
Best Regards from Brazil,
Soliman
During the 2H 2020 release of SAP SuccessFactors application was announced the sunset (planned retirement) of HTTP Basic Authentication for API calls (both SFAPI & OData), you can find more details in this link.
Recently (26th July 2021) our SAP Cloud Integration engineering colleagues also enhanced the CPI SF Adapter to support OAuth2 SAML Bearer Assertion in the SFAPI (SOAP).
Please check the details in the handbook:
- Configure the SuccessFactors (SOAP) Sender Adapter - SAP Help Portal
- Modifying SuccessFactors SOAP Entity and Operation - SAP Help Portal
Objective of this blog post:
- Sharing with SAP community one working sample of OAuth2 + SFAPI (SOAP) with customers and partners.
- New custom development integrations needs to start using OAuth2 instead of HTTP Basic Authentication (username/password) to be prepared for the Basic Auth sunset/retirement.
Let's check the steps:
1)
Starting with SuccessFactors configuration side.
If you are not familiar with OAuth, please check this page Authentication Using OAuth 2.0 - SAP Help Portal
Your SF user will need two permissions. Please add these in your role:
- General User Permission > SFAPI User Login
- Manage Integration Tools > Manage OAuth2 Client Applications
Access the Admin center > Manage OAuth2 Client Applications
Click on "Register Client Application" button and start writing down the fields *Application Name and *Application URL
Keep this page open (don't save or close yet) and let's continue with the subsequent steps.

In another browser tab, open your CPI tenant > Monitor > Manage Security > Keystore

Click on the "Create" button > Key Pair

Fill out the fields Alias, Common Name (CN) and Country/Region (C), the other fields you can keep the default values, but some could be changed too if you want, like Valid Until.
After that, click in "Create".
 One small correction in the image above = “SAP SuccessFactors has a userID and a username attribute in the User Entity. Often they are the same but in cases where they are not it is important to choose the right one. SAP Integration Suite needs the user name in the CN field of the KeyPair and the User Binding in the SAP SuccessFactors OAuth2 client registrations uses the User ID.”
After that, open the line you just created > click on Download button > Certificate.

This will generate one file with .cer extension and will be stored in your default download folder of your browser, in my sample the file generated was:
- salesdemosf_key_pair_sample_blog.cer
Opening this .cer file with your preferable text software editor, we will find the certificate value.
Caution, don't copy the ---BEGIN CERTIFICATE---- and ----END CERTIFICATE---- part, just copy the value in the middle.

Copy this value and add inside the field *X.509 Certificate field of your SuccessFactors browser tab that we opened initially.
Then, click on "Register".

Later you will see your entry created and you can click in "View"

Copy the value of the field "API Key"

2)
Let's back to CPI to complete the steps there.
Open your CPI tenant > Monitor > Manage Security > Security Material

Click on the "Create" button > OAuth2 SAML Bearer Assertion

Fill out the fields:
- Name: your unique name for this key/credentials
- Grant Type: OAuth2SAMLBearerAssertion
- Audience: www.successfactors.com
- Client Key: use the copied valued of the API Key we saw in steps earlier
- Token Service URL: in the sample we used the DC4 salesdemo API URL + oauth/token in the end, sample = https://apisalesdemo4.successfactors.com/oauth/token
- Target System Type: SuccessFactors
- Company ID: your SF company ID
- User ID: Key Pair Common Name (CN)
- Key Pair Alias: your unique name created in earlier instruction (found in Keystore), in my sample was salesdemosf_key_pair_sample_blog

Deploy!
3)
We are ready to start using this Key inside CPI development.
Creating your Request Reply, select the SuccessFactors Adapter Type
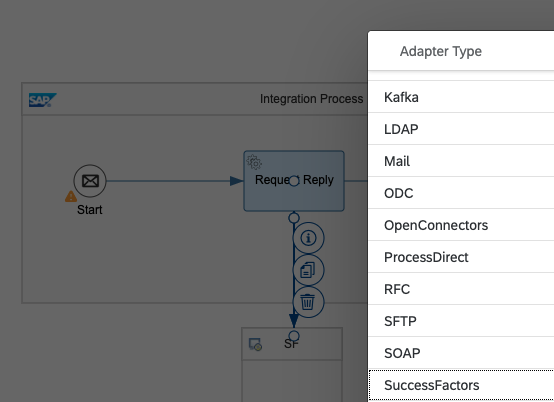
After step above, Message protocol select SOAP

In the Connection > Address field > you will select your SF datacenter API url
In the Connection > Credential Name field > you will type the Name of the Security Material we created in the step 2.

In the Processing tab, you can click on the button "Select" in the right side of the field "Entity".

Once the screen load, click in the plus ("+") button.
Then you can fill out the fields System, Authentication, Address, Address Suffix, Credential Name like sample below.

Then click on "Connect".
In the Entity Selection, we can type the entity we want, like the SFAPI CompoundEmployee:

After selecting your entity, your Query Editor will be ready to be used, selecting the fields you want, applying your filter criteria, etc.

You can click in OK (right side top of the screen, not visible in the above screenshot) and deploy your CPI custom process to validate.
My CPI process was very simple and the query used was:

Once the process is deployed and executed, we can see the calls reaching the SF side under Admin center > SFAPI Audit logs:
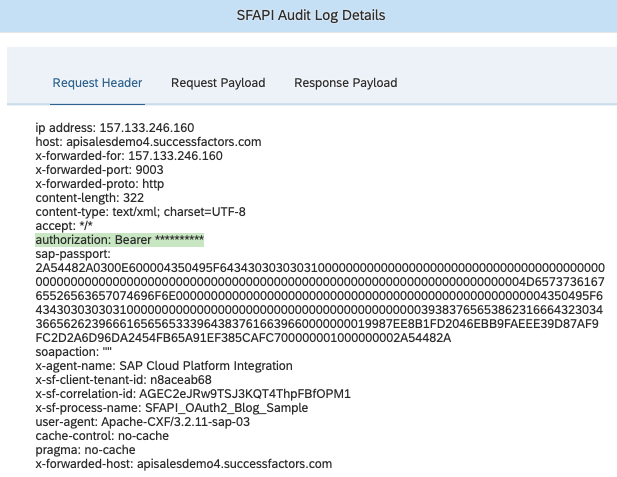
As you can see above, the calls used authorization: Bearer ********** (SFAPI and OAuth2).

That's it, all set!
Happy implementations.
Find below one additional comment from the product manager:
- "In the old CPI SFSF SOAP connector we didn’t had the authentication drop-down. So, customers who have such locally built content with old CPI SFSF SOAP connector who wish not to adopt (due to consultants unavailability etc.) to new CPI SFSF SOAP connector (where Authentication drop down is introduced), we have introduced a message/exchange property which can be used to support in such case (defined that property in iflow content modifier or script step etc.). Our product documentation was enhanced to add this point, check here"
If you are interested to see one working sample in CPI for OAuth2 and OData, please find more details in the links below:
- 3043427 - How to use OAuth2 SAML Bearer Assertion in SAP Cloud Integration connecting with SAP Succe...
- SAP Cloud Integration – OAuth2 SAML Bearer/X.509 Certificate Authentication Support in SuccessFactor...
Troubleshooting:
If you are getting issues like "Failed to connect to system" in the query editor, one common mistake can be that your API user is not allowlisted correctly in the SF side to accept calls from NEO and CF.
To fix that, you can get the list of IP addresses of your NEO or CF under the links:
- NEO Environment: Regions and Hosts Available for the Neo Environment
- CF Environment: Regions
Let's take a sample, if your NEO is hosted in the jp1 your range is 157.133.150.0/24 and 130.214.245.32/29
Other common mistake is customers doing allowlisting like this:
- 157.133.150.0-157.133.150.24 <<<< this is wrong
Use some website (sample here) to calculate the IP range, for example 157.133.150.0/24 is actually:
- 157.133.150.1-157.133.150.254 <<< this is the right range
When you know your IP range from NEO or CF, please maintain the same under:
- Admin center > Password & Login Policy settings > Set API exceptions
- Admin center > IP restriction management
These 3 places above can control IPs allowlisting inside SF and needs to be revisited in case your are keeping IP allow-listings.
Other good troubleshooting is testing your OAuth keys in Postman (outside CPI) just to see if you did the steps correctly. For that you can follow the KBA 2800150 - How to test OAuth authentication via Postman - SuccessFactors Integrations in the step 7 onwards. To get the key to be used in postman, you can go to your CPI tenant > Keystore > find your entry created > click in the line > Download Certificate > open the CER file in notepad++ and copy the key inside of the file to be used in Postman for validation too.
If the call works in postman too, it is one good indicator that something else can be wrong in CPI config side.
Conclusion:
Using the instructions of this blog posting, you will be able to set up the SAP Cloud Integration (CPI) connecting vs SuccessFactors SFAPI (SOAP) with OAuth.
I hope this blog post can help your team doing the same implementation faster.
If you find this blog post helpful – please press like button 🙂
Best Regards from Brazil,
Soliman
- SAP Managed Tags:
- SAP Integration Suite,
- API,
- SAP SuccessFactors HXM Suite,
- Cloud Integration
Labels:
10 Comments
You must be a registered user to add a comment. If you've already registered, sign in. Otherwise, register and sign in.
Labels in this area
-
1H 2023 Product Release
3 -
2H 2023 Product Release
3 -
Business Trends
104 -
Business Trends
4 -
Cross-Products
13 -
Event Information
75 -
Event Information
9 -
Events
5 -
Expert Insights
26 -
Expert Insights
17 -
Feature Highlights
16 -
Hot Topics
20 -
Innovation Alert
8 -
Leadership Insights
4 -
Life at SAP
67 -
Life at SAP
1 -
Product Advisory
5 -
Product Updates
499 -
Product Updates
29 -
Release
6 -
Technology Updates
408 -
Technology Updates
7
Related Content
- Standard integration templates in Talent Intelligence Hub in Human Capital Management Blogs by SAP
- The 1H 2024 Release of SAP SuccessFactors Learning – Release Highlights in Human Capital Management Blogs by Members
- Deprecation of SuccessFactors Learning Token Server in Human Capital Management Q&A
- AI shaping the future of HR: Is your organisation ready to embrace the change? in Human Capital Management Blogs by Members
- 1H 2024 Product Release - PLT-82081 in Human Capital Management Q&A
Top kudoed authors
| User | Count |
|---|---|
| 5 | |
| 4 | |
| 3 | |
| 2 | |
| 2 | |
| 2 | |
| 1 | |
| 1 | |
| 1 | |
| 1 |