
- SAP Community
- Products and Technology
- Technology
- Technology Blogs by Members
- How To .. Configure Inbound AS2 with Dynamic Encry...
- Subscribe to RSS Feed
- Mark as New
- Mark as Read
- Bookmark
- Subscribe
- Printer Friendly Page
- Report Inappropriate Content
Bonus: Additionally will cover AS2 Outbound Adapter configuration using Encryption and Signature Verification.
Scenario
Our company R-Co is engaging organizations "Alpha" and "Bravo" and has agreed to exchange EDI documents through AS2 protocol, each of them has its respective security artifacts (Keypair, public and private certificates) which are used to secure the communication and protect the data exchanged.
Requirement
Our company has requested to build an integration service to exchange EDI documents that support multiple partners using AS2 protocol over HTTPS, authenticating using TLS mutual authentication, all messages must be encrypted and signed using specific certificates per partner.
Solution
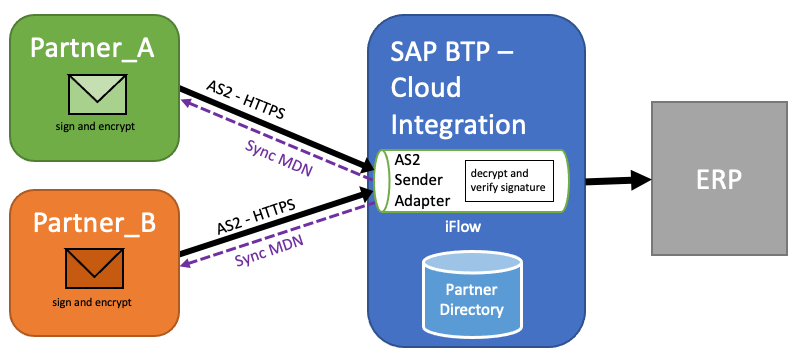
Organization Alpha will be Partner_A
Using:
Signing Algorithm - SHA1
Encryption Algorithm - 3DES
Signed MDN Algorithm - SHA1
X.509 - SXXXXXX813.p12
Organization Bravo will be Partner_B
Using:
Signing Algorithm - SHA512
Encryption Algorithm - AES256
Signed MDN Algorithm - SHA512
X.509 - SXXXXXX184.p12
Our company will be R-Co using SAP BTP Cloud Integration
Service Endpoint: https://r-co.it-cpi003-rt.cfapps.us10.hana.ondemand.com/as2/as2
Message Subject: msgB2BPartners
X.509 - Tenant Keypair: sap_cloudintegrationcertificate
Basic Certificate Usage
Let's understand how a basic setup works.
| B2B Sender Partner | ||
| Function | Signature | Self Private Key |
| Function | Encryption | B2B Receiver's Public Key |
| Function | MDN Verify Signature | B2B Receiver's Public Key |
| B2B Receiver Partner | ||
| Function | Verify Signature | B2B Sender's Public Key |
| Function | Decryption | Self Private Key |
| Function | MDN Signature | Self Private Key |
Now mapping to our scenario
| Partner A | |||
| KeyStore | Key Pair | Self Private Key | SXXXXXX813.p12 |
| Self Public Key | |||
| Self Public Certificate | SXXXXXX813.cer | ||
| B2B Sender's Public Key Certificate | sap_cloudintegrationcertificate.cer | ||
| Cloud Integration Load Balancer Root Certificate | DigiCert Global Root G2.cer | ||
| Partner B | |||
| KeyStore | Key Pair | Self Private Key | SXXXXXX184.p12 |
| Self Public Key | |||
| Self Public Certificate | SXXXXXX184.cer | ||
| B2B Sender's Public Key Certificate | sap_cloudintegrationcertificate.cer | ||
| Cloud Integration Load Balancer Root Certificate | DigiCert Global Root G2.cer | ||
| Cloud Integration | |||
| KeyStore | Key Pair | Self Private Key | sap_cloudintegrationcertificate.p12 |
| Self Public Key | |||
| Self Public Certificate | sap_cloudintegrationcertificate.cer | ||
| B2B Receiver's Public Key Certificate | SXXXXXX813.cer alias -> partner_a_813 SXXXXXX184.cer alias -> partner_b_184 | ||
| Cloud Integration Load Balancer Root Certificate | DigiCert Global Root G2.cer | ||
Build
Now that we have defined how we should communicate with our partners let's create our service.
Step 1: Create iFlow with Inbound AS2 Sender Adapter and Oubound JMS Receiver Adapter.
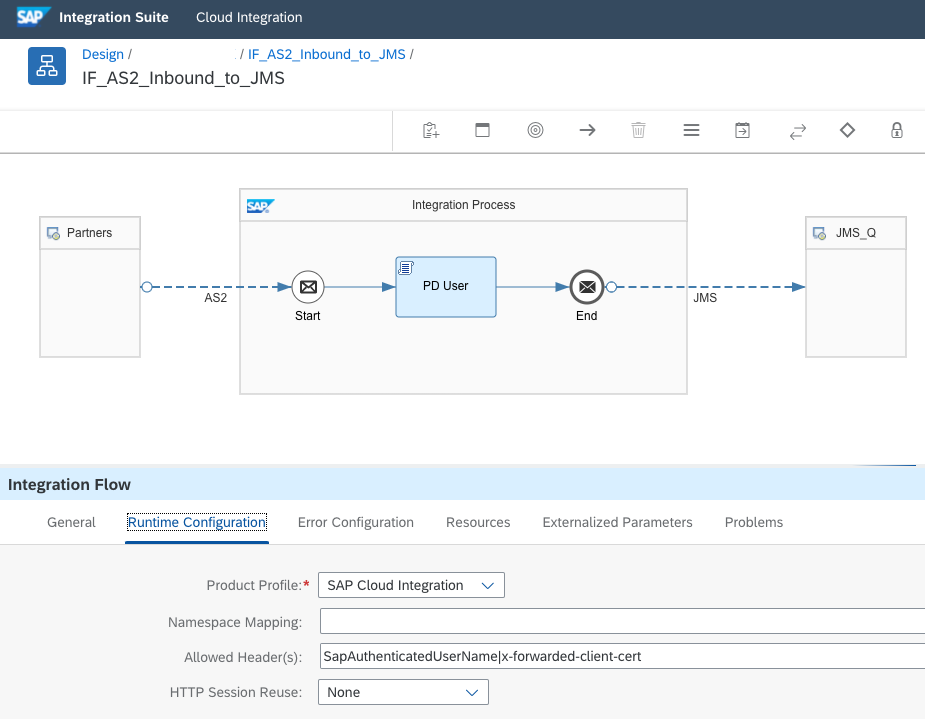
You may download the iFlow following link >> download
Note: I have included a script (optional) not in the scope of this blog, details can be found in the official documentation.
Note: In a productive scenario you may use EDI Integration Templates for SAP Integration Advisor >> "EDI to SAP SOAP - Inbound" or "EDI to SAP IDoc - Inbound". Another option might be that you are building a custom iFlow and need to define an entry or routing iFlow for all your partners using the AS2 protocol
Step 2: Configure Inbound AS2 Sender Adapter.
Note: Link to the documentation here.
Processing Tab:

Message-ID Left & Right: We will configure a *wildcard* as we are not expecting any specific details from partners.
Partner AS2 ID: We will configure a *wildcard* to be able to receive multiple partners in the same iFlow.
Own AS2 ID: R-Co // We will set our company's unique identifier.
Message Subject: msgB2BPartners // Message header of the incoming AS2 message.
The rest of the parameters we can leave as default values, if needed please refer to the documentation for all capabilities of the adapter, for now, we would be using the default role, and concurrent or parallel processes is recommended to be set at the minimum (1) per worker node.
Security Tab:
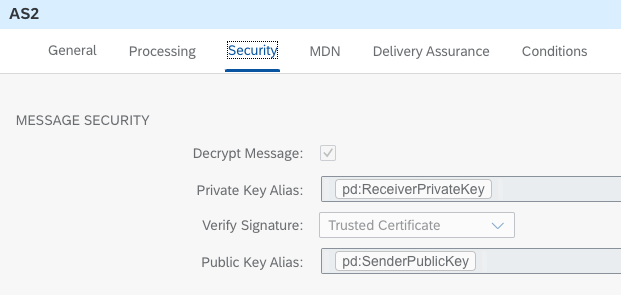
Decrypt Message: Checked // Message will be encrypted and sender side, decrypt is mandatory.
Private Key Alias: pd:ReceiverPrivateKey // Private key alias will be assigned at authentication via partner directory. The Keypair must be imported into the tenant's keystore.
Verify Signature: Trusted Certificate // Signature will be validated against a certificate in the tenant's keystore.
Public Key Alias: pd:SenderPublicKey // Public key alias will be assigned at authentication via partner directory. The certificate must be imported into the tenant's keystore.
Note: However the settings of these parameters if Partner Directory entities are set, partner directory takes precedence and overwrites any configuration on the adapter, please find further details on official documentation.
MDN Tab:

Private Key Alias for Signature: sap_cloudintegrationcertificate // This could be any Keypair in the tenant's keystore, recommended to use own tenant keypair.
Note: At the time of the writing of this blog this parameter could not be set dynamically.
The rest of the parameters will keep them with default values.
Certificates
Prerequisite: Exchange certificates with your partners.
A) sap_cloudintegrationcertificate. Navigate ➡️ Monitor >> Manage Security >> Keystore >> select certificate >> Actions >> Download Certificate

B) DigiCert Global Root G2 (Load Balancer root + chain). Navigate ➡️ Monitor >> Manage Security >> Connectivity Tests >> TLS. Type iFlow base URL and click Send. Click the Download button.
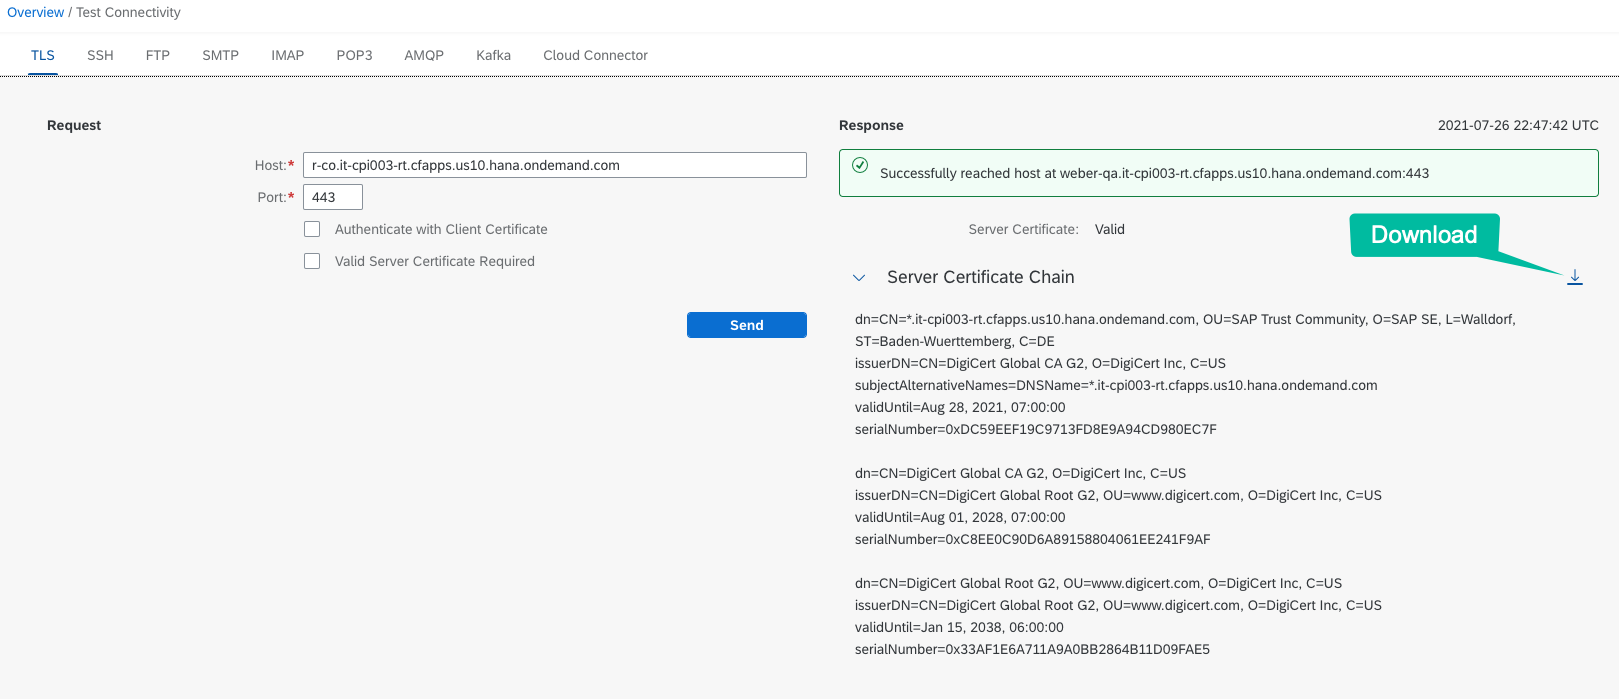
Note: Private certificates should never be exchanged, only share public certificates (.cer / .der) and complete chain (.pb7)
Step I: Create Service Instance and Service Key type X.509 for client certificate authentication
Note: Please find step by step guide <<wiki>>
Note: For purpose of this exercise we will use an S-User keypair to simulate each partner from where I have extracted the certificate; more details can be found in the following link.
Navigate BTP Cockpit >> Subaccount >> Spaces >> Instances >> Click on Create >> Service Instance
Select options as shown below and type a descriptive instance name > Next
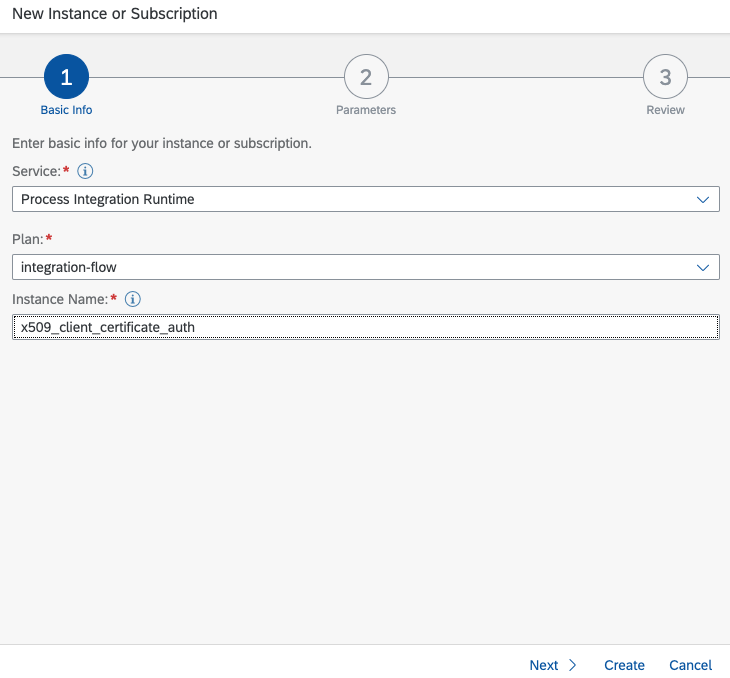 Select Grant-types as shown below, and use the default role >>Create

Create a Service Key from Service Instance.
Type a descriptive Service Key Name and from the certificate file provided by the partner, copy and paste the value to X.509 field >> Create
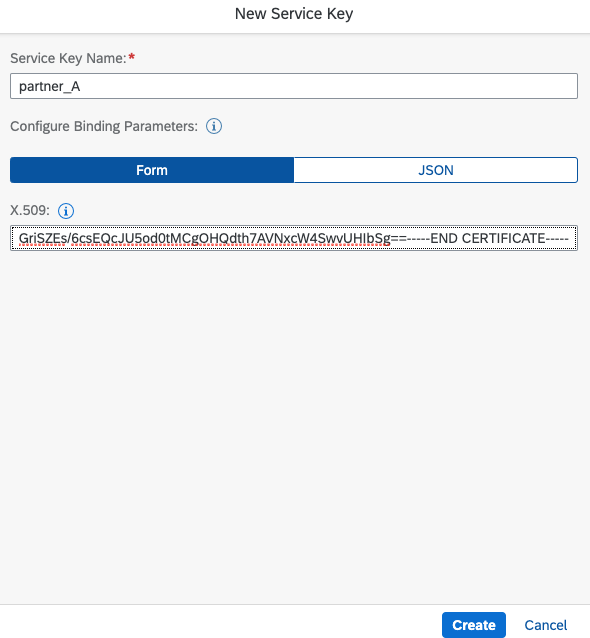
View Service Key
Copy and save "clientid" value:
"clientid": "sb-cb4b8731-0dc9-44a4-bd21-16cdfaf35aaf!b17506| !b2455"
 Repeat same actions for Partner_B
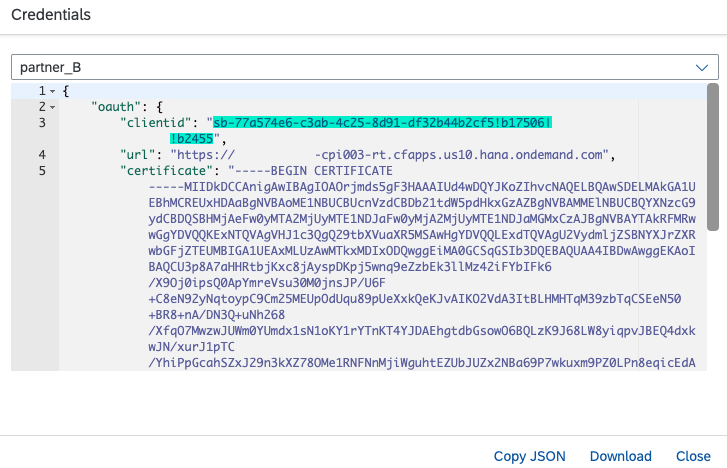 Note: If you don't have access to the SAP BTP cockpit, request these values from your BTP Admin.
Step II: Import public certificate from partner and assign aliases (Optional: Only if you would like to test without Partner Directory)
Note: For purpose of this exercise we will use an S-User keypair to simulate each partner from where I have extracted the certificate; more details can be found in the following link.
Navigate ➡️ Monitor >> Manage Security >> Keystore >> Click on Add >> Certificate
Partner_A
Assign an Alias: partner_a_813

Partner_B
Assign an Alias: partner_b_184

Result

Step 3: Configure Outbound JMS Adapter
In our scenario, we will like to send the message to a JMS queue, in a production scenario you might want to pick from that queue or route to a specific iFlow using Process Direct instead.
Queue Name: B2B_Partners
Transfer Exchange Properties: Checked
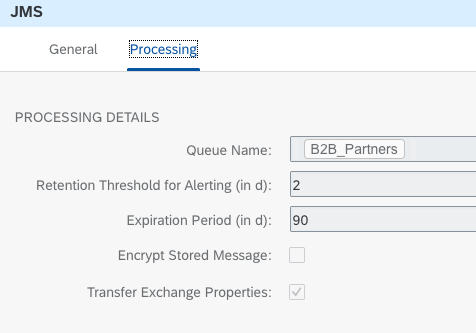
We are ready to deploy our iFlow
Step 4: Configure Partner Directory
Now we are ready to configure the partner directory but first, we need some fundamentals from the official documentation.
The Partner Directory allows you to store information about communication partners and to parameterize integration flows using this information. The Partner Directory helps you to set up a communication network between many communication partners efficiently. You use the Partner Directory to store partner-specific information. Those components that are parameterized read this information during runtime from the Partner Directory.
The Partner Directory contains the following entities(which can be accessed using an OData API)
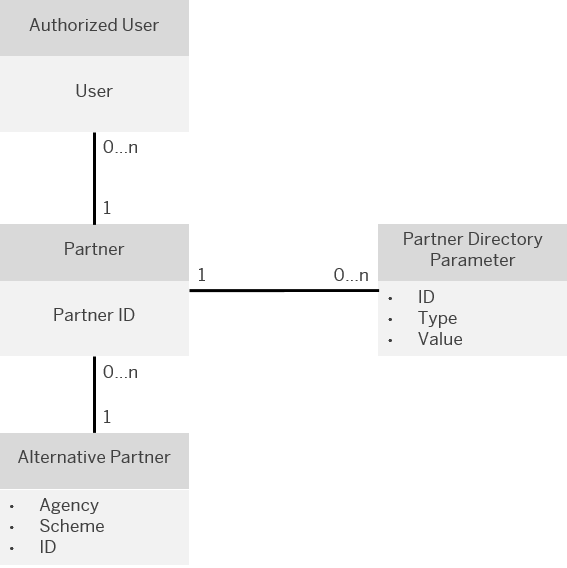
The following are specific iFlow components available in Partner Directory:
AS2 sender adapter: sender partner X.509 certificate to verify partner signature, sender partner-specific user, or client certificate
The AS2 sender reads the following parameters from the Partner Directory:

Let's digest the previous information: Partner Directory is used to store partner-specific information and access this information from the runtime. Partner Directory has predefined entities which can be leveraged to determine specific values for your partners, such as unique ID per partner, authorized users linked to the partner id, and a directory of parameters linked to the partner id. Additionally, the AS2 Sender Adapter has built-in Partner Directory capabilities.
We can now start the configuration of the Partner Directory.
Note: Please refer to the official documentation or personally recommended blog on how to execute crud operation using Postman.
- Create Partner ID in Partner Directory.
We can create Pid or Partner ID by creating a String Parameter.
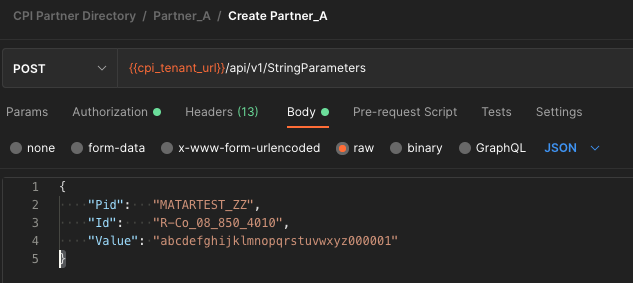
URL: {{UI_tenant_url}}/api/v1/StringParameters
Method: Post
Body in Json:
{

    "Pid":   "MATARTEST_ZZ",

    "Id":    "R-Co_08_850_4010",

    "Value": "abcdefghijklmnopqrstuvwxyz000001"

}
Note: In my case, I have used a specific naming convention for my partner id which includes values from an X12 header document as part of my own strategy, this is optional, Partner ID can be any value that is unique for your directory. Example: Pid can be an ERP ID "100000099", Id can be the endpoint address "URL-Address", and Value can be the actual endpoint "https://acme-as2.com/inbound" - Create an Authorized User in Partner Directory
We linked the Pid to a user by creating an Authorized Users entity.
URL: {{UI_tenant_url}}/api/v1/AuthorizedUsers
Method: Post
Body in JSON:
{
"Pid": "MATARTEST_ZZ",
"User": "sb-cb4b8731-0dc9-44a4-bd21-16cdfaf35aaf!b17506| !b2455"
}
Pid value is the unique value representing your partner.
User value should be retrieved from the service key linked to the partner certificate, this is the same value we retrieve from SAP BTP Cockpit. - Create Partner Directory Parameters for AS2 Sender Adapter
- Decrypt Message. This parameter is needed if partners are encrypting the message. We create a String Parameter for our Pid and assign Id: "AS2_inbound_decrypt_message" and the value: "true"

URL: {{UI_tenant_url}}/api/v1/StringParameters
Method: Post
Body in Json:
{
"Pid": "MATARTEST_ZZ",
"Id": "AS2_inbound_decrypt_message",
"Value": "true"
}
- Private Key Alias. This is the alias for the keypair which is used for decrypting the message. Recommended to use tenant's keypair but any keypair already imported can be used. We create a String Parameter for our Pid and assign id: "ReceiverPrivateKey" and the value: "sap_cloudIntegrationcertificate"

URL: {{UI_tenant_url}}/api/v1/StringParameters
Method: Post
Body in Json:
{
"Pid": "MATARTEST_ZZ",
"Id": "ReceiverPrivateKey",
"Value": "sap_cloudintegrationcertificate"
}
- Verify Signature. This parameter is to set request the adapter to verify the signature. We create a String Parameter for our Pid and assign id: "AS2_inbound_verify_signature" and assign the value: "trustedCertificate"

URL: {{UI_tenant_url}}/api/v1/StringParameters
Method: Post
Body in Json:
{
"Pid": "MATARTEST_ZZ",
"Id": "AS2_inbound_verify_signature",
"Value": "trustedCertificate"
}
- Public Key. This parameter contains the public certificate in PEM format, without header and footer, no spaces, or newlines. We create a Binary Parameter for our Pid and assign content-type: "crt" and value: "{{certificate_PEM}}"

URL: {{UI_tenant_url}}/api/v1/BinaryParameters
Method: Post
Body in Json:
{

    "Pid": "MATARTEST_ZZ",

    "Id": "SenderPublicKey",

    "ContentType": "crt",

    "Value": "MIIDkDCCAnigAwIBAgIOAO...VNxcW4SwvUHIbSg=="

}
- Decrypt Message. This parameter is needed if partners are encrypting the message. We create a String Parameter for our Pid and assign Id: "AS2_inbound_decrypt_message" and the value: "true"
We have completed the configuration for Partner_A, please repeat all tasks for Partner_B. When finalized if all API calls have been executed successfully you will be able to have the following parameters configured in your tenant.
Note: I have used Pid: "MATARTEST_ZZ" ➡️ Partner_A and Pid: "MATARSYST_ZZ" ➡️ Partner_B
String Parameters:


AuthorizedUsers:

Binary Parameter:

Testing
To be able to test we need an AS2 tool to send documents to our iFlow, a good option is Mendelson also referenced by the official documentation unfortunately at the moment of writing this article Mendelson support has confirmed that Client Certificate Authentication is not working in the community version (forum) so instead we will use SAP BTP Trial - Cloud Integration.
Note: Please find a blog on how to enable a trial account <<blog>>
Step 1: Certificate Management
Cloud Integration Trial tenant will be acting as B2B Sender System for Partner_A and Partner_B so we need to maintain the proper security artifacts.
- Import Keypair in Cloud Integration Keystore.
Navigate ➡️ Monitor >> Manage Security >> Keystore >> Click on Add >> Key Pair
Partner_A >> alias >> partner_a_813
Partner_B >> alias >> partner_b_184

Cloud Integration r-co tenant will be acting as B2B Receiver System so we need to maintain the public key from the sap_cloudintegrationcertificate Key Pair.
- Navigate ➡️ Monitor >> Manage Security >> Keystore >> Click on Add >> Certificate
assign alias >> cpi_w

If imported successfully must have the following entries on the trial's tenant keystore
Keypair:

Certificate:

Step 2: Create iFlow
- Create an iFlow with two Integration processes, two HTTPS Sender Adapter, two AS2 Receiver Adapter.

- Configure HTTPS Sender Adapter
2.1 Create first endpoint as: /partner_a 2.2 Create second endpoint as: /partner_b
 For simplicity will disable CSRF protected, and leave all default values.
Step 3: Configure Outbound AS2 (Receiver) Adapter
Note: Please refer to the Certificate section above for clarification on certificate usage.
Note: For purpose of this exercise we will use an S-User keypair to simulate each partner from where I have extracted the certificate; more details can be found in the following link.
- Configure AS2 Receiver Adapter - Partner_A
- Connection - Client Certificate Authentication - Select Authentication Type as Client Certificate and type in the alias created >> partner_a_813
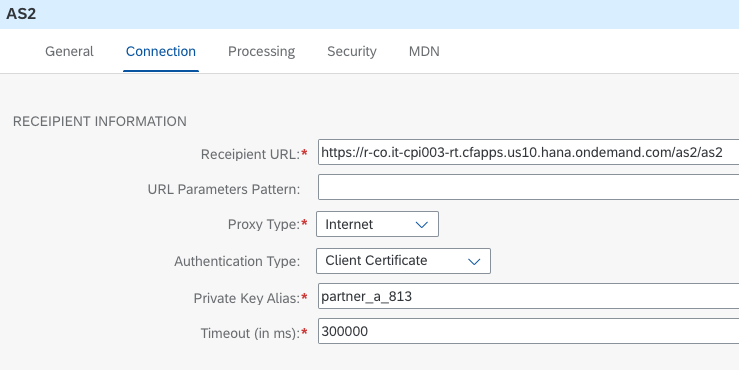
- Processing - Own AS2 ID: "Partner_A", Partner AS2 ID: R-Co, Message Subject: "msgB2BPartners", and Content-Type Application/EDI-X12

- Security - As defined Sign Message: Checked, Algorithm: SHA1, Private Key Alias: partner_a_813, Encrypt Message: Checked, Algorithm: 3DES, and Public Key Alias: cpi_w (sap_cloudintegrationcertificate)

- MDN - Type: Sync, Request Signing: Checked, Algorithm: SHA1, Verify Signature: Checked, and Public Key Alias: cpi_w (sap_cloudintegrationcertificate)

- Connection - Client Certificate Authentication - Select Authentication Type as Client Certificate and type in the alias created >> partner_a_813
- Configure AS2 Receiver Adapter - Partner_B
- Connection - Client Certificate Authentication - Select Authentication Type as Client Certificate and type in the alias created >> partner_b_184

- Processing - Own AS2 ID: "Partner_B", Partner AS2 ID: R-Co, Message Subject: "msgB2BPartners", and Content-Type Application/EDI-X12

- Security - As defined Sign Message: Checked, Algorithm: SHA512, Private Key Alias: partner_b_184, Encrypt Message: Checked, Algorithm: AES256, and Public Key Alias: cpi_w (sap_cloudintegrationcertificate)

- MDN - Type: Sync, Request Signing: Checked, Algorithm: SHA512, Verify Signature: Checked, and Public Key Alias: cpi_w (sap_cloudintegrationcertificate)

- Connection - Client Certificate Authentication - Select Authentication Type as Client Certificate and type in the alias created >> partner_b_184
- Save and Deploy
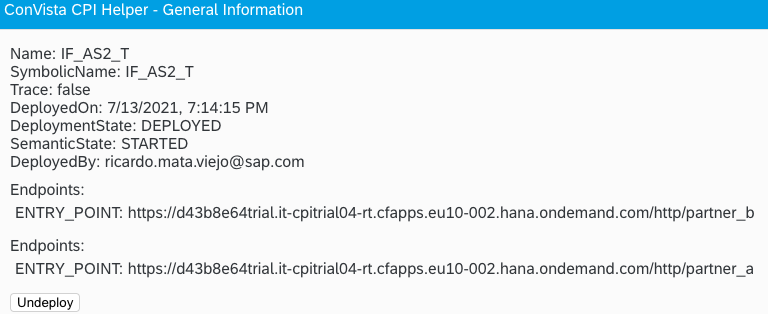
After successfully deploying we should have two endpoints, which will simulate sending data as Partner_A and Partner_B in compliance with the initial requirement and technical details.
Step 4: Complete E2E testing
We can test our scenario using a local client, I will use Postman to call the HTTPS endpoint and send a dummy EDI file. Note: Please find a video tutorial on how to create credentials and execute iFlow <<video>>
- Partner_A Test - X12 850

Note: If successful reply will contain MDN details - Partner_B Test - X12 855

Results
After execution, we can check the logs on both tenants.
Monitoring - Outbound (Trial tenant)
Navigate ➡️ Monitor >> Message Processing >> All Integrations Flows
Select Message for iFlow: IF_AS2_T
A successful message with a Synchronous MDN should have a status of processing completed successfully and MDN Attachment.
Outbound Message: Partner_A

MDN Attachment - Partner_A

Outbound Message - Partner_B

MDN Attachment - Partner_B
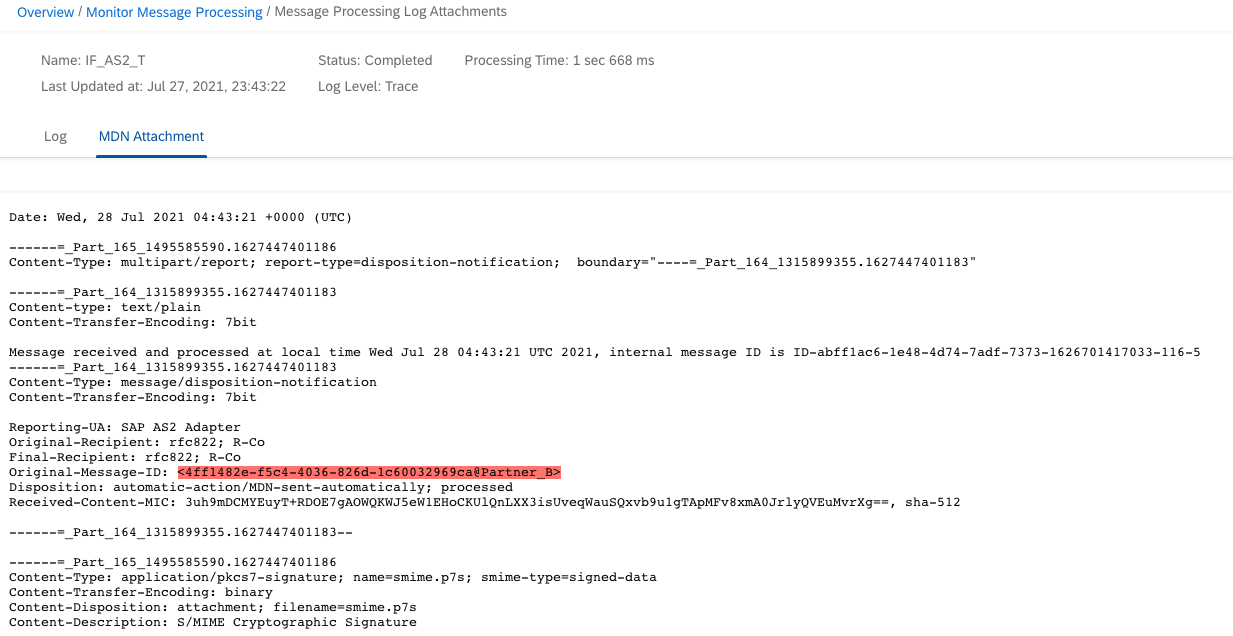
Same values as per Postman responses.
Monitoring - Inbound
Navigate ➡️ Monitor >> Message Processing >> All Integrations Flows
Select Message for iFlow: IF_AS2_Inbound_to_JMS
Inbound Message - Partner_A
The Partner ID was retrieved automatically using Partner Directory Binary Parameter and AuthorizedUser entity.

Trace - Partner_A

Will deep dive into the header values to validate the user, certificate, and AS2 envelop values.
Header Values - Partner_A
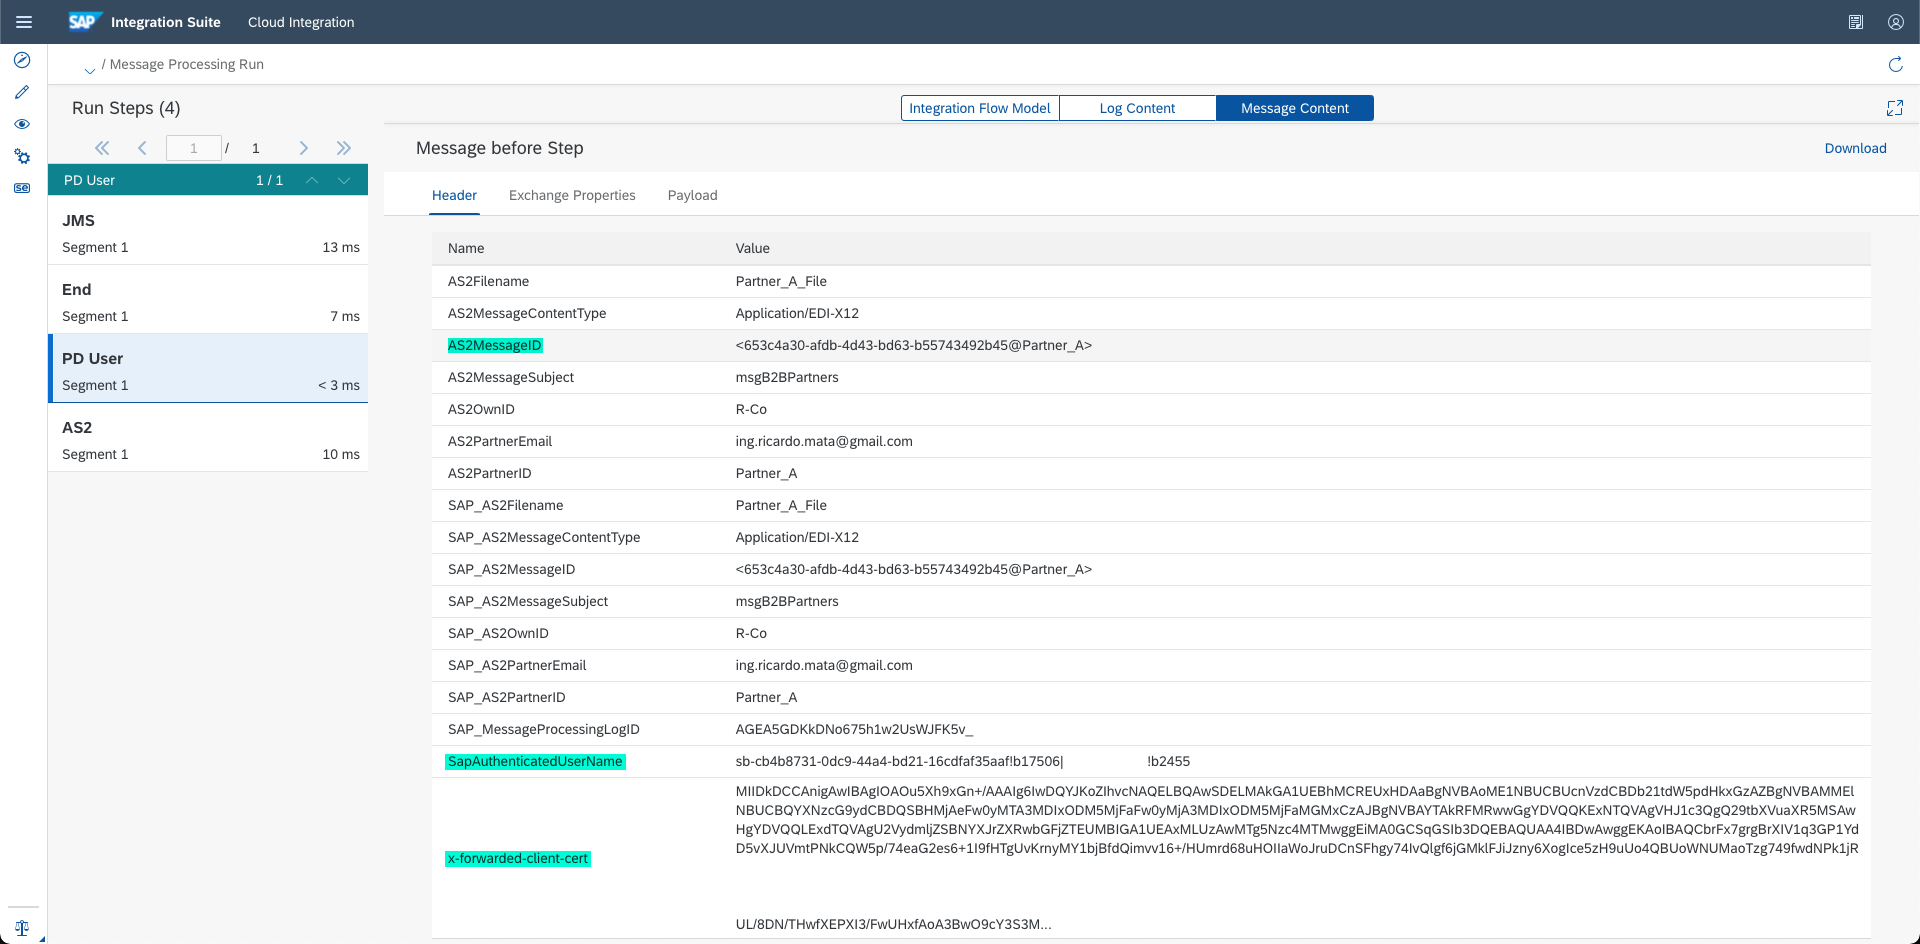
Note: We can compare x-forwarded-client-cert and SAPAuthenticatedUserName values against the service key in SAP BTP Cockpit.
At last, we analyze if the data was decrypted.
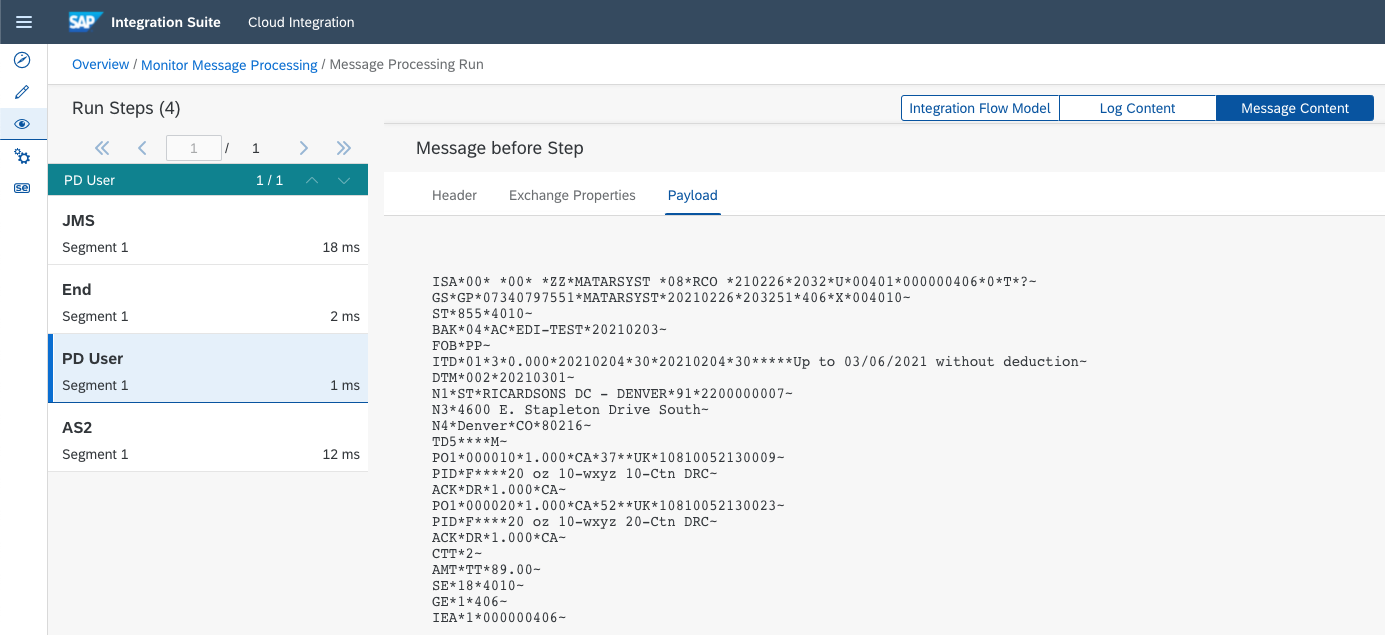
Payload - Partner_A
Analyze decrypted payload

Inbound Message - Partner_B
The Partner ID was retrieved automatically using Partner Directory Binary Parameter and AuthorizedUser entity.

Trace - Partner_B

Will deep dive into the header values to validate the user, certificate, and AS2 envelop values.
Header Values - Partner_B

Note: We can compare x-forwarded-client-cert and SAPAuthenticatedUserName values against the service key in SAP BTP Cockpit.
At last, we analyze if the data was decrypted.
Payload - Partner_B
Analyze decrypted payload
Monitor Queue
Messages are available for further processing we can corroborate the Message-ID corresponds to the ones shown in the Message Monitor screen.

Conclusion
We have demonstrated that SAP Cloud Integration with the Partner Directory can dynamically select the correct certificates, and configuration to process the incoming data from different business partners. Thanks
My goal was to provide you with a guide on how to configure AS2 Adapters in SAP BTP Cloud Integration while leveraging Partner Directory built-in capabilities using client certificate authentication, hopefully, this can help you in your projects, keep integrating 🖖🏻
Regards
- SAP Managed Tags:
- SAP Integration Suite,
- Cloud Integration
You must be a registered user to add a comment. If you've already registered, sign in. Otherwise, register and sign in.
-
"automatische backups"
1 -
"regelmäßige sicherung"
1 -
505 Technology Updates 53
1 -
ABAP
14 -
ABAP API
1 -
ABAP CDS Views
2 -
ABAP CDS Views - BW Extraction
1 -
ABAP CDS Views - CDC (Change Data Capture)
1 -
ABAP class
2 -
ABAP Cloud
2 -
ABAP Development
5 -
ABAP in Eclipse
1 -
ABAP Platform Trial
1 -
ABAP Programming
2 -
abap technical
1 -
access data from SAP Datasphere directly from Snowflake
1 -
Access data from SAP datasphere to Qliksense
1 -
Accrual
1 -
action
1 -
adapter modules
1 -
Addon
1 -
Adobe Document Services
1 -
ADS
1 -
ADS Config
1 -
ADS with ABAP
1 -
ADS with Java
1 -
ADT
2 -
Advance Shipping and Receiving
1 -
Advanced Event Mesh
3 -
AEM
1 -
AI
7 -
AI Launchpad
1 -
AI Projects
1 -
AIML
9 -
Alert in Sap analytical cloud
1 -
Amazon S3
1 -
Analytical Dataset
1 -
Analytical Model
1 -
Analytics
1 -
Analyze Workload Data
1 -
annotations
1 -
API
1 -
API and Integration
3 -
API Call
2 -
Application Architecture
1 -
Application Development
5 -
Application Development for SAP HANA Cloud
3 -
Applications and Business Processes (AP)
1 -
Artificial Intelligence
1 -
Artificial Intelligence (AI)
4 -
Artificial Intelligence (AI) 1 Business Trends 363 Business Trends 8 Digital Transformation with Cloud ERP (DT) 1 Event Information 462 Event Information 15 Expert Insights 114 Expert Insights 76 Life at SAP 418 Life at SAP 1 Product Updates 4
1 -
Artificial Intelligence (AI) blockchain Data & Analytics
1 -
Artificial Intelligence (AI) blockchain Data & Analytics Intelligent Enterprise
1 -
Artificial Intelligence (AI) blockchain Data & Analytics Intelligent Enterprise Oil Gas IoT Exploration Production
1 -
Artificial Intelligence (AI) blockchain Data & Analytics Intelligent Enterprise sustainability responsibility esg social compliance cybersecurity risk
1 -
ASE
1 -
ASR
2 -
ASUG
1 -
Attachments
1 -
Authorisations
1 -
Automating Processes
1 -
Automation
1 -
aws
2 -
Azure
1 -
Azure AI Studio
1 -
B2B Integration
1 -
Backorder Processing
1 -
Backup
1 -
Backup and Recovery
1 -
Backup schedule
1 -
BADI_MATERIAL_CHECK error message
1 -
Bank
1 -
BAS
1 -
basis
2 -
Basis Monitoring & Tcodes with Key notes
2 -
Batch Management
1 -
BDC
1 -
Best Practice
1 -
bitcoin
1 -
Blockchain
3 -
BOP in aATP
1 -
BOP Segments
1 -
BOP Strategies
1 -
BOP Variant
1 -
BPC
1 -
BPC LIVE
1 -
BTP
11 -
BTP Destination
2 -
Business AI
1 -
Business and IT Integration
1 -
Business application stu
1 -
Business Architecture
1 -
Business Communication Services
1 -
Business Continuity
1 -
Business Data Fabric
3 -
Business Partner
12 -
Business Partner Master Data
10 -
Business Technology Platform
2 -
Business Trends
1 -
CA
1 -
calculation view
1 -
CAP
2 -
Capgemini
1 -
Catalyst for Efficiency: Revolutionizing SAP Integration Suite with Artificial Intelligence (AI) and
1 -
CCMS
2 -
CDQ
12 -
CDS
2 -
Cental Finance
1 -
Certificates
1 -
CFL
1 -
Change Management
1 -
chatbot
1 -
chatgpt
3 -
CL_SALV_TABLE
2 -
Class Runner
1 -
Classrunner
1 -
Cloud ALM Monitoring
1 -
Cloud ALM Operations
1 -
cloud connector
1 -
Cloud Extensibility
1 -
Cloud Foundry
3 -
Cloud Integration
6 -
Cloud Platform Integration
2 -
cloudalm
1 -
communication
1 -
Compensation Information Management
1 -
Compensation Management
1 -
Compliance
1 -
Compound Employee API
1 -
Configuration
1 -
Connectors
1 -
Conversion
1 -
Cosine similarity
1 -
cryptocurrency
1 -
CSI
1 -
ctms
1 -
Custom chatbot
3 -
Custom Destination Service
1 -
custom fields
1 -
Customer Experience
1 -
Customer Journey
1 -
Customizing
1 -
Cyber Security
2 -
Data
1 -
Data & Analytics
1 -
Data Aging
1 -
Data Analytics
2 -
Data and Analytics (DA)
1 -
Data Archiving
1 -
Data Back-up
1 -
Data Governance
5 -
Data Integration
2 -
Data Quality
12 -
Data Quality Management
12 -
Data Synchronization
1 -
data transfer
1 -
Data Unleashed
1 -
Data Value
8 -
database tables
1 -
Datasphere
2 -
datenbanksicherung
1 -
dba cockpit
1 -
dbacockpit
1 -
Debugging
2 -
Delimiting Pay Components
1 -
Delta Integrations
1 -
Destination
3 -
Destination Service
1 -
Developer extensibility
1 -
Developing with SAP Integration Suite
1 -
Devops
1 -
Digital Transformation
1 -
Documentation
1 -
Dot Product
1 -
DQM
1 -
dump database
1 -
dump transaction
1 -
e-Invoice
1 -
E4H Conversion
1 -
Eclipse ADT ABAP Development Tools
2 -
edoc
1 -
edocument
1 -
ELA
1 -
Embedded Consolidation
1 -
Embedding
1 -
Embeddings
1 -
Employee Central
1 -
Employee Central Payroll
1 -
Employee Central Time Off
1 -
Employee Information
1 -
Employee Rehires
1 -
Enable Now
1 -
Enable now manager
1 -
endpoint
1 -
Enhancement Request
1 -
Enterprise Architecture
1 -
ETL Business Analytics with SAP Signavio
1 -
Euclidean distance
1 -
Event Dates
1 -
Event Driven Architecture
1 -
Event Mesh
2 -
Event Reason
1 -
EventBasedIntegration
1 -
EWM
1 -
EWM Outbound configuration
1 -
EWM-TM-Integration
1 -
Existing Event Changes
1 -
Expand
1 -
Expert
2 -
Expert Insights
1 -
Fiori
14 -
Fiori Elements
2 -
Fiori SAPUI5
12 -
Flask
1 -
Full Stack
8 -
Funds Management
1 -
General
1 -
Generative AI
1 -
Getting Started
1 -
GitHub
8 -
Grants Management
1 -
groovy
1 -
GTP
1 -
HANA
5 -
HANA Cloud
2 -
Hana Cloud Database Integration
2 -
HANA DB
1 -
HANA XS Advanced
1 -
Historical Events
1 -
home labs
1 -
HowTo
1 -
HR Data Management
1 -
html5
8 -
idm
1 -
Implementation
1 -
input parameter
1 -
instant payments
1 -
integration
3 -
Integration Advisor
1 -
Integration Architecture
1 -
Integration Center
1 -
Integration Suite
1 -
intelligent enterprise
1 -
Java
1 -
job
1 -
Job Information Changes
1 -
Job-Related Events
1 -
Job_Event_Information
1 -
joule
4 -
Journal Entries
1 -
Just Ask
1 -
Kerberos for ABAP
8 -
Kerberos for JAVA
8 -
Launch Wizard
1 -
Learning Content
2 -
Life at SAP
1 -
lightning
1 -
Linear Regression SAP HANA Cloud
1 -
local tax regulations
1 -
LP
1 -
Machine Learning
2 -
Marketing
1 -
Master Data
3 -
Master Data Management
14 -
Maxdb
2 -
MDG
1 -
MDGM
1 -
MDM
1 -
Message box.
1 -
Messages on RF Device
1 -
Microservices Architecture
1 -
Microsoft Universal Print
1 -
Middleware Solutions
1 -
Migration
5 -
ML Model Development
1 -
Modeling in SAP HANA Cloud
8 -
Monitoring
3 -
MTA
1 -
Multi-Record Scenarios
1 -
Multiple Event Triggers
1 -
Neo
1 -
New Event Creation
1 -
New Feature
1 -
Newcomer
1 -
NodeJS
1 -
ODATA
2 -
OData APIs
1 -
odatav2
1 -
ODATAV4
1 -
ODBC
1 -
ODBC Connection
1 -
Onpremise
1 -
open source
2 -
OpenAI API
1 -
Oracle
1 -
PaPM
1 -
PaPM Dynamic Data Copy through Writer function
1 -
PaPM Remote Call
1 -
PAS-C01
1 -
Pay Component Management
1 -
PGP
1 -
Pickle
1 -
PLANNING ARCHITECTURE
1 -
Popup in Sap analytical cloud
1 -
PostgrSQL
1 -
POSTMAN
1 -
Process Automation
2 -
Product Updates
4 -
PSM
1 -
Public Cloud
1 -
Python
4 -
Qlik
1 -
Qualtrics
1 -
RAP
3 -
RAP BO
2 -
Record Deletion
1 -
Recovery
1 -
recurring payments
1 -
redeply
1 -
Release
1 -
Remote Consumption Model
1 -
Replication Flows
1 -
Research
1 -
Resilience
1 -
REST
1 -
REST API
1 -
Retagging Required
1 -
Risk
1 -
Rolling Kernel Switch
1 -
route
1 -
rules
1 -
S4 HANA
1 -
S4 HANA Cloud
1 -
S4 HANA On-Premise
1 -
S4HANA
3 -
S4HANA_OP_2023
2 -
SAC
10 -
SAC PLANNING
9 -
SAP
4 -
SAP ABAP
1 -
SAP Advanced Event Mesh
1 -
SAP AI Core
8 -
SAP AI Launchpad
8 -
SAP Analytic Cloud Compass
1 -
Sap Analytical Cloud
1 -
SAP Analytics Cloud
4 -
SAP Analytics Cloud for Consolidation
1 -
SAP Analytics Cloud Story
1 -
SAP analytics clouds
1 -
SAP BAS
1 -
SAP Basis
6 -
SAP BODS
1 -
SAP BODS certification.
1 -
SAP BTP
20 -
SAP BTP Build Work Zone
2 -
SAP BTP Cloud Foundry
5 -
SAP BTP Costing
1 -
SAP BTP CTMS
1 -
SAP BTP Innovation
1 -
SAP BTP Migration Tool
1 -
SAP BTP SDK IOS
1 -
SAP Build
11 -
SAP Build App
1 -
SAP Build apps
1 -
SAP Build CodeJam
1 -
SAP Build Process Automation
3 -
SAP Build work zone
10 -
SAP Business Objects Platform
1 -
SAP Business Technology
2 -
SAP Business Technology Platform (XP)
1 -
sap bw
1 -
SAP CAP
1 -
SAP CDC
1 -
SAP CDP
1 -
SAP Certification
1 -
SAP Cloud ALM
4 -
SAP Cloud Application Programming Model
1 -
SAP Cloud Integration for Data Services
1 -
SAP cloud platform
8 -
SAP Companion
1 -
SAP CPI
3 -
SAP CPI (Cloud Platform Integration)
2 -
SAP CPI Discover tab
1 -
sap credential store
1 -
SAP Customer Data Cloud
1 -
SAP Customer Data Platform
1 -
SAP Data Intelligence
1 -
SAP Data Services
1 -
SAP DATABASE
1 -
SAP Dataspher to Non SAP BI tools
1 -
SAP Datasphere
9 -
SAP DRC
1 -
SAP EWM
1 -
SAP Fiori
2 -
SAP Fiori App Embedding
1 -
Sap Fiori Extension Project Using BAS
1 -
SAP GRC
1 -
SAP HANA
1 -
SAP HCM (Human Capital Management)
1 -
SAP HR Solutions
1 -
SAP IDM
1 -
SAP Integration Suite
9 -
SAP Integrations
4 -
SAP iRPA
2 -
SAP Learning Class
1 -
SAP Learning Hub
1 -
SAP Odata
2 -
SAP on Azure
1 -
SAP PartnerEdge
1 -
sap partners
1 -
SAP Password Reset
1 -
SAP PO Migration
1 -
SAP Prepackaged Content
1 -
SAP Process Automation
2 -
SAP Process Integration
2 -
SAP Process Orchestration
1 -
SAP S4HANA
2 -
SAP S4HANA Cloud
1 -
SAP S4HANA Cloud for Finance
1 -
SAP S4HANA Cloud private edition
1 -
SAP Sandbox
1 -
SAP STMS
1 -
SAP SuccessFactors
2 -
SAP SuccessFactors HXM Core
1 -
SAP Time
1 -
SAP TM
2 -
SAP Trading Partner Management
1 -
SAP UI5
1 -
SAP Upgrade
1 -
SAP-GUI
8 -
SAP_COM_0276
1 -
SAPBTP
1 -
SAPCPI
1 -
SAPEWM
1 -
sapmentors
1 -
saponaws
2 -
SAPUI5
4 -
schedule
1 -
Secure Login Client Setup
8 -
security
9 -
Selenium Testing
1 -
SEN
1 -
SEN Manager
1 -
service
1 -
SET_CELL_TYPE
1 -
SET_CELL_TYPE_COLUMN
1 -
SFTP scenario
2 -
Simplex
1 -
Single Sign On
8 -
Singlesource
1 -
SKLearn
1 -
soap
1 -
Software Development
1 -
SOLMAN
1 -
solman 7.2
2 -
Solution Manager
3 -
sp_dumpdb
1 -
sp_dumptrans
1 -
SQL
1 -
sql script
1 -
SSL
8 -
SSO
8 -
SuccessFactors
1 -
SuccessFactors Time Tracking
1 -
Sybase
1 -
system copy method
1 -
System owner
1 -
Table splitting
1 -
Tax Integration
1 -
Technical article
1 -
Technical articles
1 -
Technology Updates
1 -
Technology Updates
1 -
Technology_Updates
1 -
Threats
1 -
Time Collectors
1 -
Time Off
2 -
Tips and tricks
2 -
Tools
1 -
Trainings & Certifications
1 -
Transport in SAP BODS
1 -
Transport Management
1 -
TypeScript
1 -
unbind
1 -
Unified Customer Profile
1 -
UPB
1 -
Use of Parameters for Data Copy in PaPM
1 -
User Unlock
1 -
VA02
1 -
Vector Database
1 -
Vector Engine
1 -
Visual Studio Code
1 -
VSCode
1 -
Web SDK
1 -
work zone
1 -
workload
1 -
xsa
1 -
XSA Refresh
1
- « Previous
- Next »
- Cloud Integration: Manually Sign / Verify XML payload based on XML Signature Standard in Technology Blogs by SAP
- SAP Cloud Integration: Understanding the XML Digital Signature Standard in Technology Blogs by SAP
- CAP LLM Plugin – Empowering Developers for rapid Gen AI-CAP App Development in Technology Blogs by SAP
- Single Sign On to SAP Cloud Integration (CPI runtime) from an external Identity Provider in Technology Blogs by SAP
- Integration possibilities from SAP CI(Integration Suite) to SWIFT??? in Technology Q&A
| User | Count |
|---|---|
| 8 | |
| 8 | |
| 7 | |
| 6 | |
| 5 | |
| 4 | |
| 4 | |
| 4 | |
| 3 | |
| 3 |