
- SAP Community
- Products and Technology
- Technology
- Technology Blogs by SAP
- Train Data Attribute Recommendation Service Machin...
Technology Blogs by SAP
Learn how to extend and personalize SAP applications. Follow the SAP technology blog for insights into SAP BTP, ABAP, SAP Analytics Cloud, SAP HANA, and more.
Turn on suggestions
Auto-suggest helps you quickly narrow down your search results by suggesting possible matches as you type.
Showing results for
Advisor
Options
- Subscribe to RSS Feed
- Mark as New
- Mark as Read
- Bookmark
- Subscribe
- Printer Friendly Page
- Report Inappropriate Content
07-25-2021
10:16 AM
In our previous part 1 blog post, we looked at how to setup Data Attribute Recommendation Service, SFTP and initial configuration of SAP Cloud Integration flows. In this current blog post, we will look at each of the SAP Cloud integration flows in detail and how to configure and use them.
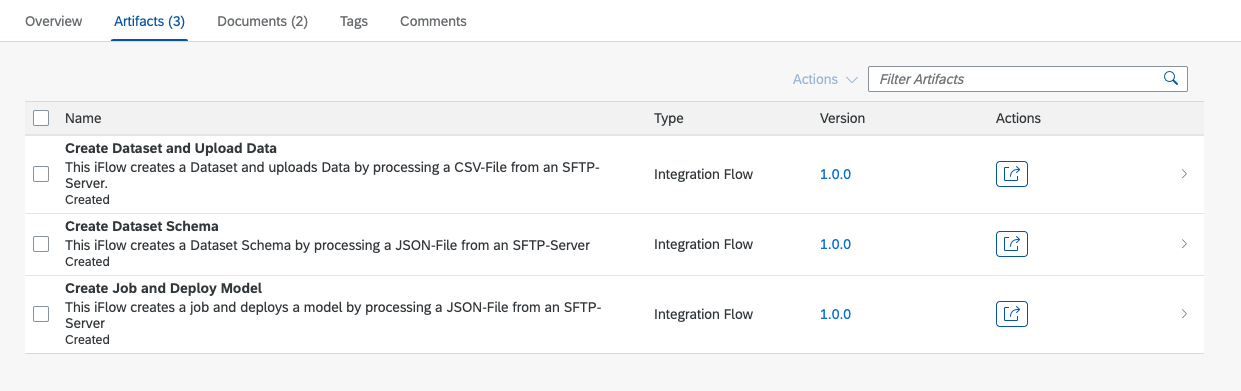
Below are the three integration flows that are part of the Data Attribute Recommendation integration package. You would see these under the artifacts tab as shown below.
Let us look at each of the above now in detail
The iFlow "Create Dataset Schema" creates a Dataset schema based on a JSON input file. Below are the steps to configure the same.
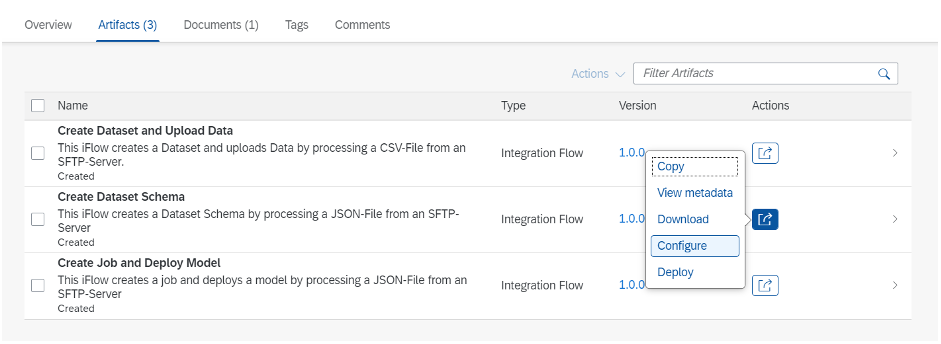
1) Select option “Configure” by clicking on “Actions” icon next to the iFlow as in below screenshot.
2) You would get a popup screen to enter parameters of SFTP Sender and Receiver. Let's start with Sender. You would need to configure SFTP_Sender by providing the required information. The Directory property specifies in which directory the JSON Files are located. In the address field the address of the SFTP-Server must be set. As a proxy type you can either use On-Premise and provide the Location ID if necessary or use Internet. For Authentication you can reuse the Name of SFTP User created in Step 4 of User Credential Setup in the previous blog Also, Post-Processing can be configured to specify the operation after a file has been processed by the Integration Flow.
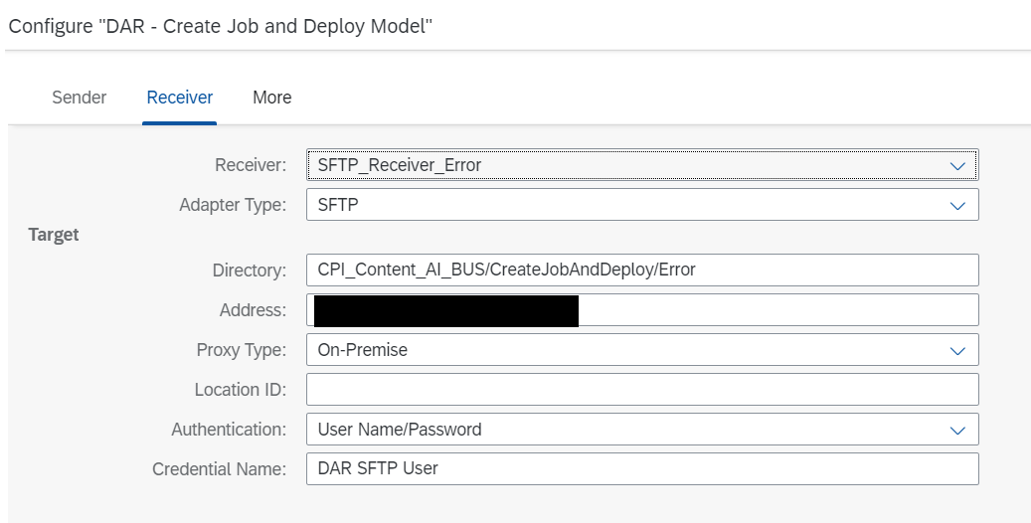
3) You also need to configure the Receiver section. To configure the SFTP_Receiver, you can enter the same data as in the previous step. Only the directory must be different from the one specified in the SFTP_Sender.
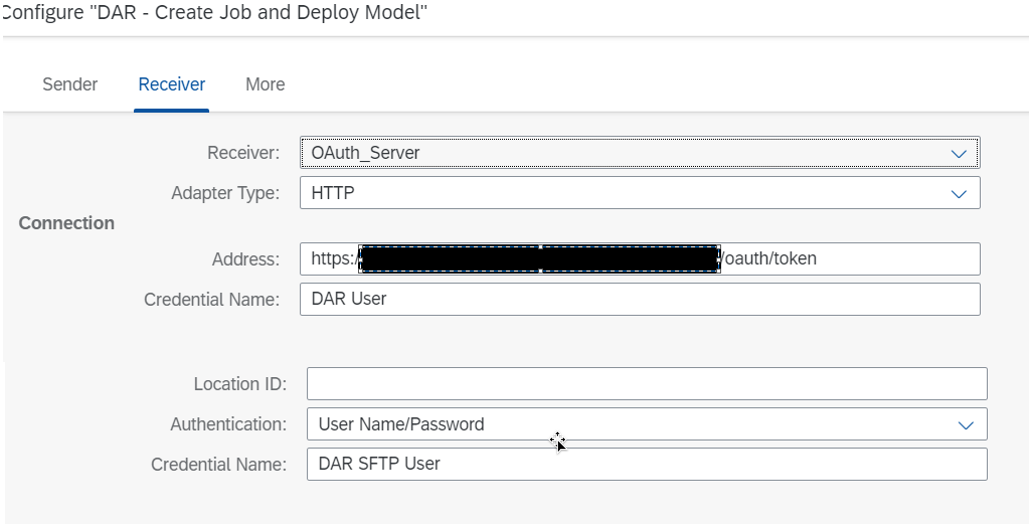
4) Next, we need to configure the OAuth_Server info. For that, you need to select the drop-down in Receiver as shown in the below screenshot.
After selection, now update the parameters for OAuth_Server
5) Lastly, in the more section, you need to configure the parameter DAR Base URL as url from Document Attribute Recommendation service key JSON file
The iFlow "Create Dataset and Upload Data" creates a Dataset and uploads the Data based on a CSV input file with training data. Below are the steps to configure the same.
1) Similar to above, first you need to select the Configure option. See above section for the screenshot.
2) Similar to above, you need to enter parameters of SFTP Sender and Receiver. You would need to configure SFTP_Sender by providing the required information. The Directory property specifies in which directory the JSON Files are located. In the address field the address of the SFTP-Server must be set. As a proxy type you can either use On-Premise and provide the Location ID if necessary or use Internet. For Authentication you can reuse the Name of SFTP User created in Step 4 of User Credential Setup in the previous blog Also, Post-Processing can be configured to specify the operation after a file has been processed by the Integration Flow.
3) Similar to above, you also need to configure the Receiver section . To configure the SFTP_Receiver, you can enter the same data as in the above step. Only the directory must be different from the one specified in the SFTP_Sender.
4) Next, we need to configure the SFTP_Receiver_Error. You can select the SFTP_Receiver_Error from the dropdown as shown below.
After the SFTP_Receiver_Error is selected, you can enter the same data as in the above step. Only the directory must be different from the one specified in the SFTP_Sender.
5) Next, we need to configure the OAuth_Server info. For that, you need to select the drop-down in Receiver as shown in the above step. After selection, update the parameters for OAuth_Server
6) Lastly, in the more section, you need to configure the parameter DAR Base URL as url from Document Attribute Recommendation service key JSON file
The iFlow "Create Job and Deploy Model" creates the training job and delpoys the model based on the JSON input file. Below are the steps to configure the same.
1) Similar to above, first you need to select the Configure option. See above sections for the screenshot.
2) Similar to above, you need to enter parameters of SFTP Sender and Receiver. You would need to configure SFTP_Sender by providing the required information. The Directory property specifies in which directory the JSON Files are located. In the address field the address of the SFTP-Server must be set. As a proxy type you can either use On-Premise and provide the Location ID if necessary or use Internet. For Authentication you can reuse the Name of SFTP User created in Step 4 of User Credential Setup in the previous blog Also, Post-Processing can be configured to specify the operation after a file has been processed by the Integration Flow.
3) Similar to above, you also need to configure the Receiver section . To configure the SFTP_Receiver, you can enter the same data as in the above step. Only the directory must be different from the one specified in the SFTP_Sender.
4) Next, we need to configure the SFTP_Receiver_Error. Similar to the above, you need to select it from the dropdown. After the SFTP_Receiver_Error is selected, you can enter the same data as in the above step. Only the directory must be different from the one specified in the SFTP_Sender.
5) Next, we need to configure the OAuth_Server info. For that, you need to select the drop-down in Receiver as shown in the above step. After selection, update the parameters for OAuth_Server
6) Lastly, in the more section, you need to configure the parameter DAR Base URL as url from Document Attribute Recommendation service key JSON file
Now that we have configured all the iFlows and deployed them, let's look at the processing of files and how it works.
In this section, we review how the files related to each of the iFlows are handled, where to upload, and how it works.
How files are processed in "Create Dataset Schema" iFlow
You need to upload the JSON file to the directory of the SFTP_Sender specified in Step 2 of the above configuration section of 'Create Dataset Schema'. The Integration Flow picks up the files and processes them. The JSON-File must be in the following structure (as per the /datasetSchemas API)
How files are processed in "Create Dataset and Upload Data " iFlow
In order to create Dataset and upload Data, a CSV-File has to be uploaded to the directory of the SFTP_Sender specified above in Step 2 of the above configuration section of 'Create Dataset and Upload Data'. The Integration Flow picks up the files and processes the same.
The header information of the Dataset that is in the CSV file should match the feature and label names provided in the dataset schema. The Dataset CSV file uses only commas (,) as separators and should contain only UTF-8 encoding data. Any other encoding type is not supported by Data Attribute Recommendation.
The Filename of the CSV must start with the name of the dataset, then a dot as a separator followed by the id of the dataset schema (example: “my-dataset-name.datasetSchemaId.csv”)
How files are processed in "Create Job and Deploy Model " iFlow
In order to create a Training Job and Deploy a Model a JSON file has to be uploaded to the directory of the SFTP_Sender specified in Step 2 of above configuration section of 'Create Job and Deploy Model'. The Integration Flow picks up the files and processes the same.
The JSON File must be in the following structure
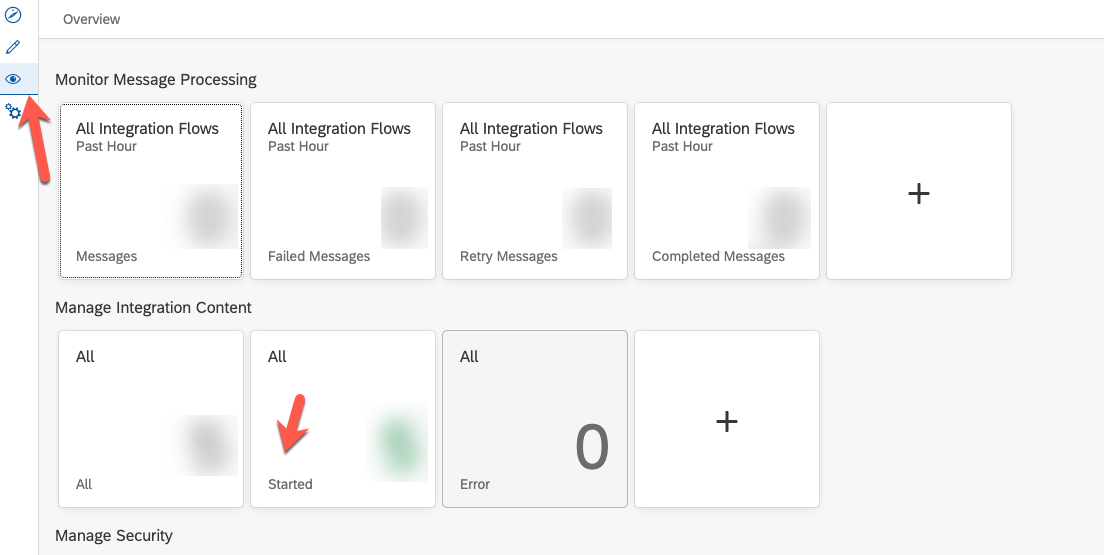
After you have deployed everything, you can monitor the integration flows and the messages by going to the operations view. You can select the tile with 'started' status under "Manage Integration Content" as shown below to see the status of each of them.
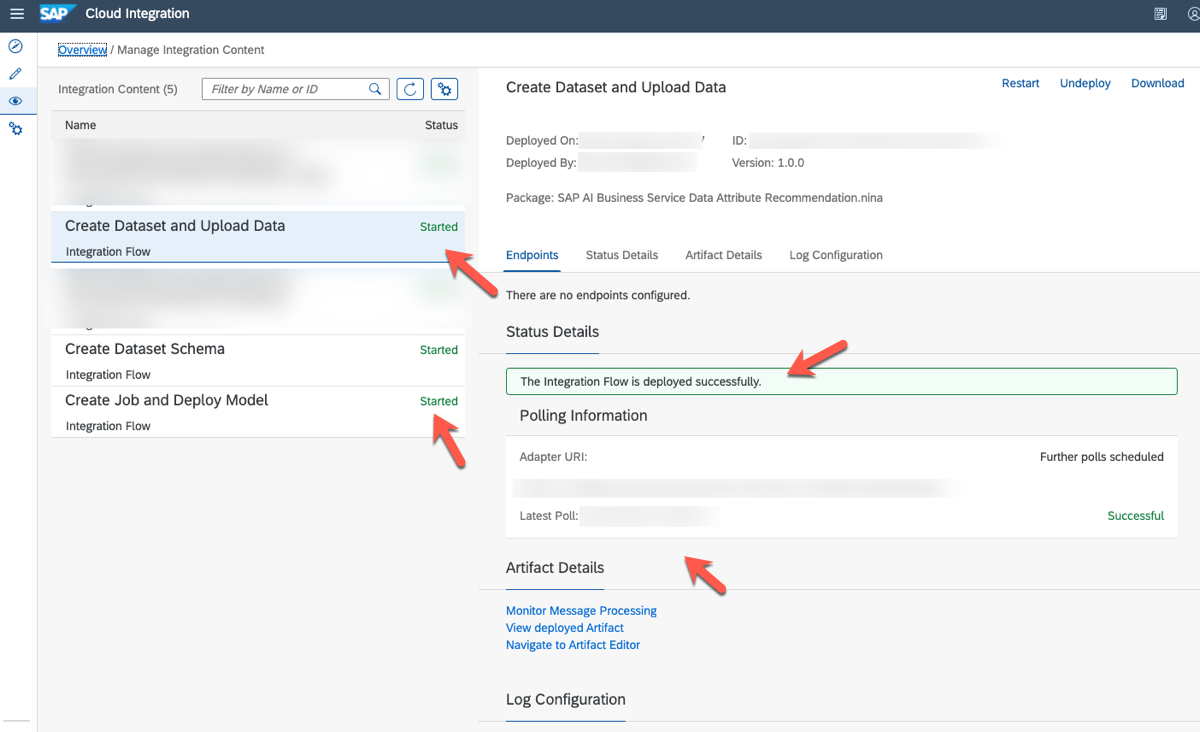
As you go to the detail view, you can see the status of the iFlow and when the "Latest Poll" happened. You can even go to the details of messages by selecting the "Monitor Message Processing" link under Artifact Details. See below screenshot.
Hope these two blog posts gave you an idea of how to configure and deploy all the iFlows related to Data Attribute Recommendation. You may also read how to integrate your enterprise email inbox with the Document Information Extraction service via SA...
Explore: SAP Community Page
Dive deeper: Open SAP Course
Get an overview: Blogpost part I | Blogpost part II
Exchange Knowledge:
Document Classification Questions | Document Information Extraction Questions
Business Entity Recognition Questions | Service Ticket Intelligence Questions
Data Attribute Recommendation Questions | Invoice Object Recommendation Questions
Integration Flows for Data Attribute Recommendation
Below are the three integration flows that are part of the Data Attribute Recommendation integration package. You would see these under the artifacts tab as shown below.
- Create Dataset Schema
- Create Dataset and Upload Data
- Create Job and Deploy Model.
All the iFlows related to Data Attribute Recommendation Service
Let us look at each of the above now in detail
How to Configure iFlow: Create Dataset Schema
The iFlow "Create Dataset Schema" creates a Dataset schema based on a JSON input file. Below are the steps to configure the same.
1) Select option “Configure” by clicking on “Actions” icon next to the iFlow as in below screenshot.
Configure Option for iFlow
2) You would get a popup screen to enter parameters of SFTP Sender and Receiver. Let's start with Sender. You would need to configure SFTP_Sender by providing the required information. The Directory property specifies in which directory the JSON Files are located. In the address field the address of the SFTP-Server must be set. As a proxy type you can either use On-Premise and provide the Location ID if necessary or use Internet. For Authentication you can reuse the Name of SFTP User created in Step 4 of User Credential Setup in the previous blog Also, Post-Processing can be configured to specify the operation after a file has been processed by the Integration Flow.

SFTP Sender Info
3) You also need to configure the Receiver section. To configure the SFTP_Receiver, you can enter the same data as in the previous step. Only the directory must be different from the one specified in the SFTP_Sender.

SFTP Receiver Info
4) Next, we need to configure the OAuth_Server info. For that, you need to select the drop-down in Receiver as shown in the below screenshot.

OAuth_Server Selection
After selection, now update the parameters for OAuth_Server
- Input Address as url from uaa section from Document Attribute Recommendation service key JSON file
- Input Credential Name with Data Attribute Recommendation User, the credentials name created in Step 3 of User Credential Setup in the previous blog

OAuth_Server Config Info
5) Lastly, in the more section, you need to configure the parameter DAR Base URL as url from Document Attribute Recommendation service key JSON file

DAR Base URL Info
How to Configure iFlow: Create Dataset and Upload Data
The iFlow "Create Dataset and Upload Data" creates a Dataset and uploads the Data based on a CSV input file with training data. Below are the steps to configure the same.
1) Similar to above, first you need to select the Configure option. See above section for the screenshot.
2) Similar to above, you need to enter parameters of SFTP Sender and Receiver. You would need to configure SFTP_Sender by providing the required information. The Directory property specifies in which directory the JSON Files are located. In the address field the address of the SFTP-Server must be set. As a proxy type you can either use On-Premise and provide the Location ID if necessary or use Internet. For Authentication you can reuse the Name of SFTP User created in Step 4 of User Credential Setup in the previous blog Also, Post-Processing can be configured to specify the operation after a file has been processed by the Integration Flow.

Create Dataset - SFTP Sender Info
3) Similar to above, you also need to configure the Receiver section . To configure the SFTP_Receiver, you can enter the same data as in the above step. Only the directory must be different from the one specified in the SFTP_Sender.

Create Dataset SFTP Receiver Info
4) Next, we need to configure the SFTP_Receiver_Error. You can select the SFTP_Receiver_Error from the dropdown as shown below.

Select SFTP Receiver Error
After the SFTP_Receiver_Error is selected, you can enter the same data as in the above step. Only the directory must be different from the one specified in the SFTP_Sender.

SFTP Receiver Error
5) Next, we need to configure the OAuth_Server info. For that, you need to select the drop-down in Receiver as shown in the above step. After selection, update the parameters for OAuth_Server
- Input Address as url from uaa section from Document Attribute Recommendation service key JSON file
- Input Credential Name with Data Attribute Recommendation User, the credentials name created in Step 3 of User Credential Setup in the previous blog
OAuth_Server Config Info
6) Lastly, in the more section, you need to configure the parameter DAR Base URL as url from Document Attribute Recommendation service key JSON file
DAR Base URL Info
How to Configure iFlow: Create Job and Deploy Model
The iFlow "Create Job and Deploy Model" creates the training job and delpoys the model based on the JSON input file. Below are the steps to configure the same.
1) Similar to above, first you need to select the Configure option. See above sections for the screenshot.
2) Similar to above, you need to enter parameters of SFTP Sender and Receiver. You would need to configure SFTP_Sender by providing the required information. The Directory property specifies in which directory the JSON Files are located. In the address field the address of the SFTP-Server must be set. As a proxy type you can either use On-Premise and provide the Location ID if necessary or use Internet. For Authentication you can reuse the Name of SFTP User created in Step 4 of User Credential Setup in the previous blog Also, Post-Processing can be configured to specify the operation after a file has been processed by the Integration Flow.

Create Job and Deploy Model Sender Info
3) Similar to above, you also need to configure the Receiver section . To configure the SFTP_Receiver, you can enter the same data as in the above step. Only the directory must be different from the one specified in the SFTP_Sender.

Create Job and Deploy - SFTP Receiver Info
4) Next, we need to configure the SFTP_Receiver_Error. Similar to the above, you need to select it from the dropdown. After the SFTP_Receiver_Error is selected, you can enter the same data as in the above step. Only the directory must be different from the one specified in the SFTP_Sender.
Create Job and Deploy - SFTP Receiver Error
5) Next, we need to configure the OAuth_Server info. For that, you need to select the drop-down in Receiver as shown in the above step. After selection, update the parameters for OAuth_Server
- Input Address as url from uaa section from Document Attribute Recommendation service key JSON file
- Input Credential Name with Data Attribute Recommendation User, the credentials name created in Step 3 of User Credential Setup in the previous blog
Create Job and Deploy Model - OAuth Server
6) Lastly, in the more section, you need to configure the parameter DAR Base URL as url from Document Attribute Recommendation service key JSON file
DAR Base URL Info
Integration Flows Deployment
After the configuration of all the integration flows, now it is time for deployment of the same. All you need to do is click on the "Deploy" Option as shown below, which is under 'Actions'. You need to do this for all the three iFlows.

Deploy the iFlows
Now that we have configured all the iFlows and deployed them, let's look at the processing of files and how it works.
Processing of files by iFlow
In this section, we review how the files related to each of the iFlows are handled, where to upload, and how it works.
How files are processed in "Create Dataset Schema" iFlow
You need to upload the JSON file to the directory of the SFTP_Sender specified in Step 2 of the above configuration section of 'Create Dataset Schema'. The Integration Flow picks up the files and processes them. The JSON-File must be in the following structure (as per the /datasetSchemas API)
{

  "features": [

    {

      "label": "string",

      "type": "TEXT"

    }

  ],

  "labels": [

    {

      "label": "string",

      "type": "TEXT"

    }

  ],

  "name": "string"

}
How files are processed in "Create Dataset and Upload Data " iFlow
In order to create Dataset and upload Data, a CSV-File has to be uploaded to the directory of the SFTP_Sender specified above in Step 2 of the above configuration section of 'Create Dataset and Upload Data'. The Integration Flow picks up the files and processes the same.
The header information of the Dataset that is in the CSV file should match the feature and label names provided in the dataset schema. The Dataset CSV file uses only commas (,) as separators and should contain only UTF-8 encoding data. Any other encoding type is not supported by Data Attribute Recommendation.
The Filename of the CSV must start with the name of the dataset, then a dot as a separator followed by the id of the dataset schema (example: “my-dataset-name.datasetSchemaId.csv”)
How files are processed in "Create Job and Deploy Model " iFlow
In order to create a Training Job and Deploy a Model a JSON file has to be uploaded to the directory of the SFTP_Sender specified in Step 2 of above configuration section of 'Create Job and Deploy Model'. The Integration Flow picks up the files and processes the same.
The JSON File must be in the following structure
{

    "datasetId": "String",

    "modelTemplateId": "String",

    "modelName": "String"

}
Monitor Integration Flows
After you have deployed everything, you can monitor the integration flows and the messages by going to the operations view. You can select the tile with 'started' status under "Manage Integration Content" as shown below to see the status of each of them.
Operations view of Cloud Integration
As you go to the detail view, you can see the status of the iFlow and when the "Latest Poll" happened. You can even go to the details of messages by selecting the "Monitor Message Processing" link under Artifact Details. See below screenshot.
Status of the iFlows
Hope these two blog posts gave you an idea of how to configure and deploy all the iFlows related to Data Attribute Recommendation. You may also read how to integrate your enterprise email inbox with the Document Information Extraction service via SA...
For more information on SAP AI Business Services:
Explore: SAP Community Page
Dive deeper: Open SAP Course
Get an overview: Blogpost part I | Blogpost part II
Exchange Knowledge:
Document Classification Questions | Document Information Extraction Questions
Business Entity Recognition Questions | Service Ticket Intelligence Questions
Data Attribute Recommendation Questions | Invoice Object Recommendation Questions
- SAP Managed Tags:
- Machine Learning,
- Artificial Intelligence,
- Cloud Integration,
- SAP AI Services,
- Data Attribute Recommendation
Labels:
1 Comment
You must be a registered user to add a comment. If you've already registered, sign in. Otherwise, register and sign in.
Labels in this area
-
ABAP CDS Views - CDC (Change Data Capture)
2 -
AI
1 -
Analyze Workload Data
1 -
BTP
1 -
Business and IT Integration
2 -
Business application stu
1 -
Business Technology Platform
1 -
Business Trends
1,661 -
Business Trends
86 -
CAP
1 -
cf
1 -
Cloud Foundry
1 -
Confluent
1 -
Customer COE Basics and Fundamentals
1 -
Customer COE Latest and Greatest
3 -
Customer Data Browser app
1 -
Data Analysis Tool
1 -
data migration
1 -
data transfer
1 -
Datasphere
2 -
Event Information
1,400 -
Event Information
64 -
Expert
1 -
Expert Insights
178 -
Expert Insights
270 -
General
1 -
Google cloud
1 -
Google Next'24
1 -
Kafka
1 -
Life at SAP
784 -
Life at SAP
11 -
Migrate your Data App
1 -
MTA
1 -
Network Performance Analysis
1 -
NodeJS
1 -
PDF
1 -
POC
1 -
Product Updates
4,578 -
Product Updates
323 -
Replication Flow
1 -
RisewithSAP
1 -
SAP BTP
1 -
SAP BTP Cloud Foundry
1 -
SAP Cloud ALM
1 -
SAP Cloud Application Programming Model
1 -
SAP Datasphere
2 -
SAP S4HANA Cloud
1 -
SAP S4HANA Migration Cockpit
1 -
Technology Updates
6,886 -
Technology Updates
395 -
Workload Fluctuations
1
Related Content
- Top Picks: Innovations Highlights from SAP Business Technology Platform (Q1/2024) in Technology Blogs by SAP
- Consuming SAP with SAP Build Apps - Connectivity options for low-code development - part 2 in Technology Blogs by SAP
- Cloud Integration: Manually Sign / Verify XML payload based on XML Signature Standard in Technology Blogs by SAP
- SAP Cloud Integration: Understanding the XML Digital Signature Standard in Technology Blogs by SAP
- CAP LLM Plugin – Empowering Developers for rapid Gen AI-CAP App Development in Technology Blogs by SAP
Top kudoed authors
| User | Count |
|---|---|
| 11 | |
| 10 | |
| 10 | |
| 9 | |
| 8 | |
| 7 | |
| 7 | |
| 7 | |
| 7 | |
| 6 |