
- SAP Community
- Products and Technology
- Technology
- Technology Blogs by SAP
- Connecting from SAP Business Application Studio to...
Technology Blogs by SAP
Learn how to extend and personalize SAP applications. Follow the SAP technology blog for insights into SAP BTP, ABAP, SAP Analytics Cloud, SAP HANA, and more.
Turn on suggestions
Auto-suggest helps you quickly narrow down your search results by suggesting possible matches as you type.
Showing results for
vijayalakshmigo
Explorer
Options
- Subscribe to RSS Feed
- Mark as New
- Mark as Read
- Bookmark
- Subscribe
- Printer Friendly Page
- Report Inappropriate Content
07-23-2021
1:35 PM
Hi Techies,
This post will cover setting up a connection between SAP BTP ABAP Environment and Business Application Studio.
You may find a few of the steps redundant or would have seen in other blogs, I wanted to be as detailed as possible to help step by step to connect BAS and SAP ABAP in BTP. Each step heading is self-explanatory, choose the one relevant to you 🙂
A booster is a set of guided interactive steps that enable you to select, configure, and consume services on SAP BTP. For more information, see Boosters.
Let's get started!
I assume you already have access to your Trial account in SAP BTP and you have created a subaccount and space. If not, follow this guide before proceeding further.
Step 1: Booster to Automate the Setup of the ABAP Environment:
Log on to the SAP BTP trial cockpit and click Go to Your Trial Account.

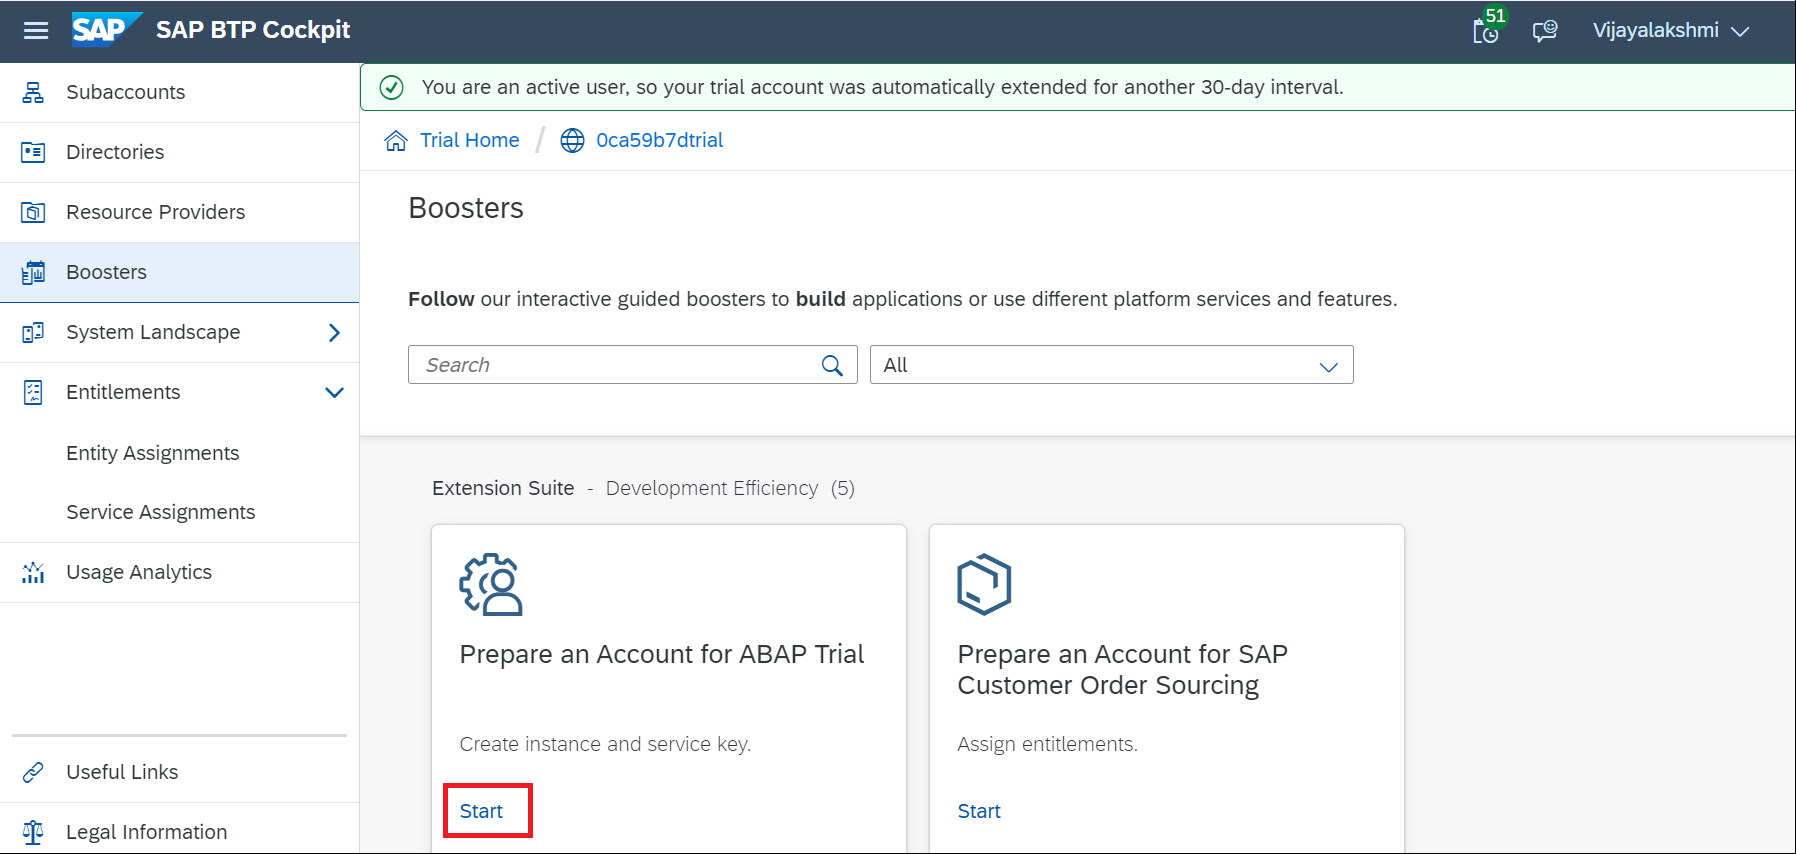
From your global account page, on the left side, choose Boosters.
Search the Prepare an Account for ABAP Trial tile and press Start to start your booster. If you already created a service instance and service key, then please skip this step
The service instance and service key is created for the ABAP trial user. You will get the below pop up after successful execution.
To view the instance and service key, Click on the "Go to Instance" link from the above pop-up
Go to your subaccount -> Select Instances and Subscriptions from the left menu
Step 2: Create ABAP cloud project
This step is to create a cloud project in ABAP Development Tool (Eclipse) and add your trial account.
Open your ABAP Development tool from Eclipse.
Do not have it yet? you can download the latest version from https://tools.hana.ondemand.com/#abap.
Need step by step guidance? Follow this video tutorial from SAP HANA Academy
To create an ABAP Cloud project, open the Eclipse, select File > New > ABAP Cloud Project.
You will get a pop up as below, choose SAP BTP Cloud Foundry Environment > Next
Choose your SAP BTP Cloud Foundry Environment Region (e.g: Europe(Frankfurt)) > Enter Email and Password > Next
Select your Organization (In this case, Trial) > Space (dev) > and service instance > Next
Click Open Logon Page in the Browser button. Enter credentials if necessary, you will get the below success message
Go back to ADT > Click Finish
You can see that the Trial system appears on the project explorer.
Step 3: Check the Destination
In your, BTP Subaccount Go to Destinations under Connectivity
You will see a destination created with the name "abap-cloud-default_abap-trial-0ca59b7dtrial-dev"
It has all the details URL, Client Id, a Client secret to additional properties.
In case you want to set up the destination manually, here are the steps:
Go to Instances and Subscriptions > select your ABAP instance -> Click on '>'
Copy the below details from your service key:
URL
Under uaa copy : Client ID, Client Secret, and URL(this will be the Token Service URL)
Click create destination and enter the below details:
Name: Enter a name of your choice
Type: HTTP
Description: Enter a meaningful description
URL: enter the URL copied from the service key
Proxy type: Internet
OAuth2UserTokenExchange
Client ID & Client Secret: Enter the client id and secret copied from the service key
Token Service URL Type: Dedicated
Token Service URL: Enter the URL which was under uaa in the service key. add "oauth/token" at the end of the link.
For example: in my case, the Token Service URL is: https://xxxxxxxdtrial.authentication.eu10.hana.ondemand.com/oauth/token
Additional Properties:
HTML5.DynamicDestination: true
HTML5.Timeout : 60000
WebIDEEnabled: true
WebIDEUsage: odata_abap,dev_abap,abap_cloud (for further information on the WebIDEUsage property values )
Save the changes
Lastly, check the connection by clicking on the "Check Connection" button. You should see success the message as below.
Step 4:Set Up SAP Business Application Studio for Development
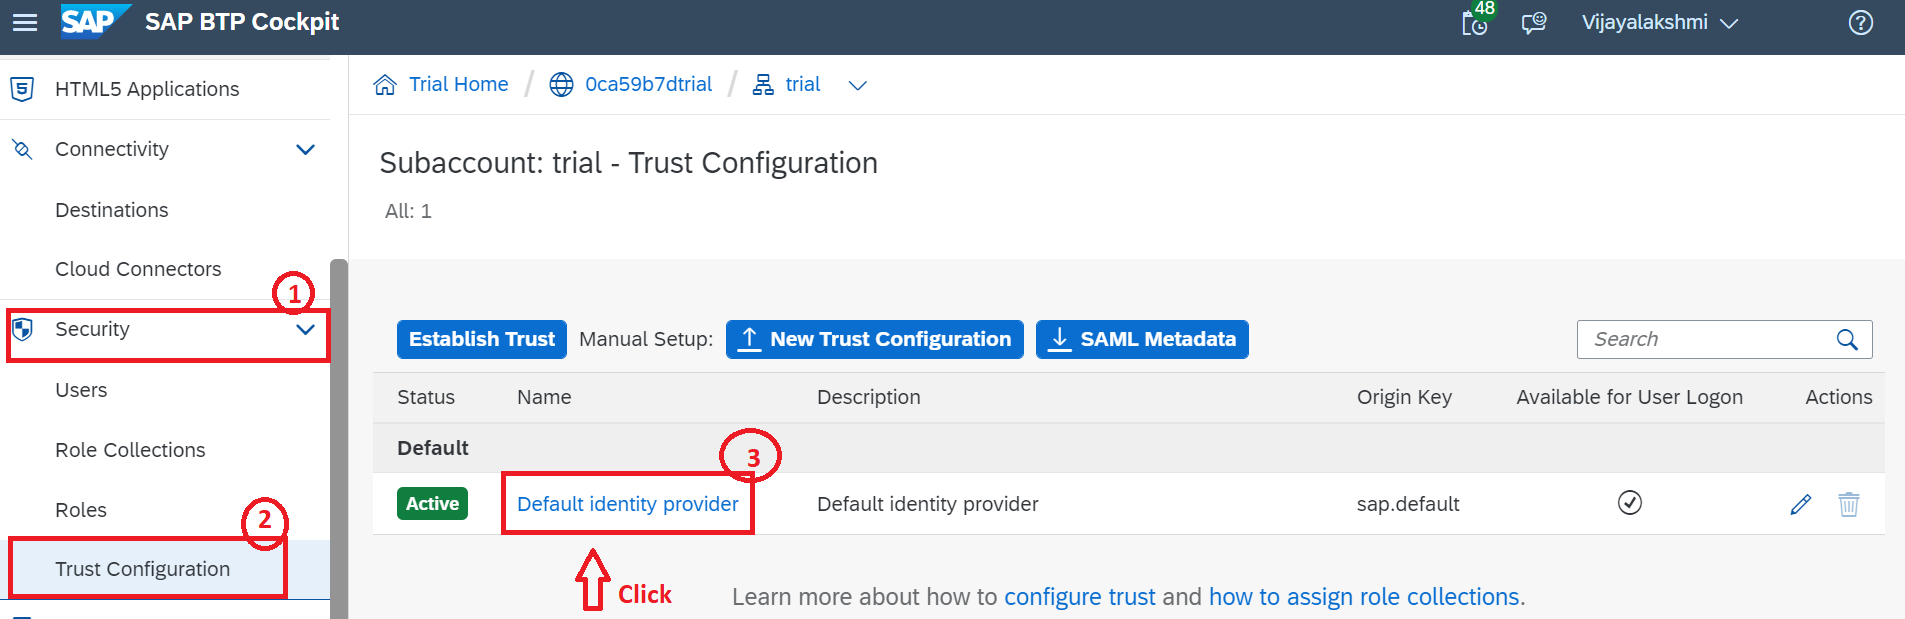
From SAP BTP, navigate to the security > Trust Configuration > Click on Default identity provider on the subaccount overview page
Enter your email id and click on "Show assignments"
Look for the "Business_Application_Studio_Developer" role. If it is not there, continue, otherwise, you may skip the below two sub-step
To add the role: click on the Assign Role Collection
Search Business_Application_Studio_Developer > Select > Click Assign role collection
Go to Service Marketplace and search for SAP Business Application Studio
If not created, click on create button to launch the wizard for subscribing to SAP Business Application Studio. and click on Go to Application.
You will be navigated to a new tab, SAP Business application Studio Loads.
Step 5: Create a Dev Space
Click on "Create Dev Space" button > Select SAP Fiori > Enter your dev space name > Click on Create Dev Space
When your status is Running, select your dev space -> In this case, it's MyDev.
Step 6: Set up your Organization and Space
In your dev space, select the open folder to set your workspace > select projects > Click Open
Select View > Find command > search for CF: Login to Cloud Foundry and select it
Select your API end point > Enter > enter your email address > Enter > enter your password > Enter
Choose your Organization (trial) > Space (dev) . You will see a success notification
Step 7: Create a list report page by getting Odata from ABAP BTP
Select View > File Command > select Fiori: Open Application Generator > List Report Object Page > Click Next
Enter below details:
Data Source: Connect to an SAP System
System: Destination abap-cloud-default_abap-trial-0ca59b7dtrial-dev as seen in Step 3
Service: If all set up fine -> You can see the list of available Odata Services.
Let's Continue and create a List report object page
Choose your Odata Service. In my case I choose ZUI_C_TRAVEL_M_XXX > Next > Select entity as TravelProcessor > Enter module name > Application title > Description > Add deployment configuration: "Yes" > Add FLP configuration: "Yes" > Configure advanced options: No > Next
On the next page, you need to provide TR and package. for that you need to log in to the ADT tool > Search your package "ZTRAVEL_APP_XVG" and open it. Open your transport organizer tab, under "Modifiable" folder" you can see your transport request (TR)
Fill in the additional required details > Click Finish
Once finished you will receive see a notification as "The files have been generated"
Run the application and Preview the data
Click Run button on the left side and start your application -> you will see in the terminal that the server is started.
Your default browser will open. Click Go to see your result.
Voila!! We have come to the end of the blog.
You can further deploy the application, add features & functionalities. The sky is the limit.
This post will cover setting up a connection between SAP BTP ABAP Environment and Business Application Studio.
SAP Business Application Studio (BAS) is a new SAP Business Technology Platform (BTP) service that offers a modern development environment tailored for the efficient development of business applications for the SAP Intelligent Enterprise.
In this blog, we will use the Trial account where I will walk you through the steps on how you can use a Booster to Automate the Setup and create a Fiori application. If you have created an instance and service key already? you can skip step 1
You may find a few of the steps redundant or would have seen in other blogs, I wanted to be as detailed as possible to help step by step to connect BAS and SAP ABAP in BTP. Each step heading is self-explanatory, choose the one relevant to you 🙂
A booster is a set of guided interactive steps that enable you to select, configure, and consume services on SAP BTP. For more information, see Boosters.
Let's get started!
I assume you already have access to your Trial account in SAP BTP and you have created a subaccount and space. If not, follow this guide before proceeding further.
Step 1: Booster to Automate the Setup of the ABAP Environment:
Log on to the SAP BTP trial cockpit and click Go to Your Trial Account.
From your global account page, on the left side, choose Boosters.

Search the Prepare an Account for ABAP Trial tile and press Start to start your booster. If you already created a service instance and service key, then please skip this step
Note: Only one service instance can be created at a time.
The service instance and service key is created for the ABAP trial user. You will get the below pop up after successful execution.

To view the instance and service key, Click on the "Go to Instance" link from the above pop-up
OR
Go to your subaccount -> Select Instances and Subscriptions from the left menu

Step 2: Create ABAP cloud project
This step is to create a cloud project in ABAP Development Tool (Eclipse) and add your trial account.
Open your ABAP Development tool from Eclipse.
Do not have it yet? you can download the latest version from https://tools.hana.ondemand.com/#abap.
Need step by step guidance? Follow this video tutorial from SAP HANA Academy
To create an ABAP Cloud project, open the Eclipse, select File > New > ABAP Cloud Project.

You will get a pop up as below, choose SAP BTP Cloud Foundry Environment > Next

Choose your SAP BTP Cloud Foundry Environment Region (e.g: Europe(Frankfurt)) > Enter Email and Password > Next

Select your Organization (In this case, Trial) > Space (dev) > and service instance > Next

Note: The service instance is "default_abap-trial" when you use the ABAP trial booster on SAP BTP. If you create a manual instance, use your own instance name.
Click Open Logon Page in the Browser button. Enter credentials if necessary, you will get the below success message

Go back to ADT > Click Finish

You can see that the Trial system appears on the project explorer.
Step 3: Check the Destination
In your, BTP Subaccount Go to Destinations under Connectivity

You will see a destination created with the name "abap-cloud-default_abap-trial-0ca59b7dtrial-dev"

It has all the details URL, Client Id, a Client secret to additional properties.
In case you want to set up the destination manually, here are the steps:
Go to Instances and Subscriptions > select your ABAP instance -> Click on '>'

Copy the below details from your service key:
URL
Under uaa copy : Client ID, Client Secret, and URL(this will be the Token Service URL)

Click create destination and enter the below details:
Name: Enter a name of your choice
Type: HTTP
Description: Enter a meaningful description
URL: enter the URL copied from the service key
Proxy type: Internet
OAuth2UserTokenExchange
Client ID & Client Secret: Enter the client id and secret copied from the service key
Token Service URL Type: Dedicated
Token Service URL: Enter the URL which was under uaa in the service key. add "oauth/token" at the end of the link.
For example: in my case, the Token Service URL is: https://xxxxxxxdtrial.authentication.eu10.hana.ondemand.com/oauth/token
Additional Properties:
HTML5.DynamicDestination: true
HTML5.Timeout : 60000
WebIDEEnabled: true
WebIDEUsage: odata_abap,dev_abap,abap_cloud (for further information on the WebIDEUsage property values )
Save the changes
Lastly, check the connection by clicking on the "Check Connection" button. You should see success the message as below.

Step 4:Set Up SAP Business Application Studio for Development
From SAP BTP, navigate to the security > Trust Configuration > Click on Default identity provider on the subaccount overview page
Enter your email id and click on "Show assignments"

Look for the "Business_Application_Studio_Developer" role. If it is not there, continue, otherwise, you may skip the below two sub-step
To add the role: click on the Assign Role Collection

Search Business_Application_Studio_Developer > Select > Click Assign role collection

Go to Service Marketplace and search for SAP Business Application Studio

If not created, click on create button to launch the wizard for subscribing to SAP Business Application Studio. and click on Go to Application.

You will be navigated to a new tab, SAP Business application Studio Loads.

Step 5: Create a Dev Space
Click on "Create Dev Space" button > Select SAP Fiori > Enter your dev space name > Click on Create Dev Space

When your status is Running, select your dev space -> In this case, it's MyDev.

Step 6: Set up your Organization and Space
In your dev space, select the open folder to set your workspace > select projects > Click Open

Select View > Find command > search for CF: Login to Cloud Foundry and select it

Select your API end point > Enter > enter your email address > Enter > enter your password > Enter

Choose your Organization (trial) > Space (dev) . You will see a success notification

Step 7: Create a list report page by getting Odata from ABAP BTP
Select View > File Command > select Fiori: Open Application Generator > List Report Object Page > Click Next

Enter below details:
Data Source: Connect to an SAP System
System: Destination abap-cloud-default_abap-trial-0ca59b7dtrial-dev as seen in Step 3
Service: If all set up fine -> You can see the list of available Odata Services.

Let's Continue and create a List report object page
Choose your Odata Service. In my case I choose ZUI_C_TRAVEL_M_XXX > Next > Select entity as TravelProcessor > Enter module name > Application title > Description > Add deployment configuration: "Yes" > Add FLP configuration: "Yes" > Configure advanced options: No > Next

On the next page, you need to provide TR and package. for that you need to log in to the ADT tool > Search your package "ZTRAVEL_APP_XVG" and open it. Open your transport organizer tab, under "Modifiable" folder" you can see your transport request (TR)

Fill in the additional required details > Click Finish

Once finished you will receive see a notification as "The files have been generated"
Run the application and Preview the data
Click Run button on the left side and start your application -> you will see in the terminal that the server is started.
Note: If you have blocked pop up, you may receive a notification as shown in screenshot > Click Open

Your default browser will open. Click Go to see your result.

Voila!! We have come to the end of the blog.
You can further deploy the application, add features & functionalities. The sky is the limit.
Labels:
14 Comments
You must be a registered user to add a comment. If you've already registered, sign in. Otherwise, register and sign in.
Labels in this area
-
ABAP CDS Views - CDC (Change Data Capture)
2 -
AI
1 -
Analyze Workload Data
1 -
BTP
1 -
Business and IT Integration
2 -
Business application stu
1 -
Business Technology Platform
1 -
Business Trends
1,658 -
Business Trends
91 -
CAP
1 -
cf
1 -
Cloud Foundry
1 -
Confluent
1 -
Customer COE Basics and Fundamentals
1 -
Customer COE Latest and Greatest
3 -
Customer Data Browser app
1 -
Data Analysis Tool
1 -
data migration
1 -
data transfer
1 -
Datasphere
2 -
Event Information
1,400 -
Event Information
66 -
Expert
1 -
Expert Insights
177 -
Expert Insights
295 -
General
1 -
Google cloud
1 -
Google Next'24
1 -
Kafka
1 -
Life at SAP
780 -
Life at SAP
13 -
Migrate your Data App
1 -
MTA
1 -
Network Performance Analysis
1 -
NodeJS
1 -
PDF
1 -
POC
1 -
Product Updates
4,577 -
Product Updates
341 -
Replication Flow
1 -
RisewithSAP
1 -
SAP BTP
1 -
SAP BTP Cloud Foundry
1 -
SAP Cloud ALM
1 -
SAP Cloud Application Programming Model
1 -
SAP Datasphere
2 -
SAP S4HANA Cloud
1 -
SAP S4HANA Migration Cockpit
1 -
Technology Updates
6,873 -
Technology Updates
419 -
Workload Fluctuations
1
Related Content
- Consuming SAP with SAP Build Apps - Mobile Apps for iOS and Android in Technology Blogs by SAP
- Demystifying the Common Super Domain for SAP Mobile Start in Technology Blogs by SAP
- Connect to ABAP environment using RFC in Technology Q&A
- What’s new in Mobile development kit client 24.4 in Technology Blogs by SAP
- Python RAG sample for beginners using SAP HANA Cloud and SAP AI Core in Technology Blogs by SAP
Top kudoed authors
| User | Count |
|---|---|
| 36 | |
| 25 | |
| 17 | |
| 13 | |
| 8 | |
| 7 | |
| 6 | |
| 6 | |
| 6 | |
| 6 |