

- SAP Community
- Products and Technology
- Technology
- Technology Blogs by SAP
- Write your code in Low code/ No code platform
Technology Blogs by SAP
Learn how to extend and personalize SAP applications. Follow the SAP technology blog for insights into SAP BTP, ABAP, SAP Analytics Cloud, SAP HANA, and more.
Turn on suggestions
Auto-suggest helps you quickly narrow down your search results by suggesting possible matches as you type.
Showing results for
Product and Topic Expert
Options
- Subscribe to RSS Feed
- Mark as New
- Mark as Read
- Bookmark
- Subscribe
- Printer Friendly Page
- Report Inappropriate Content
07-19-2021
6:07 AM
AppGyver is a Low-code no-code platform with which you can build apps quickly. The Drag-and-drop flow functions library in AppGyver gives you easy access to the various flow functions which you can add to your app but sometimes as per the requirement you need more than just the flow and formula functions.
In this blog I will try to explain if we really need to write a custom logic and formula how we can do it in AppGyver a Low code/No code platform.
It would be ideal if you have already finished reading shibaji.chandra5 excellent blog post or if you could rapidly onboard yourself on AppGyver, by referring mohini.verma handy article.
Doing any of the above, you can easily create an application from the AppGyver project canvas and have ended up in the main section of Composer pro.
Before we get started, I'd like to explain what we're hoping to accomplish. Just to get a sense of the concept, we're aiming to construct a very simple app that takes user input and determine whether it's a number and if it is, whether it's even or odd.
Let’s proceed step by step
Let's utilise the WISWIG tools to create your project's view component by dragging and dropping controls in the main area.
Change the title to "Custom code" and then remove the previous paragraph. Now let's add form elements an input field and a Button. Last but not least, include a standard paragraph component.
For the page, we'll need two variables: one for the text field, which will accept user input, and another for the paragraph component, which will display the result.
Create a page variant called input type Number and result type text in the Variable editor.
The input field and paragraph must be bound to the declared variable.
Toggle to the view editor. Select the Input control and the value field from the property pane.
To connect value property with input page variable, choose binding type "Data and Variable" > "Page variable."
Similarly, you can bind the Content attribute of the paragraph field to the result page variable.
Now that the input field and paragraph are tied to the page variable, we can add some logic. When we need to perform an action and logic, we can use the Logic and Flow function.
In our situation, we'd like to include logic on the "Check" button press.To do so, open the Flow Logic Editor by selecting the "Check" button from the canvas.
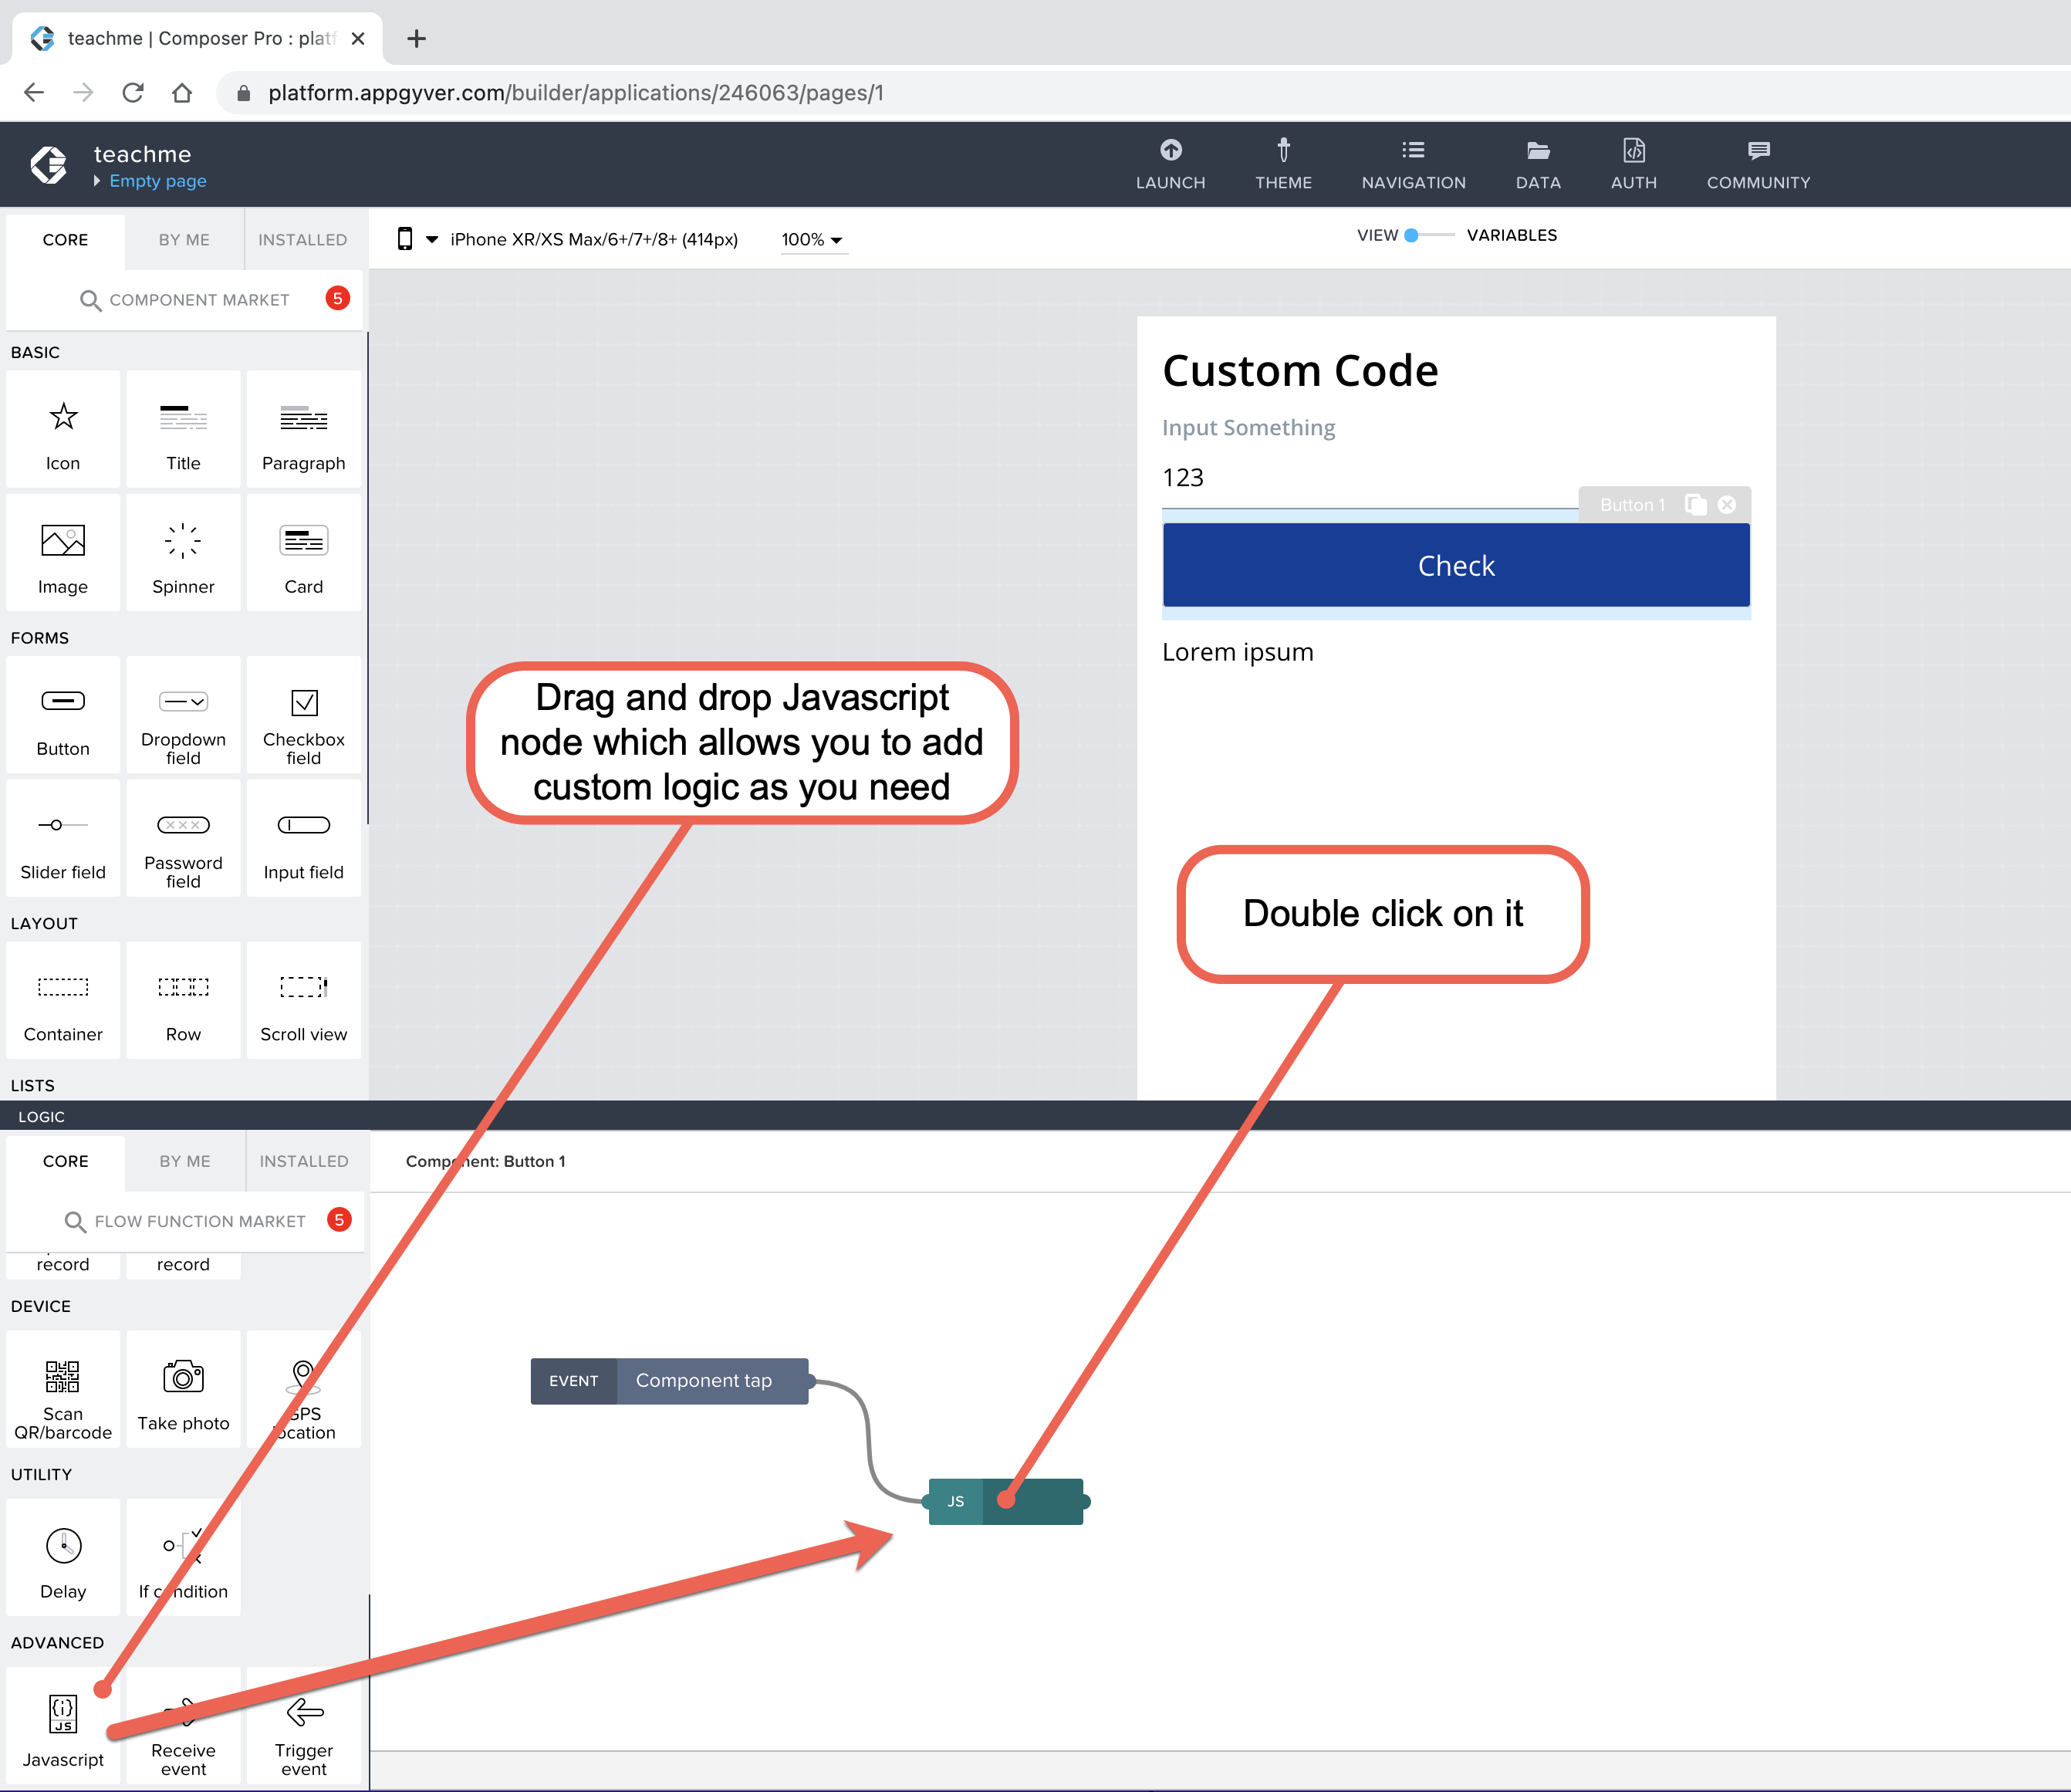
Drag and drop javascript node onto the logic canvas, connect it to Component Tap and double-click on it to open the JavaScript node configuration model.
JavaScript node configuration model allows us to write a code. This window is divided into 3 areas Inputs setting area, Coding area, and Outputs setting area.
Inputs setting area help you to define variable to bring data from your app state into the function execution context
Outputs setting area help to describe what data is available after the function has completed its execution
Function syntax and execution help to write code and how it is run during app runtime
This coding might not be really meaningful, but I've coded this simple program in order to just get an overview of the feature of custom Javascript code.

Also If you'd like to read more, can refer
https://docs.appgyver.com/app-logic/custom-javascript
In this blog I will try to explain if we really need to write a custom logic and formula how we can do it in AppGyver a Low code/No code platform.
Prerequisite
It would be ideal if you have already finished reading shibaji.chandra5 excellent blog post or if you could rapidly onboard yourself on AppGyver, by referring mohini.verma handy article.
Doing any of the above, you can easily create an application from the AppGyver project canvas and have ended up in the main section of Composer pro.
Before we get started, I'd like to explain what we're hoping to accomplish. Just to get a sense of the concept, we're aiming to construct a very simple app that takes user input and determine whether it's a number and if it is, whether it's even or odd.
Let’s proceed step by step
Let's utilise the WISWIG tools to create your project's view component by dragging and dropping controls in the main area.
Step 1: Creating a UI screen
Change the title to "Custom code" and then remove the previous paragraph. Now let's add form elements an input field and a Button. Last but not least, include a standard paragraph component.

Step 2: Add Page Variable
For the page, we'll need two variables: one for the text field, which will accept user input, and another for the paragraph component, which will display the result.
Create a page variant called input type Number and result type text in the Variable editor.

Step 3: Bind Page Components to Page Variable
The input field and paragraph must be bound to the declared variable.
Toggle to the view editor. Select the Input control and the value field from the property pane.
To connect value property with input page variable, choose binding type "Data and Variable" > "Page variable."
Similarly, you can bind the Content attribute of the paragraph field to the result page variable.

Step 4: Add Logic and Flow Function
Now that the input field and paragraph are tied to the page variable, we can add some logic. When we need to perform an action and logic, we can use the Logic and Flow function.
In our situation, we'd like to include logic on the "Check" button press.To do so, open the Flow Logic Editor by selecting the "Check" button from the canvas.

Drag and drop javascript node onto the logic canvas, connect it to Component Tap and double-click on it to open the JavaScript node configuration model.
Step 4: Write your custom logic
JavaScript node configuration model allows us to write a code. This window is divided into 3 areas Inputs setting area, Coding area, and Outputs setting area.
Inputs setting area help you to define variable to bring data from your app state into the function execution context
Outputs setting area help to describe what data is available after the function has completed its execution
Function syntax and execution help to write code and how it is run during app runtime

At first, let's set the input. In this case you can use page variable as input value. Click on input1 value icon and select binding type "Data and Variable" > "Page variable" to bind value property with input page variable and copy paste the below mentioned code in CODING area.
const value = Number(inputs.input1)


if(isNaN(value)){

  return { result : ` "${inputs.input1}" is not a number`}


}else{

  let msg = value % 2 == 0 ?  `"${value}" is a even number` :

    `"${value}" is a Odd number`

  return { result: msg}

}
This coding might not be really meaningful, but I've coded this simple program in order to just get an overview of the feature of custom Javascript code.
Below image shows you how we can refer defined input variable in code area and how function return the value of variable msg as an output result after the function has completed its execution.
Press Update Button to update Javascript function node.

Step 5: Set JavaScript node result in page variable
Drag and drop Set page variable node onto the logic canvas and connect it to Javascript node.

Bind INPUTS - Variable name with Result page variable and Click on Assigned value icon and select binding type "Output value of another node" to bind value property with node output Function/ result.

Step 6: Launching the application and testing
Developing the application is finished so press on save button to save all your task then Click on LAUNCH icon to test your application

Select your option to test your app on Web or on Mobile.

Application looks similar as shown in below image. when you press the check button its show even or odd as expected. when we input string it shows enter value is not a number.

Impression/conclusion
Almost all functions used in custom Javascript are available in the formula, so it might not be really necessary to create the Custom Javascript component like this. However it would be useful to avoid writing complex and long statement in the formula.
Currently Javascript function node supports all es6 features, from arrow functions to Object destructuring and so on. Some Javascript APIs such as fetch and moment are currently exposed in the runtime context. The execution context is wrapped inside an async function, so you can use the await keyword on the root level directly.
Also If you'd like to read more, can refer
https://docs.appgyver.com/app-logic/custom-javascript
- SAP Managed Tags:
- SAP Mobile App Framework,
- SAP Build Apps
Labels:
1 Comment
You must be a registered user to add a comment. If you've already registered, sign in. Otherwise, register and sign in.
Labels in this area
-
ABAP CDS Views - CDC (Change Data Capture)
2 -
AI
1 -
Analyze Workload Data
1 -
BTP
1 -
Business and IT Integration
2 -
Business application stu
1 -
Business Technology Platform
1 -
Business Trends
1,658 -
Business Trends
93 -
CAP
1 -
cf
1 -
Cloud Foundry
1 -
Confluent
1 -
Customer COE Basics and Fundamentals
1 -
Customer COE Latest and Greatest
3 -
Customer Data Browser app
1 -
Data Analysis Tool
1 -
data migration
1 -
data transfer
1 -
Datasphere
2 -
Event Information
1,400 -
Event Information
66 -
Expert
1 -
Expert Insights
177 -
Expert Insights
299 -
General
1 -
Google cloud
1 -
Google Next'24
1 -
Kafka
1 -
Life at SAP
780 -
Life at SAP
13 -
Migrate your Data App
1 -
MTA
1 -
Network Performance Analysis
1 -
NodeJS
1 -
PDF
1 -
POC
1 -
Product Updates
4,577 -
Product Updates
344 -
Replication Flow
1 -
RisewithSAP
1 -
SAP BTP
1 -
SAP BTP Cloud Foundry
1 -
SAP Cloud ALM
1 -
SAP Cloud Application Programming Model
1 -
SAP Datasphere
2 -
SAP S4HANA Cloud
1 -
SAP S4HANA Migration Cockpit
1 -
Technology Updates
6,873 -
Technology Updates
423 -
Workload Fluctuations
1
Related Content
- Supporting Multiple API Gateways with SAP API Management – using Azure API Management as example in Technology Blogs by SAP
- SAP LICENSE RENEWAL FROM BASIS END #ATR in Technology Blogs by Members
- Extend Your Crystal Reports Solutions in the DHTML Viewer With a Free Function Library in Technology Blogs by Members
- Consuming SAP with SAP Build Apps - Mobile Apps for iOS and Android in Technology Blogs by SAP
- How to improve the ADT Class Runner with additional Features in Technology Blogs by Members
Top kudoed authors
| User | Count |
|---|---|
| 40 | |
| 25 | |
| 17 | |
| 14 | |
| 8 | |
| 7 | |
| 7 | |
| 7 | |
| 6 | |
| 6 |