

- SAP Community
- Products and Technology
- Technology
- Technology Blogs by SAP
- Sending Notifications from SAP BTP Applications to...
Technology Blogs by SAP
Learn how to extend and personalize SAP applications. Follow the SAP technology blog for insights into SAP BTP, ABAP, SAP Analytics Cloud, SAP HANA, and more.
Turn on suggestions
Auto-suggest helps you quickly narrow down your search results by suggesting possible matches as you type.
Showing results for
Developer Advocate
Options
- Subscribe to RSS Feed
- Mark as New
- Mark as Read
- Bookmark
- Subscribe
- Printer Friendly Page
- Report Inappropriate Content
07-06-2021
12:00 PM
In this post, I introduce you to a brand-new feature for SAP BTP apps – sending user notifications to the SAP Fiori Launchpad. Your business apps can use this capability to inform end-users about events that require their attention - and to offer them a direct option to respond.
Nowadays, it's hard to think of any application that does not make use of notifications in one form on the other - especially in the enterprise context where many items need to be acknowledged by multiple users. A possible scenario for such an application could be a leave request application. End-users can enter the dates they want to enjoy some well-deserved time off and add one or more approvers. When the user hits "Submit", the data is persisted, and one or more notifications are displayed in the SAP Fiori Launchpads of the approvers. From there, they could directly approve or reject the request or navigate to the SAP Fiori app to see all requests in a table.
Note that the feature described here is only applicable to the SAP Launchpad service and the SAP Cloud Portal service - both available in SAP BTP.
Disclaimer: This leave request app is only used for display here. If you are writing your own leave request app, it might make sense to leverage the SAP Workflow service to model the approval process.
The launchpad comes with all the capabilities you would expect from a notification feature. Notifications consist of, among other properties, a translatable title, a translatable description, a timestamp, and a priority level. This priority determines whether the notification will pop up on arrival or if it will just be indicated in the shell bar header.
You can see all active notifications when you click on the notification item from the shell bar. This view also allows you to group the notifications by date, type, or by priority.
This popup also enabled you to remove notifications with the x button or see available follow-up actions behind the ellipsis (...) button. Follow-up actions consist of a translatable string and go beyond a simple approve/reject; they instead trigger an HTTP request to your backend, allowing you to execute any code.
Your application can create notifications and notification types via a simple CRUD interface, e.g., send an HTTP POST request to create a notification type and send another one to create a notification of this type. Be assured that there are plenty of options for you as a developer, e.g., deciding which values of the notification contain confidential data and which ones don’t. Have a look at the developer documentation to find the complete list of properties and features.
This hands-on will cover a simple scenario in which we trigger a notification from our local development setup. As our web app displays products and their availability, we will trigger notifications for products low on supply.
Seconds after the script runs, we will see a notification in the SAP Fiori Launchpad on SAP BTP. A click on this notification will open an SAP Fiori list report application that shows us various products from the Northwind service.
But before we start, you need to install a few tools. Install Node.js, mbt, git, and the Cloud Foundry CLI (incl the MultiApps plugin) if you haven’t done so. In case you need help, I recommend following this tutorial group that contains step-by-step guides.
If you don't want to (or cannot) install all these tools, use the SAP Business Application Studio, which already comes with all the needed tools out of the box.
In either case, you also need to subscribe to the SAP Launchpad service and create a launchpad site.
We won’t implement a full SAP Fiori app to keep things simple and focus only on sending notifications. Therefore, we’ll make use of a well-established sample application from GitHub.
Check out the full readme on GitHub to learn more about this sample application.
Follow this tutorial here to integrate the SAP Fiori app you just deployed in the SAP Launchpad service. Be aware that the application's name doesn't match the screenshots from the tutorial - you should select the app with the title "Fiori App" and the ID "com.sap.fioriapp" instead.
Once that's done, you should see a list report application that displays product information.
To enable custom apps to publish notifications, they need to send data to the service via a destination.
Follow this guide to generate the notification service's credentials and create a destination based on these credentials.
Run the following commands to create service keys for existing services instances - one for the xsuaa service instance and the other for the destination service instance.
If you wonder where these service instances are coming from, you created them when you deployed the web app in step 1.
You'll notice that the last two commands print a JSON object that contains the service keys. Copy these JSON objects into a new file with the name
We'll parse this file later to inject the service keys into our local application.
First, we need to define the dependencies and the main file of this project. To do this, let's create a
Next, we create a utility class
The following file uses this utility class and adds domain-specific templates for the notifications we want to create. Namely, it defines the template for the notifications and the notification types used by these notifications. The
We already declared the main file
Note that you need to add your email address (the one that is linked with your SAP BTP account) in line 21 to receive the generated notifications.
Now it's time to see everything in action. First, open the SAP Fiori Launchpad site that you created before – it doesn't matter if you are at the landing page or an opened SAP Fiori app.
Then run the Node.js project that you just build:
Alternatively to running the application locally, you can also execute an HTTP client script that does the same for you. gregorw shared his script in the comments below.
In this post, you've learned:
Now it's up to you to add this logic into your business apps! Note that you won't need the
Nowadays, it's hard to think of any application that does not make use of notifications in one form on the other - especially in the enterprise context where many items need to be acknowledged by multiple users. A possible scenario for such an application could be a leave request application. End-users can enter the dates they want to enjoy some well-deserved time off and add one or more approvers. When the user hits "Submit", the data is persisted, and one or more notifications are displayed in the SAP Fiori Launchpads of the approvers. From there, they could directly approve or reject the request or navigate to the SAP Fiori app to see all requests in a table.

A leave request application that makes use of notifications
Note that the feature described here is only applicable to the SAP Launchpad service and the SAP Cloud Portal service - both available in SAP BTP.
Disclaimer: This leave request app is only used for display here. If you are writing your own leave request app, it might make sense to leverage the SAP Workflow service to model the approval process.

Also watch this video to learn to see me implementing this sample project.
Notifications in the SAP Fiori Launchpad
The launchpad comes with all the capabilities you would expect from a notification feature. Notifications consist of, among other properties, a translatable title, a translatable description, a timestamp, and a priority level. This priority determines whether the notification will pop up on arrival or if it will just be indicated in the shell bar header.
You can see all active notifications when you click on the notification item from the shell bar. This view also allows you to group the notifications by date, type, or by priority.

The notifications popover
This popup also enabled you to remove notifications with the x button or see available follow-up actions behind the ellipsis (...) button. Follow-up actions consist of a translatable string and go beyond a simple approve/reject; they instead trigger an HTTP request to your backend, allowing you to execute any code.
Your application can create notifications and notification types via a simple CRUD interface, e.g., send an HTTP POST request to create a notification type and send another one to create a notification of this type. Be assured that there are plenty of options for you as a developer, e.g., deciding which values of the notification contain confidential data and which ones don’t. Have a look at the developer documentation to find the complete list of properties and features.
Hands-On
This hands-on will cover a simple scenario in which we trigger a notification from our local development setup. As our web app displays products and their availability, we will trigger notifications for products low on supply.
Seconds after the script runs, we will see a notification in the SAP Fiori Launchpad on SAP BTP. A click on this notification will open an SAP Fiori list report application that shows us various products from the Northwind service.
0. Preparation
But before we start, you need to install a few tools. Install Node.js, mbt, git, and the Cloud Foundry CLI (incl the MultiApps plugin) if you haven’t done so. In case you need help, I recommend following this tutorial group that contains step-by-step guides.
If you don't want to (or cannot) install all these tools, use the SAP Business Application Studio, which already comes with all the needed tools out of the box.
In either case, you also need to subscribe to the SAP Launchpad service and create a launchpad site.
1. Clone and deploy an SAP Fiori app
We won’t implement a full SAP Fiori app to keep things simple and focus only on sending notifications. Therefore, we’ll make use of a well-established sample application from GitHub.
git clone https://github.com/SAP-samples/multi-cloud-html5-apps-samples

cd managed-html5-runtime-fiori-mta

npm install

npm run build

npm run deploy:cf
Check out the full readme on GitHub to learn more about this sample application.
2. Add the sample app to the launchpad
Follow this tutorial here to integrate the SAP Fiori app you just deployed in the SAP Launchpad service. Be aware that the application's name doesn't match the screenshots from the tutorial - you should select the app with the title "Fiori App" and the ID "com.sap.fioriapp" instead.
Once that's done, you should see a list report application that displays product information.
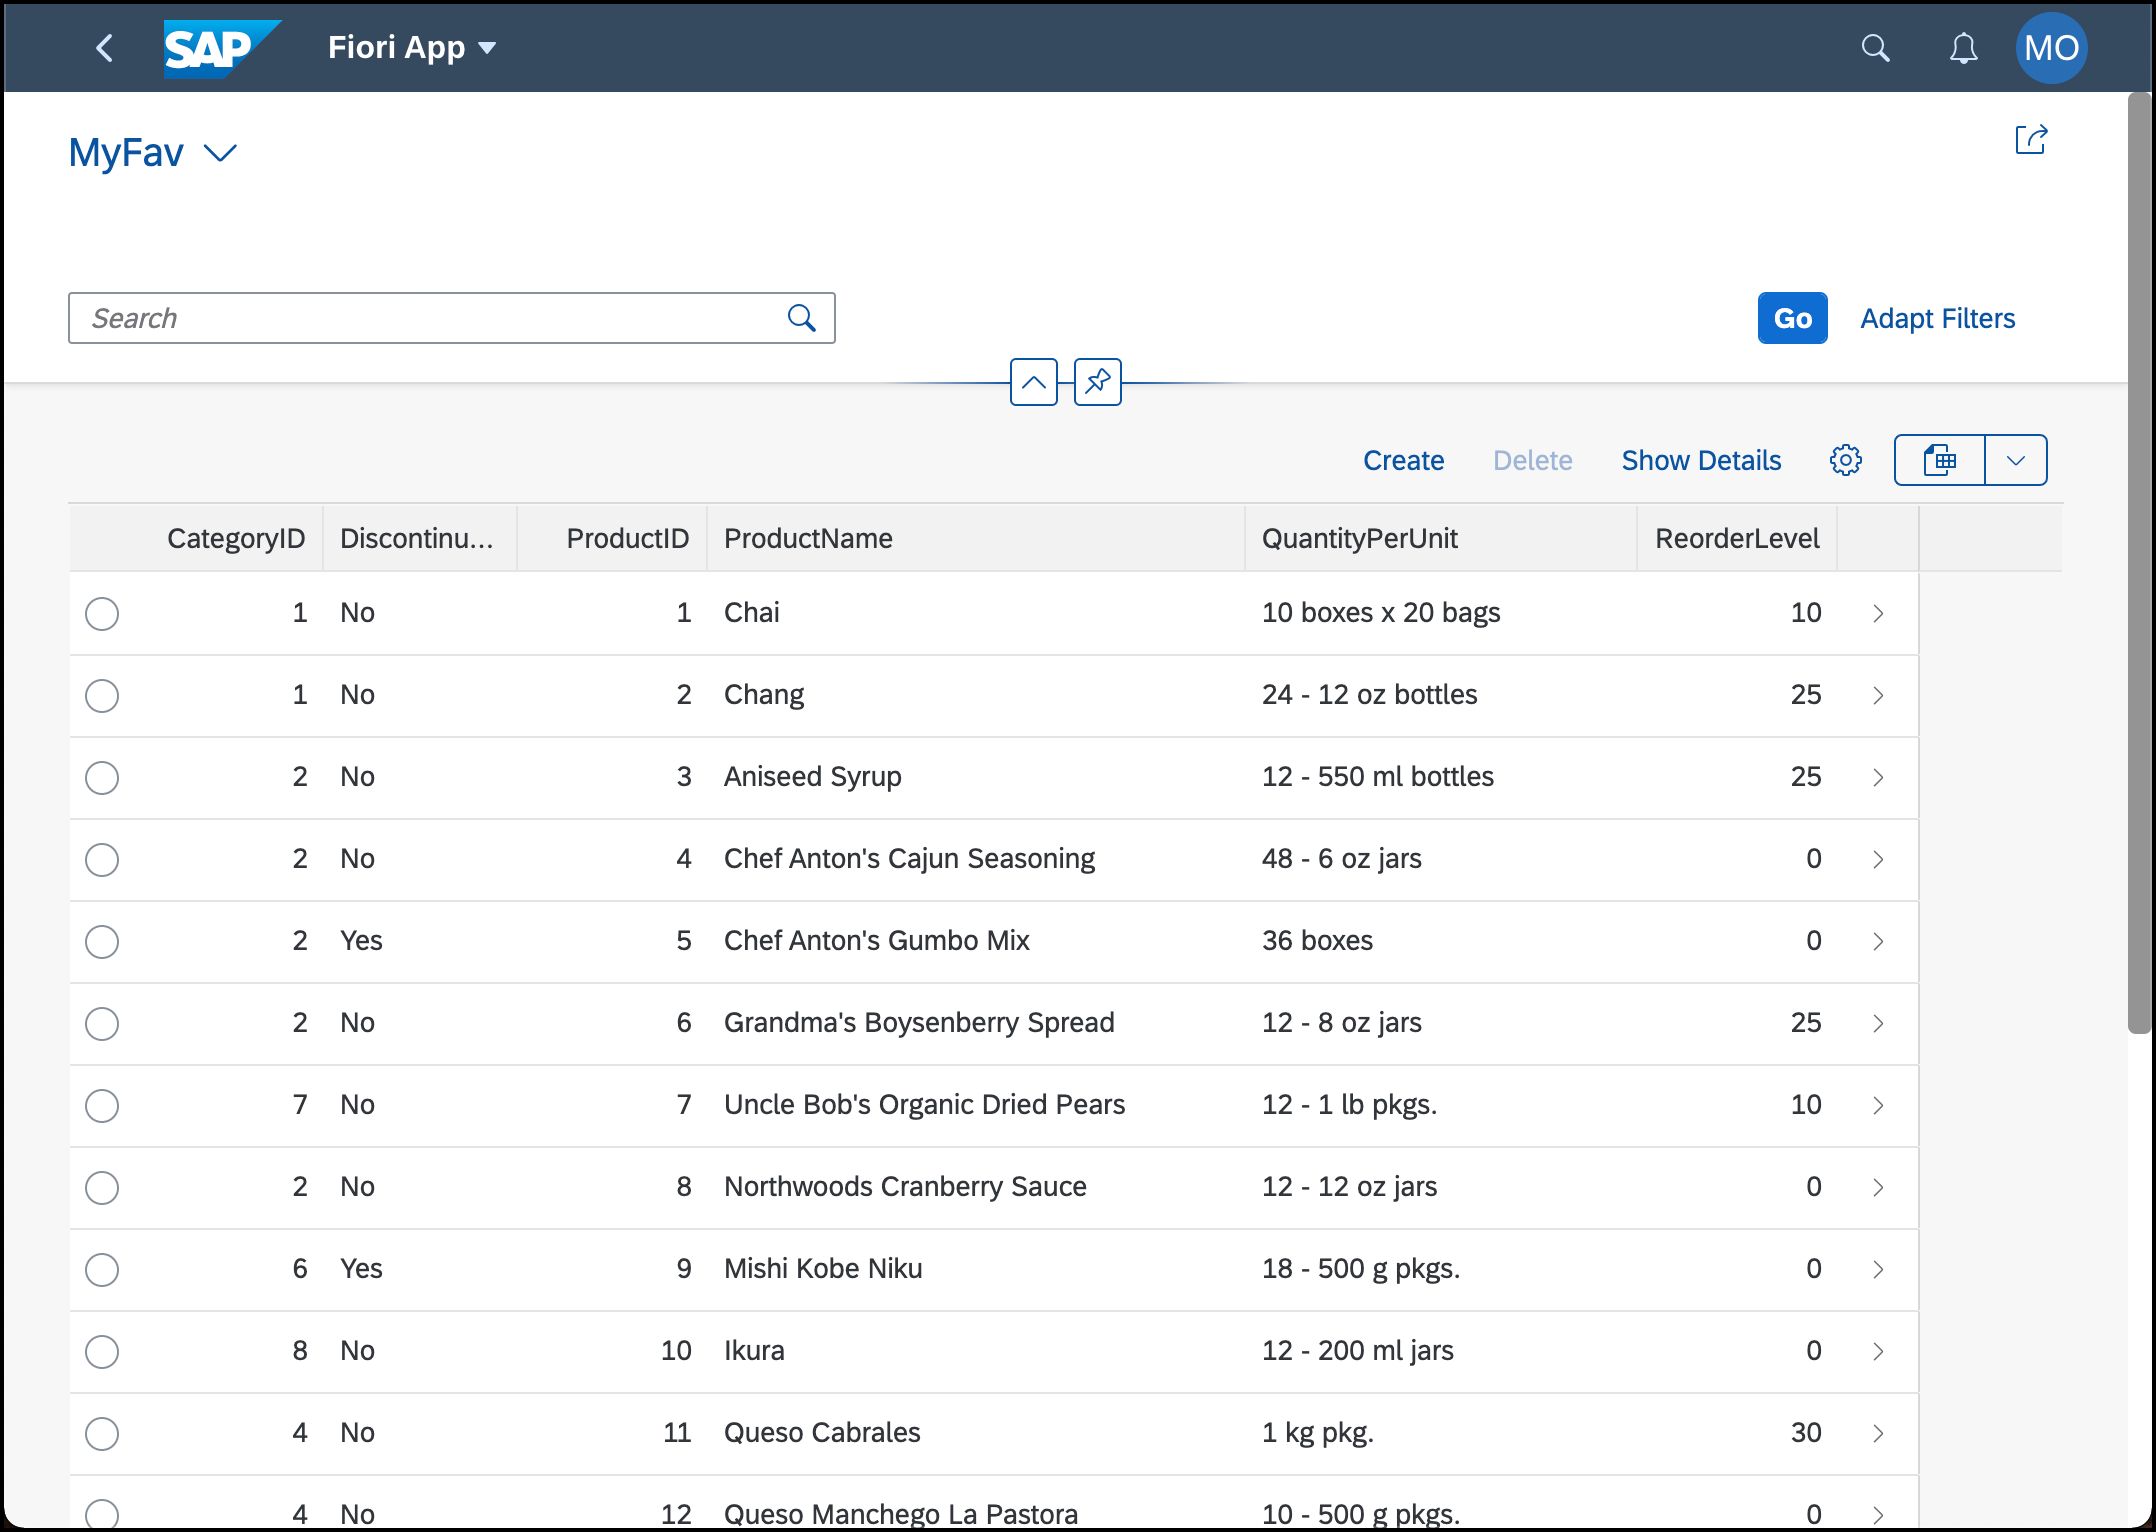
An SAP Fiori list report application.
3. Enable notification for custom applications on SAP BTP
To enable custom apps to publish notifications, they need to send data to the service via a destination.
Follow this guide to generate the notification service's credentials and create a destination based on these credentials.

Launchpad site settings in the admin UI.
Don't forget to enable the "Show Notifications" settings of the Launchpad site that you want to use.
4. Download service instance keys
Run the following commands to create service keys for existing services instances - one for the xsuaa service instance and the other for the destination service instance.
If you wonder where these service instances are coming from, you created them when you deployed the web app in step 1.
cf create-service-key managed-fiori-uaa uaa-key

cf create-service-key managed-fiori-destination destination-key

cf service-key managed-fiori-uaa uaa-key

cf service-key managed-fiori-destination destination-key
You'll notice that the last two commands print a JSON object that contains the service keys. Copy these JSON objects into a new file with the name
default-env.json:{
"VCAP_SERVICES": {
"destination": [
{
"label": "destination",
"provider": null,
"plan": "lite",
"name": "notification-test-content-destination-service",
"tags": [
"destination",
"conn",
"connsvc"
],
"instance_guid": "00849954-cdd4-4da2-9c94-a77f1eb7e779",
"instance_name": "notification-test-content-destination-service",
"binding_guid": "ae9d65c6-e542-4abd-95c7-94d70c0f52d9",
"binding_name": null,
"credentials": <INSERT CONTENT OF THE FIRST SERVICE KEY>,
"syslog_drain_url": null,
"volume_mounts": []
}
],
"xsuaa": [
{
"label": "xsuaa",
"provider": null,
"plan": "application",
"name": "notification-test-content-xsuaa-service",
"tags": [
"xsuaa"
],
"instance_guid": "abc0c759-4eee-4767-a09f-226e0d20df59",
"instance_name": "notification-test-content-xsuaa-service",
"binding_guid": "5d93c1b7-9940-4676-aeb0-6f055dc94b5a",
"binding_name": null,
"credentials": <INSERT CONTENT OF THE SECOND SERVICE KEY>,
"syslog_drain_url": null,
"volume_mounts": []
}
]
}
} We'll parse this file later to inject the service keys into our local application.
6. Write files
First, we need to define the dependencies and the main file of this project. To do this, let's create a
package.json file:{
"name": "notifications-demo",
"scripts": {
"start": "node create.js"
},
"dependencies": {
"@sap-cloud-sdk/core": "^1.46.0",
"axios": "^0.21.1"
}
}Next, we create a utility class
util/NotificationAPI.js that encapsulates the APIs calls to the destination into methods. Note that we'll use the SAP Cloud SDK here to elegantly retrieve CSRF tokens and send HTTP requests to the destination we created previously.const { getDestination, executeHttpRequest, buildCsrfHeaders } = require("@sap-cloud-sdk/core");
const { setLogLevel } = require('@sap-cloud-sdk/util');
setLogLevel('error', 'env-destination-accessor');
setLogLevel('error', 'destination-accessor-vcap');
setLogLevel('error', 'destination-accessor-service');
setLogLevel('error', 'xsuaa-service');
setLogLevel('error', 'proxy-util');
setLogLevel('error', 'http-client');
setLogLevel('error', 'environment-accessor');
const destinationName = "SAP_Notifications";
const notificationEndpoint = "v2/Notification.svc";
const notificationTypesEndpoint = "v2/NotificationType.svc";
async function _getDestination(destinationName) {
const notifServiceDest = await getDestination(destinationName);
if (!notifServiceDest) {
throw new Error(`failed to get destination: ${destinationName}`);
}
return notifServiceDest;
}
class NotificationService {
static async getNotificationTypes() {
const notifServiceDest = await _getDestination(destinationName);
const response = await executeHttpRequest(notifServiceDest, {
url: `${notificationTypesEndpoint}/NotificationTypes`,
method: "get"
});
return response.data.d.results;
}
static async postNotificationType(notificationType) {
const notifServiceDest = await _getDestination(destinationName);
const csrfHeaders = await buildCsrfHeaders(notifServiceDest, { url: notificationTypesEndpoint });
const response = await executeHttpRequest(notifServiceDest, {
url: `${notificationTypesEndpoint}/NotificationTypes`,
method: "post",
data: notificationType,
headers: csrfHeaders,
});
return response.data.d;
}
static async postNotification(notification) {
const notifServiceDest = await _getDestination(destinationName);
const csrfHeaders = await buildCsrfHeaders(notifServiceDest, { url: notificationEndpoint });
const response = await executeHttpRequest(notifServiceDest, {
url: `${notificationEndpoint}/Notifications`,
method: "post",
data: notification,
headers: csrfHeaders,
});
return response.data.d;
}
}
module.exports = { NotificationService };The following file uses this utility class and adds domain-specific templates for the notifications we want to create. Namely, it defines the template for the notifications and the notification types used by these notifications. The
DomainNotifications.js file itself exports the one function that we'll reuse in a moment.const { NotificationService } = require("./util/NotificationAPI");
const NOTIF_TYPE_KEY = "SupplyWarning";
const NOTIF_TYPE_VERSION = "1.0";
function createNotificationType() {
return {
NotificationTypeKey: NOTIF_TYPE_KEY,
NotificationTypeVersion: NOTIF_TYPE_VERSION,
Templates: [
{
Language: "en",
TemplateSensitive: "Low {{product}} supply ({{stock}} items left)",
TemplatePublic: "Ciritical product supply detected",
TemplateGrouped: "Limited Product Supply of {{category}}",
TemplateLanguage: "Mustache",
Subtitle: "{{product}} needs to be reordered"
}
]
}
}
function createNotification({ product, category, stock, recipients }) {
return {
OriginId: "supply-warn-backend",
NotificationTypeKey: NOTIF_TYPE_KEY,
NotificationTypeVersion: NOTIF_TYPE_VERSION,
NavigationTargetAction: "display",
NavigationTargetObject: "masterDetail",
Priority: "High",
ProviderId: "",
ActorId: "",
ActorType: "",
ActorDisplayText: "",
ActorImageURL: "",
Properties: [
{
Key: "product",
Language: "en",
Value: product,
Type: "String",
IsSensitive: false
},
{
Key: "category",
Language: "en",
Value: category,
Type: "String",
IsSensitive: false
},
{
Key: "stock",
Language: "en",
Value: stock,
Type: "String",
IsSensitive: false
}
],
Recipients: recipients.map(recipient => ({ RecipientId: recipient })),
}
}
async function publishSupplyWarningNotification(notification) {
const notifTypes = await NotificationService.getNotificationTypes();
const notifType = notifTypes.find(nType => nType.NotificationTypeKey === NOTIF_TYPE_KEY && nType.NotificationTypeVersion === NOTIF_TYPE_VERSION);
if (!notifType) {
console.log(`Notification Type of key ${NOTIF_TYPE_KEY} and version ${NOTIF_TYPE_VERSION} was not found. Creating it...`);
await NotificationService.postNotificationType(createNotificationType());
}
return await NotificationService.postNotification(createNotification(notification));
}
module.exports = { publishSupplyWarningNotification };We already declared the main file
create.js in the project descriptor above. This script uses axios to pull all product data and filters for products of a defined category that are low on supply. It then uses the exported function of the previous file to create a notification per item and finally prints a success message.Note that you need to add your email address (the one that is linked with your SAP BTP account) in line 21 to receive the generated notifications.
const { publishSupplyWarningNotification } = require("./DomainNotifications");

const axios = require("axios");

require('@sap/xsenv').loadEnv();


const categories = {

    2: "Condiments",

    4: "Dairy Products",

    6: "Meat/Poultry"

};


(async () => {

    try {

        const res = await axios("https://services.odata.org/V2/Northwind/Northwind.svc/Products?$format=json");


        const criticalSupplyOfCategory6 = res.data.d.results.filter(a => a.UnitsInStock <= a.ReorderLevel && a.CategoryID === 6);


        await Promise.all(criticalSupplyOfCategory6.map(product => publishSupplyWarningNotification({

            product: product.ProductName,

            category: categories[product.CategoryID],

            stock: `${product.UnitsInStock}`,

            recipients: ["marius.obert@sap.com"]

        })));


        console.log("Success");

    } catch (e) {

        if (e.response) {

            console.error(`${e.response.statusText} (${e.response.status}): ${JSON.stringify(e.response.data.error.message)}.`)

        } else {

            console.error(e)

        }

    }

})()
7. See the notification popping up in your SAP Fiori Launchpad
Now it's time to see everything in action. First, open the SAP Fiori Launchpad site that you created before – it doesn't matter if you are at the landing page or an opened SAP Fiori app.
Then run the Node.js project that you just build:
npm install

npm start
Awesome! You just triggered your first notification from a custom-built app.
Alternatively to running the application locally, you can also execute an HTTP client script that does the same for you. gregorw shared his script in the comments below.
Summary
In this post, you've learned:
- Where to find the credentials of the notification API
- That you need to add a new destination for this API
- That you can leverage the SAP Cloud SDK to consume the API
- How to write custom logic that creates notification types and send notifications to business users
Now it's up to you to add this logic into your business apps! Note that you won't need the
default-env.json in a production-ready application as you can achieve the same result with a regular service binding.
- SAP Managed Tags:
- SAP Fiori,
- Node.js,
- SAPUI5,
- SAP Cloud Portal service,
- SAP Build Work Zone, standard edition,
- SAP Fiori Launchpad
Labels:
43 Comments
You must be a registered user to add a comment. If you've already registered, sign in. Otherwise, register and sign in.
Labels in this area
-
ABAP CDS Views - CDC (Change Data Capture)
2 -
AI
1 -
Analyze Workload Data
1 -
BTP
1 -
Business and IT Integration
2 -
Business application stu
1 -
Business Technology Platform
1 -
Business Trends
1,661 -
Business Trends
88 -
CAP
1 -
cf
1 -
Cloud Foundry
1 -
Confluent
1 -
Customer COE Basics and Fundamentals
1 -
Customer COE Latest and Greatest
3 -
Customer Data Browser app
1 -
Data Analysis Tool
1 -
data migration
1 -
data transfer
1 -
Datasphere
2 -
Event Information
1,400 -
Event Information
65 -
Expert
1 -
Expert Insights
178 -
Expert Insights
280 -
General
1 -
Google cloud
1 -
Google Next'24
1 -
Kafka
1 -
Life at SAP
784 -
Life at SAP
11 -
Migrate your Data App
1 -
MTA
1 -
Network Performance Analysis
1 -
NodeJS
1 -
PDF
1 -
POC
1 -
Product Updates
4,577 -
Product Updates
330 -
Replication Flow
1 -
RisewithSAP
1 -
SAP BTP
1 -
SAP BTP Cloud Foundry
1 -
SAP Cloud ALM
1 -
SAP Cloud Application Programming Model
1 -
SAP Datasphere
2 -
SAP S4HANA Cloud
1 -
SAP S4HANA Migration Cockpit
1 -
Technology Updates
6,886 -
Technology Updates
408 -
Workload Fluctuations
1
Related Content
- ABAP Cloud Developer Trial 2022 Available Now in Technology Blogs by SAP
- Analyze Expensive ABAP Workload in the Cloud with Work Process Sampling in Technology Blogs by SAP
- SAP Document and Reporting Compliance - 'Colombia' - Contingency Process in Technology Blogs by SAP
- 404 error while calling SAP Build Work Zone(Launchpad) Notification API in BAS in Technology Q&A
- Consuming CAPM Application's OData service into SAP Fiori Application in Business Application Studio in Technology Blogs by Members
Top kudoed authors
| User | Count |
|---|---|
| 13 | |
| 10 | |
| 10 | |
| 9 | |
| 8 | |
| 7 | |
| 6 | |
| 5 | |
| 5 | |
| 5 |