
- SAP Community
- Products and Technology
- Technology
- Technology Blogs by SAP
- Next destination: Cloud connectivity on SAP Busine...
Technology Blogs by SAP
Learn how to extend and personalize SAP applications. Follow the SAP technology blog for insights into SAP BTP, ABAP, SAP Analytics Cloud, SAP HANA, and more.
Turn on suggestions
Auto-suggest helps you quickly narrow down your search results by suggesting possible matches as you type.
Showing results for
Employee
Options
- Subscribe to RSS Feed
- Mark as New
- Mark as Read
- Bookmark
- Subscribe
- Printer Friendly Page
- Report Inappropriate Content
06-30-2021
7:21 PM
Overview
In this blog post, I will demonstrate how to connect to on-premise web services whilst developing applications on SAP Business Application Studio and then how to deploy these applications to SAP Business Technology Platform, Cloud Foundry environment.
Prerequisites
- Knowledges about SAP BTP (such as, about destinations, service creation, and application development);
- SAP BTP trial account with a SAP Business Application Studio subscription. You can find more information about this on this tutorial;
- SAP Cloud Connector installed in the on-premise system. You can find more information about this on the official documentation.
Cloud Connector
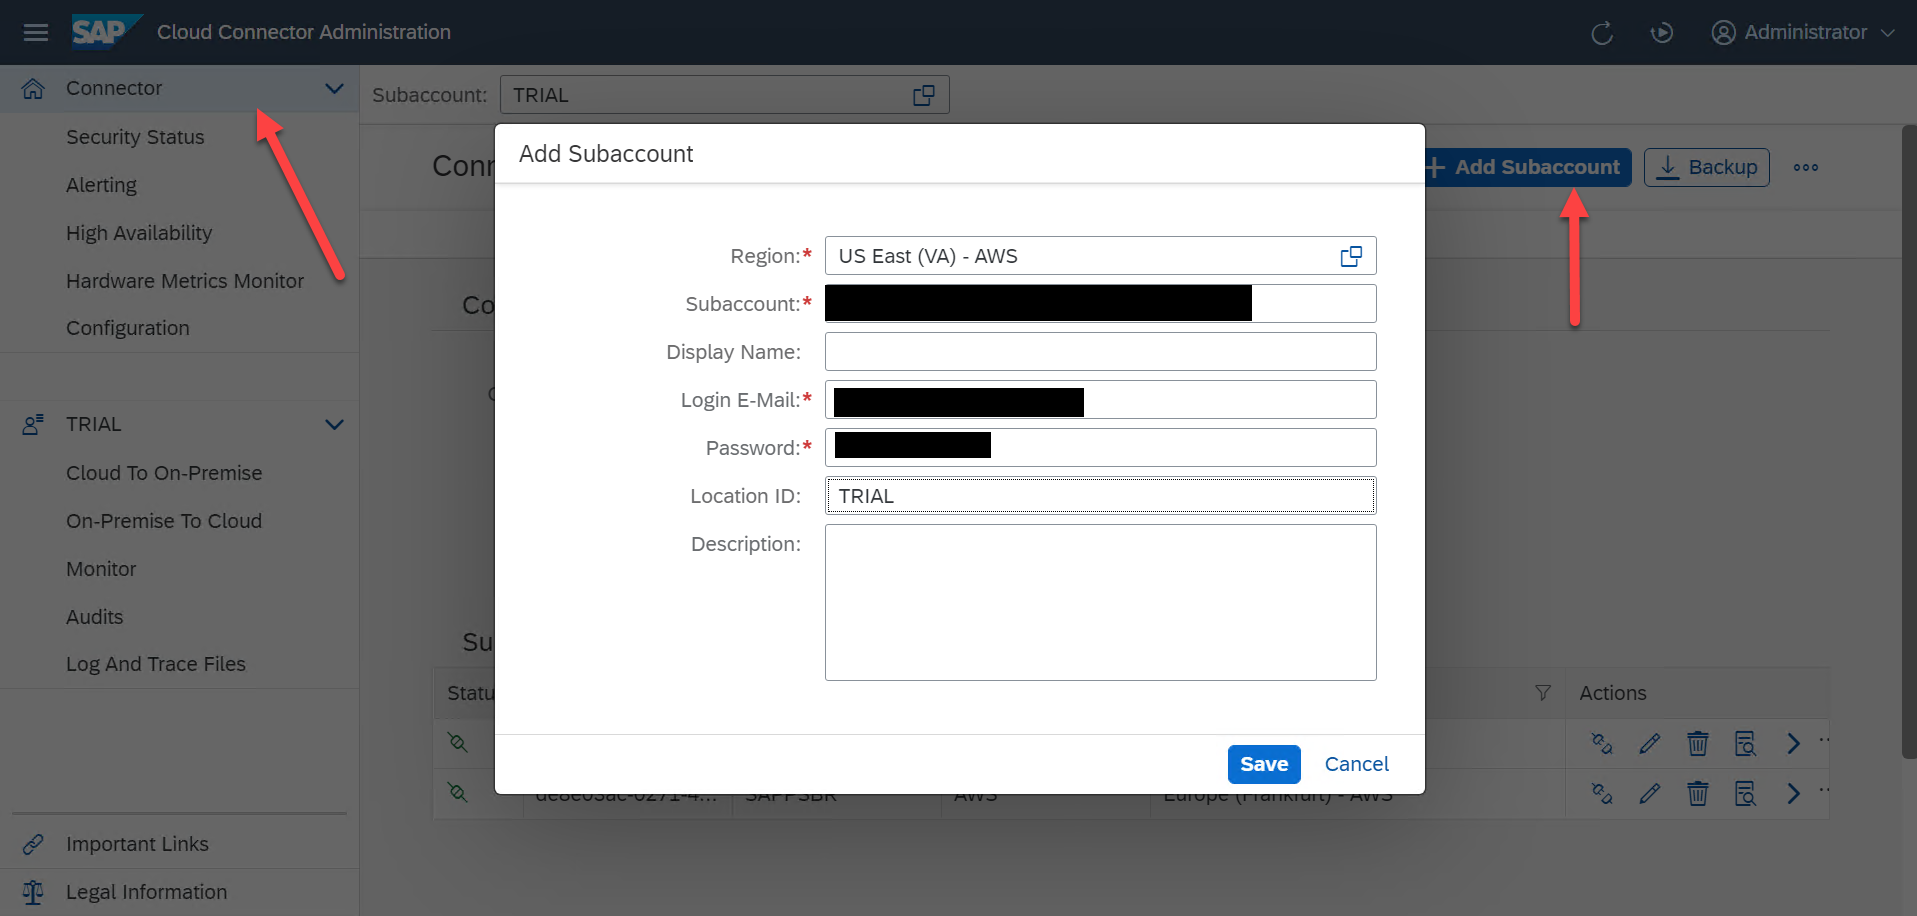
Cloud Connector is a link between SAP BTP and on-premise systems. It allows you use existing on-premise resources without having to expose the entire internal landscape. After installing Cloud Connector on the system, we have to add the trial subaccount from SAP BTP to it. On the Cloud Connector Administration page, click on connector, then on add subaccount. Enter the region for the trial subaccount, the subaccount ID, your credentials for the trial instance and the location ID.
After adding the subaccount, select it and click on cloud to on-premise. Add a new virtual mapping to the internal system. The virtual host URL will be the one used to access the on-premise resource. Remember to also add the resources for this virtual host, otherwise the destination won´t be accessible.

After doing this, we should see the connected cloud connector on the subaccount trial instance.

Now that the Cloud Connector is connected, the virtual host is now accessible to the trial subaccount. Add a destination that maps to this virtual host. Add a name to the destination, select the same type as the virtual host, enter the virtual host for the URL, select OnPremise as the proxy type and enter the location ID for the Cloud Connector. Please remember to add HTML5.DynamicDestination and WebIDEEnabled as additional properties and set them both to true, this will enable Business Application Studio to acess the destination.

Local development on SAP Business Application Studio
After creating the destination on the subaccount level, the destination should be accessible inside SAP Business Application Studio. To check this, open the terminal inside SAP Business Application Studio and use the curl command below to create an HTTP request to the destination:
curl <YOUR_DESTINATION_NAME>.dest/<YOUR_PATH_TO_REQUEST>The virtual host is also accessible within SAP Business Application if you run the curl command with the virtual host URL instead. After saving the destination correctly, if you get any errors, run the command below to refresh the destinations:
curl http://localhost:8887/reloadNow that the destinations are properly configured, local development in SAP Business Application Studio can begin. For this blog post, I will use a blank SAP UI5 as the example. The focus of this blog post is only the connectivity part of development and deployment, you can find more information about how to setup an SAP UI5 application here. When developing different types of applications (Cloud Application Programming Model, SAP HANA Cloud Projects, Workflow projects) the place where the connectivity configuration will change, but the connectivity principals will remain the same. Don´t worry, I will show an example further ahead.
It is important to remember that the destinations created at subaccount level will not be available when the app is executed. Therefore, if you create a simple SAP UI5 that makes an Ajax request to the virtual host registered, the request will fail at runtime due to the fact that the destination and the connectivity services are not bound yet to the application. To connect to the destination when executing an application locally on SAP Business Application Studio, we have to define a proxy in the project so that it knows where to look when the request is made.
When developing SAP UI5 applications, there are two files that we need to configure when developing locally: the xs-app.json file and the ui5.yaml file. The xs-app.json file will define the application routes. Inside the routes array, we have to define the route to the on-premise resource, as shown below:
{

      "source": "^/http/(.*)$", //the source request being made on the ajax call

      "target":"<YOUR_TARGET_RESOURCE>", //the target resource on the destination

      "authenticationType": "none",

      "destination":"<YOUR_DESTINATION_NAME>", //destination name configured before

      "csrfProtection":false

}
Then, on the ui5.yaml file, it will be defined the mocked destinations to be routed during the local runtime. For it to work with on-premise resources, it is needed add a proxy local host to access the on-premise destinations:
destinations:

          - name : "<YOUR_DESTINATION_NAME>"

            url: "<YOUR_DESTINATION_URL>"

            proxyHost: "http://127.0.0.1"

            proxyPort: 8887
Finally, after configuring these two files, the Ajax request must be made considering the source route defined on the xs-app.json, as the example shows below:
$.ajax({

          url: '/http/BRIM',

          type: "POST",

          dataType: "xml",

          data: soapMessage,

          processData: false,

          contentType: "text/xml; charset=\"utf-8\"",

          success: function (soap) {});
This Ajax request will be made to the localhost environment and will be redirected by the approuter, which was configured on the xs-app.json, to the mocked destination defined on the ui5.yaml file.
For this example, I used as an example, an SAP UI5 application. However, if the application being developed is a Cloud Application Programming Model for example, the destinations would be mocked on the default-env.json file, using the same proxy described in this blog post.
{

  "destinations": [

    {

      "name": "<YOUR_DESTINATION_NAME>",

      "url": "<YOUR_DESTINATION_URL>",

      "proxyHost: "http://127.0.0.1"

      "proxyPort: 8887

    }

  ]

}
Deployment to SAP Business Technology Platform
After developing locally an application using SAP Business Application Studio, we have to deploy it to SAP Business Technology Platform. If we simply build and deploy the mta.yaml file, the destination still won´t be reachable within the application. This happens because we have to bind two services to the application: the connectivity service, which will allow the connection to an on-premise resource, and the destinations service, which will configure the destinations that this application will use. Below is an example of an mta.yaml file with these two services bound to the application:
ID: <YOUR_APP_NAME>

_schema-version: 3.2.0

version: 0.0.1

parameters:

  enable-parallel-deployments: true

modules:

  - name: <YOUR_APP_NAME>

    type: nodejs

    path: approuter

    parameters:

      disk-quota: 512M

      memory: 512M

    requires:

      - name: <YOUR_DESTINATION_SERVICE_NAME>

      - name: <YOUR_CONNECTIVITY_SERVICE_NAME>

    build-parameters:

      builder: custom

      commands:

        - npm install

        - npm run build:ui --prefix ..

resources:

  - name: <YOUR_DESTINATION_SERVICE_NAME>

    type: org.cloudfoundry.managed-service

    parameters:

      service-plan: lite

      service: destination

      config:

        HTML5Runtime_enabled: true

        version: 1.0.0

  - name: <YOUR_CONNECTIVITY_SERVICE_NAME>

    type: org.cloudfoundry.managed-service

    parameters:

      service-plan: lite

      service: connectivity
Once we deploy this mta.yaml file, the destination and the connectivity services will be created in SAP BTP alongside with the deployment of the application. The last step required to be able to connect to an on-premise resource is to replicate the destination created at the subaccount level that enabled the local development using SAP Business Application Studio, in the destination service we just created after deploying the mta.yaml file example above. To do this, we can export the destination from the subaccount level:

And then, import it in the destination service bound to the application deployed:

Before running the application, restart the application to make sure that all the configurations were applied. Now, you should be able to access an on-premise resource from an application deployed on SAP Business Technology Platform.
Conclusion
We reached our final destination: cloud connectivity on SAP BTP to on-premise systems!
Please feel free to reach out to me in case of any doubts, here are some other resources that might help you during development:
Connectivity on SAP Business Application Studio
Testing SAP BTP Destinations
Information about default-env.json
- SAP Managed Tags:
- SAPUI5,
- SAP Connectivity service,
- SAP Business Technology Platform
Labels:
1 Comment
You must be a registered user to add a comment. If you've already registered, sign in. Otherwise, register and sign in.
Labels in this area
-
ABAP CDS Views - CDC (Change Data Capture)
2 -
AI
1 -
Analyze Workload Data
1 -
BTP
1 -
Business and IT Integration
2 -
Business application stu
1 -
Business Technology Platform
1 -
Business Trends
1,658 -
Business Trends
92 -
CAP
1 -
cf
1 -
Cloud Foundry
1 -
Confluent
1 -
Customer COE Basics and Fundamentals
1 -
Customer COE Latest and Greatest
3 -
Customer Data Browser app
1 -
Data Analysis Tool
1 -
data migration
1 -
data transfer
1 -
Datasphere
2 -
Event Information
1,400 -
Event Information
66 -
Expert
1 -
Expert Insights
177 -
Expert Insights
293 -
General
1 -
Google cloud
1 -
Google Next'24
1 -
Kafka
1 -
Life at SAP
780 -
Life at SAP
13 -
Migrate your Data App
1 -
MTA
1 -
Network Performance Analysis
1 -
NodeJS
1 -
PDF
1 -
POC
1 -
Product Updates
4,577 -
Product Updates
341 -
Replication Flow
1 -
RisewithSAP
1 -
SAP BTP
1 -
SAP BTP Cloud Foundry
1 -
SAP Cloud ALM
1 -
SAP Cloud Application Programming Model
1 -
SAP Datasphere
2 -
SAP S4HANA Cloud
1 -
SAP S4HANA Migration Cockpit
1 -
Technology Updates
6,873 -
Technology Updates
419 -
Workload Fluctuations
1
Related Content
- Consuming SAP with SAP Build Apps - Mobile Apps for iOS and Android in Technology Blogs by SAP
- Onboarding Users in SAP Quality Issue Resolution in Technology Blogs by SAP
- git command to connect to BTP Destination pointing to Git repo in Technology Q&A
- How to use AI services to translate Picklists in SAP SuccessFactors - An example in Technology Blogs by SAP
- Improving Time Management in SAP S/4HANA Cloud: A GenAI Solution in Technology Blogs by SAP
Top kudoed authors
| User | Count |
|---|---|
| 35 | |
| 25 | |
| 14 | |
| 13 | |
| 7 | |
| 7 | |
| 6 | |
| 6 | |
| 5 | |
| 5 |