Kyma provides us with a configured, monitored and secured Kubernetes Cluster. This is an easy way for us to host container images on the SAP Business Technology Platform. With Kyma, we can use YAML files to deploy our Kubernetes objects, and then review the health of our pods and deployments at a glance from dashboards

Resource Health at a Glance
However, for those of us who lean more technical, you may find yourself thinking:
"This is great, but I need to check my files, my folders, and my configuration. How do I get to the OS?"
Luckily, we're able to use Kubectl to access the Kubernetes Cluster, and things running on it. After installing kubectl, you will need to set the KUBECONFIG environment variable to point to a file on your computer (in my case, C:\Tools\kube\kubeconfig.yml). You'll want this location to be easily accessible, as you'll need to replace this file often
But where do we get the kubeconfig.yml file in the first place? Good question - let's go to the Kyma Dashboard
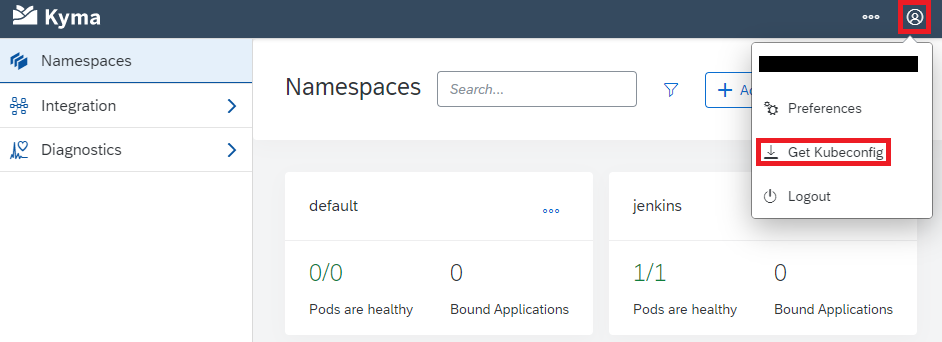
We can download our Kubeconfig file on the top right here
Once we place this file in the location we specified earlier, we're ready to go. However - this Kubeconfig file has a validity of eight hours. This is why we want to make sure the location is easy to access
Once we've got Kubectl installed and our Kubeconfig file in place, it's time to head to our terminal
First things first, let's get a list of the pods in our jenkins namespace:
kubectl get pods -n [namespace]

This is a good start, but we could already get this information from the Kyma Dashboard. Let's use the pod name we just returned to send a command
kubectl exec [pod name] -n [namespace] -- cat /etc/os-release
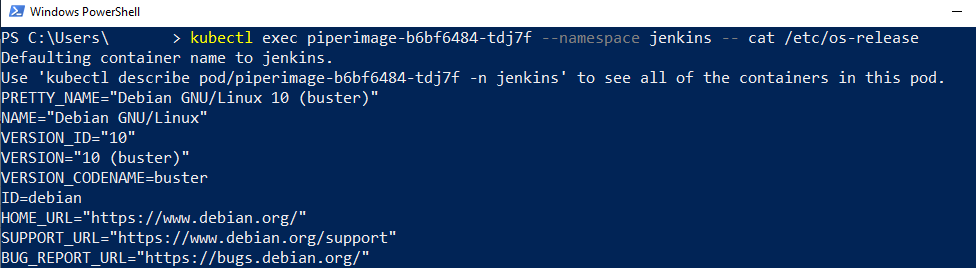
From this example we can pass a command to the container within our pod, and get the OS Release information. The same syntax works in general to pass commands to the container
kubectl exec [pod name] -n [namespace] -- [command]
We can also use this format to access the shell, with the addition of two options: -i (short for
--stdin) and -t (short for
--tty)
kubectl exec -i -t [pod name] -n [namespace] -- /bin/sh

As we see, we can run shell commands here as usual, using
exit to return to our terminal. People who prefer bash can run the above command using
/bin/bash instead
I hope that you've found this blog post helpful, and I welcome your comments and questions below. For anyone who wants to learn further commands with
Kubectl, I encourage you to check out the
official documentation
Note: While I am an employee of SAP, any views/thoughts are my own, and do not necessarily reflect those of my employer
