
- SAP Community
- Products and Technology
- Technology
- Technology Blogs by SAP
- Your First End-to-End Tutorial of Event Mesh on SA...
Technology Blogs by SAP
Learn how to extend and personalize SAP applications. Follow the SAP technology blog for insights into SAP BTP, ABAP, SAP Analytics Cloud, SAP HANA, and more.
Turn on suggestions
Auto-suggest helps you quickly narrow down your search results by suggesting possible matches as you type.
Showing results for
Product and Topic Expert
Options
- Subscribe to RSS Feed
- Mark as New
- Mark as Read
- Bookmark
- Subscribe
- Printer Friendly Page
- Report Inappropriate Content
06-07-2021
10:22 AM
Here is an end to end hands-on about using SAP Event Mesh on SAP Business Technology Platform (China, Shanghai region, or cf-cn40 landscape). You can find all the code snippets used in this blog post in this GitHub repository.
The process of renaming (from Enterprise Messaging to Event Mesh) and the rollout of the free service plan is still undergoing, and we will update this tutorial according to the latest changes.
First, we go to Cloud Cockpit and set up service entitlements, instances, subscriptions and user authorizations.
Assign one of each following entitlement to your Subaccount:
The first entitlement is to create a message client service instance, and the second one is to provide a management cockpit, or dashboard as the name given.
In your cf space, create a service instance for
In the wizard, you are asked to fill in a JSON-formatted service descriptor (following the Syntax for Service Descriptor), you can copy and paste the following, and change the parameters:
To create a service key, in the cockpit, select service instance 👉 create service key 👉 just type in the name of the service key 👉 and hit create.
Take a look at the auto-generated JSON-formatted service key, and find the key-value pairs of:
You will make use of them later.

In the cockpit, subscribe to
Add role collections and assign users for the application subscription. Role collections are already created, so you can assign users, i.e. your SAP account to the collections to get access to Enterprise Messaging.

Now you can go to the application "Event Mesh Dashboard" by clicking the link provided in the subscription and have some explorations, for instance, you can go to the
You need to first create a queue named
Hit
Go to Test, on the left-hand side, select the queue and message client, fill in the
On the right-hand side, select the queue and message client, and hit
To create a queue, Event Mesh provides a type of APIs to manage the queue, queue subscription, etc., REST APIs for Management, to publish and consume messages, the type is REST APIs for Messaging.
We use Postman to send HTTP requests. Remember to find URLs and other values from the service key.
Before communicating with Event Mesh services via APIs, we need to get the access token from XSUAA. This Help document can guide you through the process of fetching access token by providing client id and client secret to the token endpoint.
What you need to fill in the postman:
Send the request, you will get 200 OK response, with the access_token. The access token needs to be included in the header of the next few requests:
In the document about API, you can find the API to create queue is
The parameter in URL:
What you need to fill in the postman:
The body is optional, schema QueueP is defined with default values.
Send the request and you will get the response of 201 Created, with the information of the created queue.
To list the queues, use
To send a message to a queue, we can find the API in messaging API
Header
For Body, you can choose
The ID of the created message will be returned in the header of the response.
To consume a message from the queue,
All postman config files can be found in the folder
Create a topic (queue subscription) for
You can subscribe via the dashboard. Note that the queue can only subscribe to topics that follow the rules defined in the service descriptor. here it means the topic should have the same namespace prefix as the queue.
Send a message to the topic and you will find the queue
In the postman, we use API
In the dashboard, you will find that the number of messages in the queue
Create queue subscription for queue
Via management APIs, in postman, we use
Parameters in URL
If the topic creation successfully proceeds, the response will be 201 Created, with the names of the queue and the topic as the body.
The current architecture:
Send a message to the topic.
You can see both of the queues can receive the message.
Let's consume the message from the two queues.
In this tutorial Tutorial: Develop a Messaging App on SAP BTP, you can learn how to develop Node.js-based and Java-based message cunsomer or producer applications on BTP.
SAP has provided full collections of development tool sets like Node.js packages, Java libraries, and other programming languages, to help you develop messaging applications logic in XS Advanced (i.e. SAP HANA Extended Application Services advanced model, the Cloud Foundry PaaS with enhancements provided by SAP)).
For development in JavaScript, you can make use of Standard Node.js Packages for XS Advanced:
For development in Java, you can leverage SAP Cloud Application Programming Model (libraries: com.sap.cloud.servicesdk.xbem.*), following Java Message Service (JMS) 2.0 specification, :
For the SAP Cloud SDK, features of Event Mesh for both of JavaScript and Java is planned, and its progress depends on CAP.
Instead of consumers fetching messages from the message client, if we add a webhook, the message client will POST the messages from the specified queue to the specified URL. Here we only create a webhook for the queue
The current architecture of a webhook looks like this:
Go to application studio 👉 create a
Delete all the auto-created files and folders. create file
Replace the name with your app name, route with your host name concatenated with your custom domain, e.g.
If you don't know which domain you can make use of, open terminal 👉
In the terminal, go to the current folder,
Install the two Node.js packages we will use, express and body-parser, by
We want to add start script, so add key-value pair
Now let's work on the file
Deploy it onto BTP. In the terminal, go to project root, run
Test the webhook by sending a message to the webhook with the postman (or curl from the terminal).
All the code snippets can be found in the folder
Go to dashboard 👉 go into our message client 👉 choose
The process of activation will be completed by making a handshake between the message client and your webhook application, during the first message exchange.
Send a message to the topic
Then publish a message to the topic
Go to
If you bind the SAP Application Logging Service to your webhook application (here is the How-To on SAP Help Portal), you can also observe the logs on the cockpit.
In this blog post, we first set up SAP Event Mesh service instance and subscription on Cloud Cockpit. Then, we tried to create queues via SAP Event Mesh Dashboard and HTTP API calls, and we tested the messaging of the queues by publishing messages to the queues and consuming the messages. We also created a queue subscription and tested it by publishing messages to the topic and consume them from the queues. Next, we build a webhook, deployed it to the BTP CF environment, and subscribe it to one of the queues. By now, you have walked through a full end-to-end scenario of SAP Event Mesh on cn40.
If you have further questions, feel free to leave me a comment here, or submit a question in the Q&A area on this topic.
The process of renaming (from Enterprise Messaging to Event Mesh) and the rollout of the free service plan is still undergoing, and we will update this tutorial according to the latest changes.
💻 Prerequisites:
- Global Account and Subaccount on SAP Business Technology Platform (China, Shanghai Region)
- Entitlements of SAP Event Mesh, SAP Business Application Studio
Set Up Service Instance and Subscription
First, we go to Cloud Cockpit and set up service entitlements, instances, subscriptions and user authorizations.
Entitlement
Assign one of each following entitlement to your Subaccount:
| Service | Technical Name | Plan |
|---|---|---|
| Event Mesh | enterprise-messaging | default |
| Enterprise Messaging | enterprise-messaging-hub | standard |
The first entitlement is to create a message client service instance, and the second one is to provide a management cockpit, or dashboard as the name given.

Service instance
In your cf space, create a service instance for
Event Mesh (technical name: enterprise-messaging), with the service plan default.In the wizard, you are asked to fill in a JSON-formatted service descriptor (following the Syntax for Service Descriptor), you can copy and paste the following, and change the parameters:
- namespace: <org-name>/<mesage-client-name>/<number>/<queue-name>, following the Syntax for Naming Queues, Topics, and Topic Patterns
- message client name (recommended to be the same as service instance name)
{

    "emname": "<message-client-name>", // fill in your message client name

    "namespace": "<your-namespace>", // fill in your namespace

    "version": "1.1.0",

    "options": {

        "management": true,

        "messagingrest": true,

        "messaging": true

    },

    "rules": {

        "queueRules": {

            "publishFilter": [

                "${namespace}/*"

            ],

            "subscribeFilter": [

                "${namespace}/*"

            ]

        },

        "topicRules": {

            "publishFilter": [

                "${namespace}/*"

            ],

            "subscribeFilter": [

                "${namespace}/*"

            ]

        }

    }

}
🔖 Besides Cloud Cockpit, you can also do this step via CF CLI.
Service key
To create a service key, in the cockpit, select service instance 👉 create service key 👉 just type in the name of the service key 👉 and hit create.
Take a look at the auto-generated JSON-formatted service key, and find the key-value pairs of:
- namespace,
- management API URI, and three messaging API URIs (typically the URI for HTTP REST protocol),
- client id, client secret and token endpoint.
You will make use of them later.
Subscription and role collections
In the cockpit, subscribe to
Enterprise Messaging (technical name: enterprise-messaging-hub), standard service plan.
Add role collections and assign users for the application subscription. Role collections are already created, so you can assign users, i.e. your SAP account to the collections to get access to Enterprise Messaging.
Now you can go to the application "Event Mesh Dashboard" by clicking the link provided in the subscription and have some explorations, for instance, you can go to the
message clients page, and find the message client you just created when you create your service instance.Create a queue and test the messaging via the dashboard
Create
🎬 Scenario: you want to watch CCTV New Year's Gala. You are busy but you don't want to miss all the comedies. CCTV will send you messages when a performance starts, and the message will tell you if it is comedy.
You need to first create a queue named
comedy. On page SAP Event Mesh Dashboard 👉 on the left menu, select tab Message Clients 👉 go into the tile mymessageclient 👉 tab Queues 👉 click Create Queue 👉 in the pop-out window, fill in the parameters: queue name = comedy, and leave others as default.Hit
Create, and you can see the queue myorg/mymessageclient/001/category has been created, with zero messages currently.🔖 You don't have to add namespace as a prefix to your queue name as it will be attached.
Test
Go to Test, on the left-hand side, select the queue and message client, fill in the
Message Data parameters, hit Publish Message. You can see a "published" notification flashing out, and there is one message in the queue now.📊 Sample Message Data
- Content-Type: application/json
- Body: {"time": "20210124 21:00:00", "category": "music"}
On the right-hand side, select the queue and message client, and hit
Consume Message. You can receive the message data you just published, and the number of messages in the queue goes down to zero.
Create a queue and send message to the queue, via messaging API (postman)
🎬 Scenario: your daughter also watches the show. She wants to know when she can see her idols on the screen, so she is interested in CCTV's messages about the artists screen time.
To create a queue, Event Mesh provides a type of APIs to manage the queue, queue subscription, etc., REST APIs for Management, to publish and consume messages, the type is REST APIs for Messaging.
We use Postman to send HTTP requests. Remember to find URLs and other values from the service key.
Get access token
Before communicating with Event Mesh services via APIs, we need to get the access token from XSUAA. This Help document can guide you through the process of fetching access token by providing client id and client secret to the token endpoint.
What you need to fill in the postman:
| Tab | Key | Value |
|---|---|---|
| Bar | Method | choose GET |
| Bar | URL | <tokenendpoint>?grant_type=client_credentials&response_type=token |
| Authorization | Type | choose Basic Auth |
| Authorization | Username | <clientid> |
| Authorization | Password | <clientsecret> |
Send the request, you will get 200 OK response, with the access_token. The access token needs to be included in the header of the next few requests:
Authorization: Bearer {{access_token}}.Create a queue
In the document about API, you can find the API to create queue is
PUT /hub/rest/api/v1/management/messaging/queues/{queue}.The parameter in URL:
{queue} is the URL encoded queue name with a namespace prefix. e.g. myorg/mymessageclient/001/artist --> myorg%2Fmymessageclient%2F001%2Fartist.What you need to fill in the postman:
| Tab | Key | Value |
|---|---|---|
| Bar | Method | choose PUT |
| Bar | URL | <management[0].uri>/hub/rest/api/v1/management/messaging/queues/{queue} |
| Authorization | Type | choose No Auth |
| Headers | Authorization | Bearer <access_token> |
The body is optional, schema QueueP is defined with default values.
Send the request and you will get the response of 201 Created, with the information of the created queue.

To list the queues, use
GET /hub/rest/api/v1/management/messaging/queues. Instead of Method and Path, all other parameters remain the same. Send the request, you can see all the queues.Send and consume message via message API
To send a message to a queue, we can find the API in messaging API
POST /messagingrest/v1/queues/{queue-name}/messages. Parameter {queue-name} in URL again should be URL encoded full name with a namespace prefix.| Tab | Key | Value |
|---|---|---|
| Bar | Method | choose POST |
| Bar | URL | <messaging[protocol=httprest].uri>/messagingrest/v1/queues/{queue-name}/messages |
| Authorization | Type | choose No Auth |
| Headers | x-qos | sample 0 |
| Headers | Authorization | Bearer <access_token> |
| Body | raw - JSON | sample {"time": "20210124 21:00:00", "artists": [{"name": "TFBOYS"}, {"name": "Ye Zhang"}]} |
Header
x-qos is the quality of service, 0 means as long as the message is sent, mission completed; 1 means make sure the receiver get at least one message.For Body, you can choose
raw type, and type in any text, for cloud event you can have a defined JSON format.The ID of the created message will be returned in the header of the response.

To consume a message from the queue,
POST /messagingrest/v1/queues/{queue-name}/messages/consumption. Use the same header settings, and leave the body blank.
All postman config files can be found in the folder
./apis.Create a topic, and publish messages to the topic
🎬 Scenario: if CCTV only sends one type of message, performance, containing the performers and category information that you and your daughter care about. to prevent that one message will be retained until you or your daughter consumes it, you two decide to maintain two personal queues. and subscribe to the performance topic, aka queue subscription.
Create a topic (queue subscription) for artist via dashboard
You can subscribe via the dashboard. Note that the queue can only subscribe to topics that follow the rules defined in the service descriptor. here it means the topic should have the same namespace prefix as the queue.

Publish messages to the topic
Send a message to the topic and you will find the queue
artist receives the message.In the postman, we use API
POST /messagingrest/v1/topics/{topic-name}/messages to send the request.| Tab | Key | Value |
|---|---|---|
| Bar | Method | choose POST |
| Bar | URL | url encoded <messaging[protocol=httprest].uri>/messagingrest/v1/topics/{topic-name}/messages |
| Authorization | Type | choose No Auth |
| Headers | x-qos | sample 0 |
| Headers | Authorization | Bearer <access_token> |
| Body | raw - JSON | sample {"time": "20210124 21:05:00", "name": "A Funny Comedy", "category": "comedy", "artists": [{"name": "Ling Jia"}], "status": "START"} |
In the dashboard, you will find that the number of messages in the queue
artist increases by 1.Create queue subscription for queue category via APIs
Via management APIs, in postman, we use
PUT /hub/rest/api/v1/management/messaging/queues/{queue}/subscriptions/{topic}.| Tab | Key | Value |
|---|---|---|
| Bar | Method | choose PUT |
| Bar | URL | URL encoded <management[0].uri>/hub/rest/api/v1/management/messaging/queues/{queue}/subscriptions/{topic} |
| Authorization | Type | choose No Auth |
| Headers | Authorization | Bearer <access_token> |
Parameters in URL
queue and topic they all need to be encoded with prefix. Leave the body blank.
If the topic creation successfully proceeds, the response will be 201 Created, with the names of the queue and the topic as the body.
The current architecture:

architecture: adopted from SAP Help Portal
Publish messages to the topic and consume the messages from two queues via APIs
Send a message to the topic.
| Tab | Key | Value |
|---|---|---|
| Bar | Method | choose POST |
| Bar | URL | URL encoded <messaging[protocol=httprest].uri>/messagingrest/v1/topics/{topic-name}/messages |
| Authorization | Type | choose No Auth |
| Headers | x-qos | sample 0 |
| Headers | Authorization | Bearer <access_token> |
| Body | raw - JSON | sample {"time": "20210124 21:00:00", "name": "Go, Amigo and Hi, Motherland Mash Up", "category": "music", "artists": [{"name": "TFBOYS"}, {"name": "Ye Zhang"}], "status": "START"} |
You can see both of the queues can receive the message.
Let's consume the message from the two queues.

[optional] Develop producer and consumer applications on SAP BTP
In this tutorial Tutorial: Develop a Messaging App on SAP BTP, you can learn how to develop Node.js-based and Java-based message cunsomer or producer applications on BTP.
SAP has provided full collections of development tool sets like Node.js packages, Java libraries, and other programming languages, to help you develop messaging applications logic in XS Advanced (i.e. SAP HANA Extended Application Services advanced model, the Cloud Foundry PaaS with enhancements provided by SAP)).
JavaScript
For development in JavaScript, you can make use of Standard Node.js Packages for XS Advanced:
- @Sap/xb-msg: Provides messaging capabilities with a message broker. This package supports the RabbitMQ message broker with the following protocols: amqp v091, amqp v100, mqtt v311
- @Sap/xb-msg-env: Provides the functions needed to set up messaging client options from Cloud Foundry or XS advanced environment variables
- @Sap/xsenv: Utility for easy setup and access of XS Advanced environment variables and services
Java
For development in Java, you can leverage SAP Cloud Application Programming Model (libraries: com.sap.cloud.servicesdk.xbem.*), following Java Message Service (JMS) 2.0 specification, :
- MessagingService,
- MessagingServiceJmsConnectionFactory,
- ...
For the SAP Cloud SDK, features of Event Mesh for both of JavaScript and Java is planned, and its progress depends on CAP.
Create a webhook (nodejs), deploy it (application studio), and subscribe your webhook to a queue
🎬 Scenario: now you don't want to check the queue from time to time for the comedy performances, you want to build a webhook which can send you notification when there is a performance message from the CCTV, and the performance is comedy.
Instead of consumers fetching messages from the message client, if we add a webhook, the message client will POST the messages from the specified queue to the specified URL. Here we only create a webhook for the queue
comedy.The current architecture of a webhook looks like this:

architecture with webhook: adopted from SAP Help Portal
We provide an as-simple-as-possible webhook application sample here, which is adopted from Part 1 of the series of Youtube: Diving into messaging on SAP Cloud Platform (1-8).
Create and deploy
Go to application studio 👉 create a
Full Stack Cloud Application Dev Space named emtester, go into the dev space 👉 Create Project 👉 select template and target location Basic Multitarget Application 👉 Start 👉 type in the project name webhook, finish.Delete all the auto-created files and folders. create file
manifest.yml. copy and paste the following content:---
applications:
- name: webhook
routes:
- route: <host-name>.<domain>
path: .
memory: 128MReplace the name with your app name, route with your host name concatenated with your custom domain, e.g.
webhook.exercise.sap-samples.cn40.apps.platform.sapcloud.cn.If you don't know which domain you can make use of, open terminal 👉
cf login 👉 choose the targed org and space 👉 cf domains 👉 find one.In the terminal, go to the current folder,
npm init and hit return to get all the default values. type in ok. You will find the file package.json is created, and it requires a main page index.js.Install the two Node.js packages we will use, express and body-parser, by
npm install express body-parser🔖 What do these two packages do?
express is a Node.js package to provide small, robust tooling for HTTP servers, making it a great solution for single page applications, web sites, hybrids, or public HTTP APIs.
body-parser is a Node.js package to parse incoming request bodies in a middleware before your handlers, available under the req.body property.
We want to add start script, so add key-value pair
start in the scripts, and delete the test from the scripts. Finally the file package.json will look like:{
"name": "webhook",
"version": "1.0.0",
"description": "",
"main": "index.js",
"scripts": {
"start": "node index.js"
},
"author": "",
"license": "ISC",
"dependencies": {
"body-parser": "^1.19.0",
"express": "^4.17.1"
}
}Now let's work on the file
index.js, just create it and copy and paste:const express = require("express")
const bodyParser = require("body-parser")
const app = express()
const PORT = process.env.PORT || 8080
app.use(bodyParser.json())
app.get('/', (req, res) => {
res.status(401).send('Hey, this is a webhook - we only receive POST!')
})
app.post('/', (req, res) => {
if(req.body.category == "comedy") {
console.log(' ', req.body)
res.status(200).send(' ' + req.body.name).end()
}
else {
console.log(' ', req.body)
res.status(200).end()
}
})
app.listen(PORT, () => console.log(` Server running on port ${PORT}`))[Optional] If you want to test the app in local terminal, go to the project root, runnpm start, and in a new tab use curl to send request to localhost:
curl -H 'Content-Type: application/json' -d'{"time": "20210124 21:00:00", "name": "Go, Amigo and Hi, Motherland Mash Up", "category": "music", "artists": [{"name": "TFBOYS"}, {"name": "Ye Zhang"}], "status": "START"}' http://localhost:8080/


curl -H 'Content-Type: application/json' -d'{"time": "20210124 21:05:00", "name": "A Funny Comedy", "category": "comedy", "artists": [{"name": "Ling Jia"}], "status": "START"}' http://localhost:8080/
The first request will leave a log with sad face, and the second request will make the webhook app to log a happy face.
Deploy it onto BTP. In the terminal, go to project root, run
cf push.Test the webhook by sending a message to the webhook with the postman (or curl from the terminal).

All the code snippets can be found in the folder
./webhook/.Create webhook subscription
Go to dashboard 👉 go into our message client 👉 choose
webhooks tab 👉 creat webhook subscription 👉 in the pop-up window, fill in queue name, webhook url and other parameters 👉 click create.
The process of activation will be completed by making a handshake between the message client and your webhook application, during the first message exchange.

Send a message to the topic performance, and read the logs of the webhook application webhook
Then publish a message to the topic
performance again. You will find, artist queue has lined up with messages to be consumed, while category queue has zero messages. It is because the messages to the latter queue have been forwarded to the webhook.Go to
cf logs webhook to see the logs, you will find that all the two messages have been logged, labelled with an interested or not interested label.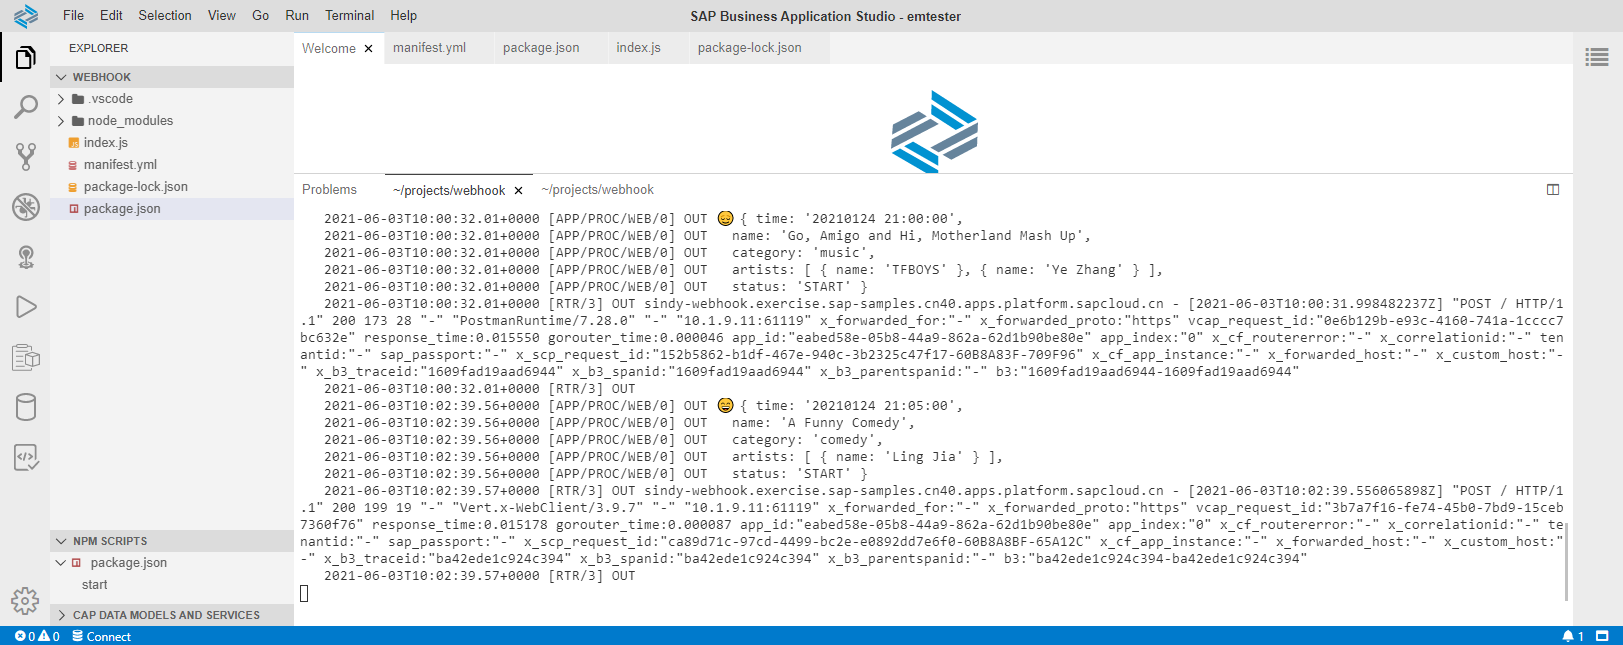
If you bind the SAP Application Logging Service to your webhook application (here is the How-To on SAP Help Portal), you can also observe the logs on the cockpit.

Wrap-up
In this blog post, we first set up SAP Event Mesh service instance and subscription on Cloud Cockpit. Then, we tried to create queues via SAP Event Mesh Dashboard and HTTP API calls, and we tested the messaging of the queues by publishing messages to the queues and consuming the messages. We also created a queue subscription and tested it by publishing messages to the topic and consume them from the queues. Next, we build a webhook, deployed it to the BTP CF environment, and subscribe it to one of the queues. By now, you have walked through a full end-to-end scenario of SAP Event Mesh on cn40.
If you have further questions, feel free to leave me a comment here, or submit a question in the Q&A area on this topic.
Reference
- SAP Managed Tags:
- SAP Event Mesh,
- SAP Business Technology Platform
Labels:
20 Comments
You must be a registered user to add a comment. If you've already registered, sign in. Otherwise, register and sign in.
Labels in this area
-
ABAP CDS Views - CDC (Change Data Capture)
2 -
AI
1 -
Analyze Workload Data
1 -
BTP
1 -
Business and IT Integration
2 -
Business application stu
1 -
Business Technology Platform
1 -
Business Trends
1,658 -
Business Trends
91 -
CAP
1 -
cf
1 -
Cloud Foundry
1 -
Confluent
1 -
Customer COE Basics and Fundamentals
1 -
Customer COE Latest and Greatest
3 -
Customer Data Browser app
1 -
Data Analysis Tool
1 -
data migration
1 -
data transfer
1 -
Datasphere
2 -
Event Information
1,400 -
Event Information
66 -
Expert
1 -
Expert Insights
177 -
Expert Insights
293 -
General
1 -
Google cloud
1 -
Google Next'24
1 -
Kafka
1 -
Life at SAP
780 -
Life at SAP
13 -
Migrate your Data App
1 -
MTA
1 -
Network Performance Analysis
1 -
NodeJS
1 -
PDF
1 -
POC
1 -
Product Updates
4,577 -
Product Updates
340 -
Replication Flow
1 -
RisewithSAP
1 -
SAP BTP
1 -
SAP BTP Cloud Foundry
1 -
SAP Cloud ALM
1 -
SAP Cloud Application Programming Model
1 -
SAP Datasphere
2 -
SAP S4HANA Cloud
1 -
SAP S4HANA Migration Cockpit
1 -
Technology Updates
6,873 -
Technology Updates
417 -
Workload Fluctuations
1
Related Content
- Onboarding Users in SAP Quality Issue Resolution in Technology Blogs by SAP
- Now available: starter kit for genAI on SAP BTP in Technology Blogs by SAP
- How to use AI services to translate Picklists in SAP SuccessFactors - An example in Technology Blogs by SAP
- IoT - Ultimate Data Cyber Security - with Enterprise Blockchain and SAP BTP 🚀 in Technology Blogs by Members
- SAP Signavio is the highest ranked Leader in the SPARK Matrix™ Digital Twin of an Organization (DTO) in Technology Blogs by SAP
Top kudoed authors
| User | Count |
|---|---|
| 34 | |
| 25 | |
| 13 | |
| 7 | |
| 7 | |
| 6 | |
| 6 | |
| 6 | |
| 5 | |
| 4 |