
- SAP Community
- Products and Technology
- Enterprise Resource Planning
- ERP Blogs by SAP
- How to enhance the standard SAP Intelligent RPA bo...
Enterprise Resource Planning Blogs by SAP
Get insights and updates about cloud ERP and RISE with SAP, SAP S/4HANA and SAP S/4HANA Cloud, and more enterprise management capabilities with SAP blog posts.
Turn on suggestions
Auto-suggest helps you quickly narrow down your search results by suggesting possible matches as you type.
Showing results for
Product and Topic Expert
Options
- Subscribe to RSS Feed
- Mark as New
- Mark as Read
- Bookmark
- Subscribe
- Printer Friendly Page
- Report Inappropriate Content
06-03-2021
3:21 PM
How to enhance the standard SAP Intelligent RPA bot in the SAP cloud studio?
In this article, I shall talk about enhancing the standard bot which is available in the SAP Bot store.
Let us take an example of John who works for company, say, ABC. He has several material document lists in the system for which he would like to generate respective GR (Goods Receipt) for a Production Order. He needs the process to be automated where the bot needs to perform the following steps:
- Read the excel template as input which consists of material list
- Automate the Goods Receipt list according to the defined input criteria,
- Download the list
- Send an email to the respective stake holders with the details of the list downloaded in the previous step.
How can this be achieved using SAP bot?
SAP Standard provides MB51 bot which is a “List of Goods-Receipt”. Standard MB51 bot performs the process 1,2 and 3. However, MB51 bot provided by standard does not have the feature of sending emails. We shall now see below how John could automate the standard bot with few simple steps.
Step 1: John logs into the RPA(Robotic process automation) tenant and navigates to the SAP Bot store. He can search for the bot using the Search Criteria “Goods Receipt”. As his design tool is SAP Cloud studio, he selects the highlighted option “Cloud Studio” as shown in the Fig1.

Fig1: Bot Store
Step 2: Click Get to acquire the bot as shown in Fig2.

Fig2: Acquiring Bot from Bot Store
Step 3: Now, go to Packages as seen in the below screenshot where you will be able to view the standard bot acquired as shown in Fig3.

Fig3: Bot acquired can be found in the Packages
Step 4: Select the package and click on the 3 dots as highlighted in the screenshot below.
Click “Save As... New Project” which in turn will create a new project for you as shown in Fig4.1.

Fig4.1: Create a new project out of a package
A new project has been created using which John will be able to modify the standard bot as shown in Fig4.2.

Fig4.2: Newly created Project out of the Package
Step 5: Click on the project to navigate to bot design tool “cloud studio” where the standard bot can be enhanced. Fig5, shows the Cloud studio to design the bot.

Fig5: Cloud Studio
Step 6: Amongst the automation steps in Fig 5,
“MB51 Start” is the first step to run as soon as the bot execution starts.
This automation script will first read the Excel template using the path provided in the environment variables. Once the excel contents are read, SAP logon is then initiated to log into relevant system. On successful login, the automation script “MB51 process” is executed.
“MB51 Process” performs the following steps:
- Navigate to t-code MB51,
- Select the required variant to fetch the goods receipts for the material documents read from the excel input in a list.
- The list is saved in the format of an excel file which is saved with a timestamp to uniquely identify the download for current transaction. The excel file will be saved in the file path specified in one of the steps.
- Exit the SAP system.

Fig 6.1: MB51 Bot Process Automation script
John identifies that “MB51 process” automation step is the place where he can extract the file name and the path where excel with Goods Receipt list is saved. As shown in the screenshot Fig 6.1, he would need to automate the process after the step name “closeSAP-Application - 3”.
- For email service, Outlook SDK is required to automate this process.
So, he will check whether the outlook SDK is available in the dependencies tab as shown in Fig 6.2.

Fig 6.2: Dependencies tab
- If it is unavailable, click “Manage the Project Properties”, a pop-window opens as shown in the Fig 6.3.

Fig 6.3: Manage the Project Properties
- Navigate to Dependencies option.
- Click Add dependency as shown in the Fig 6.4.

Fig 6.4: Add dependency
- Select the package as “SAP Intelligent RPA Outlook SDK” and click ADD as shown in the Fig 6.5 and 6.6.

Fig 6.5: Searching for the Outlook SDK
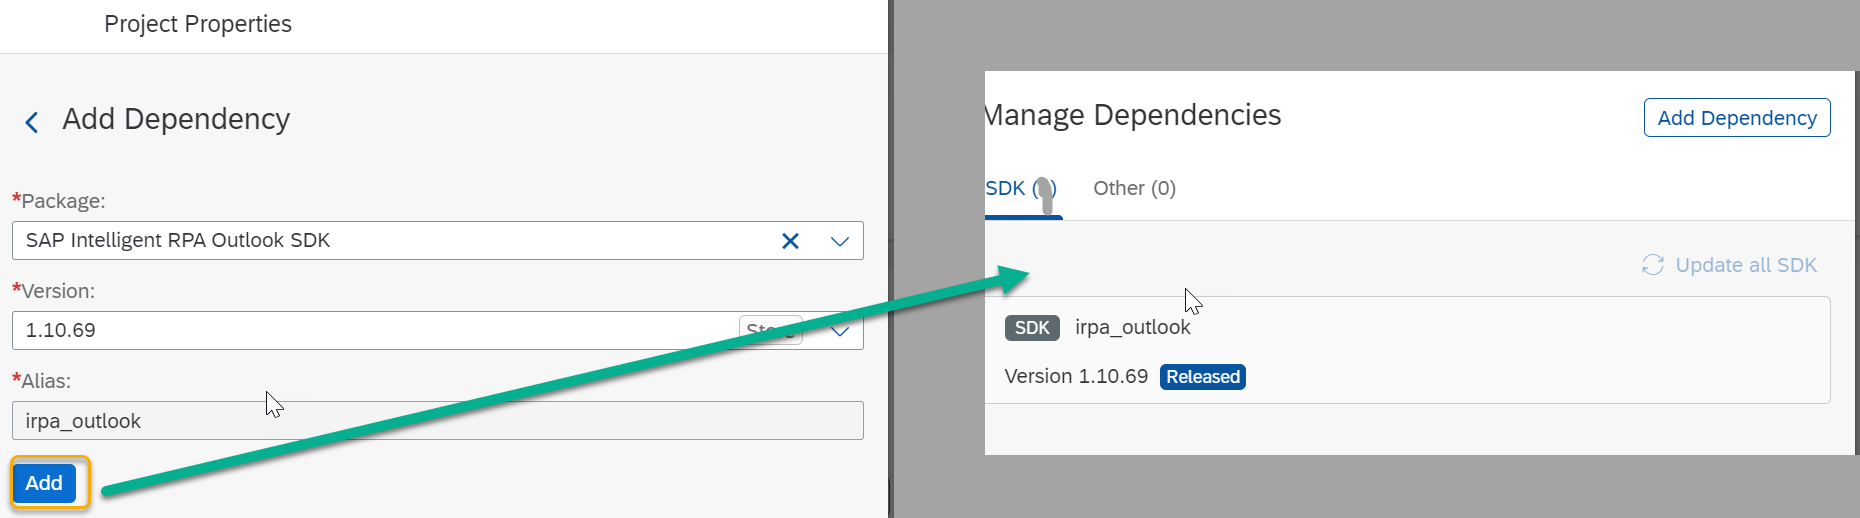
Fig 6.6: Adding the Outlook SDK
- The Outlook SDK gets added in the dependency tab as shown in Fig6.7.

Fig 6.7: Added Outlook SDK in the Dependencies tab
- Once Outlook SDK is available in the dependency tab, John will search in the Tools section for Outlook SDK and he will find all the relevant outlook activities as shown in the Fig 6.8.

Fig 6.8: Searching for the Outlook SDK in the Tools section
Step 7: Add the activities such as Open Outlook Instance, Send Email and Release Outlook instance after the “closeSAP-Applications” as highlighted in the Fig7.

Fig 7: Adding the Outlook Activities
Step 8: John now needs to edit “Send Email” step with relevant information. Before that he needs to identify the File path of excel file with the Goods Receipt list. To retrieve the file path, he needs to click Step set file path and then he can see the Input Parameters.
In the value section there is “outputPath”, he needs to click edit option and can find the file path information as highlighted in the Screenshot Fig 8.1.

Fig 8.1: Saved Excel File path information
It is also critical for John to identify the right excel before emailing to the respective stakeholders. As already mentioned in Step 6 excel is saved with timestamp to uniquely identify the downloaded excel file. John uses the timestamp of the current excel downloaded to identify the excel file uniquely. There is a script provided by SAP for generating the timestamp which can be used as highlighted in the screenshot Fig8.2.

Fig 8.2: Timestamp Script provided by SAP
Step 9:
- To set the file path in the email section click the activity “Send email”.
- Select Input parameter as Custom Data as shown in the Fig 9.1.

Fig 9.1: Adding Custom Input Parameters to Send Email Activity
- Enter the relevant information such as To, CC, Subject, attachment path and so on as shown in the Fig9.2.
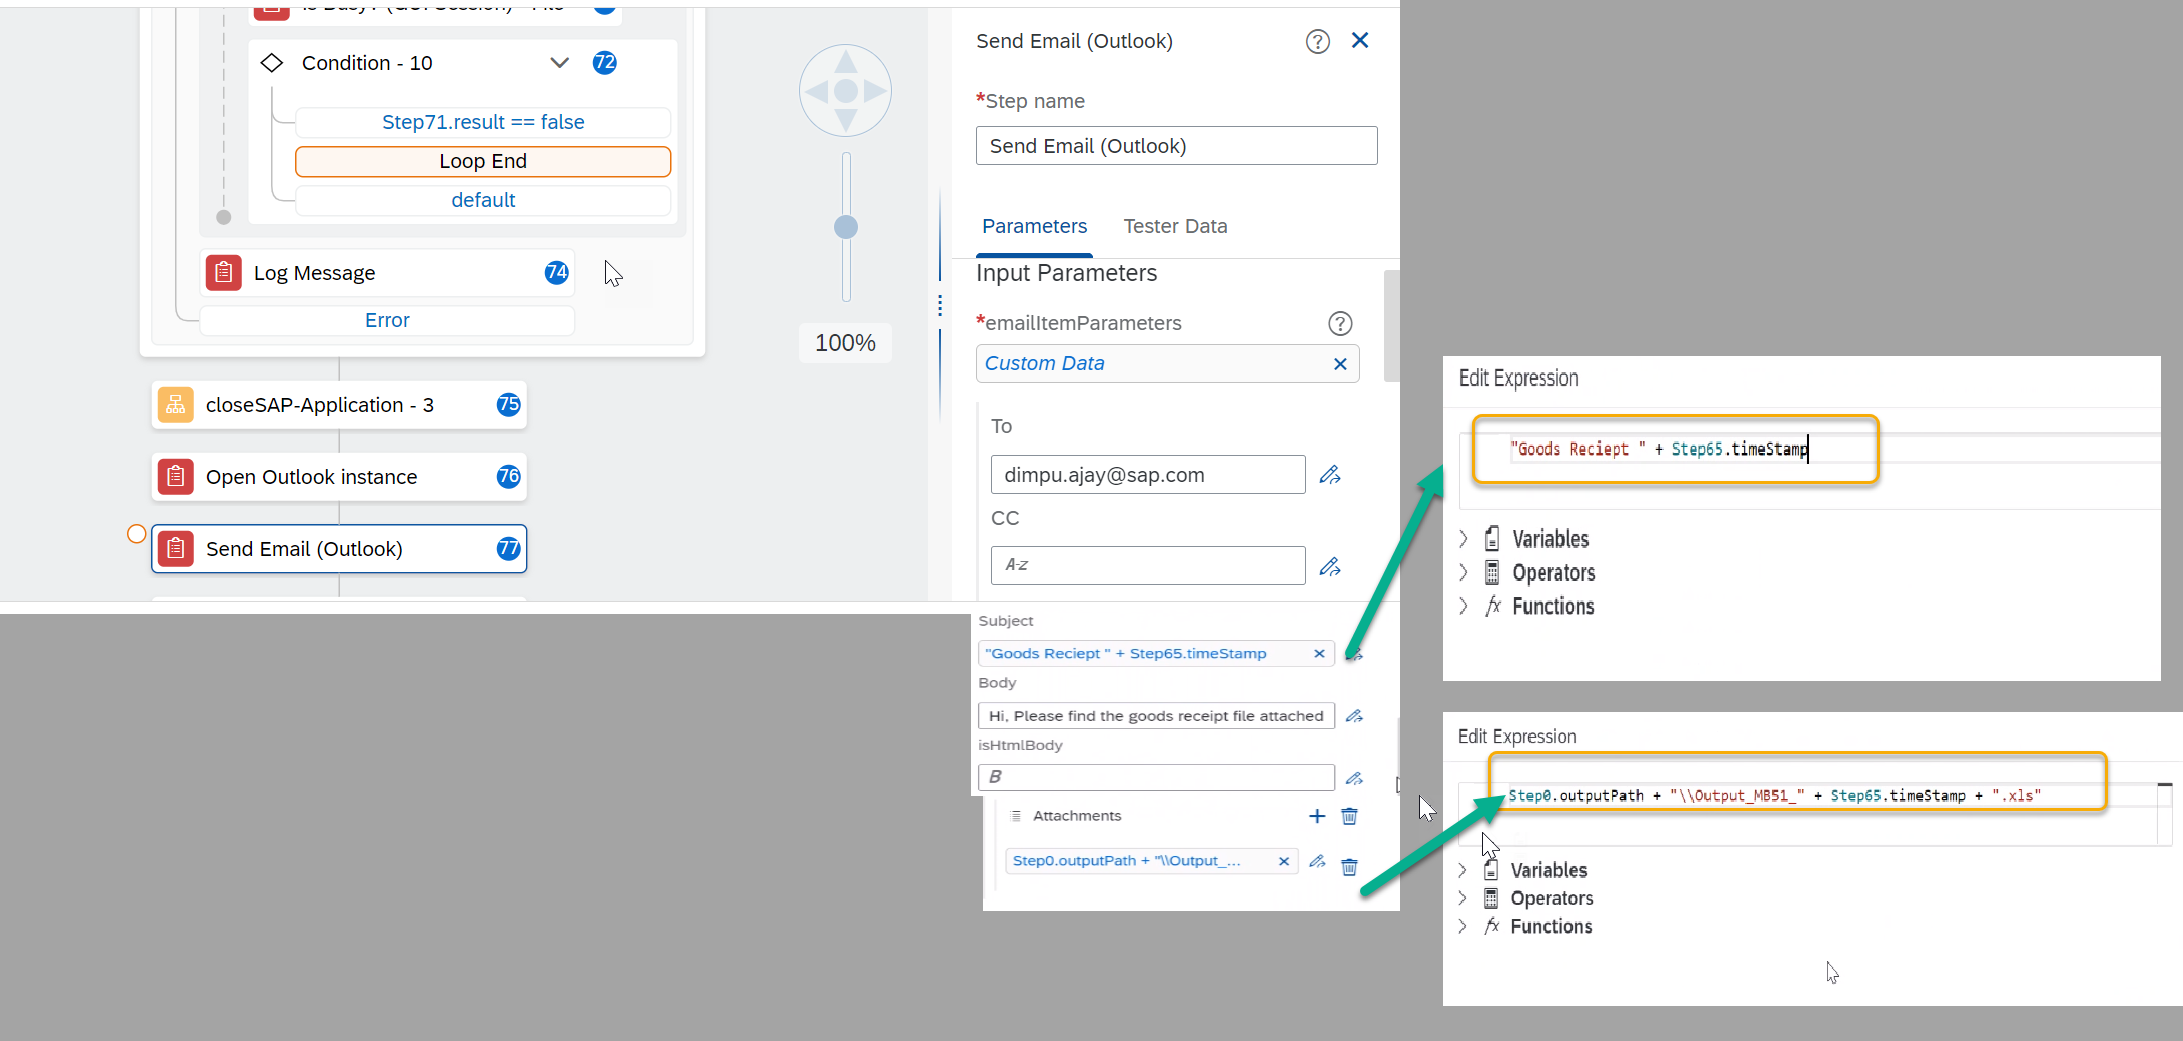
Fig 9.2: Enter the parameters
- The Excel file name should be unique such that one can identify the excel. So, we identify using the timestamp as shown in the Fig9.3.

Fig 9.3: Path of the downloaded Excel File
- Subject of the Email is uniquely identified using the timestamp as shown in the Fig9.4

Fig 9.4: Subject of the Email
Step 10: Save the automation and click test to run the Project as shown in the Fig10.1

Fig 10.1: Run the bot
- Once the project starts, it will open the excel template from the below folder and reads the excel template as shown in the Fig10.2.
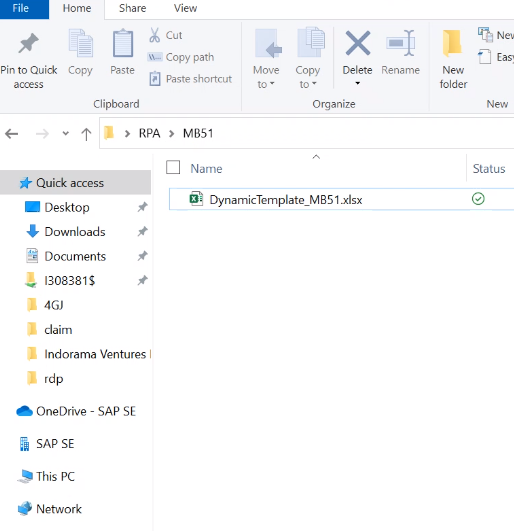
Fig 10.2: Reads Excel Template from the given input Path
- System details are read along with MB51 transaction parameters as shown in the Fig10.3 and 10.4.

Fig 10.3 : Reads the system information from the excel template

Fig 10.4: Reads the Variant for the material list from the Excel template
- Opens the SAP GUI and logins to relevant system as shown in the Fig10.5.

Fig 10.5: Starts SAP Logon
- Once logged in, navigates to the MB51 transaction as depicted in the Fig10.6.

Fig10.6: Login to the required system
- Selects the required variant and it runs the report as shown in the screenshot Fig10.7 to 10.9.

Fig 10.7

Fig 10.8

Fig 10.9
- After the report run, the file will be saved and then downloaded message will be displayed as shown in the Fig 10.10 to 10.12.

Fig 10.10

Fig 10.11 excel file downloaded message

Fig 10.12: Newly Downloaded Excel of Goods Receipt List
- Subsequently, bot sends an email to relevant stake holder as shown in the Fig10.13.

Fig 10.13: Email triggered with an Excel File attached
Note: In the above example, John has hardcoded the email id in the step. However, it can also be passed as an input in excel template or as a variable while executing the BOT.
Summary: Once the requirement is clear within any project, we would need to identify the scenarios supported by SAP standard bot. Once analyzed, it is easier to enhance based on the custom requirement.
Reference:
Cloud Studio User Guide
Bot Store User Guide
- SAP Managed Tags:
- SAP Intelligent Robotic Process Automation,
- SAP S/4HANA Public Cloud
Labels:
You must be a registered user to add a comment. If you've already registered, sign in. Otherwise, register and sign in.
Labels in this area
-
Artificial Intelligence (AI)
1 -
Business Trends
363 -
Business Trends
21 -
Customer COE Basics and Fundamentals
1 -
Digital Transformation with Cloud ERP (DT)
1 -
Event Information
461 -
Event Information
24 -
Expert Insights
114 -
Expert Insights
153 -
General
1 -
Governance and Organization
1 -
Introduction
1 -
Life at SAP
415 -
Life at SAP
2 -
Product Updates
4,685 -
Product Updates
211 -
Roadmap and Strategy
1 -
Technology Updates
1,502 -
Technology Updates
89
Related Content
- SAP S/4HANA Cloud, public edition, ABAP Environment Case 8: Material Shelf Life Management in Enterprise Resource Planning Blogs by SAP
- Building Low Code Extensions with Key User Extensibility in SAP S/4HANA and SAP Build in Enterprise Resource Planning Blogs by SAP
- Downloading Your Business Configuration Adaptations in SAP Central Business Configuration in Enterprise Resource Planning Blogs by SAP
- Boost SCM Efficiency: Mat. Shelf Life Mgmt App Empowers Intelligent Decision-Making for Enterprises in Enterprise Resource Planning Blogs by SAP
- SAP S/4HANA Cloud Extensions with SAP Build Best Practices: An Expert Roundtable in Enterprise Resource Planning Blogs by SAP
Top kudoed authors
| User | Count |
|---|---|
| 11 | |
| 10 | |
| 6 | |
| 6 | |
| 4 | |
| 4 | |
| 4 | |
| 3 | |
| 3 | |
| 3 |