

- SAP Community
- Products and Technology
- Technology
- Technology Blogs by SAP
- The Case For Theta : Part 2
Technology Blogs by SAP
Learn how to extend and personalize SAP applications. Follow the SAP technology blog for insights into SAP BTP, ABAP, SAP Analytics Cloud, SAP HANA, and more.
Turn on suggestions
Auto-suggest helps you quickly narrow down your search results by suggesting possible matches as you type.
Showing results for
Product and Topic Expert
Options
- Subscribe to RSS Feed
- Mark as New
- Mark as Read
- Bookmark
- Subscribe
- Printer Friendly Page
- Report Inappropriate Content
05-05-2021
10:24 PM
...delving into the details
In introductory post of this series, I lay out a explanation of and reasoning for potential enterprise use-cases for Theta blockchain technology. Please read that first as we're going to jump right into getting set up for development.
https://blogs.sap.com/2021/05/04/the-case-for-theta
Dev Setup
You will need a subscription to Business Application Studio(BAS) details here.
Go to the url of your BAS subscription and create a new DevSpace. Name it and select the Cloud Application type and click Create Dev Space.
I've created a sample project the we can leverage. As I add to this blog series, I'll add release to the repo. Clone it in the projects folder.
git clone https://github.com/SAP-samples/btp-blockchain-theta.git

git checkout v2.0
I've also created an extension that acts as a helper to install additional tools that are not build into BAS. Open the Extension manager and search for "sappe" and install "BAS Extras".

Installing the extension doesn't do much itself other than create a new set of command that can be found under View -> Find Command... Click on BAS: Install NOTROOT first.
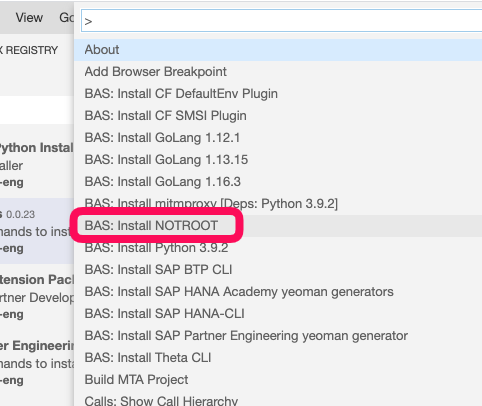
You can check the progress by viewing the output for NOTROOT installer.
Also repeat the procedure to install the CF DefaultEnv Plugin and the Theta CLI
Similar to the last post, check that you can query the Theta Mainnet with the following in a new terminal.
curl -X POST -H 'Content-Type: application/json' --data '{"jsonrpc":"2.0","method":"theta.GetStatus","params":[],"id":1}' https://theta-bridge-rpc.thetatoken.org/rpc | jq .Notice I'm piping the output through jq to make it easier to read. Here we see that we are querying the public Mainnet.

Verify that the thetacli is working by attempting to list the local keys (wallet) with this.
thetacli key listYou should get the following.

These are the wallet addresses that are set up by default for testing. Of these, two of them are preloaded with a quantity of THETA and TFuel tokens. The others are empty until you transfer(send) some tokens to them. Let's check the balance of the one starting 0x2EB...
thetacli query account --address=0x2E833968E5bB786Ae419c4d13189fB081Cc43bab
What's going on here? The thetacli tools defaults to trying to connect to a node running at localhost:16888. We haven't provided a test node yet but in the interim, if we want to use the thetacli to connect to the MainNet, we can configure it to do so by running this command to override the defaults.
echo "remoteRPCEndpoint: https://theta-bridge-rpc.thetatoken.org/rpc" > ~/.thetacli/config.yamlNow try the command again.
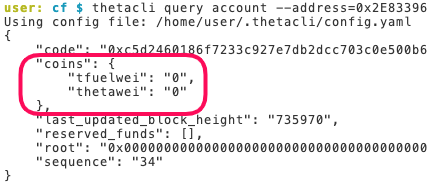
thetacli query account --address=0x2E833968E5bB786Ae419c4d13189fB081Cc43babThis wallet address also has a history on the mainnet. Notice that while records exist for this wallet, it had no current balance of THETA or TFuel tokens.
thetacli query statusSee that it's picking up our config.yaml file and indeed querying the mainnet.

When you are ready to go back to the localhost config, just delete or rename the config.yaml file.
Deploying the PrivateNet Node
The project sample provides a multi-target application(MTA) that is suitable for deployment in CloudFoundry. It requires that you deploy it into an org and space with the following entitlements.
- Cloud Foundry Runtime : MEMORY : 4 units
- Credential Store : Standard : 1 unit
In BAS use View -> Find Command -> CF : Login to Cloud Foundry to get logged in.
In the terminal run this to build and deploy the application and the privatenet node.
cd ~/projects/btp-blockchain-theta/cf

mkdir -p mta_archives

mbt build -p=cf -t=mta_archives --mtar=theta.mtar

cf deploy mta_archives/theta.mtar -f
When the deploy is completed, enable ssh on theta-privatenet and ssh to it.
cf enable-ssh theta-privatenet

cf restart theta-privatenet

cf ssh theta-privatenet
It can take some minutes to get the node server processes running. I you don't see "..Theta Private Net has started." just wait a few minutes and run this command "screen -ls" until you see one listed.
You should get this prompt. If so you're ssh'd into your deployed privatenet docker container.

The node server process has been started in the background using the screen utility. Connect to it with this.
screen -x thetaYou should see messages flying by that look like this.
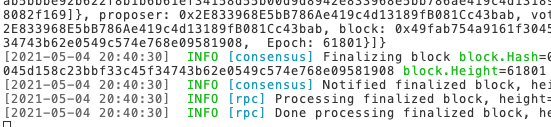
To detach from the screen program press control-A and then D. Type "exit" do disconnect from ssh.
I configured the privatenet node server to use port 8080 instead of the default 16888 so that when deployed in CloudFoundry it would be available through a route. So reconfiguring the thetacli can be done with this command.
echo "remoteRPCEndpoint: https://partner-prova-dev-theta-privatenet.cfapps.us21.hana.ondemand.com/rpc" > ~/.thetacli/config.yamlNow we can connect to our privatenet node server with thetacli.
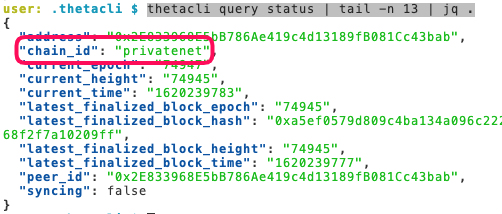
thetacli query status | tail -n 13 | jq .Notice that we are connecting to our privatenet node.
Now let's check the balance of that wallet as we did before on the mainnet.
thetacli query account --address=0x2E833968E5bB786Ae419c4d13189fB081Cc43babNotice that this wallet contains a lot more THETA and TFuel than on the mainnet. If your testing requires more, just start a fresh node.

How can we use the same wallet both on our privatenet as on the mainnet?
One of the things that took me a while to understand is how value is stored in a cryptocurrency wallet. The problem here I think is the use of the word "wallet". In the real world we think of a physical wallet as containing some amount of currency and we take this currency out of the wallet when we pay for something. Likewise when we get paid we can put our salary(currency) in the wallet for later spending. In crypto terms it would be more correct to think of a wallet as a key to a safe deposit box. You have the key but the stuff is sitting in a protected box at the bank. An even better analogy would be a special password that allowed you to use your key. Without the password and the key, you can't get your stuff out of the safe deposit box to send to someone. In actuality the secret allows you to use the key to encrypt a transaction that can only send something from out account. In the crypto world you can create a new empty wallet at any time and it will be unique and work across our privatenet, the mainnet, or testing networks but won't work on other non-Theta blockchains.
So if we want to have an application that can demonstrate a send operation on the blockchain, we need some ability to provide it the secret key without revealing it to anyone else. In the SAP BTP system there is credential store service that we'll use for this purpose.
Where can I store my private key so that application can use it to send?
In the BTP Cockpit, navigate to the subaccount where you have CloudFoundry enable and the application deployed. Select Instances and Subscriptions and click on the line with THETA_CRED.

This will expand a panel on the right side of the window. Click Manage Instance.

Now click Credential Store.

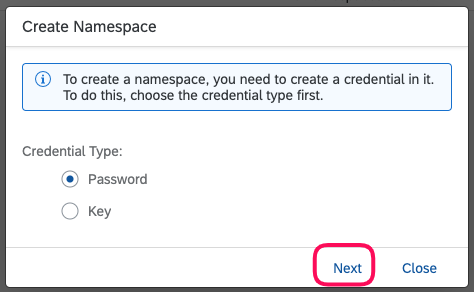
We can see that there are 0 passwords saved so far and no namespaces defined. Click Create Namespace to create it and an initial password.

Verify that the Credential Type is set to Password and click Next.
Now enter privatenet as the namespace and privkey as the name of the password. For the value, unzip the provided wallet.tgz file and display the contents of the qertyuiop.privkey file.
tar xzvf wallet.tgz

cat wallet/qwertyuiop.privkey
Make sure to copy the initial "0x" through the ending "737" but not any spaces or newlines.

Verify that you now have a namespace called privatenet.

And that there is a Password called privkey.

Note that if you ever undeploy the application or otherwise delete the THETA_CRED credstore instance, you'll loose the credentials you've stored and will have to re-create them as above.
Now let's test the application.
Find the url of the sample application by using this cf command in the org/space where it was deployed.
cf app theta-app | grep routesPaste that route into your browser. You should see this.

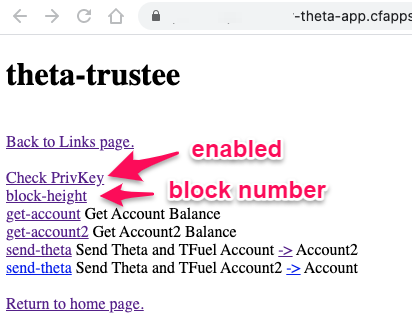
This is an MTA so you're seeing the app-router here. All the logic is in the trustee module. Click on the link. I've kept the UI very simple so that you can easily replace it with the front-end of your choice easily.
The Check PrivKey link should open a tab and show enabled indicating that the privkey was read from the credential store and is available for encrypting send transactions. This code this is in the server.js file located in the trustee folder near line 227.
app.get("/trustee/chkprivkey", function (req, res) {


	var responseStr = "";

	responseStr += "<!DOCTYPE HTML><html><head><title>ThetaTrustee</title></head><body><h1>theta-trustee</h1><br />";

	responseStr += "<a href=\"/trustee/links\">Back to Links page.</a><br />";

	responseStr += "<pre>\n";

	responseStr += privkey.status + "\n";

	responseStr += "</pre>\n";

	responseStr += "<a href=\"/\">Return to home page.</a><br />";

	responseStr += "</body></html>";

	res.status(200).send(responseStr);

});
The block-height link will open a tab with a number that is a simple call to the privatenet node api to indicate that calls are getting through. This code this is in the server.js file located in the trustee folder near line 254.
app.get("/trustee/block-height", async function (req, res) {


	var responseStr = "";

	responseStr += "<!DOCTYPE HTML><html><head><title>ThetaTrustee</title></head><body><h1>theta-trustee</h1><br />";

	responseStr += "<a href=\"/trustee/links\">Back to Links page.</a><br />";


	const blockHeight = await provider.getBlockNumber();


	responseStr += "<pre>\n";

	responseStr += blockHeight + "\n";

	responseStr += "</pre>\n";


	responseStr += "<a href=\"/\">Return to home page.</a><br />";

	responseStr += "</body></html>";

	res.status(200).send(responseStr);

});
 \
\
The get-account and get-account2 links show the account balances of those to wallets/accounts.
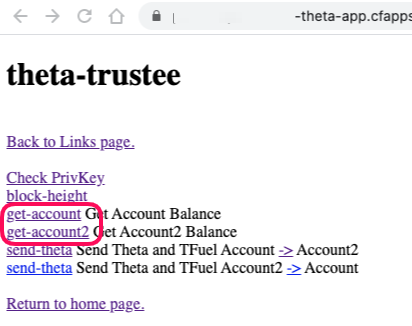
Notice that I adjusted the wei(which is the smallest division possible) values to normal Theta and TFuel so that it's easier to read the values. Details in the code near line 371.
app.get("/trustee/get-account", async function (req, res) {


	var responseStr = "";

	responseStr += "<!DOCTYPE HTML><html><head><title>ThetaTrustee</title></head><body><h1>theta-trustee</h1><br />";

	responseStr += "<a href=\"/trustee/links\">Back to Links page.</a><br />";


	// thetacli query account --address=2E833968E5bB786Ae419c4d13189fB081Cc43bab | jq .coins

	var account = await provider.getAccount(address);

	console.log("account :" + JSON.stringify(account.coins,null,2));


	responseStr += "<pre>\n";

	responseStr += "account  : " + address + "\n";

	responseStr += JSON.stringify(account.coins,null,2) + "\n";

	responseStr += "theta:  " + (account.coins.thetawei / 1000000000000000000) + "\n";

	responseStr += "tfuel: " + (account.coins.tfuelwei / 1000000000000000000) + "\n";

	responseStr += "</pre>\n";


	responseStr += "<a href=\"/\">Return to home page.</a><br />";

	responseStr += "</body></html>";

	res.status(200).send(responseStr);

});
Now it's time to execute a send transaction. The send-theta link will preview the transaction not send it. The "->" link will actually perform the send.

In the send-theta function that handles these, we first need to query for the last known sequence number for the wallet.
		const count = await provider.getTransactionCount(from);

		responseStr += "last sequence count :" + count + "\n";
Then we dynamically create a wallet object with the secret key information we've stored in the credential store and connect it to our provider(privatenet in this case).
		const wallet = new Wallet(use_privkey.value);

		const connectedWallet = wallet.connect(provider);
Then we create some values to send using special large unsigned custom types.
		const ten18 = (new BigNumber(10)).pow(18); // 10^18, 1 Theta = 10^18 ThetaWei, 1 Gamma = 10^ TFuelWei


		const thetaWeiToSend = (new BigNumber(1.0)).multipliedBy(ten18);


		const tfuelWeiToSend = (new BigNumber(10.0)).multipliedBy(ten18);
Finally we create an object to represent the send.
		const txData = {

			from: from,

			outputs: [

				{

					address: to,

					thetaWei: thetaWeiToSend,

					tfuelWei: tfuelWeiToSend,

                    sequence: count + 1

				}

			]

		};
Create a transaction object with the transaction data.
const transaction = new SendTransaction(txData);
And send it while waiting for the response.
const txresult = await connectedWallet.sendTransaction(transaction);
Once it's finished we grab the returned transaction hash that uniquely identifies the transaction and query it's details.
const block = await provider.getTransaction(blockHash);
There is some timing code in there as well so that we can keep track of how long the transaction is taking. This will come into play in part 3 of this blog series. If we look at the output we can see that there is a fee section in the transaction and even though we're sending 1 Theta and 10 TFuel, the inputs(sender) is adjusted to deduct the amount requested plus the fee while the outputs(receiver) just gets the amounts we specified.

At the price in USD of TFuel as of the writing of this blog post, the charge is equal to about 1/3 of a thousandth of a cent. Or pretty small. Compare that to what Etherium charges for a transaction. I've tested this on the mainnet as well and the verified that the fee is the same there, not just in testing.
What about the off-chain payments you mentioned?
I know I've skipped over a lot of the details about how the code works including the details of how the transaction payload is encrypted and signed in preparation for the send transaction. You can find the docs for all the API calls here.
API Reference
NodeJS library Reference
And the primary source of all docs related to Theta.
https://docs.thetatoken.org
In the next blog post in this series(Part 3), I'll explore the off-chain micropayments feature and implement a test to measure the performance of that approach. For the impatient, give this white-paper a read and you'll be in a great mindset for my next installment.
Building the Theta Protocol: Part IV
Off-Chain Micropayment Support
Let me know if you have and questions or issues by leaving me a question below or better yet, asking it on the SAP community.
-Andrew
| Partners: If you have a question, click here to ask it in the SAP Community . Be sure to tag it with Partnership and leave your company name in the question so that we can better assist you. |
- SAP Managed Tags:
- SAP Business Application Studio,
- SAP BTP, Cloud Foundry runtime and environment,
- Blockchain
Labels:
11 Comments
You must be a registered user to add a comment. If you've already registered, sign in. Otherwise, register and sign in.
Labels in this area
-
ABAP CDS Views - CDC (Change Data Capture)
2 -
AI
1 -
Analyze Workload Data
1 -
BTP
1 -
Business and IT Integration
2 -
Business application stu
1 -
Business Technology Platform
1 -
Business Trends
1,661 -
Business Trends
86 -
CAP
1 -
cf
1 -
Cloud Foundry
1 -
Confluent
1 -
Customer COE Basics and Fundamentals
1 -
Customer COE Latest and Greatest
3 -
Customer Data Browser app
1 -
Data Analysis Tool
1 -
data migration
1 -
data transfer
1 -
Datasphere
2 -
Event Information
1,400 -
Event Information
64 -
Expert
1 -
Expert Insights
178 -
Expert Insights
270 -
General
1 -
Google cloud
1 -
Google Next'24
1 -
Kafka
1 -
Life at SAP
784 -
Life at SAP
11 -
Migrate your Data App
1 -
MTA
1 -
Network Performance Analysis
1 -
NodeJS
1 -
PDF
1 -
POC
1 -
Product Updates
4,578 -
Product Updates
323 -
Replication Flow
1 -
RisewithSAP
1 -
SAP BTP
1 -
SAP BTP Cloud Foundry
1 -
SAP Cloud ALM
1 -
SAP Cloud Application Programming Model
1 -
SAP Datasphere
2 -
SAP S4HANA Cloud
1 -
SAP S4HANA Migration Cockpit
1 -
Technology Updates
6,886 -
Technology Updates
395 -
Workload Fluctuations
1
Related Content
- CIG transaction tracker handling in Technology Q&A
- Consuming SAP with SAP Build Apps - Connectivity options for low-code development - part 2 in Technology Blogs by SAP
- explore the business continuity recovery sap solutions on AWS DRS in Technology Blogs by Members
- Unlocking Full-Stack Potential using SAP build code - Part 1 in Technology Blogs by Members
- Cloud Integration: Manually Sign / Verify XML payload based on XML Signature Standard in Technology Blogs by SAP
Top kudoed authors
| User | Count |
|---|---|
| 11 | |
| 10 | |
| 10 | |
| 10 | |
| 8 | |
| 7 | |
| 7 | |
| 7 | |
| 7 | |
| 6 |