
- SAP Community
- Products and Technology
- Technology
- Technology Blogs by SAP
- Install ABAP Platform 1909 - Dev Edition on an Azu...
Technology Blogs by SAP
Learn how to extend and personalize SAP applications. Follow the SAP technology blog for insights into SAP BTP, ABAP, SAP Analytics Cloud, SAP HANA, and more.
Turn on suggestions
Auto-suggest helps you quickly narrow down your search results by suggesting possible matches as you type.
Showing results for
Advisor
Options
- Subscribe to RSS Feed
- Mark as New
- Mark as Read
- Bookmark
- Subscribe
- Printer Friendly Page
- Report Inappropriate Content
04-30-2021
3:49 PM
In this tutorial, I will shed more light on why an ABAPer or developer who requires just a test system for experimentation should choose the ABAP Platform Dev edition over another feature rich but expensive alternative. We will then get our hands dirty and set up an ABAP instance on Azure with the necessary minisap certificates.
This tutorial is split into two parts with Part 1 focusing on Azure (creating the ubuntu instance and logging in) and Part 2 focusing on the installation and access to the ABAP platform.
If you are already conversant with MS Azure and can create your instance without following a tutorial, you can simply read the introduction section of Part 1 and then go ahead to create an ubuntu instance in Azure with 4 virtual CPUs and 28GiB+ of RAM. You can continue from Part 2 after that to complete the next steps of this tutorial series.
Prerequisite setup
Process blueprint
Introduction
As coders, we run into several situations where we would like to test snippets of code on a local system before even implementing the snippet in a dev system. In certain instances, we as developers would want to use code QA tools like the ABAP Test Cockpit and either do not have the authorizations to access the tool or are not comfortable with setting it up in a customer system.
My goto setup to get a personal system was the SAP Cloud Appliance Library (SAP CAL), It serves the purpose it was designed for perfectly. It is very well built and very intuitive to use while requiring very little interaction with the underlying technologies to get up and running in a test ABAP environment. The only apparent downside with regards to SAP CAL is the fact that it is a bit of an overkill for what a developer might want to use the system for, which warrants its relatively heavy price tag. The cost break down of running an an SAP NetWeaver AS ABAP 7.51 SP02 on HANA Dev system as at the time of writing this post is:
2.90 USD per hour when Active which evaluates to 2088 USD per month when Active, if my calculations are right.
As a test system, most developers will not leave their system running 24/7 over the course of the month but I’m sure we all have experiences to share regarding forgetting to shut down our instance for a week or more and having to shell out some “hard” cash to cover the fees.
With the latest release of the SAP ABAP Platform, we as developers who require just a test system to experiment with our code do not have to generate a CAL instance but can get up and running with a minimalist setup for as little as 60 USD per month when Active, which is a meagre 2.87% of what a developer would have to pay for an equivalent SAP CAL instance.
With the cost-benefit analysis out of the way, let us now focus our attention on how to get up and running in an ABAP Platform 1909 Dev edition on an Azure Ubuntu Instance.
Step 1: Create and login into an ubuntu instance on Azure.
Logon to your microsoft Azure portal and under Azure Services choose Virtual Machines
Create an ubuntu instance with the size A4m_v2 or an equivalent 4vcpu and above 28GB RAM instance. Please visit the Pricing Calculator | Microsoft Azure to check out the various instances and the costs based on the region you choose. Also to understand the purpose of each of the types of Azure Virtual Machines, you can visit this link. In the spirit of cost saving, it is very important to choose the Azure Spot instance and select the Eviction Type and Eviction Policy shown in the image below. This will almost halve your monthly fees for the VM.
Fill the rest of the entries as shown below. It is important to take a note of your username and password as this will be used to login into the instance later on. Finally, click the Next : Disks > button at the bottom of the page to create a disk for your instance.
On the Disks tab, choose the Standard HDD OS Disk type as it is marginally cheaper and performant enough for what we need it for. With that said, you do not mind splurging a bit more for an SSD, I would definitely recommend that as there is a noticeable increase in speed when using the SSD instead of HDD. Next, click on the Create and attach a new disk button as shown in the image below.
In the detail page that opens up, click the change size button.
Ensure the Disk SKU is still Standard HDD. After choosing the 256 GiB click the OK button at the bottom of the detail page.
Confirm that everything looks good and click the OK button as shown below.
We now have the necessary parts of our Virtual Machine setup so the next step is to click the Review + Create button, after making sure the Disk size and Disk type match what is shown in the image below.
On the review page, ensure that everything looks okay and click the Create button.
Once the virtual machine and the disks are successfully deployed, you will be presented with a page that looks like the image shown below. Please click the Go to resource button to be sent to the detail page of the provisioned virtual machine.
On the detail page of the virtual machine, what we need is the username you noted down while creating the virtual machine and the public IP address which is highlighted in the image below. We need these details to login into our ubuntu instance via SSH.
Now open your terminal in mac or cmd/powershell in windows. No matter which shell you use as your terminal, just enter:
An example is
As show in the images below.
For a mac terminal:
Once you’re logged in you should see.
Follow the same steps for both powershell and command prompt in windows as shown below. If you are having issues with ssh in command prompt, it is possible because you don’t have it enabled in your windows installation. Please follow this microsoft tutorial to enable SSH in your windows installation.
With our successful login into our ubuntu instance in MS Azure under our belts, this brings us to the end of Part 1 of this tutorial series. In Part 2 we will prepare our data drive, install docker and install ABAP 1909 Dev edition with the help of docker.
If you run into any issues while following this tutorial, please leave a comment under the tutorial or ask in the SAP community pages and I’m sure myself or one of the other readers will be able to provide some assistance.
See you in Part 2!!!
This tutorial is split into two parts with Part 1 focusing on Azure (creating the ubuntu instance and logging in) and Part 2 focusing on the installation and access to the ABAP platform.
If you are already conversant with MS Azure and can create your instance without following a tutorial, you can simply read the introduction section of Part 1 and then go ahead to create an ubuntu instance in Azure with 4 virtual CPUs and 28GiB+ of RAM. You can continue from Part 2 after that to complete the next steps of this tutorial series.
Prerequisite setup
- A microsoft azure subscription.
- A dockerhub account (login credentials needed).
- A basic understanding of bash or your favourite ubuntu shell.
- A SAPGUI installation.
Process blueprint
- Create and login into an ubuntu instance on Azure.
- Prepare the data drive on your ubuntu instance.
- Install docker and move docker data directory to the prepared data drive.
- Install ABAP Platform 1909 Dev Edition with docker.
- Open the necessary ports on Azure.
- Access your ABAP instance in SAP GUI and generate a new license.
Introduction
As coders, we run into several situations where we would like to test snippets of code on a local system before even implementing the snippet in a dev system. In certain instances, we as developers would want to use code QA tools like the ABAP Test Cockpit and either do not have the authorizations to access the tool or are not comfortable with setting it up in a customer system.
My goto setup to get a personal system was the SAP Cloud Appliance Library (SAP CAL), It serves the purpose it was designed for perfectly. It is very well built and very intuitive to use while requiring very little interaction with the underlying technologies to get up and running in a test ABAP environment. The only apparent downside with regards to SAP CAL is the fact that it is a bit of an overkill for what a developer might want to use the system for, which warrants its relatively heavy price tag. The cost break down of running an an SAP NetWeaver AS ABAP 7.51 SP02 on HANA Dev system as at the time of writing this post is:
2.90 USD per hour when Active which evaluates to 2088 USD per month when Active, if my calculations are right.

Image 1: Cost calculator for running an SAP NetWeaver AS ABAP 7.51 SP02 on HANA Dev system.
As a test system, most developers will not leave their system running 24/7 over the course of the month but I’m sure we all have experiences to share regarding forgetting to shut down our instance for a week or more and having to shell out some “hard” cash to cover the fees.
With the latest release of the SAP ABAP Platform, we as developers who require just a test system to experiment with our code do not have to generate a CAL instance but can get up and running with a minimalist setup for as little as 60 USD per month when Active, which is a meagre 2.87% of what a developer would have to pay for an equivalent SAP CAL instance.


Image 2: Azure Pricing for running ABAP Platform 1909 Dev Edition in docker
With the cost-benefit analysis out of the way, let us now focus our attention on how to get up and running in an ABAP Platform 1909 Dev edition on an Azure Ubuntu Instance.
Step 1: Create and login into an ubuntu instance on Azure.
Logon to your microsoft Azure portal and under Azure Services choose Virtual Machines

Image 3: Services overview page

Image 4: Add virtual machine page
Create an ubuntu instance with the size A4m_v2 or an equivalent 4vcpu and above 28GB RAM instance. Please visit the Pricing Calculator | Microsoft Azure to check out the various instances and the costs based on the region you choose. Also to understand the purpose of each of the types of Azure Virtual Machines, you can visit this link. In the spirit of cost saving, it is very important to choose the Azure Spot instance and select the Eviction Type and Eviction Policy shown in the image below. This will almost halve your monthly fees for the VM.

Image 5: Create a virtual machine
Fill the rest of the entries as shown below. It is important to take a note of your username and password as this will be used to login into the instance later on. Finally, click the Next : Disks > button at the bottom of the page to create a disk for your instance.

Image 6: Virtual machine security settings.
On the Disks tab, choose the Standard HDD OS Disk type as it is marginally cheaper and performant enough for what we need it for. With that said, you do not mind splurging a bit more for an SSD, I would definitely recommend that as there is a noticeable increase in speed when using the SSD instead of HDD. Next, click on the Create and attach a new disk button as shown in the image below.

Image 7: Create and attach disk
In the detail page that opens up, click the change size button.

Image 8: Create a new disk
Ensure the Disk SKU is still Standard HDD. After choosing the 256 GiB click the OK button at the bottom of the detail page.

Image 9: Select a disk size
Confirm that everything looks good and click the OK button as shown below.

Image 10: Confirm disk details
We now have the necessary parts of our Virtual Machine setup so the next step is to click the Review + Create button, after making sure the Disk size and Disk type match what is shown in the image below.

Image 11: Review and create virtual machine
On the review page, ensure that everything looks okay and click the Create button.

Image 12: Confirm virtual machine details and create
Once the virtual machine and the disks are successfully deployed, you will be presented with a page that looks like the image shown below. Please click the Go to resource button to be sent to the detail page of the provisioned virtual machine.
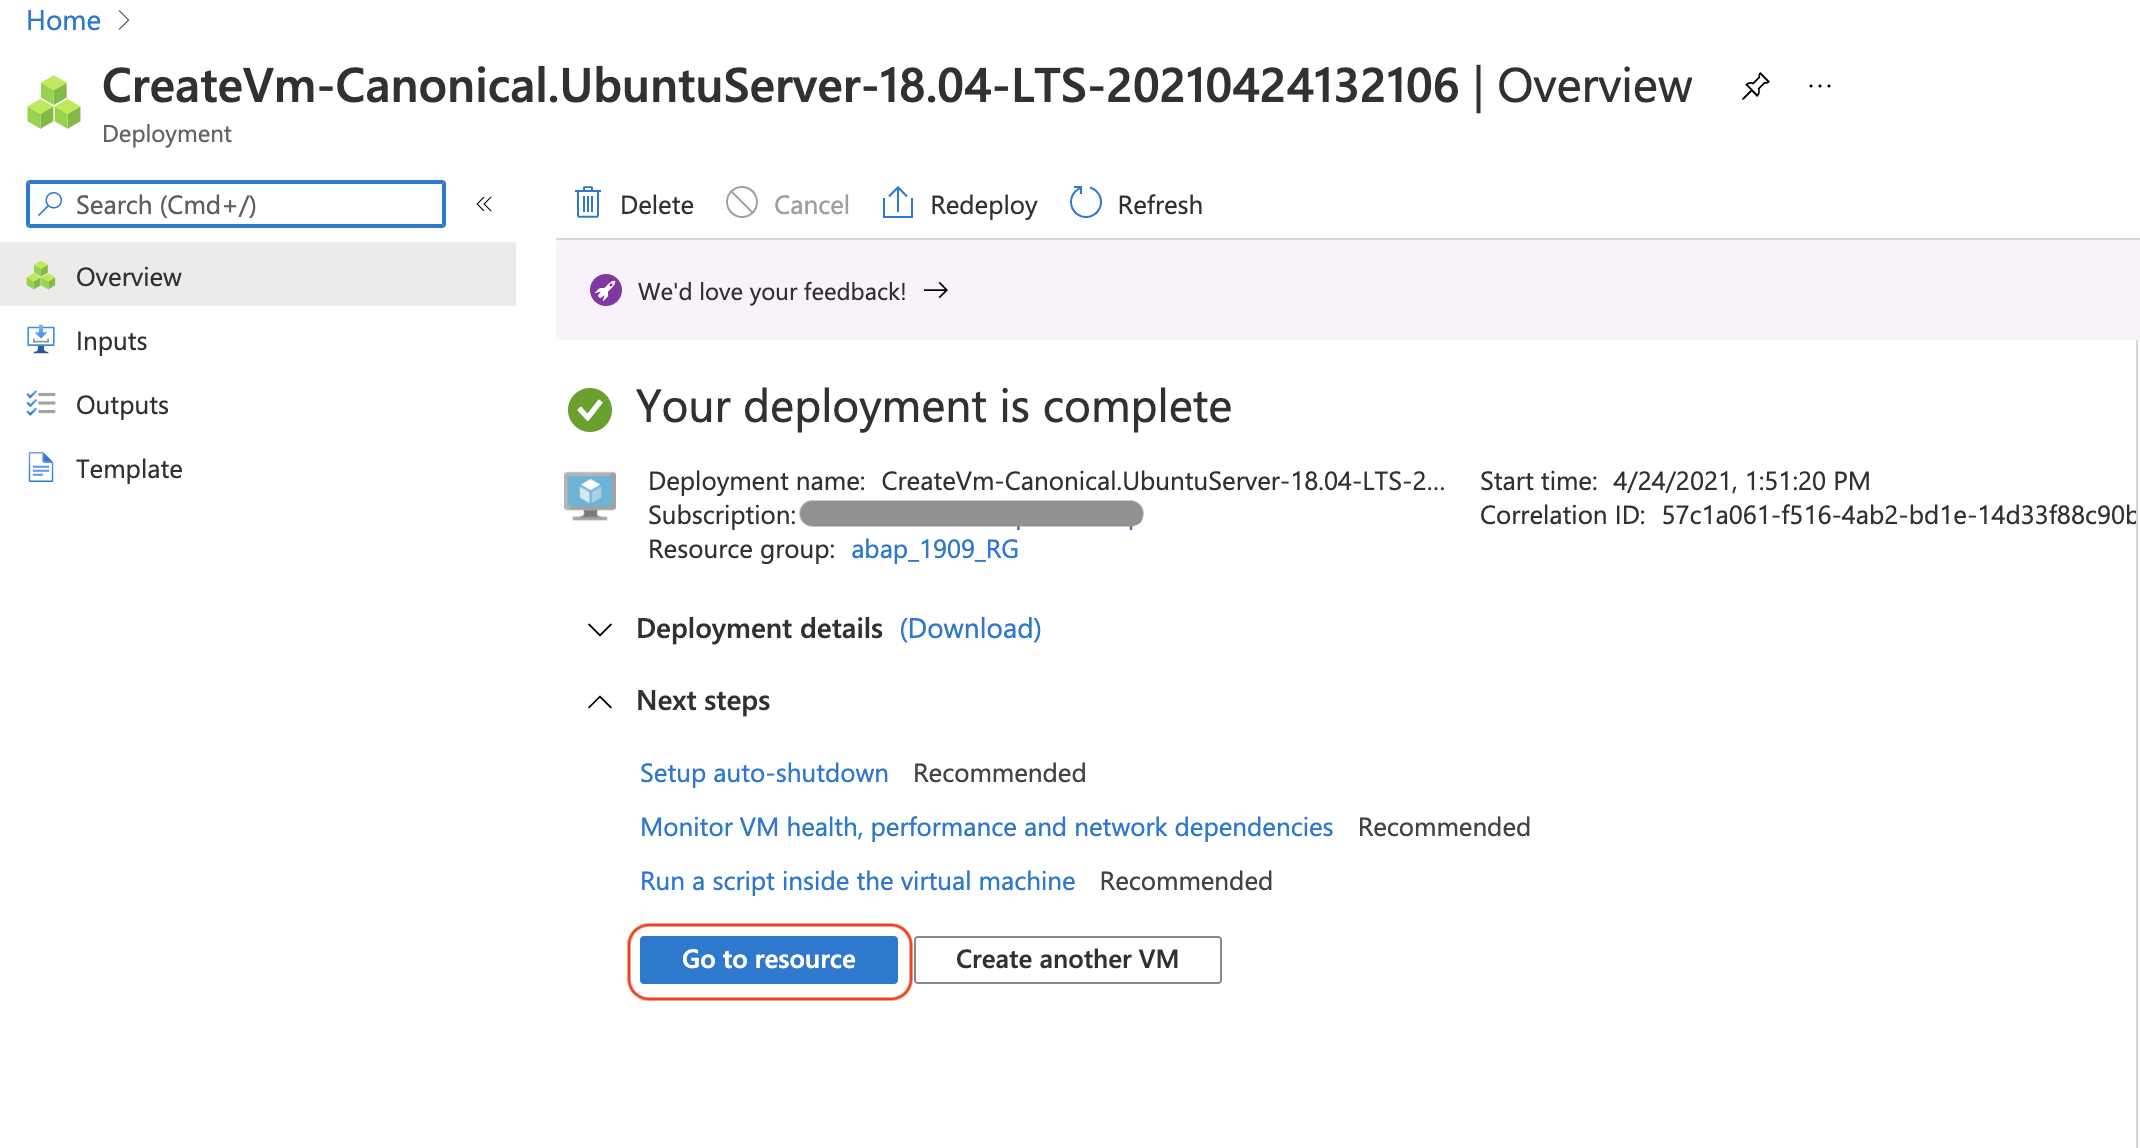
Image 13: Go to resource
On the detail page of the virtual machine, what we need is the username you noted down while creating the virtual machine and the public IP address which is highlighted in the image below. We need these details to login into our ubuntu instance via SSH.

Image 14: Copy public IP address
Now open your terminal in mac or cmd/powershell in windows. No matter which shell you use as your terminal, just enter:
ssh <username>@<ip_address>An example is
ssh samdavies@104.214.219.138As show in the images below.
For a mac terminal:

Image 15: SSH into virtual machine
Once you’re logged in you should see.

Image 16: Mac terminal SSH login
Follow the same steps for both powershell and command prompt in windows as shown below. If you are having issues with ssh in command prompt, it is possible because you don’t have it enabled in your windows installation. Please follow this microsoft tutorial to enable SSH in your windows installation.


Image 17: Command prompt successful SSH logon
With our successful login into our ubuntu instance in MS Azure under our belts, this brings us to the end of Part 1 of this tutorial series. In Part 2 we will prepare our data drive, install docker and install ABAP 1909 Dev edition with the help of docker.
If you run into any issues while following this tutorial, please leave a comment under the tutorial or ask in the SAP community pages and I’m sure myself or one of the other readers will be able to provide some assistance.
See you in Part 2!!!
Labels:
You must be a registered user to add a comment. If you've already registered, sign in. Otherwise, register and sign in.
Labels in this area
-
ABAP CDS Views - CDC (Change Data Capture)
2 -
AI
1 -
Analyze Workload Data
1 -
BTP
1 -
Business and IT Integration
2 -
Business application stu
1 -
Business Technology Platform
1 -
Business Trends
1,658 -
Business Trends
103 -
CAP
1 -
cf
1 -
Cloud Foundry
1 -
Confluent
1 -
Customer COE Basics and Fundamentals
1 -
Customer COE Latest and Greatest
3 -
Customer Data Browser app
1 -
Data Analysis Tool
1 -
data migration
1 -
data transfer
1 -
Datasphere
2 -
Event Information
1,400 -
Event Information
69 -
Expert
1 -
Expert Insights
177 -
Expert Insights
326 -
General
1 -
Google cloud
1 -
Google Next'24
1 -
GraphQL
1 -
Kafka
1 -
Life at SAP
780 -
Life at SAP
13 -
Migrate your Data App
1 -
MTA
1 -
Network Performance Analysis
1 -
NodeJS
1 -
PDF
1 -
POC
1 -
Product Updates
4,575 -
Product Updates
374 -
Replication Flow
1 -
REST API
1 -
RisewithSAP
1 -
SAP BTP
1 -
SAP BTP Cloud Foundry
1 -
SAP Cloud ALM
1 -
SAP Cloud Application Programming Model
1 -
SAP Datasphere
2 -
SAP S4HANA Cloud
1 -
SAP S4HANA Migration Cockpit
1 -
Technology Updates
6,872 -
Technology Updates
458 -
Workload Fluctuations
1
Related Content
- 10+ ways to reshape your SAP landscape with SAP Business Technology Platform – Blog 7 in Technology Blogs by SAP
- AppRouter path mapping – Custom Domain in Technology Blogs by Members
- revamped SAP First Guidance Collection in Technology Blogs by Members
- Integration between SAP and One Identity in Technology Blogs by SAP
- What’s New for SAP Start – May 2024 in Technology Blogs by SAP
Top kudoed authors
| User | Count |
|---|---|
| 21 | |
| 8 | |
| 8 | |
| 6 | |
| 6 | |
| 6 | |
| 6 | |
| 6 | |
| 5 | |
| 5 |