
- SAP Community
- Products and Technology
- Technology
- Technology Blogs by SAP
- Modeling in SAP HANA Cloud (part 3): building calc...
Technology Blogs by SAP
Learn how to extend and personalize SAP applications. Follow the SAP technology blog for insights into SAP BTP, ABAP, SAP Analytics Cloud, SAP HANA, and more.
Turn on suggestions
Auto-suggest helps you quickly narrow down your search results by suggesting possible matches as you type.
Showing results for
Developer Advocate
Options
- Subscribe to RSS Feed
- Mark as New
- Mark as Read
- Bookmark
- Subscribe
- Printer Friendly Page
- Report Inappropriate Content
04-23-2021
8:11 PM
So, in the previous parts, we worked to set up the project in SAP Business Application Studio and add a User-Provided Service that would allow us to do the modeling in SAP HANA Cloud. These models will be used in SAP Analytics Cloud later on.
Now it is time to create some calculation views!
As mentioned in part 1 the assumption is that you've done already some of the recommended tutorials, so many basic operations, and steps not need to be explained in these posts.
As a result of data generation and loads, we have multiple tables from the TPC-DS data model that supports multiple star schemas: sales, returns, inventory.
In this first exercise, we will focus on the Inventory star schema that should help us to illustrate a few interesting aspects while working on the smallest subset of the tables: 1 fact table
As you will see we need to remember that all data in these tables are generated and therefore we might need or want to modify some of them.
First, let's create a feature development branch
Create the first dimension calcview:
Let's create the first calculation view by following the menu path View | Find Command... | SAP HANA: Create SAP HANA Database Artifact.
It is going to be a calculation view (1) called
The file is created and initially is unstaged accordingly to Git version management.
Let's add a source to its Projection's node. The Find Data Sources dialog is open.
The source of data is a table
Let's restrict the search to objects containing
As this is the first synonym we are creating for an object from the
Because we haven't done this before it is a good time now to click on Generate .hdbgrants File option and assign corresponding roles
There are a few things happening after you click Finish in that dialog.
Two files
Let's have a closer look at these steps.
The
Let's have a look at the generated file...
...and the result of the file's deployment as seen in the Roles Management in the Cockpit app.
The
While the role allowing to SELECT data from objects in
Although design-time resources must be free of explicit schema references in order to enable deployment into ..., only
Let's check the result of the deployment, e.g. in the Database Explorer.
Finalize
Open a projection node and map only these 6 columns:
It should be enough for our exercise.
In the semantics node let's modify labels to make them more business user-friendly. I did not label the surrogate key
Once the modeling of the calculation view is completed and the artifact is deployed, we can preview the data right from the editor in the Business Application Studio. Right-click the projection node and choose Data Preview.
Let’s commit our changes to the local Git repository.
We used the previous calcview editor to generate a synonym required by the calculation view modeled. It sounds like a good idea to create all synonyms at once required by all calcviews we might want to build.
We want to mass-create synonyms for all tables from the schema
First, let's remove two unnecessary entries:
...and deploy the file now, which should generate synonyms for all 25 tables from
Create the
Now, let create the next file
...and populate the form with dimension data category of the type standard.
In the projection node add a data source based on the synonym
...and in Mapping add fields
As you remember we are working with the machine-generated test data, where descriptions are mostly just some random texts, so we will create our own calculated column
In the semantics node let's add user-friendly labels for business columns...
...and deploy the calculation view and preview the data. E.g. we can understand how many different items (aggregation
Create the
Now, let create the next file
Use the projection node to map columns from the source:
and to create a calculated column
Update labels in the semantics node...
...and deploy the view to be able to preview the data.
Create the
Now that all three dimensions have been created it is time to finally create the cube.
Create a new file
Add a projection node as an input to the star join node. Add
Now add previously created three dimensions as data sources to the star join node...
...and join all three fact table's
Now, because we are working with Inventory data, it would not make sense to aggregate stock numbers for multiple days! We need to restrict requests for data to only one single date.
While still in the star join node open parameters and add a new variable
And last, but not least action in the star join node is to map our only measure column
Finally, in the semantics node:
Let's deploy the calculation view and preview the data. This time a parameters view opens first with value help working as we defined...
...and the filter is applied to the data selected.
We have our cube with a star join built and ready!
Before we close this post let’s commit our changes to the local Git repository.
And with that, we are all set to use SAP Analytics Cloud to analyze data from this cube stored in SAP HANA Cloud as the next step.
-Vitaliy, aka @Sygyzmundovych
Now it is time to create some calculation views!
As mentioned in part 1 the assumption is that you've done already some of the recommended tutorials, so many basic operations, and steps not need to be explained in these posts.
Scope the exercise to the Inventory cube
As a result of data generation and loads, we have multiple tables from the TPC-DS data model that supports multiple star schemas: sales, returns, inventory.
In this first exercise, we will focus on the Inventory star schema that should help us to illustrate a few interesting aspects while working on the smallest subset of the tables: 1 fact table
Inventory and three dimension tables Date_Dim, Warehouse, Item.
From: TPC BENCHMARK DS, Standard Specification, Version 2.13.0
As you will see we need to remember that all data in these tables are generated and therefore we might need or want to modify some of them.
Create a development branch
First, let's create a feature development branch
calcviews in our code.git checkout -b calcviews
git statusCreate the first dimension calcview: Date_Dim
Let's create the first calculation view by following the menu path View | Find Command... | SAP HANA: Create SAP HANA Database Artifact.

It is going to be a calculation view (1) called
Date_Dim (2) with the label Date (3). And it will be a dimension (4) of the type standard (5).The file is created and initially is unstaged accordingly to Git version management.

Let's add a source to its Projection's node. The Find Data Sources dialog is open.

The source of data is a table
DATE_DIM in the classic schema TPCDS, which is an external schema from the perspective of our project's target HDI container. Therefore it can be seen only via an external service UPS4TPCDS created in the previous post.Let's restrict the search to objects containing
DATE_ and pick a service UPS4TPCDS from the list of external services. Next, we need to create a synonym in our local target container's schema, so click Create Synonym.As this is the first synonym we are creating for an object from the
UPS4TPCDS-delivered schema, we first need to grant roles or privileges to technical users from our target HDI container: to the object owner OO and to application users _RT.
Because we haven't done this before it is a good time now to click on Generate .hdbgrants File option and assign corresponding roles
SELECT_TPCDS_WITH_GRANT and SELECT_TPCDS, which we created in the previous post, and assigned to the UPS user TPC_USER with WITH ADMIN priviledge.There are a few things happening after you click Finish in that dialog.

Two files
UPS4TPCDS.hdbgrants and UPS4TPCDS.hdbsynonym have been created (1) and automatically deployed (2). After that, the local synonym vital.tpcds::DATE_DIM has been added as a data source (3) in the projection node of the calculation view we are building.Let's have a closer look at these steps.
.hdbgrants file
The
.hdbgrants configuration file enables you to assign privileges (via roles in our example) to the owner (#OO user of our project's target container) of the synonym object (here `vital.tpcds::DATE_DIM`) and the application users (_RT users) of the synonym's target objects (in our case "TPCDS"."DATE_DIM" table.Let's have a look at the generated file...

{

  "UPS4TPCDS": {

    "object_owner": {

      "roles": [ "SELECT_TPCDS_WITH_GRANT" ]

    },

    "application_user": {

      "roles": [ "SELECT_TPCDS" ]

    }

  }

}
...and the result of the file's deployment as seen in the Roles Management in the Cockpit app.

The
_WITH_GRANT role has been assigned to the object owner user with #OO postfix.
While the role allowing to SELECT data from objects in
"TPCDS" schema, but without grant privilege has become a part of the role TPCDS_HDI_DB_1::access_role that is assigned to every _RT consumer user. In our example, there is only one such user for now..hdbsynonym file
Although design-time resources must be free of explicit schema references in order to enable deployment into ..., only
.hdbsynonym file has been generated because the synonym is referencing an object in the classic schema.
Let's check the result of the deployment, e.g. in the Database Explorer.

Finalize Date_Dim calculation view
Open a projection node and map only these 6 columns:
D_DATE_SKD_DATED_MOYD_QOYD_YEARD_DAY_NAME
It should be enough for our exercise.

In the semantics node let's modify labels to make them more business user-friendly. I did not label the surrogate key
_SK, because it is a technical field not visible to end-users.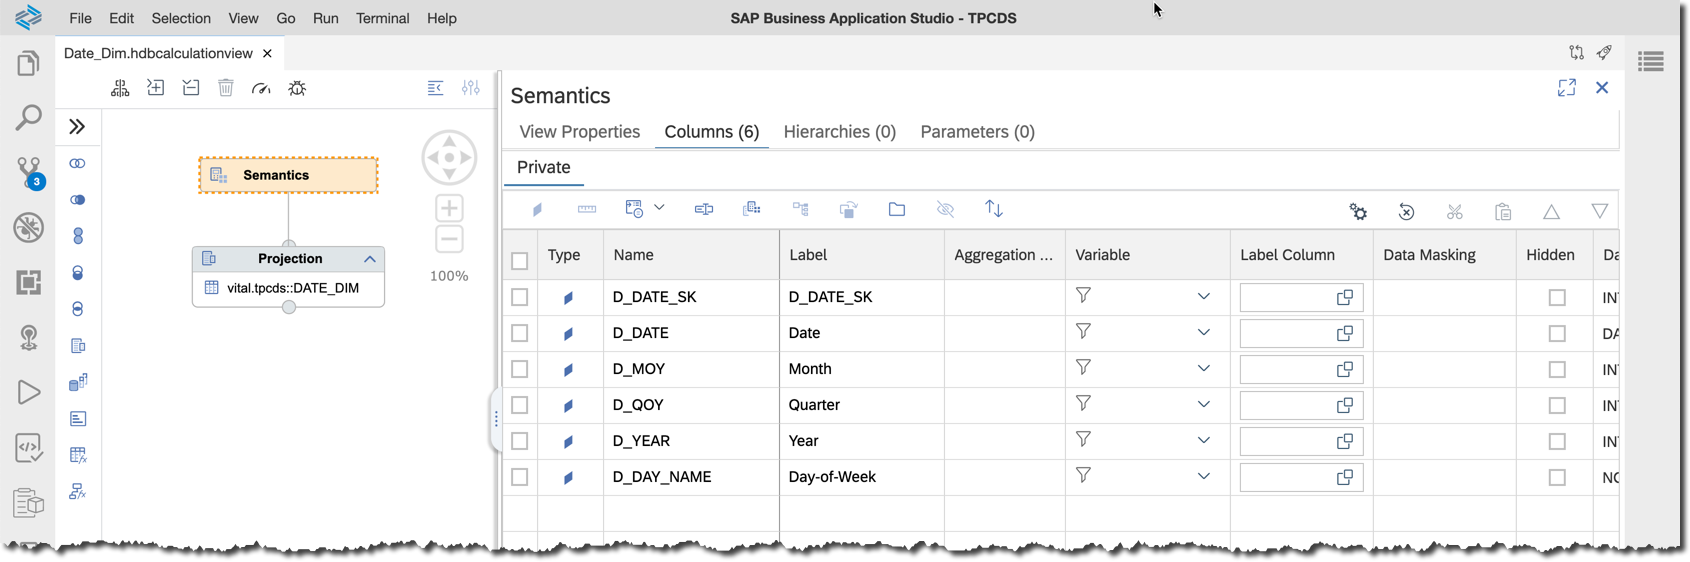
Once the modeling of the calculation view is completed and the artifact is deployed, we can preview the data right from the editor in the Business Application Studio. Right-click the projection node and choose Data Preview.

Make sure you click on the node and not on the data source name inside the node, as this will open the preview of data from the synonym.
Commit changes to the local git repo
Let’s commit our changes to the local Git repository.
git status

git add db/src/

git commit -am "Date_Dim calc view"

git hist
Mass import of synonyms
We used the previous calcview editor to generate a synonym required by the calculation view modeled. It sounds like a good idea to create all synonyms at once required by all calcviews we might want to build.

We want to mass-create synonyms for all tables from the schema
TPCDS available via the service UPS4TPCDS.
First, let's remove two unnecessary entries:
vital.tpcds::DATE_DIM_1vital.tpcds::DUMMY

...and deploy the file now, which should generate synonyms for all 25 tables from
TPCDS schema.~/sap/hdbclient/hdbsql -U HDI_DB_RT -A \
"SELECT SCHEMA_NAME,SYNONYM_NAME,OBJECT_SCHEMA,OBJECT_NAME,OBJECT_TYPE FROM SYNONYMS WHERE SCHEMA_NAME LIKE 'TPCDS%'"
Create the Item dimension calcview
Now, let create the next file
Item.hdbcalculationview directly from the Explorer...
...and populate the form with dimension data category of the type standard.

In the projection node add a data source based on the synonym
vital.tpcds::ITEM already existing in the project's HDI container...
...and in Mapping add fields
I_ITEM_SKI_ITEM_IDI_CURRENT_PRICEI_CLASSI_CATEGORY

As you remember we are working with the machine-generated test data, where descriptions are mostly just some random texts, so we will create our own calculated column
I_CC_NAME with a simple name of items constructed from the text Product and item's surrogate ID using the expression CONCAT('Product ', "I_ITEM_SK").
In the semantics node let's add user-friendly labels for business columns...

...and deploy the calculation view and preview the data. E.g. we can understand how many different items (aggregation
COUNT) we have in particular categories.
Create the Warehouse dimension calcview
Now, let create the next file
Warehouse.hdbcalculationview which will be another standard dimension with the synonym `vital.tpcds::WAREHOUSE` as a data source.Use the projection node to map columns from the source:
W_WAREHOUSE_SKW_WAREHOUSE_IDW_CITYW_STATEW_COUNTRY
and to create a calculated column
W_CC_NAME with the expression CONCAT('Warehouse# ', "W_WAREHOUSE_SK").Update labels in the semantics node...

...and deploy the view to be able to preview the data.

Create the Inventory cube calcview with the star join
Now that all three dimensions have been created it is time to finally create the cube.
Create a new file
Inventory.hdbcalculationview in the db/src/ folder, and make sure it is defined as a CUBE with Star Join when opening.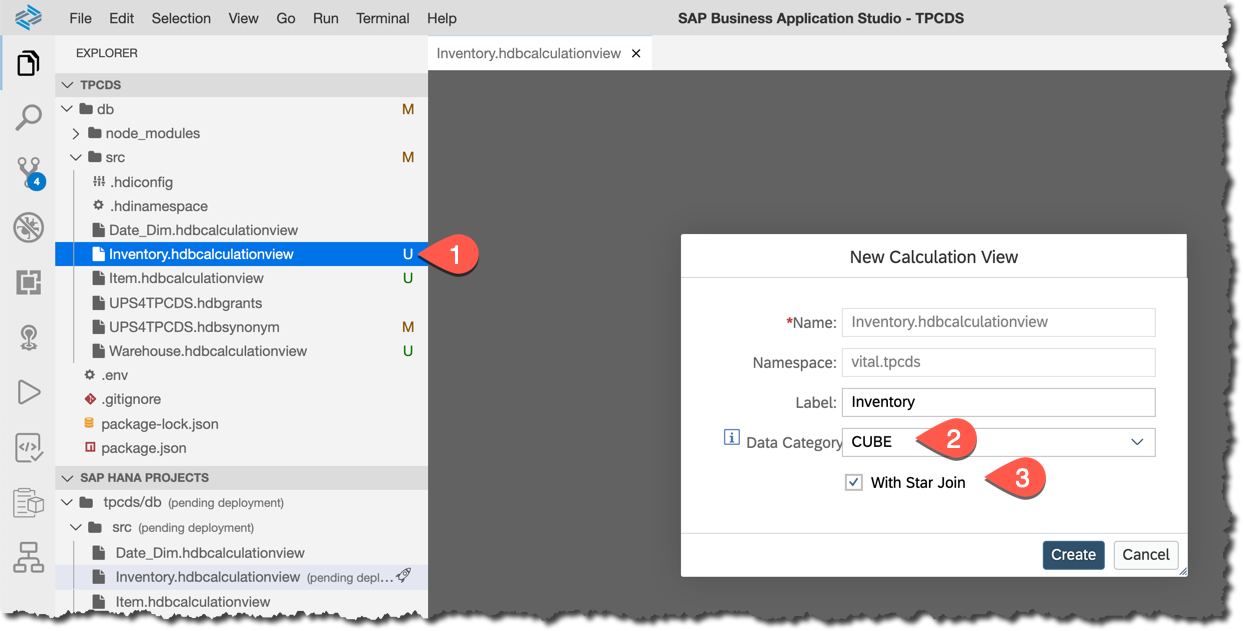
Add a projection node as an input to the star join node. Add
vital.tpcds::INVENTORY synonym as a data source of the projection node and map all 4 columns to the output of the projection.
Now add previously created three dimensions as data sources to the star join node...

...and join all three fact table's
Projection_1 columns with surrogate keys with corresponding columns in dimensions. Set joins' cardinality to n..1.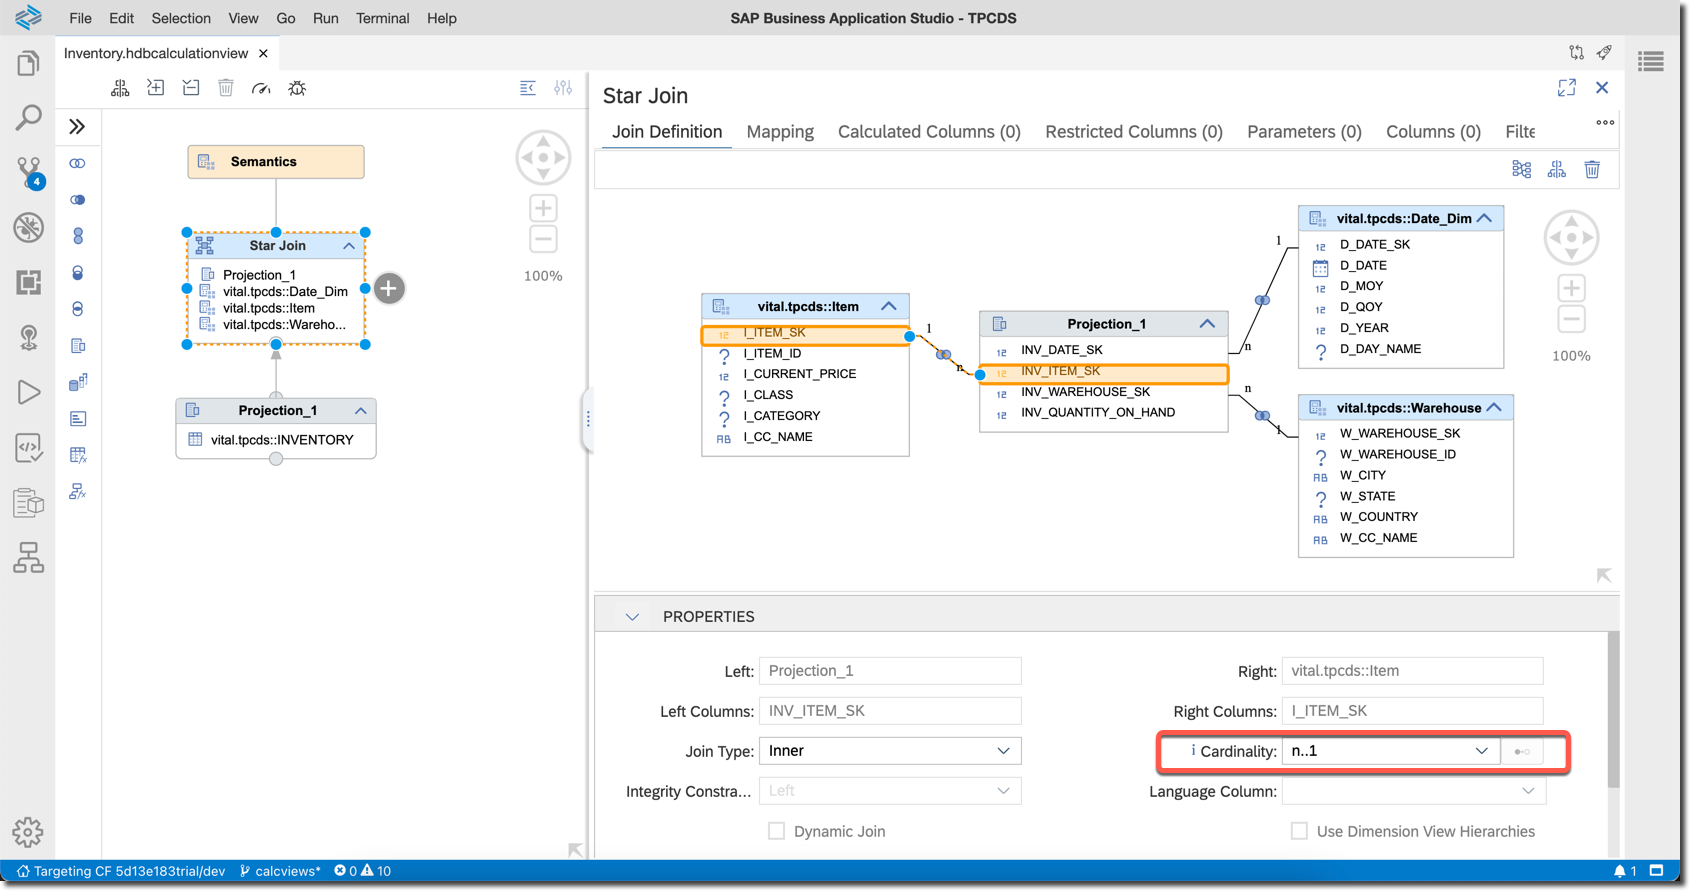
Now, because we are working with Inventory data, it would not make sense to aggregate stock numbers for multiple days! We need to restrict requests for data to only one single date.
While still in the star join node open parameters and add a new variable
VAR_DATE_REPORT with:- a mandatory single value selection type,
vital.tpcds::Inventoryas value help, andvital.tpcds::Date_Dim.D_DATEreference column.

And last, but not least action in the star join node is to map our only measure column
INV_QUANTITY_ON_HAND to the output.
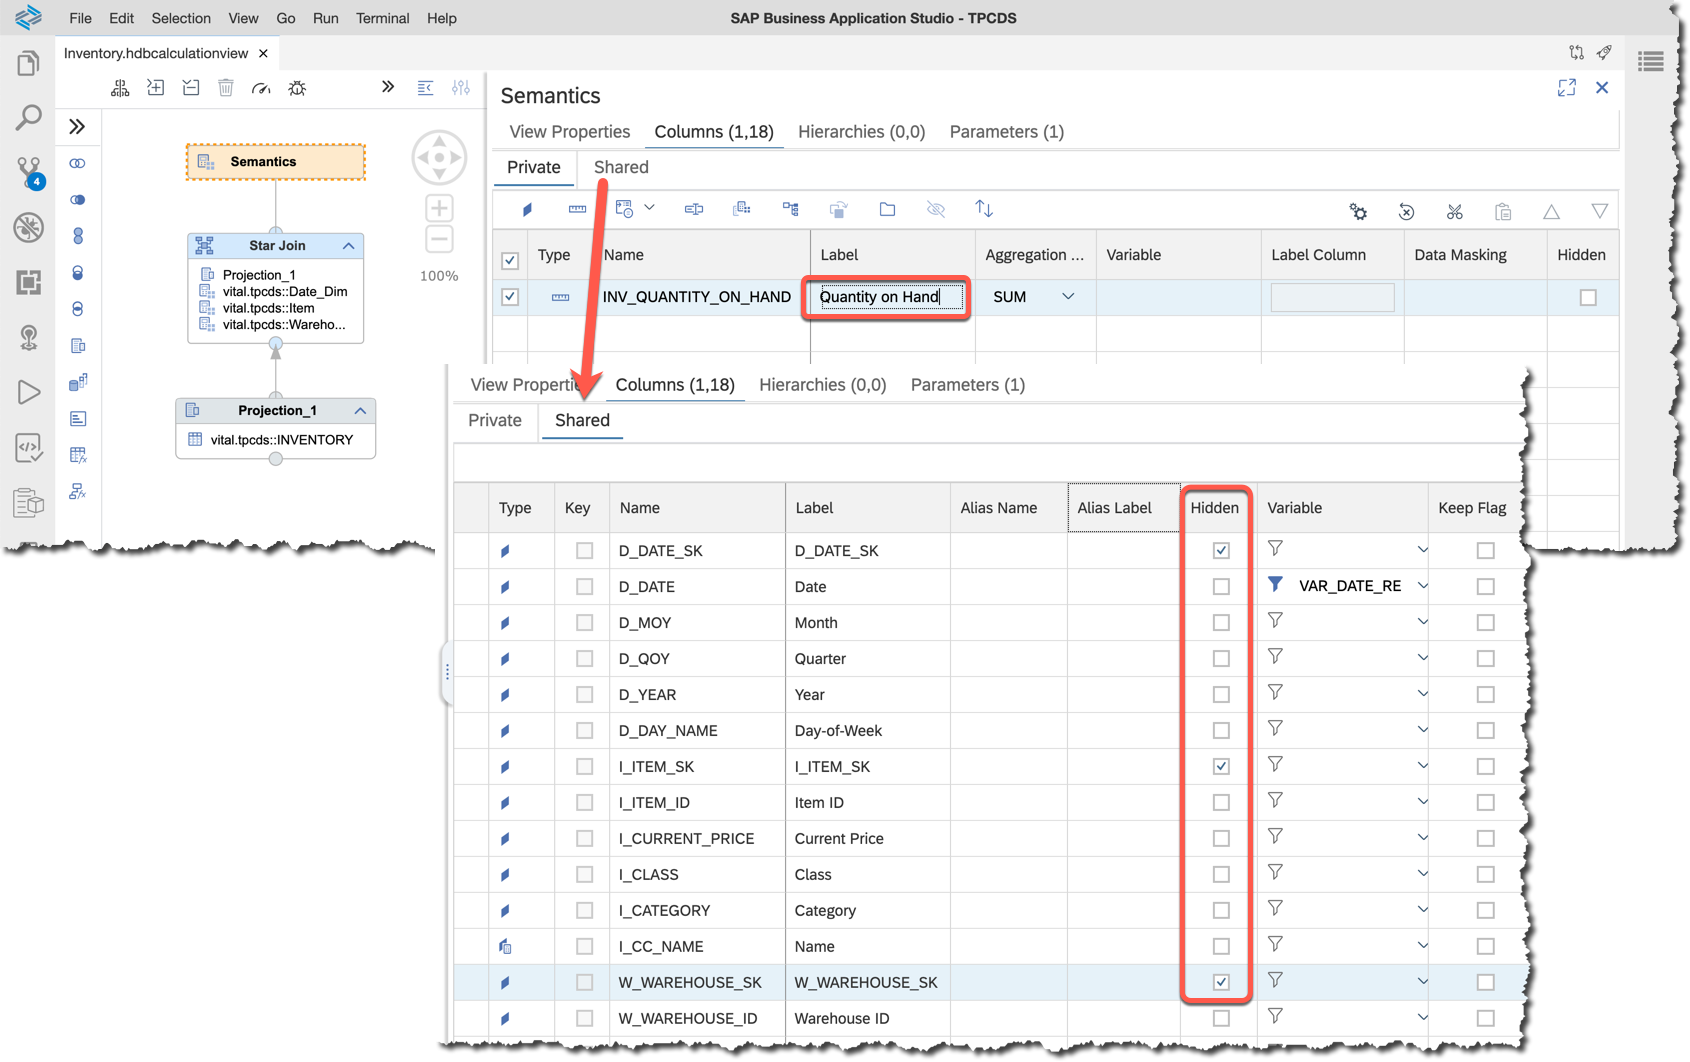
Finally, in the semantics node:
- Change the label of the "private" column to `Quantity on Hand`,
- Change "shared" surrogate columns
SKto hidden.
Let's deploy the calculation view and preview the data. This time a parameters view opens first with value help working as we defined...

...and the filter is applied to the data selected.

We have our cube with a star join built and ready!
Commit changes to the local Git repository
Before we close this post let’s commit our changes to the local Git repository.
git add --all

git commit -am "Calc views for Inventory"

git hist
And with that, we are all set to use SAP Analytics Cloud to analyze data from this cube stored in SAP HANA Cloud as the next step.
-Vitaliy, aka @Sygyzmundovych
- SAP Managed Tags:
- SAP Business Application Studio,
- SAP HANA Cloud,
- SQL,
- SAP HANA
Labels:
You must be a registered user to add a comment. If you've already registered, sign in. Otherwise, register and sign in.
Labels in this area
-
ABAP CDS Views - CDC (Change Data Capture)
2 -
AI
1 -
Analyze Workload Data
1 -
BTP
1 -
Business and IT Integration
2 -
Business application stu
1 -
Business Technology Platform
1 -
Business Trends
1,661 -
Business Trends
87 -
CAP
1 -
cf
1 -
Cloud Foundry
1 -
Confluent
1 -
Customer COE Basics and Fundamentals
1 -
Customer COE Latest and Greatest
3 -
Customer Data Browser app
1 -
Data Analysis Tool
1 -
data migration
1 -
data transfer
1 -
Datasphere
2 -
Event Information
1,400 -
Event Information
64 -
Expert
1 -
Expert Insights
178 -
Expert Insights
273 -
General
1 -
Google cloud
1 -
Google Next'24
1 -
Kafka
1 -
Life at SAP
784 -
Life at SAP
11 -
Migrate your Data App
1 -
MTA
1 -
Network Performance Analysis
1 -
NodeJS
1 -
PDF
1 -
POC
1 -
Product Updates
4,577 -
Product Updates
326 -
Replication Flow
1 -
RisewithSAP
1 -
SAP BTP
1 -
SAP BTP Cloud Foundry
1 -
SAP Cloud ALM
1 -
SAP Cloud Application Programming Model
1 -
SAP Datasphere
2 -
SAP S4HANA Cloud
1 -
SAP S4HANA Migration Cockpit
1 -
Technology Updates
6,886 -
Technology Updates
403 -
Workload Fluctuations
1
Related Content
- Error: "Instantiation of calculation model failed ...........' on drilling up/down in a chart in SAC in Technology Q&A
- SAC - Add Row total to Dimension Subtotal? in Technology Q&A
- GRC Risk Management Series: Risk Analysis profile in Technology Blogs by Members
- What’s New in SAP Analytics Cloud Release 2024.07 in Technology Blogs by SAP
- SAP Datasphere - Space, Data Integration, and Data Modeling Best Practices in Technology Blogs by SAP
Top kudoed authors
| User | Count |
|---|---|
| 13 | |
| 10 | |
| 10 | |
| 7 | |
| 7 | |
| 6 | |
| 6 | |
| 5 | |
| 5 | |
| 4 |