
- SAP Community
- Products and Technology
- Technology
- Technology Blogs by SAP
- Building calculation view using Business applicati...
Technology Blogs by SAP
Learn how to extend and personalize SAP applications. Follow the SAP technology blog for insights into SAP BTP, ABAP, SAP Analytics Cloud, SAP HANA, and more.
Turn on suggestions
Auto-suggest helps you quickly narrow down your search results by suggesting possible matches as you type.
Showing results for
Product and Topic Expert
Options
- Subscribe to RSS Feed
- Mark as New
- Mark as Read
- Bookmark
- Subscribe
- Printer Friendly Page
- Report Inappropriate Content
04-20-2021
7:01 AM
After the release of the Business application studio(BAS) I was eagerly waiting for the extension which will help us to build calculation views, and finally, we can build using BAS. This blog post will help you understand how to connect the existing HDI container and build a calculation view on the tables in the respective schema.
Why should you use the Business application studio?
SAP Business Application Studio is a development environment available on SAP Business Technology Platform that is lightweight and developer-friendly. Building HANA-native artifacts using the BAS template-based approach is what makes it special.A desktop-like development experience in the cloud that accelerates development using wizards, optimized code & graphical editors, local test run & debug, terminal (CLI) access, quick deployment, and more.
Right from connecting, building, and deploying is super easy on BAS - which is every developer's dream.
Prerequisites
Before we jump on directly creating the calculation view let's build some tables using SAP Cloud Application Programming Model (CAP) and deploy them on the SAP HANA Cloud instance. You can use the following entities as is so that you can relate to the blog appropriately. You will be creating 3 entities Event, Event Participants, and User details.
Make sure these artifacts are successfully deployed and have some mock data within them which will be required to test the calculation views.
Setup Dev space in BAS
The first step is to create de space with SAP HANA Native application capabilities. As you can notice once you select this capability space will have extension SAP HANA Calculation view editor by default included in it and that's what we need.
Create HANA Database project
BAS supports templates-based creation of the HANA Database project and to create one please select project from the template on the Welcome screen and select "SAP HANA Database Project" and follow the 6 steps as mentioned below.
Note - Numbering 1-6 starting top left of the table
Note - Create calculation view of type CUBE as only this type of views are supported in SAP Analytics Cloud
With this, we can now start editing the calculation view file which we just now created. The next steps will be adding a join and assign the respective tables and finally setting the node to aggregation. Follow the next 6 steps to configure your view and last step which our 6th step you can decide on what fields should be measures and dimensions.
To verify the calculation view is deployed properly and validate the data you can open a database explorer and run the calculation view to visualize the data.
Wow!! That fantastic isn't it with a few of these simple steps we have created our first calculation view.
Steps to consume calculation view in SAP Analytics Cloud
Now it's time to consume this view in SAP Analytics Cloud. First will be needing some DB connection information which will be used to create a live connection in SAC.
Copy the service credentials from BTP cockpit as shown below-
Open SQL Console in DB explorer and grant the following roles and privileges to the technical user which will be used to create the connection in SAC.
Copy the Host address from the credentials which we had noted earlier from the BTP cockpit. Will be creating a Live HANA connection in SAC. Enter the technical username and password which we created in the last step. This should create a successful live connection to our database.
Let's create a model using this connection and check if we can access the calculation view -
Yes!! We can see the calculation view which we created "EVENTS_CALC_VIEW_TEST". Let's use this to create the model and finally a story to show some statistics as shown below.
Friends, it is very simple to use BAS to build calculation views and consume in SAC. Please give it a try and do drop your comments about your experience.
Reference-
Why should you use the Business application studio?
SAP Business Application Studio is a development environment available on SAP Business Technology Platform that is lightweight and developer-friendly. Building HANA-native artifacts using the BAS template-based approach is what makes it special.A desktop-like development experience in the cloud that accelerates development using wizards, optimized code & graphical editors, local test run & debug, terminal (CLI) access, quick deployment, and more.
Right from connecting, building, and deploying is super easy on BAS - which is every developer's dream.
Prerequisites
- Setup Business application studio(BAS)
- Setup SAP HANA Cloud
- Access to SAP Analytics Cloud
Create entities using SAP Cloud Application Programming Model (CAP)
Before we jump on directly creating the calculation view let's build some tables using SAP Cloud Application Programming Model (CAP) and deploy them on the SAP HANA Cloud instance. You can use the following entities as is so that you can relate to the blog appropriately. You will be creating 3 entities Event, Event Participants, and User details.
entity EVENT : cuid,managed {

    desc : String;

    org_unit : String ;

    start_date: Timestamp;

    end_date : Timestamp;

    km_to_accomplish : Integer;

    event_participants : Composition of many EVENT_PARTICIPANTS on event_participants.event_id = $self;

}


entity EVENT_PARTICIPANTS :managed {

    key owner_id : Integer;

    key event_id : Association to EVENT;

    registered : Boolean;

}


entity USER_DETAILS:cuid,managed{

    sap_id : String;

    owner_id : Integer;

    username : String;

    resource_state : Integer;

    firstname: String;

    lastname : String;

    city: String;

    state : String;

    country :String;

    gender :String;

    weight : Integer;

    profile : String;

    event_list : Association to many EVENT_PARTICIPANTS on event_list.owner_id = owner_id;

}
Make sure these artifacts are successfully deployed and have some mock data within them which will be required to test the calculation views.
Setup Dev space in BAS
The first step is to create de space with SAP HANA Native application capabilities. As you can notice once you select this capability space will have extension SAP HANA Calculation view editor by default included in it and that's what we need.

Create the Dev space, after it's initiated i.e. started you can open your dev space. 
Create HANA Database project
BAS supports templates-based creation of the HANA Database project and to create one please select project from the template on the Welcome screen and select "SAP HANA Database Project" and follow the 6 steps as mentioned below.
Note - Numbering 1-6 starting top left of the table
 |  |  |
 |  |  |
We are going to connect this HANA Database project to the existing HDI Container service in step 5. You can select your HDI container service in this step which will give you access to the schema underneath, and you can access the tables which you created earlier. After the successful creation of the project, you should now be able to see the connection in green color which is listed under explorer -> SAP HANA Projects(Step 6)
Time to build a calculation view
What I loved about BAS is the ready-to-use templates !! Building a calculation view is pretty simple to do so select View → Find Command. Please follow the following 3 steps to create your calculation view file.
Note - Create calculation view of type CUBE as only this type of views are supported in SAP Analytics Cloud
 |  |  |
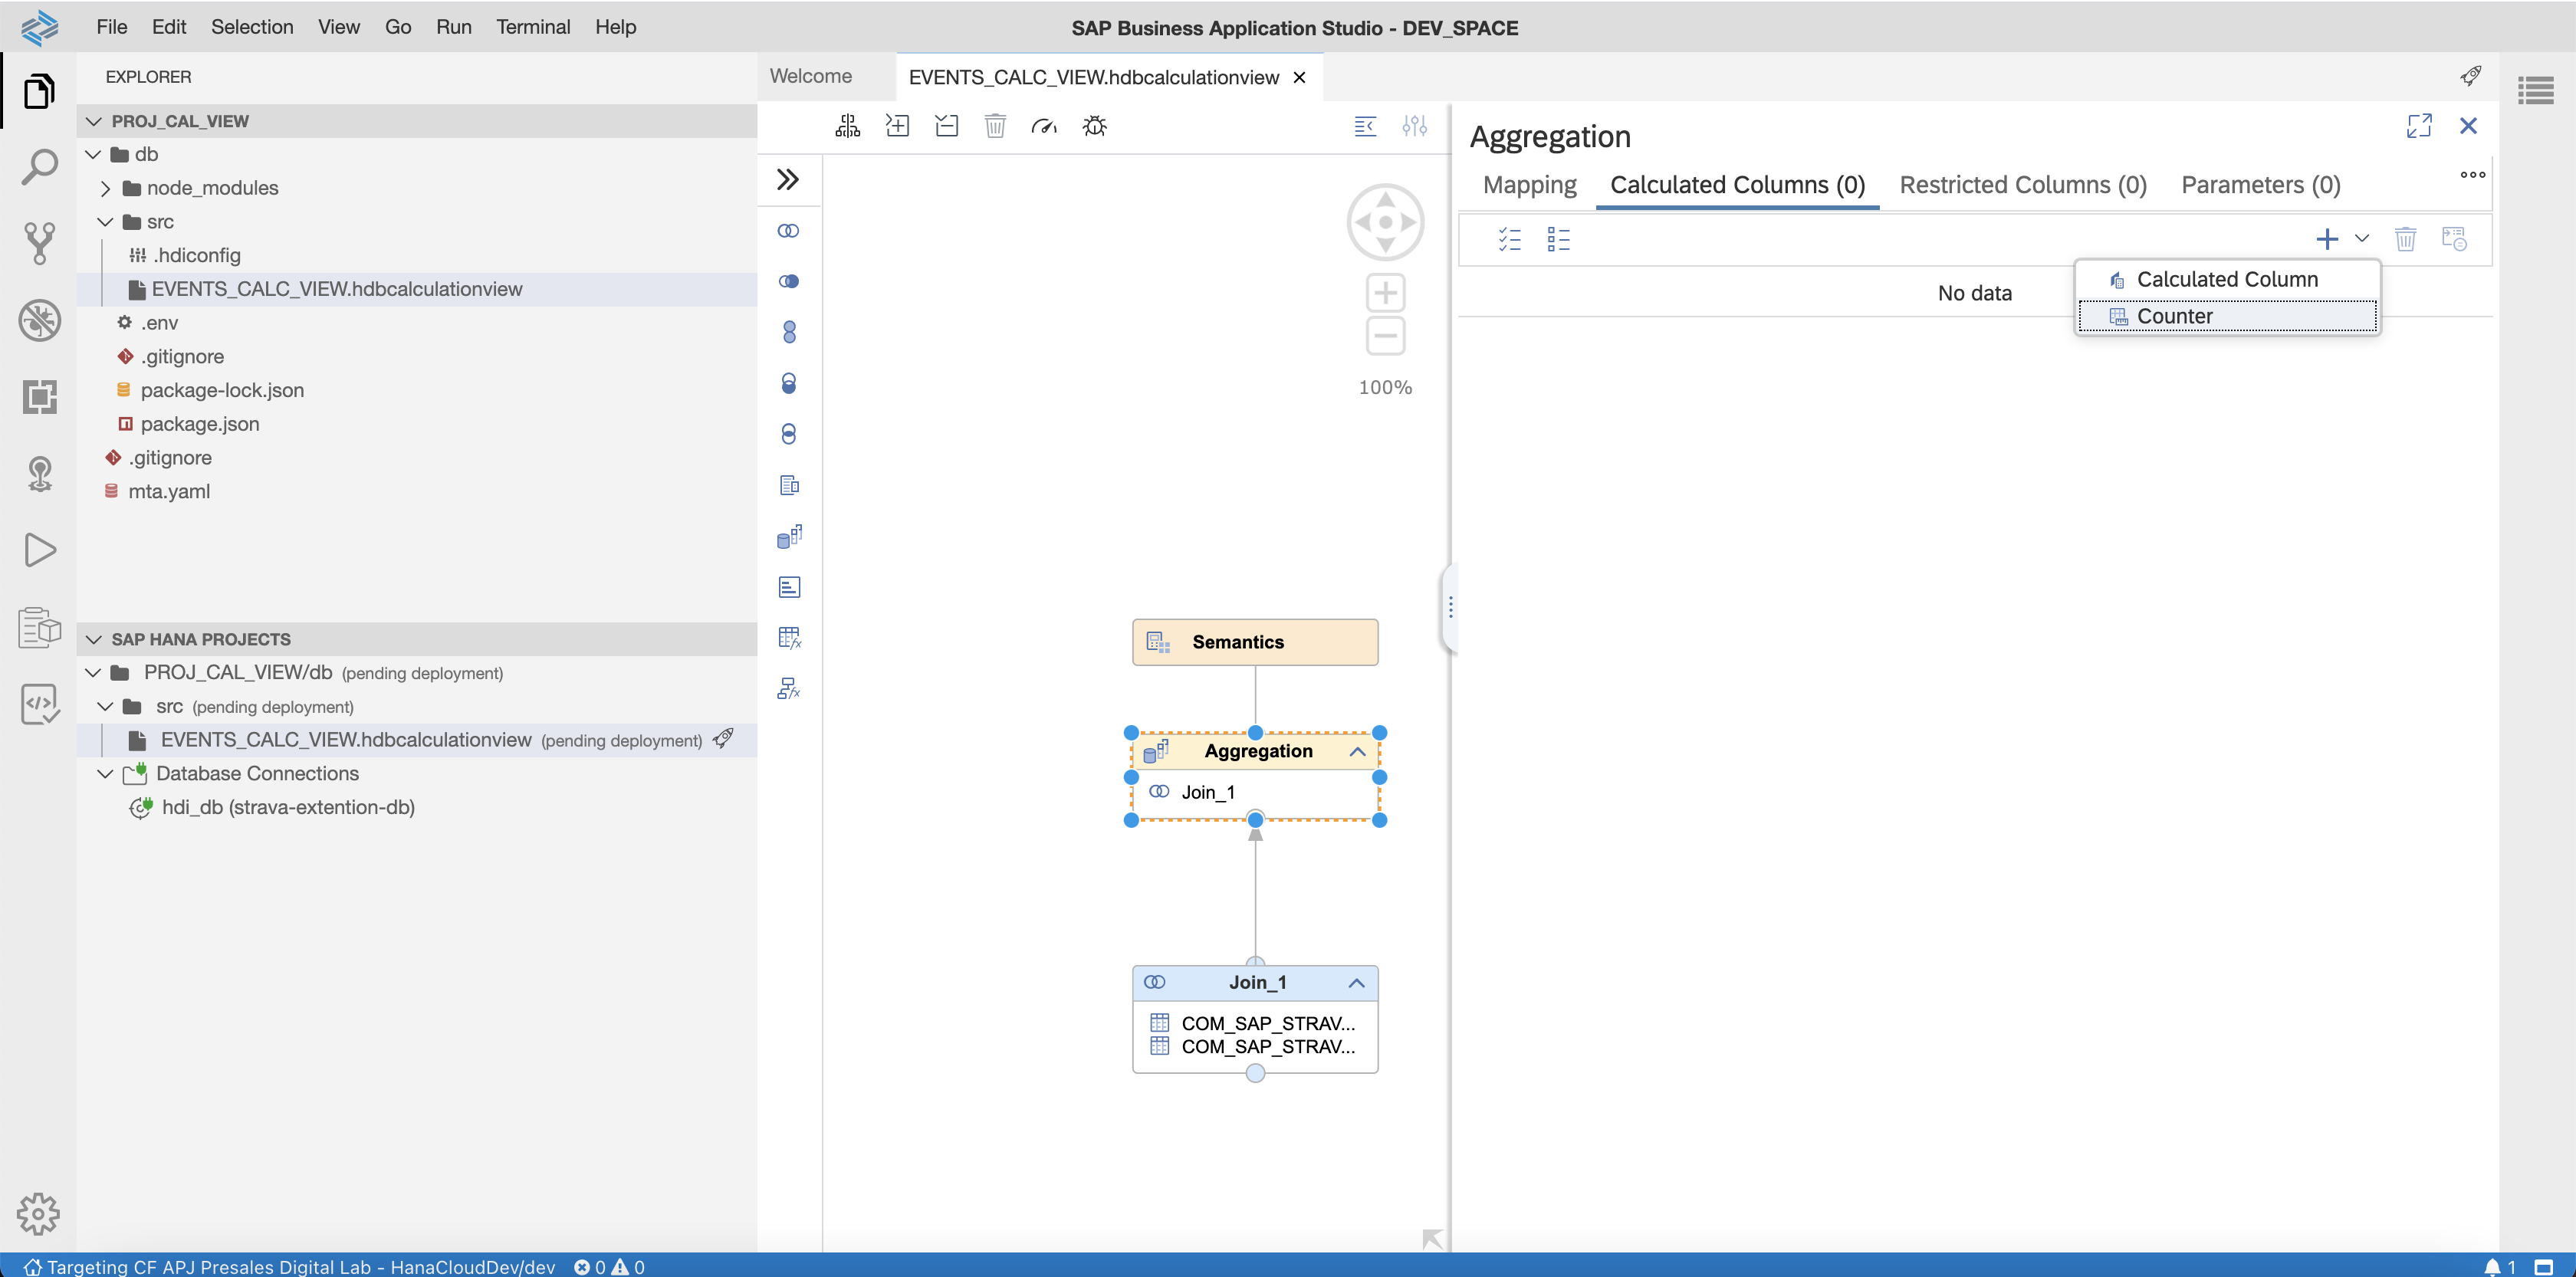
With this, we can now start editing the calculation view file which we just now created. The next steps will be adding a join and assign the respective tables and finally setting the node to aggregation. Follow the next 6 steps to configure your view and last step which our 6th step you can decide on what fields should be measures and dimensions.
 |  |  |
 |  |  |
Deploying calculation view
To deploy the calculation view use the Rocket icon shown in front of your HANA artifact which you can locate under Explorer → HANA Data Projects and you should get a successfully deployed message in your console at the bottom. Refer to the below image for your reference.
To verify the calculation view is deployed properly and validate the data you can open a database explorer and run the calculation view to visualize the data.

Wow!! That fantastic isn't it with a few of these simple steps we have created our first calculation view.
Steps to consume calculation view in SAP Analytics Cloud
Now it's time to consume this view in SAP Analytics Cloud. First will be needing some DB connection information which will be used to create a live connection in SAC.
Copy the service credentials from BTP cockpit as shown below-

Open SQL Console in DB explorer and grant the following roles and privileges to the technical user which will be used to create the connection in SAC.
To grant a technical user who can access the calculation view use the following commands

CREATE USER MHFC_USER PASSWORD "PASSWORD" NO FORCE_FIRST_PASSWORD_CHANGE SET USERGROUP DEFAULT;


// pass your schema name appended with #DI

// run this sql statement  in sql console respective to the hdb

set schema "A4AF128D36614EC0E6751AED14446#DI";


CREATE LOCAL TEMPORARY TABLE #PRIVILEGES LIKE _SYS_DI.TT_SCHEMA_PRIVILEGES;


INSERT INTO #PRIVILEGES (PRIVILEGE_NAME, PRINCIPAL_SCHEMA_NAME, PRINCIPAL_NAME) values ('SELECT','','MHFC_USER');


CALL "A4AF128D36614EC0E6751AED14446#DI".GRANT_CONTAINER_SCHEMA_PRIVILEGES(#PRIVILEGES, _SYS_DI.T_NO_PARAMETERS, ?, ?, ?);


DROP TABLE #PRIVILEGES;
Copy the Host address from the credentials which we had noted earlier from the BTP cockpit. Will be creating a Live HANA connection in SAC. Enter the technical username and password which we created in the last step. This should create a successful live connection to our database.

Let's create a model using this connection and check if we can access the calculation view -
 |  |
Yes!! We can see the calculation view which we created "EVENTS_CALC_VIEW_TEST". Let's use this to create the model and finally a story to show some statistics as shown below.

Friends, it is very simple to use BAS to build calculation views and consume in SAC. Please give it a try and do drop your comments about your experience.
Reference-
- BAS - https://developers.sap.com/tutorials/appstudio-onboarding.html
- Connecting SAC to HANA Cloud - https://blogs.sap.com/2020/09/28/connect-sap-analytics-cloud-to-hana-cloud-in-three-clicks/
- SAP CAP - https://cap.cloud.sap/docs/about/
Labels:
12 Comments
You must be a registered user to add a comment. If you've already registered, sign in. Otherwise, register and sign in.
Labels in this area
-
ABAP CDS Views - CDC (Change Data Capture)
2 -
AI
1 -
Analyze Workload Data
1 -
BTP
1 -
Business and IT Integration
2 -
Business application stu
1 -
Business Technology Platform
1 -
Business Trends
1,661 -
Business Trends
91 -
CAP
1 -
cf
1 -
Cloud Foundry
1 -
Confluent
1 -
Customer COE Basics and Fundamentals
1 -
Customer COE Latest and Greatest
3 -
Customer Data Browser app
1 -
Data Analysis Tool
1 -
data migration
1 -
data transfer
1 -
Datasphere
2 -
Event Information
1,400 -
Event Information
66 -
Expert
1 -
Expert Insights
178 -
Expert Insights
293 -
General
1 -
Google cloud
1 -
Google Next'24
1 -
Kafka
1 -
Life at SAP
784 -
Life at SAP
12 -
Migrate your Data App
1 -
MTA
1 -
Network Performance Analysis
1 -
NodeJS
1 -
PDF
1 -
POC
1 -
Product Updates
4,577 -
Product Updates
340 -
Replication Flow
1 -
RisewithSAP
1 -
SAP BTP
1 -
SAP BTP Cloud Foundry
1 -
SAP Cloud ALM
1 -
SAP Cloud Application Programming Model
1 -
SAP Datasphere
2 -
SAP S4HANA Cloud
1 -
SAP S4HANA Migration Cockpit
1 -
Technology Updates
6,886 -
Technology Updates
416 -
Workload Fluctuations
1
Related Content
- What’s new in Mobile development kit client 24.4 in Technology Blogs by SAP
- How to use AI services to translate Picklists in SAP SuccessFactors - An example in Technology Blogs by SAP
- Dynamic Approver based on dynamic task determination. in Technology Q&A
- Improvising Time Management in SAP S/4HANA Cloud: A Co-Innovation Solution in Technology Blogs by SAP
- Handle the behavior of extension field by toggle button using SDK UI designer. in Technology Blogs by Members
Top kudoed authors
| User | Count |
|---|---|
| 30 | |
| 23 | |
| 10 | |
| 7 | |
| 6 | |
| 6 | |
| 5 | |
| 5 | |
| 5 | |
| 4 |