
- SAP Community
- Products and Technology
- Technology
- Technology Blogs by SAP
- SAP Business Technology Platform – SAP Continuous ...
Technology Blogs by SAP
Learn how to extend and personalize SAP applications. Follow the SAP technology blog for insights into SAP BTP, ABAP, SAP Analytics Cloud, SAP HANA, and more.
Turn on suggestions
Auto-suggest helps you quickly narrow down your search results by suggesting possible matches as you type.
Showing results for
Employee
Options
- Subscribe to RSS Feed
- Mark as New
- Mark as Read
- Bookmark
- Subscribe
- Printer Friendly Page
- Report Inappropriate Content
04-20-2021
3:46 AM
Overview
This is the 3rd of 7 blog posts which are part of the SAP Business Technology Platform Showcase series of blogs and videos. We invite you to check this overview blog, so you can understand the full end-to-end story and the context involving multiple SAP BTP solutions.
Here we will see how to develop and trigger a pipeline using either Jenkins or SAP Continuous Integration and Delivery, for automating the deploy of the SAP HANA Cloud application that was developed previously in this series, on multi-target (DEV/PRD) landscapes.
Below you can see this is the 3rd step of the “Solution Map” prepared for the journey on the referred overall blog:
[caption id="attachment_35285" align="aligncenter" width="567"]
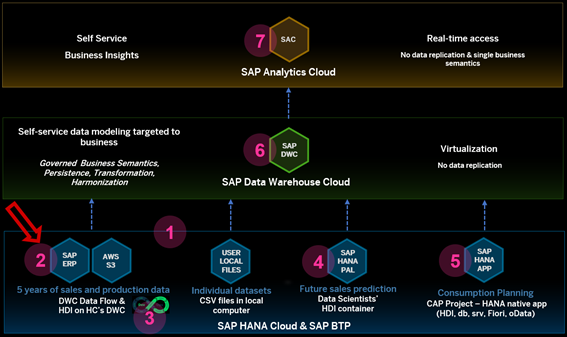 SAP BTP Showcase – Overall Technical Architecture[/caption]
You can also follow these scenarios watching this technical demonstration video.
Prerequisites
• Admin access to the SAP Continuous Integration and Delivery. For more information please refer to this tutorial.
• (Optional) If you are using an Enterprise GitHub account, you will need a Cloud Connector connected to your SAP Business Technology Platform subaccount.
• Having created a simple SAP Cloud Application Programming Model application, as presented in Blog 5: Develop a SAP HANA Cloud native application
• Having completed the Blog 2: Access the SAP HANA Cloud database underneath SAP Data Warehouse Cloud.
Scenarios
Using SAP Continuous Integration and Delivery service
First, we need to access the SAP Continuous Integration and Delivery service and create a GitHub credential to access the Enterprise GitHub (this step is only required if you are using an Enterprise GitHub account or using a private repository). Enter the credential name, the username for the account and the access token for it. To generate a personal access token, follow this tutorial.

Repeat this first step to create a credential for your user in the SAP Business Technology Platform (former SAP Cloud Platform) using your username and password. We will use it later to deploy our project using the service.
Moving on to the creation of the repository on the service, click on the add button to create a new repository. If you are using an Enterprise GitHub account, select create credentials on the Cloud Connector options. Fill the credentials with its name and the location ID from the Cloud Connector, these information can be found on the destination created for the Cloud Connector.

Enter the clone URL from your repository, then click on add. Your new repository should look like the picture below:

Now we are going to create a webhook with GitHub, so we are capable to detect when changes were made and automate our build jobs. Click on the Webhook Data button and add those two values to your clipboard.

Open the repository settings and select the Hooks area. Paste the Payload URL and Secret we copied from the last step. Here we can select which events we want to capture in our webhook. For this demo, we will only use the push event.

After we configured the repository´s webhook, we can create the job. Go to the Jobs tab and click on the add button. Enter the job name, the repository that we just created, and which branch we want to track.
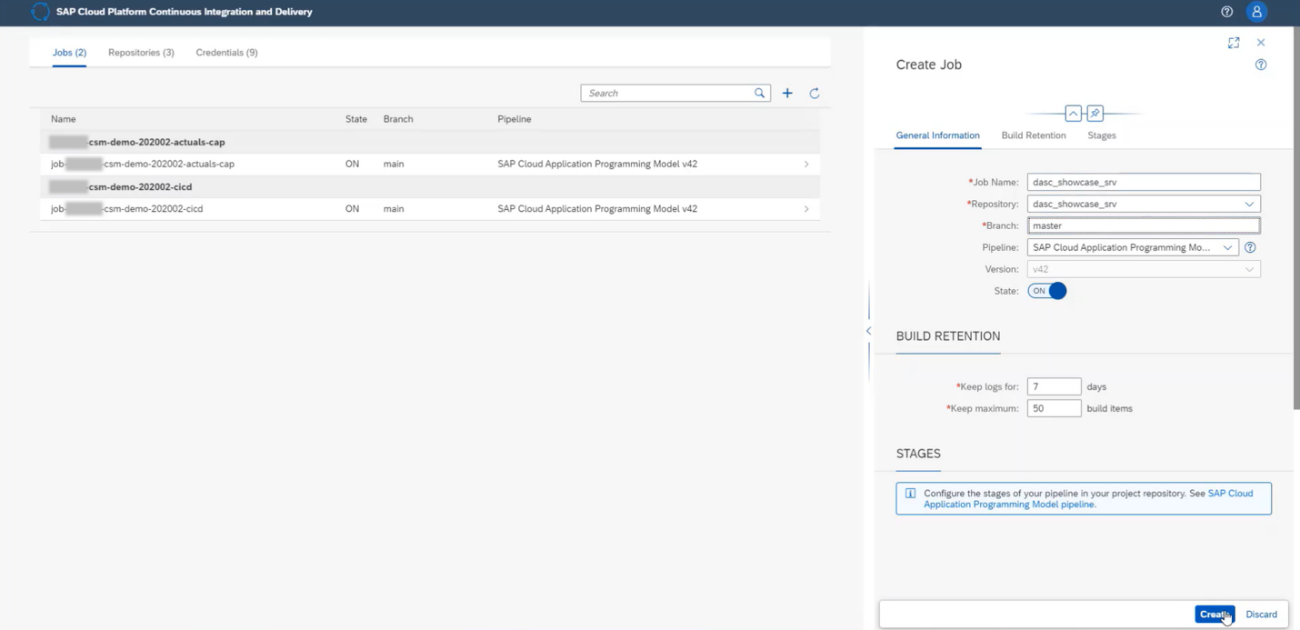
That´s it! The job has been configured, now we can move on to do apply our changes to the repository and automatically execute this job.
Open the SAP Business Application Studio and create a new Dev Space for SAP Cloud Business Application, as we will need some tools that it already provides for us in this environment.
Open a workspace and then a terminal. Clone your GitHub repository to your workspace.

Now we will add the pipeline configuration to our project. This environment is configured to use the CDS CLI tools. So, in the terminal, we will open the project folder and run the command below:
cds add pipelineThis command will add a Jenkinsfile (that will be used later on this demo) and a .pipeline folder with a config.yml that will be used to pass the parameters for the job execution.

Open the config.yml file and replace its contents with the code below:
# Project configuration


general:


productiveBranch: 'master'


# Stage configuration


stages:


productionDeployment:


cfTargets:


- org: <your-org>


space: <your-space>


apiEndpoint: <your-api>


appName: <your-app-name>


credentialsId: <your-cid-credential-for-btp>
Please be very careful about this file indentation. With this code, we will be selecting which branch we want to target and where our deploy will be made. Please insert your org, space, api endpoint, app name, and finally, the credentials ID with the SAP Business Technology Platform user created on the SAP Continuous Integration and Delivery service. Your code should look like the picture below:

Open the mta.yaml file and add the code below under the srv module (please, be very careful about this file indentation):
- name: <your-app-name>-deployer


# ------------------------------------------------------------


type: hdb


path: gen/db


parameters:


buildpack: nodejs_buildpack


requires:


# 'hana' and 'xsuaa' resources extracted from CAP configuration


- name: <your-app-name>-db


parameters:


disk-quota: 256M


memory: 256M
This file will trigger the deployment of the changes made to the database automatically. Your mta.yaml file should look like the picture below:

Once you made these changes, we can push our changes to the repository.
As the webhook was already configured to listen to the push event, as soon as the changes are pushed to the repository, the job should be initiated using the configurations defined on the .pipeline/config.yml file.

Some minutes after, the job will finish its execution. You can watch the logs from each stage by clicking on the stage. Click on the Production Deployment stage to visualize the service that was created and the database container that was deployed.

Now, we can open the SAP Business Technology Platform and look for the artifacts that were generated with this deployment. Just to be sure that everything worked as expected, open the Database Explorer and add the container that was deployed. Check if the tables defined on the project are there.
Good job! Following a few steps, we configured the SAP Continuous Integration and Delivery service to execute a pipeline defined in our project. Now we will show an example of executing the pipeline using an Enterprise Jenkins with Project Piper to highlight the DevOps flexibility that SAP provides.
Using Jenkins Instance
Once again, open the SAP Business Application Studio. Using the terminal, enter the command below to add a new branch:
git checkout -b dwcOn this branch, we will not use the SAP HANA Cloud from the SAP Business Technology Platform. Instead, we will target our deployment to use the SAP HANA Cloud underneath an SAP Data Warehouse Cloud instance (as presented in Blog 2: Access the SAP HANA Cloud database underneath SAP Data Warehouse Cloud).
Now, open the Jenskinsfile and replace its contents with the code below:
@Library('piper-lib-os') _


node() {


stage('prepare') {


checkout scm


setupCommonPipelineEnvironment script:this


}


stage('build') {


mtaBuild script: this


}


stage('deploy') {


cloudFoundryDeploy script: this


  }

}
Jenkins will scan the repository to run this script when executing the pipelines. Your code should look like the picture below:

The stages from the Jenkinsfile are referencing the steps from the .pipeline/config.yml. So, we need to change it as well. Open the .pipeline/config.yml and replace its content with the code below (please be careful with the indentation):
### General project setup


general:


### Step-specific configuration


steps:


mtaBuild:


buildTarget: 'CF'


cloudFoundryDeploy:


deployTool: 'mtaDeployPlugin'


deployType: 'standard'


cloudFoundry:


org: <your-org>


space: <your-space>


credentialsId: 'CF_CREDENTIALSID'
Your .pipeline/config.yml file should look like the picture below:

Before we head on to configure our Jenkins, we will target the SAP HANA Cloud from an SAP Data Warehouse Cloud instance as our database for the application. Please, bear in mind that this step is optional. If you want to use an SAP HANA Cloud from another space inside the SAP Business Technology Platform, you may skip this step. To do this, we must access the space management from the instance, search for the Database user that was created earlier in this series of tutorials and copy the database id from the host name as shown in the picture below:

Open the mta.yaml file and paste the database ID inside the configuration for the db resource from the app, as shown in the picture below:

That´s it! Now the application is configured to target the SAP HANA Cloud used by the SAP Data Warehouse Cloud instance.
Now, we will configure a Jenkins instance based on Docker images provided by Project Piper. Please refer to the official documentation for more information.
Run the docker image using the command below:
docker run -it --rm -u $(id -u):$(id -g) -v "${PWD}":/cx-server/mount/ ppiper/cx-server-companion:latest init-cx-serverAnd then run start the Cx Server using the following command:
chmod +x ./cx-server

./cx-server start
After the Jenkins instance has initialized, log in using the initial password for the admin user. Run the command below to get the initial password:
./cx-server initial-credentialsOnce we are logged on, we need to create a global credential for our Cloud Foundry user that will be used to deploy the application to the SAP Business Technology Platform. From the Jenkins dashboard, click on Manage Jenkins, then click on Manage Credentials. Select the domain that you want to create the credentials and add a username with password credential with your user and password for the Cloud Foundry. This credential is the one used on the config.yml file for the deploy step.

Then, we can go ahead and create a new item.

Enter a name for the item and choose Multibranch Pipeline for it, then click OK.

Now, we will add a source for the pipeline. In this demo, we connected through SSH to our Enterprise GitHub account. If you are not using an Enterprise GitHub account or a private repository, you can simply add your project repository and move on to the build step. To be able to clone your repository from an Enterprise GitHub account, you will need to add an SSH Key credential.

Enter your Enterprise GitHub account username. Now we will need to generate an SSH key before we proceed. Please refer to the GitHub documentation for more information.

Open Git Bash and run the command below to generate an SSH key. Remember to replace the user for your Enterprise GitHub user.
ssh-keygen -t ed25519 -C "<your-github-user>"Ensure that the ssh-agent is running using the command below:
eval `ssh-agent -s`Now, add your SSH private key to the ssh-agent using the command below:
ssh-add ~/.ssh/id_ed25519Now, we need to add the public key to the Enterprise GitHub account. Access your personal settings from the profile, select the SSH and CPG keys, and add a new SSH key. On Git bash, enter the command below to copy the public key we just generated:
clip < ~/.ssh/id_ed25519.pubAfter you copied the public key, we can just paste it in the GitHub to add a new SSH key.

Once the SSH key was created in GitHub, we can do a connection test to check if everything is alright by running the command below:
ssh -T git@<your-hostname>After checking the connectivity to GitHub, we can finally use the command below to copy the private SSH key and paste it in the SSH credentials that we are adding to Jenkins.
clip < ~/.ssh/id_ed25519After pasting the private key, click on the add button.

Select the SSH credential that we just created and click on the save button.
Jenkins will scan the repository for Jenkinsfiles. So far on our repository, we have a single branch with a Jenkinsfile.

Now, we are going to push the changes that we made to the dwc branch that we created previously. Open the SAP Business Application Studio again, commit your changes and push them to the repository.

Then click on Scan Multibranch Pipeline Now for Jenkins to execute the scan again and add the dwc branch with our updated Jenkinsfile. If a build for this repository was not started, click on the arrow besides its name and then click on Build Now.

We can follow the build status by clicking on the dwc branch. On the picture below, is shown a pipeline that was fully executed. Its stages are defined on the Jenkinsfile from the project.
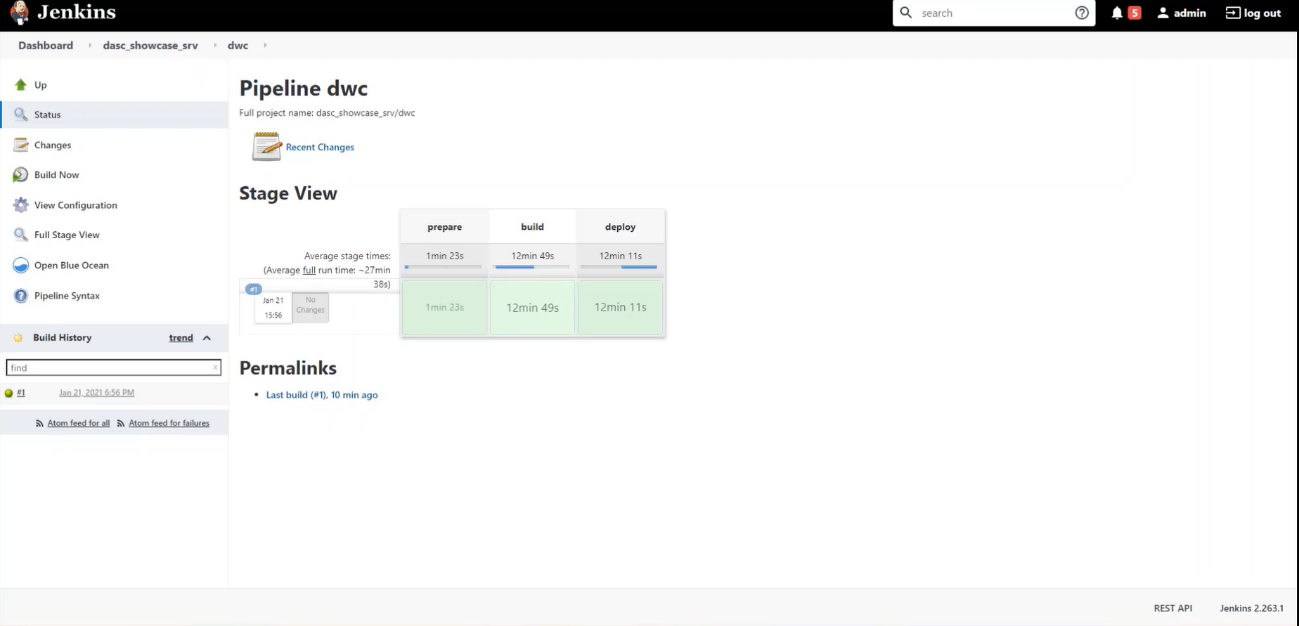
Once the deploy was finished, we can head towards the SAP Business Technology Platform and check if our application is up and running.
Summary
Congratulations! We have completed this example of how to use Continuous Integration and Delivery with SAP technologies. With this, we are capable of developing software with short feedback cycles using SAP technologies that substantially ease the set up of continuous delivery.
Recommended reading:
Blog 1: Location, Location, Location: Loading data into SAP Data Warehouse Cloud: how to easily cons...
Blog 2: Access the SAP HANA Cloud database underneath SAP Data Warehouse Cloud: how to create an SAP...
Blog 4: Run future sales prediction using SAP HANA Cloud Machine Learning algorithms: how to create ...
Blog 5: Develop a SAP HANA Cloud native application: how to create a SAP Cloud Application Programmi...
Blog 6: Provide governed business semantics with SAP Data Warehouse Cloud: how to consume all of the...
Blog 7: Consume SAP Data Warehouse Cloud’s assets using SAP Analytics Cloud: how to provide self-ser...
- SAP Managed Tags:
- SAP Analytics Cloud,
- SAP Data Intelligence,
- SAP Datasphere,
- SAP HANA Cloud,
- SAP Business Technology Platform
Labels:
You must be a registered user to add a comment. If you've already registered, sign in. Otherwise, register and sign in.
Labels in this area
-
ABAP CDS Views - CDC (Change Data Capture)
2 -
AI
1 -
Analyze Workload Data
1 -
BTP
1 -
Business and IT Integration
2 -
Business application stu
1 -
Business Technology Platform
1 -
Business Trends
1,661 -
Business Trends
88 -
CAP
1 -
cf
1 -
Cloud Foundry
1 -
Confluent
1 -
Customer COE Basics and Fundamentals
1 -
Customer COE Latest and Greatest
3 -
Customer Data Browser app
1 -
Data Analysis Tool
1 -
data migration
1 -
data transfer
1 -
Datasphere
2 -
Event Information
1,400 -
Event Information
65 -
Expert
1 -
Expert Insights
178 -
Expert Insights
280 -
General
1 -
Google cloud
1 -
Google Next'24
1 -
Kafka
1 -
Life at SAP
784 -
Life at SAP
11 -
Migrate your Data App
1 -
MTA
1 -
Network Performance Analysis
1 -
NodeJS
1 -
PDF
1 -
POC
1 -
Product Updates
4,577 -
Product Updates
330 -
Replication Flow
1 -
RisewithSAP
1 -
SAP BTP
1 -
SAP BTP Cloud Foundry
1 -
SAP Cloud ALM
1 -
SAP Cloud Application Programming Model
1 -
SAP Datasphere
2 -
SAP S4HANA Cloud
1 -
SAP S4HANA Migration Cockpit
1 -
Technology Updates
6,886 -
Technology Updates
408 -
Workload Fluctuations
1
Related Content
- Hack2Build on Business AI – Highlighted Use Cases in Technology Blogs by SAP
- SAP Partners unleash Business AI potential at global Hack2Build in Technology Blogs by SAP
- It’s Official - SAP BTP is Again a Leader in G2’s Reports in Technology Blogs by SAP
- Introducing Blog Series of SAP Signavio Process Insights, discovery edition – An in-depth exploratio in Technology Blogs by SAP
- Unify your process and task mining insights: How SAP UEM by Knoa integrates with SAP Signavio in Technology Blogs by SAP
Top kudoed authors
| User | Count |
|---|---|
| 13 | |
| 10 | |
| 10 | |
| 7 | |
| 6 | |
| 5 | |
| 5 | |
| 5 | |
| 4 | |
| 4 |