
- SAP Community
- Products and Technology
- Technology
- Technology Blogs by SAP
- AppGyver and SAP Business Technology Platform: a m...
Technology Blogs by SAP
Learn how to extend and personalize SAP applications. Follow the SAP technology blog for insights into SAP BTP, ABAP, SAP Analytics Cloud, SAP HANA, and more.
Turn on suggestions
Auto-suggest helps you quickly narrow down your search results by suggesting possible matches as you type.
Showing results for
Employee
Options
- Subscribe to RSS Feed
- Mark as New
- Mark as Read
- Bookmark
- Subscribe
- Printer Friendly Page
- Report Inappropriate Content
04-05-2021
9:28 PM
About AppGyver
SAP recently announced that it had acquired AppGyver, a no-code app development platform. With this acquisition, SAP is better able to help customers and partners adapt their IT systems efficiently to their specific needs and optimize the usability of their applications.
AppGyver enables the creation of web and mobile applications in a no-code environment. It offers a powerful visual development platform that allows business users with no coding experience to build efficient applications that can be easily configured and that work seamlessly across all operating systems, without writing a single line of code.
Overview
In this blog post, I will demonstrate how to create an application in AppGyver, integrate it with services hosted in SAP Business Technology Platform to read some data from SAP HANA Cloud through SAP Cloud Application Programming Model, and then deploy to SAP BTP using Cloud Foundry and SAP Business Application Studio (the deployment process might be done using Visual Studio Code as well, using the Cloud Foundry command line). This entire demonstration was developed using trial accounts from AppGyver and SAP Business Technology Platform, so please feel free to go ahead and create your account to do your own experiments.
Demonstration
For this demo, I will create an application that controls the office capacity by listing check-ins that were made by the employees. The focus of this blog post is the development and deployment using AppGyver.
Prerequistes
- Solid Cloud Foundry knowledge will be necessary to perform the deploy.
- Basic REST API knowledge is not necessary, but it would be helpful when building the data integration scenario.
SAP Business Technology Platform
I used SAP Business Technology Platform to host an OData built using SAP Cloud Application Programming Model to expose SAP HANA Cloud data. There is plenty of documentation about how to create this service so this will not be the focus of this blog post. The only thing that it is important to mention, it is required to enable cross-origin resource sharing on the service so AppGyver is capable of accessing the resource. To do that, I added a server.js file with the code below to the root directory of my project, in which I am capable of adding custom middleware to the service.
const cds = require('@sap/cds')


cds.on('bootstrap', (app) => {

    const cors = require('cors')

	app.use(cors())

	app.use((req, res, next) => {

		res.setHeader('Access-Control-Allow-Origin', '*');

		next();

	});

})


cds.on('listening', () => {

	// add more middleware ...

})


module.exports = cds.server // delegate to default server.js
AppGyver
After creating a trial account and logging in to it, you should see the screen below. Click on the create new button to open the app builder and start developing your application.

The app builder allows you to:
- define your app´s structure and navigation logic
- build pixel-perfect user interfaces using drag-and-drop
- create complex logic with visual programming
- integrate with external data resources
- bind data to your components to create dynamic views, and more.
After selecting the project´s name and template, you should see the screen below. The left panel shows the components that are available to use. It is possible to search for components created by the community and published on the component market too. The right panel shows the properties and style of the current selected component. One valuable tip for the newcomers is the step-by-step tutorial displayed by the arrow. This tutorial gives you a good overview about AppGyver´s capabilities.

First, let´s add some basic styling to our app. Delete the placeholder content and drag-and-drop a container to the app. Then, drag-and-drop a title component to inside the container. Select the page layout and add custom values for page padding in the style panel. Finally, select the container and change the background color and also change the color for the title text, just to play around a little with AppGyver styling.

Now, let´s drag-and-drop another container to the user interface. Then, drag-and-drop a row component within that container. Inside the row´s cells, we will add some dropdown fields. We will then bind its values to a REST API integration with SAP Business Technology Platform to display the options available. After adding the dropdown fields, change its labels so that it matches its contents.

Now, we are going to add some data to our application. On the top navbar, click on the data button. Select REST API integration as the data resource.

On the new resource, enter a resource ID and the resource URL with the OData service hosted on SAP Business Technology Platform. Then, click on get collection to configure the get request to retrieve the available offices.

On the get collection page, enter the relative path for the resource and the response key path. AppGyver requires that the data resource is an array, the response key path must show the path to the array with the values from the OData. In this case, the path to it is simply "value". After filling the fields, run a test to verify if everything is working properly.

Now that we added a data resource, we will add a data variable. The application will access this variable to consume the data from the REST API integration. Switch to the variables panel, on the left panel, click on data variables and then on add data variable. Select the data resource we created on the previous step.

Now, we will switch back to the view panel and select the offices dropdown field component. Then, we are going to bound the option list to a formula that will map the values from the variable to dropdown field.

Select formula as the binding type and enter the formula below. Replace ActiveOffices1 with the data variable that you created.
MAP(data.ActiveOffices1, {label: item.name, value: item.ID})
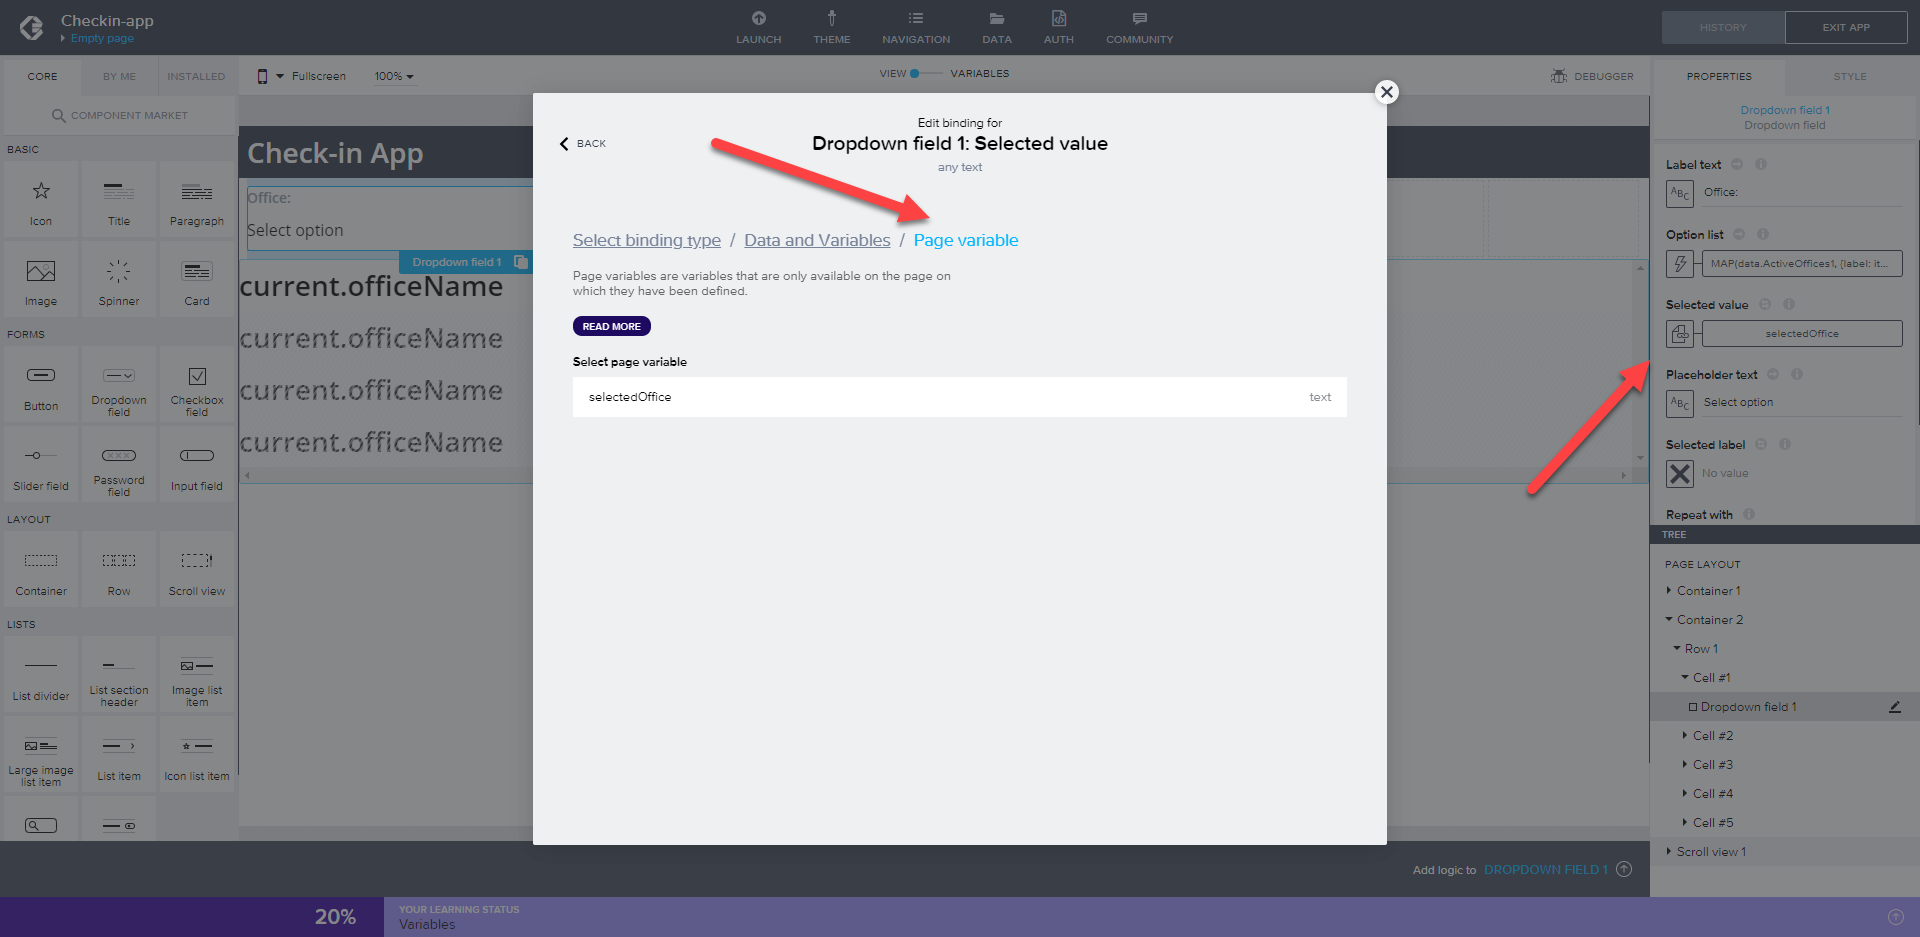
Now, we are going to bind the selected value from the dropdown to a page variable. By doing so, once the selection is changed by the user, the variable value will change too. First, create a new variable to hold the selected office. Switch to the variables panel, just as we did previously, except that this time we need to create a page variable of the type text. After we created the page variable, we can switch back to the view panel and select the offices dropdown component. Bind the selected value to the page variable that you have just created.
That´s great! So far we created a dropdown populated with options retrieved from an OData service hosted on SAP Business Technology platform and bound the selected value to a variable. Now, we are going to retrieve the available floors for that office accordingly to the user selection. To do so, add another data resource, just as we did for retrieving the offices. However, this time we will add an URL placeholder to filter the results for only the floors that belong to the selected office. the key placeholder must be inserted on the URL like the following:
{<your_key>}
Now, we are going to add a data variable for this integration, just as we did for the offices. But this time, we will add some logic to retrieve the floor values only when the selected office variable changes. After adding the new data variable, open the logic editor for that variable. Drag-and-drop the receive event logic component and select on change of the selected office variable as the event source. This will trigger this REST API integration each time the user changes the office selection. Now, we just have to bind the selected office value to the URL placeholder. Select the get record collection logic component and bind the office ID placeholder to the selected office page variable.

Then, just as we did for the offices dropdown, we are going to bind the option list to the variable containing the floors that were retrieved from the REST API integration with the formula below:
MAP(data.ActiveFloors1, {label: item.name, value: item.ID})
Finally, we are going to create a list to display the check-ins made to the floor selected by the user. Drag-and-drop a scroll view component to the user interface. Then, drag-and-drop the row component to the user interface. Add 3 cells to the row, as shown on the picture below.

Now, we are going to retrieve and bind the data to the rows of our list. First, create a selected floor variable and bind it to the floor dropdown field. Then, just as we did for the floor REST API integration, create another data resource for the check-in list. This data collection will be triggered by on change event of the selected floor variable and populate the check-in data variable. Up to this point, we are simply repeating previous steps. Now we are going to make the row we created repeat itself with the check-in data variable. Bind the repetition of the rows to the data variable.

Then, all we have to do, is display the values from the data variable that is looping our rows. For each cell of the row, add a title component. For its content, we are going to add a formula that will fetch the field for the current record on the loop. Add the formula below to the content binding, replacing the field accordingly.
current.<your_field>
Now that everything should be working, we can go ahead and test our application. Click on the launch button, then click open app preview portal.

If everything is working properly, you should be able to select the floor registered on SAP HANA Cloud and visualize all the check-ins made for that floor.

Congratulations! You created a very basic app in AppGyver that communicates with an OData service hosted on SAP Business Technology Platform. Now we can go ahead and host the AppGyver application itself on SAP BTP.
AppGyver application deployment on SAP Business Technology Platform
Before we begin, it is important to mention that AppGyver also provides the option to host the web application within AppGyver. However, if you want some more advanced monitoring capabilities or even to unify your IT landscape, it is possible to export build the web application and export it as a .zip file and host it on the infrastructure of your choice. In this blog post, I will export the web application and deploy it in the Cloud Foundry Runtime of the SAP Business Technology Platform.
First, click on the launch button, open the distribute panel and click on the open build service button.

On the build service, you will see three options for the build: IOS Mobile, Android Mobile, and Web App. For this post, we will only use the Web App build. Click on the configure button for the Web App.

Select a hostname for the AppGyver hosted domain. This will be used to deploy the app to AppGyver´s cloud and make it available under the myapp.appgyverapp.com subdomain once the project is built. After configuring the application, click on the build button to configure version aspects of the build and build the project. After it has finished building (it might take a while), you will be capable of downloading the build results.

Upload the .zip file to SAP Business Application Studio (or install the Cloud Foundry command line and open it on Visual Studio Code). Create a folder for the project and unzip the file using the command below:
unzip <file_name>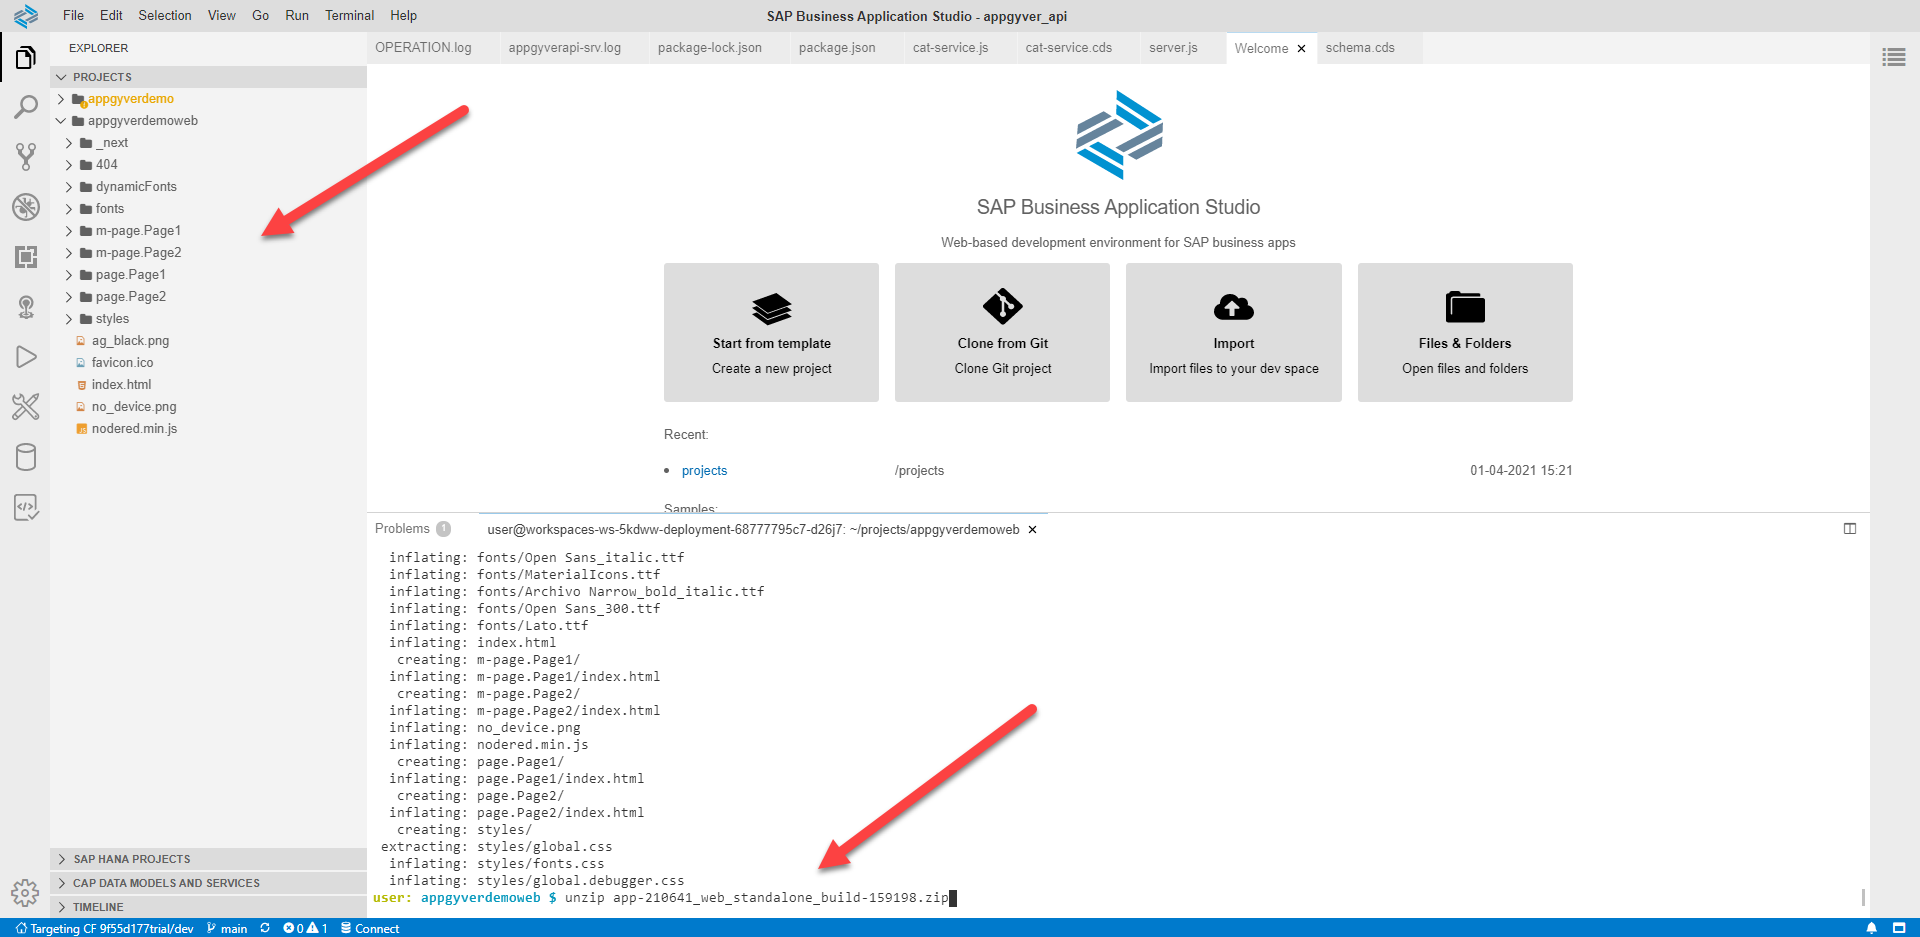
We will deploy an application that requires no backend code other than the NGINX server, which the buildback provides. For our application to use the staticfile buildback, we need to create a Staticfile in the root directory of our project. Cloud Foundry will detect it and use it when pushing the app.

Before running the command that will deploy the application to Cloud Foundry, we have to login using the command palette from SAP Business Application Studio or through the cf login command.

After you are logged in, run the command below to push your AppGyver application to SAP Business Technology Platform Cloud Foundry Runtime.
cf push <your_app_name>Once the deployment has been completed, you can access the route that was created for us to view the final result.


Conclusion
AppGyver is a very powerful tool that enables power users to create their own applications with minimum help from the IT department. The platform makes it as simple as possible for users to integrate data from REST API integrations and create beautiful interfaces using a no-code approach. As it was recently purchased, it still does not have SAP Fiori components, and some other features that I think it would be interesting regarding the SAP ecosystem. But I am very excited about the road ahead of this acquisition and could not be more thrilled with the possibilities that it enables and how easy it would be to build all of these possibilities!
Labels:
5 Comments
You must be a registered user to add a comment. If you've already registered, sign in. Otherwise, register and sign in.
Labels in this area
-
ABAP CDS Views - CDC (Change Data Capture)
2 -
AI
1 -
Analyze Workload Data
1 -
BTP
1 -
Business and IT Integration
2 -
Business application stu
1 -
Business Technology Platform
1 -
Business Trends
1,658 -
Business Trends
91 -
CAP
1 -
cf
1 -
Cloud Foundry
1 -
Confluent
1 -
Customer COE Basics and Fundamentals
1 -
Customer COE Latest and Greatest
3 -
Customer Data Browser app
1 -
Data Analysis Tool
1 -
data migration
1 -
data transfer
1 -
Datasphere
2 -
Event Information
1,400 -
Event Information
66 -
Expert
1 -
Expert Insights
177 -
Expert Insights
293 -
General
1 -
Google cloud
1 -
Google Next'24
1 -
Kafka
1 -
Life at SAP
780 -
Life at SAP
12 -
Migrate your Data App
1 -
MTA
1 -
Network Performance Analysis
1 -
NodeJS
1 -
PDF
1 -
POC
1 -
Product Updates
4,577 -
Product Updates
340 -
Replication Flow
1 -
RisewithSAP
1 -
SAP BTP
1 -
SAP BTP Cloud Foundry
1 -
SAP Cloud ALM
1 -
SAP Cloud Application Programming Model
1 -
SAP Datasphere
2 -
SAP S4HANA Cloud
1 -
SAP S4HANA Migration Cockpit
1 -
Technology Updates
6,873 -
Technology Updates
416 -
Workload Fluctuations
1
Related Content
- Onboarding Users in SAP Quality Issue Resolution in Technology Blogs by SAP
- Now available: starter kit for genAI on SAP BTP in Technology Blogs by SAP
- How to use AI services to translate Picklists in SAP SuccessFactors - An example in Technology Blogs by SAP
- Improvising Time Management in SAP S/4HANA Cloud: A Co-Innovation Solution in Technology Blogs by SAP
- IoT - Ultimate Data Cyber Security - with Enterprise Blockchain and SAP BTP 🚀 in Technology Blogs by Members
Top kudoed authors
| User | Count |
|---|---|
| 31 | |
| 24 | |
| 8 | |
| 7 | |
| 7 | |
| 6 | |
| 6 | |
| 5 | |
| 5 | |
| 4 |