Introduction:
As more customers are using SAP Analytic Cloud to connect to their multiple data sources and extend their on-premise system to build stories with beautiful visualization, a simple method of connecting all these systems is necessary for us technical folks.
In this blog (Part l) and subsequent blog (Part 2), I will be going over some of the connection examples from SAC to an on-premise SAP S/4HANA 2020 system along with review with some of the prerequisites and provide screenshots of the steps from our internal systems. I will follow up by creating a story in SAC in Part 2 to test the connectivity and consume the data from the backend, including reports with CDS views, etc .
I will using this guide and nice graphics from the
Cloud Analytics Team. Please keep this reference handy as you go through your configuration along with articles for help.sap.com I will share below.

The diagram above outlines the connection technology options and data sources to SAC. The public domain which includes other cloud applications (Concur, Qualtrics, Successfactors, etc) and local domains (S/4HANA, SAP BW/4HANA, SAP ERP, File Server, etc). There are multiple ways of connecting to SAC, depending on your use cases and Data Source.
Live Data Connection
- Live Data – This can be on-premise (remote) or cloud data sources (local)
- Data Privacy - All Data will remain at the source (customer landscape) and will not be replicated to SAC
- Supported Data Sources - From above graphic as of 03/2021
Remote: SAP HANA, SAP BW, SAP BW/4HANA, SAP SAP S/4HANA, SAP universe
Local: SAP Cloud Platform, S/4HANA Cloud, SAP HANA Cloud, SAP Data Warehouse Cloud
Import Data Connection
- Import Data – on-premise or cloud applications to uploaded or copied into encrypted and secured SAP HANA Database. SAC then stores model and data.
- Any changes made in the source does not affect the imported data.
- DataVolume Requirements- Available Here
- 03/2021 Supported Datasources - Available Here
Systems Requirements - Please refer to this chart for Systems Requirements and Technical Prerequisites

Part I. Import Data Connection - Lets Begin

Setting up Cloud Connector using SAP ANALYTICS Cloud Kit 1.0
My current server setup include:
- Windows 10 system
- SAC account
- S/4HANA 2020 / HANA SP5 Rev 51
I will be using the
SAP ANALYTICS Cloud Kit 1.0 for the installation. This kit will automate the installation of the Apache Tomcat service, SAP Cloud Connector and SAP Analytic Cloud Agent in one step. This is only for Windows x64 bit unfortunately. The team promises that this will be a quickand easy deployment…we’ll see!

- Download and extract to the Windows 10 System

2. Run PowerShell as administrator , and
./setup.ps1
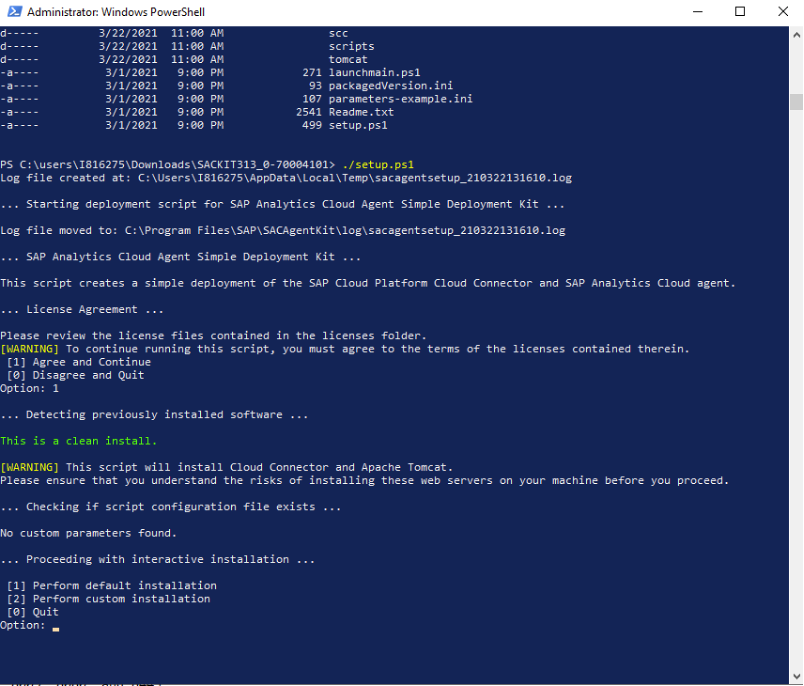
3. Select 2 for Custom Installation

4. I selected option 1 because this is a test system with limited memory. Click Continue on the Next Option
Done! That was painless.
From Windows: Open Services Manager, here you can verify the following services are installed and currently running.
https://localhost:8443

I could not log in with Chrome due to the “certificate error” but was successful with MS Edge browser.
Tada, I see the light.
First step completed. Now we need to configure Cloud Connector to connect to SAC and vice Versa.
- The installation will generate a Post Setup Guide file which contains very useful step by step instructions on how to proceed next.
- file:///C:/Program%20Files/SAP/SACAgentKit/Setup-Guide.html
Do not share this file. Keep it in a safe place as it contains your initial Username and Password with the URL info. Note: Username is case sensitive
Log into SAC

5. Under Data Source Configuration, note the Subaccount, Regional Host and Subaccount User info
6.
SAP Cloud Connector - Define Subaccount by entering the SAC info from above screen and enter your Subaccount User and Password. You can add a Location ID also and Click Ok.
Define a Subaccount in the SAP Cloud Platform Cloud Connector. Add the following information:
Region Host: Select your region host from the list.
Subaccount Name: Add your SAP HANA account name. For example, dd00bb33.
Subaccount User: Add your S-User username.
Password: Add your S-User password.
Password: Add your S-User password.
Location ID: SACAgentKit
HTTPS Proxy (optional)
Host
Port
User
Password

7. You should see a similar screen now below. Here you will see all of the information

8. Next to Add System Mapping, select Cloud To On-Premise on the left pane. Under the Access Control tab, select + on the right.
- Back End System : Other SAP System
- Internal Host: localhost
- Internal Port: 8080
- Virtual Host: localhost
- Virtual Host:8080
- Host Request Header: Use Internal Host
- Principal Type: None

9. System Mapping Added

10. Add resources by selecting +

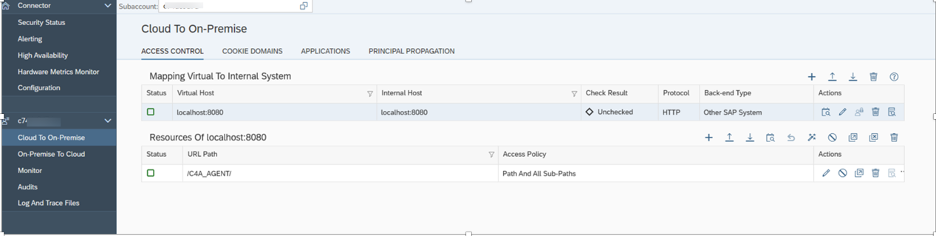
11. Resource added
Log into SAC
Select System Configuration -> On premise data sources-> + Add a new location

12. Enter Location ID, Host and Port. User Name and Password are provided in the Post Setup Guide.html for SAC


Optional Download JCO files: This is only needed for SAP BW and SAP ERP: Install the SAP Java Cloud Connector (JCo). Download file below


13. On a Windows server, put the sapjco3.jar and sapjco3.dll files in the lib folder of Apache Tomcat.
In SAP Cloud Connector, Add the Data Source which is our internal test S/4HANA 2020 system

14. Same procedure as step 8, however
- Back-end Type = ABAP System
- Virtual Host = Backend system
- Virtual Port = HTTPS port
- Pricipal Type = None

15. Mapping is now complete
In SAC, go to Main Menu -> Connection -> Add Connection
Expand Acquire Data, select SAP S/4HANA

16. 
17. Enter Connection Name, Location, Backend url with port number, User Name and Password.
18. Done
Conclusion of Part l. : The SAP Analytic Cloud Agent Simple Deployment Kit lives up to it's promises..yes, it was a simple install. Next I will connect to another SAP S/4HANA 2020 using Live Connection. Thank you
masaaki.arai for your help and allowing me to use your demo system.
Thank you
Brought to you by the S/4HANA RIG
Part 2. Live Data Connection to S/4HANA 2020 using CORS


