
- SAP Community
- Products and Technology
- Technology
- Technology Blogs by SAP
- Utilize Qualtrics as a Mail Server to Send Emails ...
Technology Blogs by SAP
Learn how to extend and personalize SAP applications. Follow the SAP technology blog for insights into SAP BTP, ABAP, SAP Analytics Cloud, SAP HANA, and more.
Turn on suggestions
Auto-suggest helps you quickly narrow down your search results by suggesting possible matches as you type.
Showing results for
Developer Advocate
Options
- Subscribe to RSS Feed
- Mark as New
- Mark as Read
- Bookmark
- Subscribe
- Printer Friendly Page
- Report Inappropriate Content
03-22-2021
4:02 PM

In this blog post I will explain how to send an email from a custom web app utilizing Qualtrics as a mail server.
I was recently looking for a way to send an email from a web application to the user who was currently logged in. It is a web application which allows users to book coaching sessions, so I wanted to send a confirmation email for a booking that was performed in the app. The app is a custom web app running in the Cloud Foundry environment on the SAP Business Technology Platform. I had plenty of (client-side) JavaScript code in the app so I wanted to write a simple JavaScript function that would trigger the email action. The app already used Qualtrics to collect feedback, which is why I was looking for a way to utilize a Qualtrics survey as a mail server. The solution is easy to implement and works like a charm, which is why I think it is worth sharing.
Prerequisites:
- You need a Qualtrics account and the rights to create and publish a survey. A sandbox account unfortunately won’t do the job, as API functions are not supported for those type of accounts (you will need the API token for your account).
- You will need to make a POST call from any app or client to the Qualtrics API. One option would be to use Postman. You can also use an app you developed yourself (your own code) to perform the call. In my example I will use client-side JavaScript, which is part of a custom web application, but it could be any other language as well.
A short summary:
- We create a new Qualtrics survey with three text entry questions. The response to those text entries will be the recipient info, subject and body of the email.
- We add an event-based action to the survey and tell Qualtrics to send an email each time a response to the survey is being recorded.
- We use JavaScript to create a response that matches our survey structure and POST this response to the Qualtrics API.
- This response triggers the Qualtrics action we defined earlier, which results in an email being sent to the recipient defined in the JavaScript part.
Step 1:
To get started we create a new Qualtrics survey in your Qualtrics account and give it a name.


Step 2:
In the survey editor we create three new text entry questions. These three text entries will later be used to submit all the information Qualtrics that it needs to create an email. The question text does not matter for this, but the questions have to be text entries.


Step 3:
After creating the questions, we will move to the Actions tab and create an event-based actions. We tell Qualtrics to trigger this action each time a response to the survey is created or updated.


Step 4:
Now we add a task to the action we just created. This task will be executed each time the action is triggered (see step 3). We choose Email as the task to perform.


Step 5:
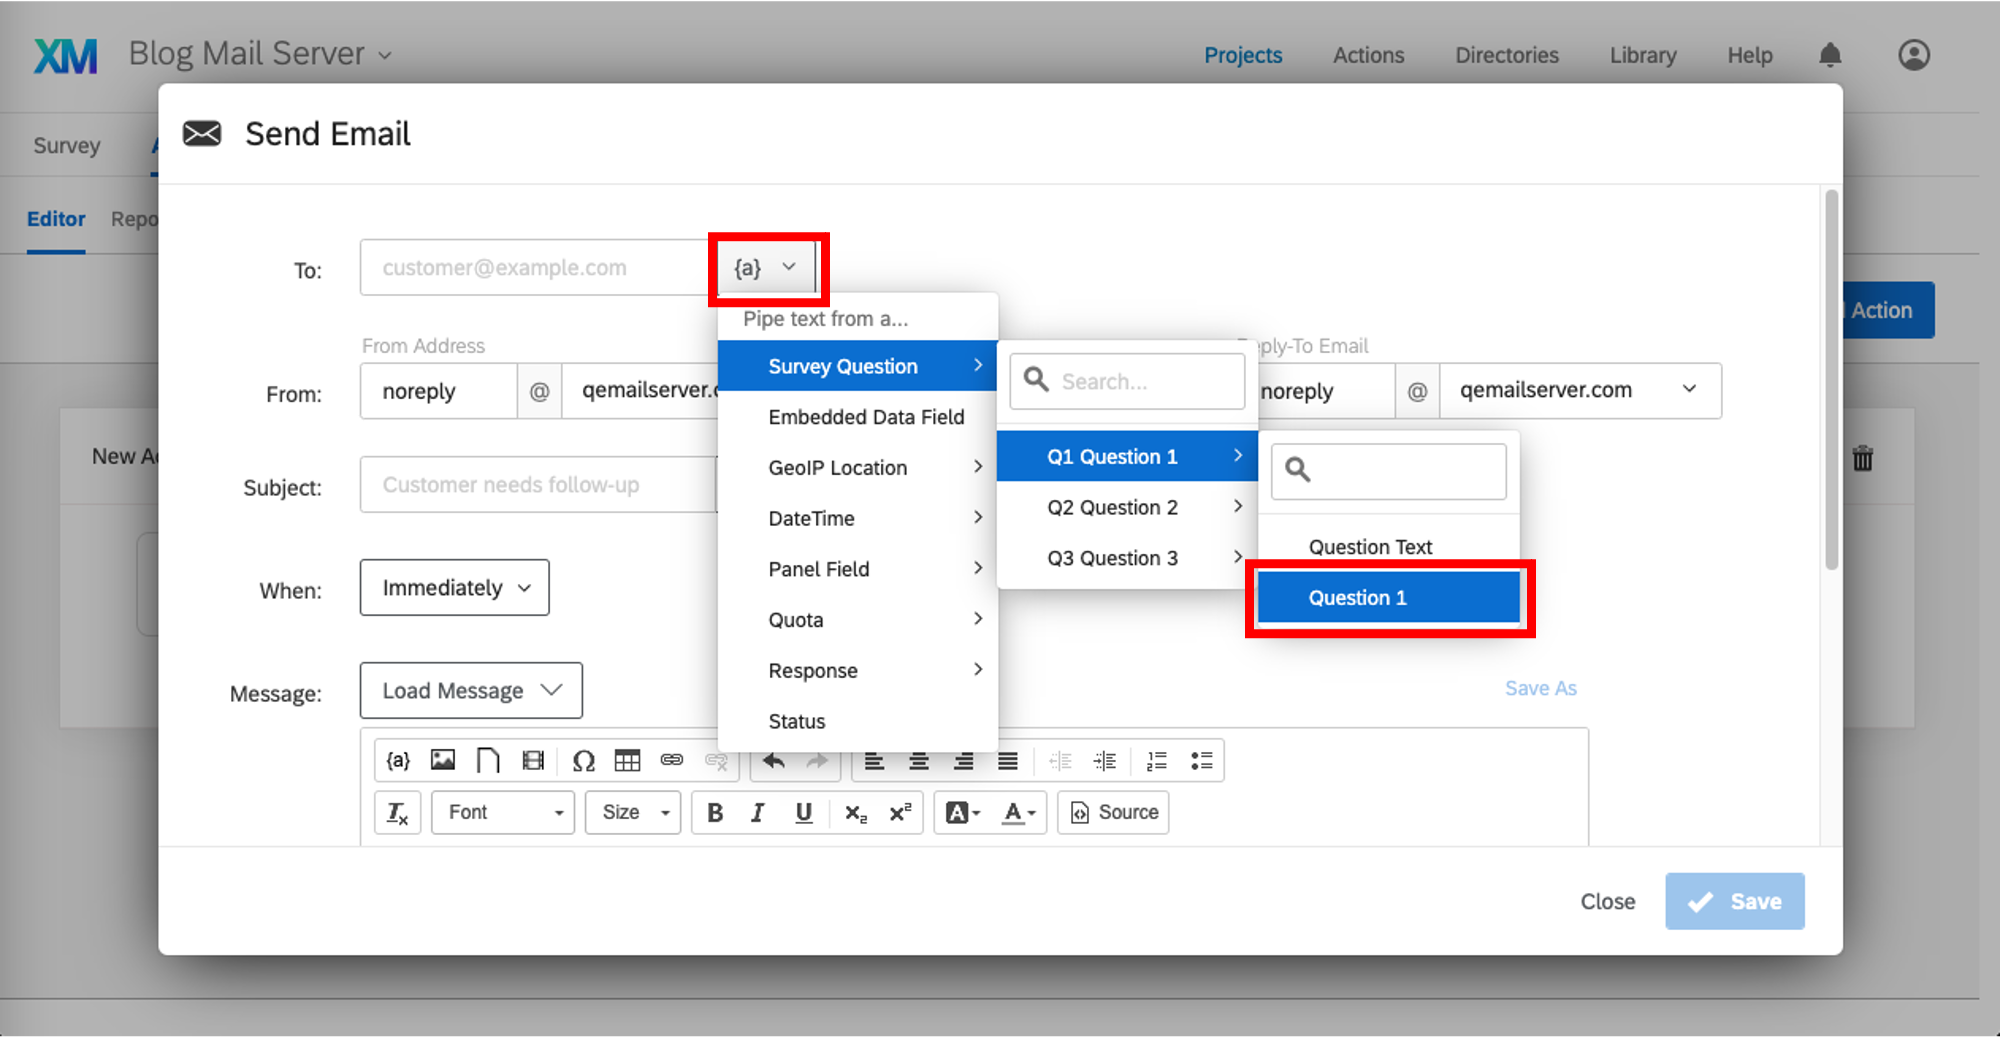
Now we design the email that is to be sent each time the email task is being executed. We define the response to the first question (see step 2) as our recipient’s email address. This means Qualtrics will handle the response text to this first question as an email address and send the email to that address.
We also define the subject and the body of the email in the same manner. The response text to the second question will be the subject of the email. The response text to the third question will be (part) of the body of the email.


Step 6:
In order to make Qualtrics consider survey responses that are being recorded by the Qualtrics API for the Actions functionality, we explicitly have to define a condition for exactly that. We tell Qualtrics that a survey response has to be ‘imported’ in order to execute the task we defined in step 5.


Step 7:
Now we can start with the coding. As stated earlier, I used JavaScript for this, but you could use any other language as well.
A few notes before we can use the API:
- In order to be able to use the Qualtrics API you will need an API Token. Read how you can get yours here.
- You will also need your datacenter id. Read about how to find your endpoint here.
- Additionally, you will need your survey ID, which can be found in the URL of your project. It has a structure like this: SV_randomNumbersAndLetters
In the code below you can see that we define a response that matches the structure of our survey (three questions) and post this response to the Qualtrics response API. The URL contains our datacenter id as well as our survey ID. Read more about this API here.
By the way: The response text to the first question could also be multiple email addresses separated by commas. Qualtrics would then send the email to all of those addresses.
function sendResponse() {


    let myHeaders = new Headers();

    myHeaders.append("content-type", "application/json");

    //your personal api token

    myHeaders.append("x-api-token", "<YourAPIToken>");


    //this is hard coded right now, but this could be variables, of course

    let my_response = {

      my_recipients: "nicolai.geburek@sap.com",

      my_subject: "Text entry for questions 2. This will be my subject.",

      my_body: "Text entry for question 3. This will be my body.",

    }


    let raw = JSON.stringify(

        {"values": {

        "QID1_TEXT": my_response.my_recipients,

        "QID2_TEXT": my_response.my_subject,

        "QID3_TEXT": my_response.my_body}

    });


    let requestOptions = {

        method: 'POST',

        headers: myHeaders,

        body: raw,

        redirect: 'follow'

    };


    //this is your data center endpoint and your survey ID

    fetch("https://<DatacenterID>.qualtrics.com/API/v3/surveys/<SurveyID>/responses", requestOptions)

    .then(response => response.text())

    .then(result => console.log(result))

    .catch(error => console.log('error', error));


}

//sendResponse();
Step 8:
Now we can check whether everything works the way we planned it. In the Reporting section of the Actions tab we can see all the successful (and also failed) actions that have been executed. You can see that I also didn’t make it work in my first attempt, so stay patient 😉 Down below you can also see the email that has been sent to my inbox.


Step 9 (optional):
- After this is all set up you could go back to step 7 and not hard code the email address, subject and body like I did in my example, but use variables/objects from your code instead.
- You could change the design of your email in the Actions editor to make it look prettier.
Thanks for reading until here!
Please feel free to give me feedback on this post or any clarification questions in the comment section below. For questions and more learning resources about SAP Business Technology Platform, please visit: https://community.sap.com/topics/business-technology-platform and submit your question here using this tag: https://answers.sap.com/tags/8077228b-f0b1-4176-ad1b-61a78d61a847
- SAP Managed Tags:
- API,
- JavaScript,
- SAP Business Technology Platform
Labels:
You must be a registered user to add a comment. If you've already registered, sign in. Otherwise, register and sign in.
Labels in this area
-
ABAP CDS Views - CDC (Change Data Capture)
2 -
AI
1 -
Analyze Workload Data
1 -
BTP
1 -
Business and IT Integration
2 -
Business application stu
1 -
Business Technology Platform
1 -
Business Trends
1,658 -
Business Trends
91 -
CAP
1 -
cf
1 -
Cloud Foundry
1 -
Confluent
1 -
Customer COE Basics and Fundamentals
1 -
Customer COE Latest and Greatest
3 -
Customer Data Browser app
1 -
Data Analysis Tool
1 -
data migration
1 -
data transfer
1 -
Datasphere
2 -
Event Information
1,400 -
Event Information
66 -
Expert
1 -
Expert Insights
177 -
Expert Insights
293 -
General
1 -
Google cloud
1 -
Google Next'24
1 -
Kafka
1 -
Life at SAP
780 -
Life at SAP
13 -
Migrate your Data App
1 -
MTA
1 -
Network Performance Analysis
1 -
NodeJS
1 -
PDF
1 -
POC
1 -
Product Updates
4,577 -
Product Updates
340 -
Replication Flow
1 -
RisewithSAP
1 -
SAP BTP
1 -
SAP BTP Cloud Foundry
1 -
SAP Cloud ALM
1 -
SAP Cloud Application Programming Model
1 -
SAP Datasphere
2 -
SAP S4HANA Cloud
1 -
SAP S4HANA Migration Cockpit
1 -
Technology Updates
6,873 -
Technology Updates
417 -
Workload Fluctuations
1
Related Content
- Business Process Integration and Assimilation in a M&A and How to Accelerate Synergy Savings. in Technology Blogs by SAP
- SAP BTP SDK for Android 24.4.0 is now available in Technology Blogs by SAP
- Crystal Reports Server - Restful API & Parameters in Technology Q&A
- Know Your Unknown Customer and Improve Customer Experience! in Technology Blogs by Members
- Harnessing Generative AI Capabilities with SAP HANA Cloud Vector Engine - Part 1 [Architecture] in Technology Blogs by SAP
Top kudoed authors
| User | Count |
|---|---|
| 35 | |
| 25 | |
| 13 | |
| 7 | |
| 7 | |
| 6 | |
| 6 | |
| 6 | |
| 5 | |
| 4 |