 Abstract
This blog post explains, how to create a simple IoT application in a "No Code" approach running on a microcontroller which collects ambient data and submits it continuously to SAP IoT services for SAP BTP. From there, the data can be collected, processed, aggregated or analyzed.
Motivation
No/Low-Code is once more on the rise. It's a rainy weekend and an ideal time to try out if this idea would work for micro-controller development. A team of seasoned embedded and Internet of Things developer from Brazil created a No-Code framework which supports IoT app development right out of the chrome browser by clicking building blocks together. That's it! Too good to be true or will it hold its promise?
I was curious: Could I create an IoT app which would be able to connect to
SAP IoT services for SAP BTP? Let's find out!
Architecture

Architecture for developing and testing the IoT application
You above simple setup using a sensor to capture ambient humidity and temperature every 4 seconds and sending it to the SAP platform. On the other hand, the development is done by connecting the device by either network connection leveraging the ESP32's WiFi capabilities and the embedded webrepl library in MicroPython or USBSerial interface.
I ended up using the USBSerial as I found it more stable for development and testing.
Setup
To get started, you very likely have to prepare your ESP32 to run MicroPython. Normally ESP32s are programmed in C/C++ using the
Espressif ESP-IDF which recently became available on VSCode. Aside of that a lot of maker projects use the
Arduino IDE.
BIPES builds on having MicroPython installed on it. For that you can use this
tutorial. If you work on Windows the commands look slightly different:
To erase the ESP32 (exchange COM6 with the COM-port you have in use for the connection):
esptool.py --chip esp32 --port COM6 erase_flash
To flash the MicroPython:
esptool.py --chip esp32 --port COM6 --baud 460800 write_flash -z 0x1000 .\esp32-20210320-unstable-v1.14-120-g42cf77f48.bin
From that point on you are good to go if you use the serial connection from Chrome. Open up the development environment of
BIPES by clicking this link
here.
They support many different micro controllers and even RaspberryPi devices. You can test if the connection works by moving to the console and connecting.
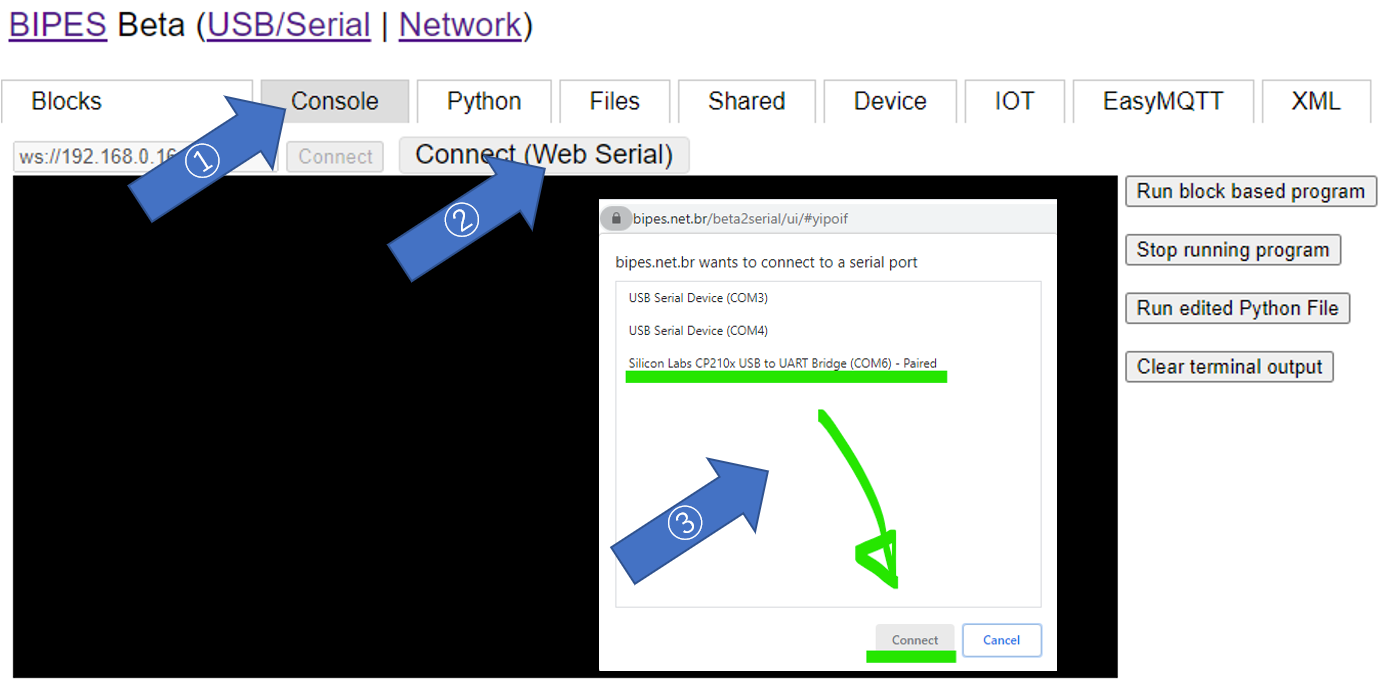
Establishing a serial connection to the micro controller through Chrome
You can now type in e.g.
help() to see if the device responds:

Testing connection to the micro controller
As a next step we can install a
tiny package manager which allows for downloading MicroPython modules. You can upload the two python files by the "Files" menu in BIPES. Also, if not already done, it makes sense to bring the ESP32 into the internet. For that I recommend you modify the existing
boot.py file - which again you can conveniently do in the "Files" menu by adding these lines:
# This file is executed on every boot (including wake-boot from deepsleep)

#import esp

#esp.osdebug(None)

import webrepl

webrepl.start()

import network

sta_if = network.WLAN(network.STA_IF)

sta_if.active(True)

sta_if.connect("<Your SSID>", "<Your WiFi password>")

sta_if.ifconfig()
The ESP32 will now connect automatically. The file is stored in the file-system of the micro controller and therefore not lost after powering off.
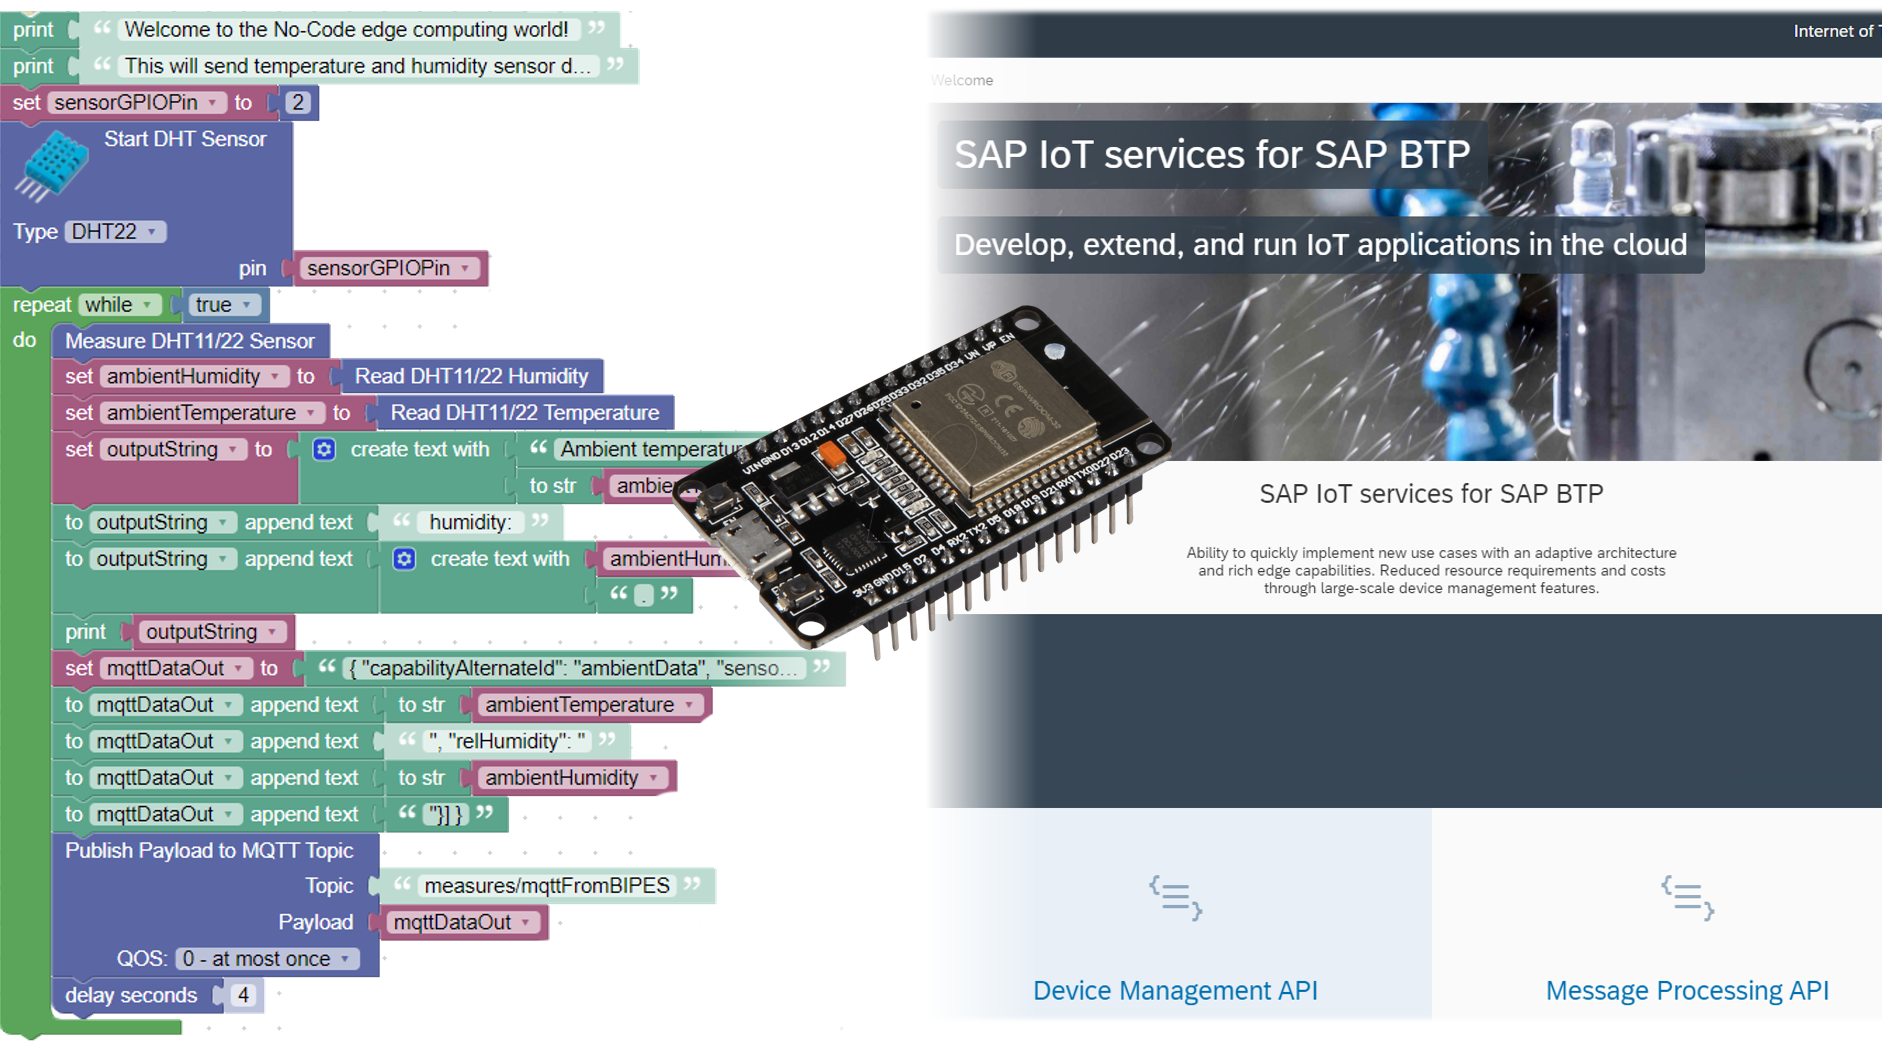
Now you can start building the setup in the "Blocks" menu. Below picture gives you an idea how it works, it's just drag and drop and connecting the ends. A really fun exercise.

Builder tool to create the IoT applications by putting the puzzle pieces together.
I was pleasantly surprised how mature this editor is, everything is very fast and snappy! I had to cheat slightly by adding two lines of Python code manually as SAP IoT requires certificate authentication via SSL/TLS. If you are not clear how to work with the certificate please check my previous blog:
Good things come in small packages: MQTT from Python which explains how to make the generated certificate work for our use case.
To save you time in building your first project you can access this
link where I shared my tested setup.
Let's start it now and see the data being submitted to SAP IoT services through secured MQTT protocol.

Click the picture to see the video
You can see the data being sent every 4 second to SAP IoT services for SAP BTP.
Verdict
It is not easy to draw a conclusion of whether no-code for microcontrollers is the future of IoT app development. This is my very personal take on it:
I'm fascinated that I was indeed able to create a running application on my ESP32! Moreover, I only did it from my browser without the need to install any additional software which is particularly amazing considering these devices work on serial communication when it comes to programming them. I was also fascinated that clicking the building blocks together is powerful enough to connect to sensors and to submit secured MQTT messages to SAP IoT.
As you have seen, I needed to add 2 lines of python code to cater for a scenario which was not foreseen. In education it opens up this exciting world assuming someone prepares a suitable set of hardware and requirements to be accomplished. If you leave the path of supported sensors or libraries, you need to get back to coding quickly. Larger programs will also appear "big" through the block builder.
For the moment I find this platform provides an enjoyable way to walk the first steps on the IoT/ edge-computing trail. If you always wanted to get your hands on it: Well invested time!
Credits
Credits go to the
BIPES Team that created this wonderful open source framework and development platform! I hope we will see and read more from them in the near future. Thank you!
😊
