
- SAP Community
- Products and Technology
- Technology
- Technology Blogs by SAP
- Building a Hyperledger Fabric consortium based on ...
Technology Blogs by SAP
Learn how to extend and personalize SAP applications. Follow the SAP technology blog for insights into SAP BTP, ABAP, SAP Analytics Cloud, SAP HANA, and more.
Turn on suggestions
Auto-suggest helps you quickly narrow down your search results by suggesting possible matches as you type.
Showing results for
former_member23
Participant
Options
- Subscribe to RSS Feed
- Mark as New
- Mark as Read
- Bookmark
- Subscribe
- Printer Friendly Page
- Report Inappropriate Content
03-12-2021
2:24 AM
In the previous blog we have instantiated a bare Hyperledger Fabric consortium instance based on Azure AKS template.
Step 1. We are going to perform a lot of config activities in the shell, so first we need to launch the Azure Cloud Shell. If you’re launching it for the first time, you’ll be asked to create a new storage account. Alternatively, you can choose an existing storage account in order to save your shell environment settings.

Step 2. Now we need to communicate with the template that we have already instantiated. The MS team have prepared a bunch of scripts for this purpose. Those scripts (AZ HLF Tools) will be helping us communicate with created items and perform typical admin actions on a blockchain network such as chaincode installation and instantiation. You can find the full package of tools including all the scripts that I mentioned here: https://github.com/Azure/Hyperledger-Fabric-on-Azure-Kubernetes-Service
In order to pull and set up a local copy of the tools, we need to run the following terminal command:
As a result, you should see an output similar to the one below and, more importantly, you should see and navigate into the ‘azhlfTool’ catalogue:
Step 3. Let’s now install the azhlfTool by running the commands below:
Step 4. We’re ready to setup environment variables. It would be a good idea to save them into your local file. On the screen captures below I create a text file named ‘my_config’ and edit it using built-in text editor directly in the cloud shell.
Orderer Environment Variables
Peer Environment Variables
Storage Environment Variable
Step 5. After setting up storage environment variables, we now need to create a storage account. If you have one already created, then skip the last step below. Otherwise, create a new storage account with the following commands:
Step 6. Now we should generate a storage key as per below instructions:
Step 7. Now we need to setup Azure file share connection string:
Step 8. Now we execute below commands to fetch organization’s connection profile, admin user identity, and MSP from Azure Kubernetes Cluster and store these identities in client application local store.
For orderer org:
For peer org:
Step 9. Now we finally starting to create a channel with the command below, which creates a new channel:
Step 10. We need to execute the below commands in the following order to add a peer organization in a channel and consortium.
1. From peer organization client, upload peer organization MSP on Azure Storage:
2. From orderer organization client, download peer organization MSP from Azure Storage and then issue command to add peer organization in channel/consortium:
3. From orderer organization client, upload orderer connection profile on Azure Storage so that peer organization can connect to orderer nodes using this connection profile:
4. From peer organization client, download orderer connection profile from Azure Storage and then issue command to add peer nodes in the channel:
Step 11. Let’s set anchor peers (that’s a peer node on a channel that all other peers can discover and communicate with):
Step 12. We are coming closer to instantiation of the sample chaincode provided in the azhlfTool package. Let’s firstly set the chaincode specific environment variables as per below:
Step 13. We are ready to install the chaincode:
Step 14. Once the chaincode is installed, it is ready to be instantiated with input parameters. We are passing four parameters according to what the Init method is expecting:
Step 15. Now we are ready to call the chaincode and see if it really works!
We can invoke and query the respective chaincode methods in order to initiate assets transfer and check that the balance is up to date after the operation:
We can see that the deployed sample code is working in the fully configured Azure environment.
In summary, in this blog we’ve configured a Hyperledger Fabric consortium with Azure tools.
Now we are ready to expose it to the outside world through an API server. As you remember, our main goal is to integrate a Hyperledger Fabric template instance deployed on Azure with SAP Business Technology Platform solutions. We will continue reaching this goal and building our project further, so watch out for upcoming blogs. See you soon!
Now let’s install and instantiate actual blockchain code in order to form the consortium and try to execute that code. In order to complete this, please follow the steps below:
Step 1. We are going to perform a lot of config activities in the shell, so first we need to launch the Azure Cloud Shell. If you’re launching it for the first time, you’ll be asked to create a new storage account. Alternatively, you can choose an existing storage account in order to save your shell environment settings.
AZ Bash Cloud Shell
Step 2. Now we need to communicate with the template that we have already instantiated. The MS team have prepared a bunch of scripts for this purpose. Those scripts (AZ HLF Tools) will be helping us communicate with created items and perform typical admin actions on a blockchain network such as chaincode installation and instantiation. You can find the full package of tools including all the scripts that I mentioned here: https://github.com/Azure/Hyperledger-Fabric-on-Azure-Kubernetes-Service
In order to pull and set up a local copy of the tools, we need to run the following terminal command:
curl https://raw.githubusercontent.com/Azure/Hyperledger-Fabric-on-Azure-Kubernetes-Service/master/azhlfT... | bashAs a result, you should see an output similar to the one below and, more importantly, you should see and navigate into the ‘azhlfTool’ catalogue:

Cloning azhlfTool
Step 3. Let’s now install the azhlfTool by running the commands below:
$ cd azhlfTool

$ npm install

$ npm run setup
Step 4. We’re ready to setup environment variables. It would be a good idea to save them into your local file. On the screen captures below I create a text file named ‘my_config’ and edit it using built-in text editor directly in the cloud shell.

Saving env vars into a config file
$ touch my_config

$ code my_config

$ source my_config
Orderer Environment Variables
ORDERER_ORG_SUBSCRIPTION="Your Subscription"

ORDERER_ORG_RESOURCE_GROUP="RG_HL_Blog_O"

ORDERER_ORG_NAME="blogOrgO"

ORDERER_ADMIN_IDENTITY="admin.$ORDERER_ORG_NAME"

CHANNEL_NAME="azbloghlfchannel"
Peer Environment Variables
PEER_ORG_SUBSCRIPTION="Your Subscription"

PEER_ORG_RESOURCE_GROUP="RG_HL_Blog_P"

PEER_ORG_NAME="blogOrgP"

PEER_ADMIN_IDENTITY="admin.$PEER_ORG_NAME"
Storage Environment Variable
STORAGE_SUBSCRIPTION="Your Subscription"

STORAGE_RESOURCE_GROUP="RG_HL_Blog_O"

STORAGE_ACCOUNT="hlfbloge4264"

STORAGE_LOCATION="australiaeast"

STORAGE_FILE_SHARE="hlfbloge42649ccc"
Step 5. After setting up storage environment variables, we now need to create a storage account. If you have one already created, then skip the last step below. Otherwise, create a new storage account with the following commands:
az account set --subscription $STORAGE_SUBSCRIPTION

az group create -l $STORAGE_LOCATION -n $STORAGE_RESOURCE_GROUP
Storage Resource Group creation
az storage account create -n $STORAGE_ACCOUNT -g $STORAGE_RESOURCE_GROUP -l $STORAGE_LOCATION --sku Standard_LRS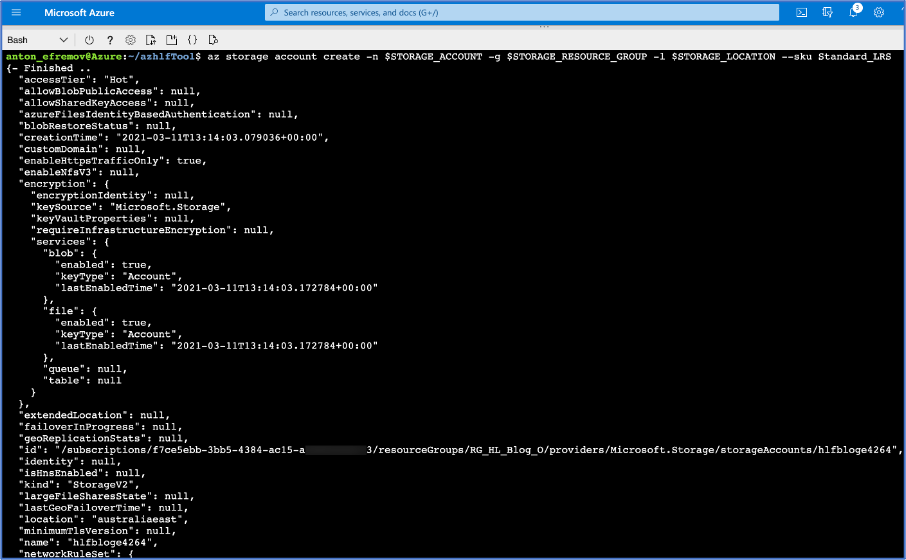
Storage Account creation
Step 6. Now we should generate a storage key as per below instructions:
STORAGE_KEY=$(az storage account keys list --resource-group $STORAGE_RESOURCE_GROUP  --account-name $STORAGE_ACCOUNT --query "[0].value" | tr -d '"')


az storage share create  --account-name $STORAGE_ACCOUNT  --account-key $STORAGE_KEY  --name $STORAGE_FILE_SHARE
Storage Key/Share creation
Step 7. Now we need to setup Azure file share connection string:
STORAGE_KEY=$(az storage account keys list --resource-group $STORAGE_RESOURCE_GROUP  --account-name $STORAGE_ACCOUNT --query "[0].value" | tr -d '"')


SAS_TOKEN=$(az storage account generate-sas --account-key $STORAGE_KEY --account-name $STORAGE_ACCOUNT --expiry `date -u -d "1 day" '+%Y-%m-%dT%H:%MZ'` --https-only --permissions lruwd --resource-types sco --services f | tr -d '"')


AZURE_FILE_CONNECTION_STRING=https://$STORAGE_ACCOUNT.file.core.windows.net/$STORAGE_FILE_SHARE?$SAS_TOKEN
Setting connection string vars
Step 8. Now we execute below commands to fetch organization’s connection profile, admin user identity, and MSP from Azure Kubernetes Cluster and store these identities in client application local store.
For orderer org:
./azhlf adminProfile import fromAzure -o $ORDERER_ORG_NAME -g $ORDERER_ORG_RESOURCE_GROUP -s $ORDERER_ORG_SUBSCRIPTION

./azhlf connectionProfile import fromAzure -g $ORDERER_ORG_RESOURCE_GROUP -s $ORDERER_ORG_SUBSCRIPTION -o $ORDERER_ORG_NAME

./azhlf msp import fromAzure -g $ORDERER_ORG_RESOURCE_GROUP -s $ORDERER_ORG_SUBSCRIPTION -o $ORDERER_ORG_NAME
Getting orderer org connection profile
For peer org:
./azhlf adminProfile import fromAzure -g $PEER_ORG_RESOURCE_GROUP -s $PEER_ORG_SUBSCRIPTION -o $PEER_ORG_NAME

./azhlf connectionProfile import fromAzure -g $PEER_ORG_RESOURCE_GROUP -s $PEER_ORG_SUBSCRIPTION -o $PEER_ORG_NAME

./azhlf msp import fromAzure -g $PEER_ORG_RESOURCE_GROUP -s $PEER_ORG_SUBSCRIPTION -o $PEER_ORG_NAME
Getting peer org connection profile
Step 9. Now we finally starting to create a channel with the command below, which creates a new channel:
./azhlf channel create -c $CHANNEL_NAME -u $ORDERER_ADMIN_IDENTITY -o $ORDERER_ORG_NAME
Creating a channel
Step 10. We need to execute the below commands in the following order to add a peer organization in a channel and consortium.
1. From peer organization client, upload peer organization MSP on Azure Storage:
./azhlf msp export toAzureStorage -f $AZURE_FILE_CONNECTION_STRING -o $PEER_ORG_NAME2. From orderer organization client, download peer organization MSP from Azure Storage and then issue command to add peer organization in channel/consortium:
./azhlf msp import fromAzureStorage -o $PEER_ORG_NAME -f $AZURE_FILE_CONNECTION_STRING

./azhlf channel join -c  $CHANNEL_NAME -o $ORDERER_ORG_NAME -u $ORDERER_ADMIN_IDENTITY -p $PEER_ORG_NAME

./azhlf consortium join -o $ORDERER_ORG_NAME -u $ORDERER_ADMIN_IDENTITY -p $PEER_ORG_NAME
3. From orderer organization client, upload orderer connection profile on Azure Storage so that peer organization can connect to orderer nodes using this connection profile:
./azhlf connectionProfile export toAzureStorage -o $ORDERER_ORG_NAME -f $AZURE_FILE_CONNECTION_STRING4. From peer organization client, download orderer connection profile from Azure Storage and then issue command to add peer nodes in the channel:
./azhlf connectionProfile  import fromAzureStorage -o $ORDERER_ORG_NAME -f $AZURE_FILE_CONNECTION_STRING

./azhlf channel joinPeerNodes -o $PEER_ORG_NAME  -u $PEER_ADMIN_IDENTITY -c $CHANNEL_NAME --ordererOrg $ORDERER_ORG_NAME
Building consortium
Step 11. Let’s set anchor peers (that’s a peer node on a channel that all other peers can discover and communicate with):
./azhlf channel setAnchorPeers -c $CHANNEL_NAME -p peer1 -o $PEER_ORG_NAME -u $PEER_ADMIN_IDENTITY --ordererOrg $ORDERER_ORG_NAME
Setting an anchor peer
Step 12. We are coming closer to instantiation of the sample chaincode provided in the azhlfTool package. Let’s firstly set the chaincode specific environment variables as per below:
ORGNAME=$PEER_ORG_NAME

USER_IDENTITY="admin.$ORGNAME"

CC_NAME=demo_cc

CC_VERSION=1

CC_LANG=golang

CC_PATH= /home/<YOUR_AZURE_USER_NAME>/azhlfTool/samples/chaincode/src/chaincode_example02/go
Setting env vars to instantiate chaincode
Step 13. We are ready to install the chaincode:
./azhlf chaincode install -o $ORGNAME -u $USER_IDENTITY -n $CC_NAME -p $CC_PATH -l $CC_LANG -v $CC_VERSION
Instantiating chaincode
Step 14. Once the chaincode is installed, it is ready to be instantiated with input parameters. We are passing four parameters according to what the Init method is expecting:
./azhlf chaincode instantiate -o $ORGNAME -u $USER_IDENTITY -n $CC_NAME -v $CC_VERSION -c $CHANNEL_NAME -f init --args "a" "2000" "b" "1000"
Calling Init
Step 15. Now we are ready to call the chaincode and see if it really works!
We can invoke and query the respective chaincode methods in order to initiate assets transfer and check that the balance is up to date after the operation:
./azhlf chaincode invoke -o $ORGNAME -u $USER_IDENTITY -n $CC_NAME -c $CHANNEL_NAME -f invoke -a "a" "b" "10"


./azhlf chaincode query -o $ORGNAME -p peer1 -u $USER_IDENTITY -n $CC_NAME -c $CHANNEL_NAME -f query -a "a"
Calling the instance methods
We can see that the deployed sample code is working in the fully configured Azure environment.
In summary, in this blog we’ve configured a Hyperledger Fabric consortium with Azure tools.
Now we are ready to expose it to the outside world through an API server. As you remember, our main goal is to integrate a Hyperledger Fabric template instance deployed on Azure with SAP Business Technology Platform solutions. We will continue reaching this goal and building our project further, so watch out for upcoming blogs. See you soon!
- SAP Managed Tags:
- Blockchain,
- SAP Business Technology Platform
Labels:
2 Comments
You must be a registered user to add a comment. If you've already registered, sign in. Otherwise, register and sign in.
Labels in this area
-
ABAP CDS Views - CDC (Change Data Capture)
2 -
AI
1 -
Analyze Workload Data
1 -
BTP
1 -
Business and IT Integration
2 -
Business application stu
1 -
Business Technology Platform
1 -
Business Trends
1,661 -
Business Trends
87 -
CAP
1 -
cf
1 -
Cloud Foundry
1 -
Confluent
1 -
Customer COE Basics and Fundamentals
1 -
Customer COE Latest and Greatest
3 -
Customer Data Browser app
1 -
Data Analysis Tool
1 -
data migration
1 -
data transfer
1 -
Datasphere
2 -
Event Information
1,400 -
Event Information
64 -
Expert
1 -
Expert Insights
178 -
Expert Insights
273 -
General
1 -
Google cloud
1 -
Google Next'24
1 -
Kafka
1 -
Life at SAP
784 -
Life at SAP
11 -
Migrate your Data App
1 -
MTA
1 -
Network Performance Analysis
1 -
NodeJS
1 -
PDF
1 -
POC
1 -
Product Updates
4,577 -
Product Updates
324 -
Replication Flow
1 -
RisewithSAP
1 -
SAP BTP
1 -
SAP BTP Cloud Foundry
1 -
SAP Cloud ALM
1 -
SAP Cloud Application Programming Model
1 -
SAP Datasphere
2 -
SAP S4HANA Cloud
1 -
SAP S4HANA Migration Cockpit
1 -
Technology Updates
6,886 -
Technology Updates
402 -
Workload Fluctuations
1
Related Content
- Highlights of the SAP Open Source 2022 report in Technology Blogs by SAP
- Blockchain Projects Made Easy in Technology Blogs by SAP
- Part 4 : Provide secure authentication and authorization using Hyperledger Fabric CA in Technology Blogs by SAP
- Part 3 :- Building User Interface on SAP Business Technology Platform to consume Blockchain in Technology Blogs by SAP
Top kudoed authors
| User | Count |
|---|---|
| 12 | |
| 10 | |
| 9 | |
| 7 | |
| 7 | |
| 6 | |
| 6 | |
| 6 | |
| 6 | |
| 4 |