
- SAP Community
- Products and Technology
- Technology
- Technology Blogs by SAP
- Hands-On Tutorial: Manage & Deploy Machine Learnin...
Technology Blogs by SAP
Learn how to extend and personalize SAP applications. Follow the SAP technology blog for insights into SAP BTP, ABAP, SAP Analytics Cloud, SAP HANA, and more.
Turn on suggestions
Auto-suggest helps you quickly narrow down your search results by suggesting possible matches as you type.
Showing results for
Product and Topic Expert
Options
- Subscribe to RSS Feed
- Mark as New
- Mark as Read
- Bookmark
- Subscribe
- Printer Friendly Page
- Report Inappropriate Content
03-09-2021
8:05 AM
Back when I was a student at university, I spent a lot of time trying to find the perfect machine learning model. Especially, during my master thesis I combined a query statistical law called Benford’s Law with different machine learning algorithms. The idea of the use case was that when people try to commit fraud in bookkeeping the imagined numbers will be significantly different to Benford’s Law. Of course, this also meant a lot of statistical testing and data preparation steps with which I don’t want to bore you today. Instead, we will focus on the deployment of one trained and optimized machine learning model. This step was never really the focus during my studies but becomes crucial when we want to share our results with other colleagues or incorporate the results into the business process. This might sound simple at first, but it is actually the reason why many machine learning projects fail. Even, when I simply send others my machine learning model by email, their installed Python environment might be different to mine. In addition, every required package used in the script would need to be same version, to make sure that they get the same results. All these small details make the process of deploying and sharing machine learning very complex. Therefore, we will take an approach to expose our machine learning model through an API endpoint in Kyma Runtime.
Before we jump into the technical details, let us briefly summarize the main technologies needed for this task:
Docker will be our containerization platform that packages our application with all its dependencies in the form of a container. This means we don’t have to worry about different Python environments installed on our local laptop or any other requirement issues. Also, the needed Python packages in the correct version will be taken care off. Hence, we can easily share our app with other users. If you don’t have Docker running yet, you can install Docker for Windows under the following link and create an account under Docker Hub.
Kyma is an open-source project built on top of Kubernetes, which is a container orchestration engine for automating deployment, scaling, and management of containerized applications. Kyma is a fully managed Kubernetes based runtime. It allows you to build extensions through microservices and serverless functions. Are you curious to try it out? This blog post describes in detail how you can enable Kyma as part of the SAP Business Technology Platform trial.
Flask is a framework which can be leveraged in Python to build web applications. We will use it to create an application, which generates predictions from new observations using our trained model. The key for this will be a straightforward API endpoint. In addition, we will use Visual Studio to run our Python script.
This is of course a lot to cover in one Hands-On Tutorial. The following blog posts show an intuitive Hello World example and really helped me to get started:
Hence, what will you learn in this Hands-On tutorial?
Creating an optimal machine learning model takes a lot of time and hard work. For this Hands-On tutorial this is already taken care of. You can find all the needed materials in the following GitHub repository. But what does our machine learning model actually do? To put it simple, our optimized and trained random forest model predicts if a transaction is fraudulent or not. Of course, before we can use it in our app, we must import the required packages. Then, we load the trained model from our working directory and start building our API with Flask. Hence, we create the API endpoint ,,predict’’ and write the function which will create our predictions based on a new observation. Further, we need to transform the data from the GET request into a format which our model can digest. After that the data is passed into the predict function of our model and the result is saved into a new variable. At last, we return the result of our prediction and run the app on a local host and given port.
If you execute the Python script, you should see the following output in your terminal.
To test the API endpoint, we can for example use Postman. Please, execute the following GET request:
We can also see the successful GET request in our terminal. This also allows us to debug our app in case of an error.
Now to our second task. Let us deploy our app into a Docker Image, such that we can easily share it with customers or colleagues. Our Dockerfile looks as follows:
In the Dockerfile we install the Python base image for our app. Then the requirement file is added, which contains the packages needed to run our Python script. After the installation of the required packages the app is added into the container. At last, we expose the port of our Flask app and run it. Make sure you have all the needed files in one folder including the app, the Dockerfile, requirements file and machine learning model.
Let’s move to the folder in our command tool.
Then, build the image
Just like before you can test the image through Postman.
Of course, you may want to check the containers and stop it through the following commands:
Stop the container through:
Then login into your Docker Hub.
Let’s tag our Docker Image.
Next, we push our Docker image into our Docker Hub repository.
Please confirm that the push was successful.
Congratulations! We arrived at our third task, managing our container using Kubernetes in Kyma runtime. Therefore, we create the following deployment file. Make sure to update line 31 to your Docker ID.
Save the YAML file and launch Kyma.
Then, create a new namespace.

Browse for your YAML file and press ,,Deploy’’.

Wait until the deployment is successful.
You can click on to the Pods and check if it is running successfully.
Now, please click on to API Rules on the left and create a new API Rule.
Add a name and a hostname all in small letters. Of course, you can choose from different access strategies. Then click on ,,Create’’.
Copy the API rule to your clipboard.
Back in Postman execute the following GET request.
I hope this Hands-On tutorial helped you to get started with Kyma and to bring more machine learning models into production. There are of course many other services and intelligent technologies available in our SAP Business Technology Platform. Have a look in our Service Catalog and bind them to your application.
If you want to dig deeper into Kyma, try out the following Hands-On materials:
I want to thank sarah.detzler, stojanm and mike.khatib for their support while writing this Hands-On tutorial.
Cheers!
Yannick Schaper
Before we jump into the technical details, let us briefly summarize the main technologies needed for this task:
Docker will be our containerization platform that packages our application with all its dependencies in the form of a container. This means we don’t have to worry about different Python environments installed on our local laptop or any other requirement issues. Also, the needed Python packages in the correct version will be taken care off. Hence, we can easily share our app with other users. If you don’t have Docker running yet, you can install Docker for Windows under the following link and create an account under Docker Hub.
Kyma is an open-source project built on top of Kubernetes, which is a container orchestration engine for automating deployment, scaling, and management of containerized applications. Kyma is a fully managed Kubernetes based runtime. It allows you to build extensions through microservices and serverless functions. Are you curious to try it out? This blog post describes in detail how you can enable Kyma as part of the SAP Business Technology Platform trial.
Flask is a framework which can be leveraged in Python to build web applications. We will use it to create an application, which generates predictions from new observations using our trained model. The key for this will be a straightforward API endpoint. In addition, we will use Visual Studio to run our Python script.
This is of course a lot to cover in one Hands-On Tutorial. The following blog posts show an intuitive Hello World example and really helped me to get started:
- Deploy a Python Application using Docker Container
- Manage your First Container using Kubernetes in Kyma Runtime
Hence, what will you learn in this Hands-On tutorial?
- Create an API endpoint which enables a user to create predictions on the fly with a trained machine learning model.
- Containerize the Python script for our app in a Docker Image with all the needed requirements and dependencies.
- Deploy and manage our container using Kubernetes in Kyma runtime, bringing the opensource world and SAP world together.
Creating an optimal machine learning model takes a lot of time and hard work. For this Hands-On tutorial this is already taken care of. You can find all the needed materials in the following GitHub repository. But what does our machine learning model actually do? To put it simple, our optimized and trained random forest model predicts if a transaction is fraudulent or not. Of course, before we can use it in our app, we must import the required packages. Then, we load the trained model from our working directory and start building our API with Flask. Hence, we create the API endpoint ,,predict’’ and write the function which will create our predictions based on a new observation. Further, we need to transform the data from the GET request into a format which our model can digest. After that the data is passed into the predict function of our model and the result is saved into a new variable. At last, we return the result of our prediction and run the app on a local host and given port.

If you execute the Python script, you should see the following output in your terminal.

To test the API endpoint, we can for example use Postman. Please, execute the following GET request:
http://<hostname:port>/predict?c=0&a=4900&obo=10000&nbo=5100&obd=1000&nbd=5900&dl=1
We can also see the successful GET request in our terminal. This also allows us to debug our app in case of an error.

Now to our second task. Let us deploy our app into a Docker Image, such that we can easily share it with customers or colleagues. Our Dockerfile looks as follows:

In the Dockerfile we install the Python base image for our app. Then the requirement file is added, which contains the packages needed to run our Python script. After the installation of the required packages the app is added into the container. At last, we expose the port of our Flask app and run it. Make sure you have all the needed files in one folder including the app, the Dockerfile, requirements file and machine learning model.

Let’s move to the folder in our command tool.
cd C:\HandsOnKymaThen, build the image
docker build -t ml-app .Just like before you can test the image through Postman.
docker run -p 8001:8001 ml-app
Of course, you may want to check the containers and stop it through the following commands:
docker container lsStop the container through:
docker stop <CONTAINER ID>Then login into your Docker Hub.
docker loginLet’s tag our Docker Image.
docker tag ml-app <YourDockerID>/ml-app-imageNext, we push our Docker image into our Docker Hub repository.
docker push <YourDockerID>/ml-app-imagePlease confirm that the push was successful.

Congratulations! We arrived at our third task, managing our container using Kubernetes in Kyma runtime. Therefore, we create the following deployment file. Make sure to update line 31 to your Docker ID.

Save the YAML file and launch Kyma.

Then, create a new namespace.
Further, choose ,,Deploy new workload’’ and ,,Upload YAML’’.


Browse for your YAML file and press ,,Deploy’’.
Wait until the deployment is successful.

You can click on to the Pods and check if it is running successfully.

Now, please click on to API Rules on the left and create a new API Rule.
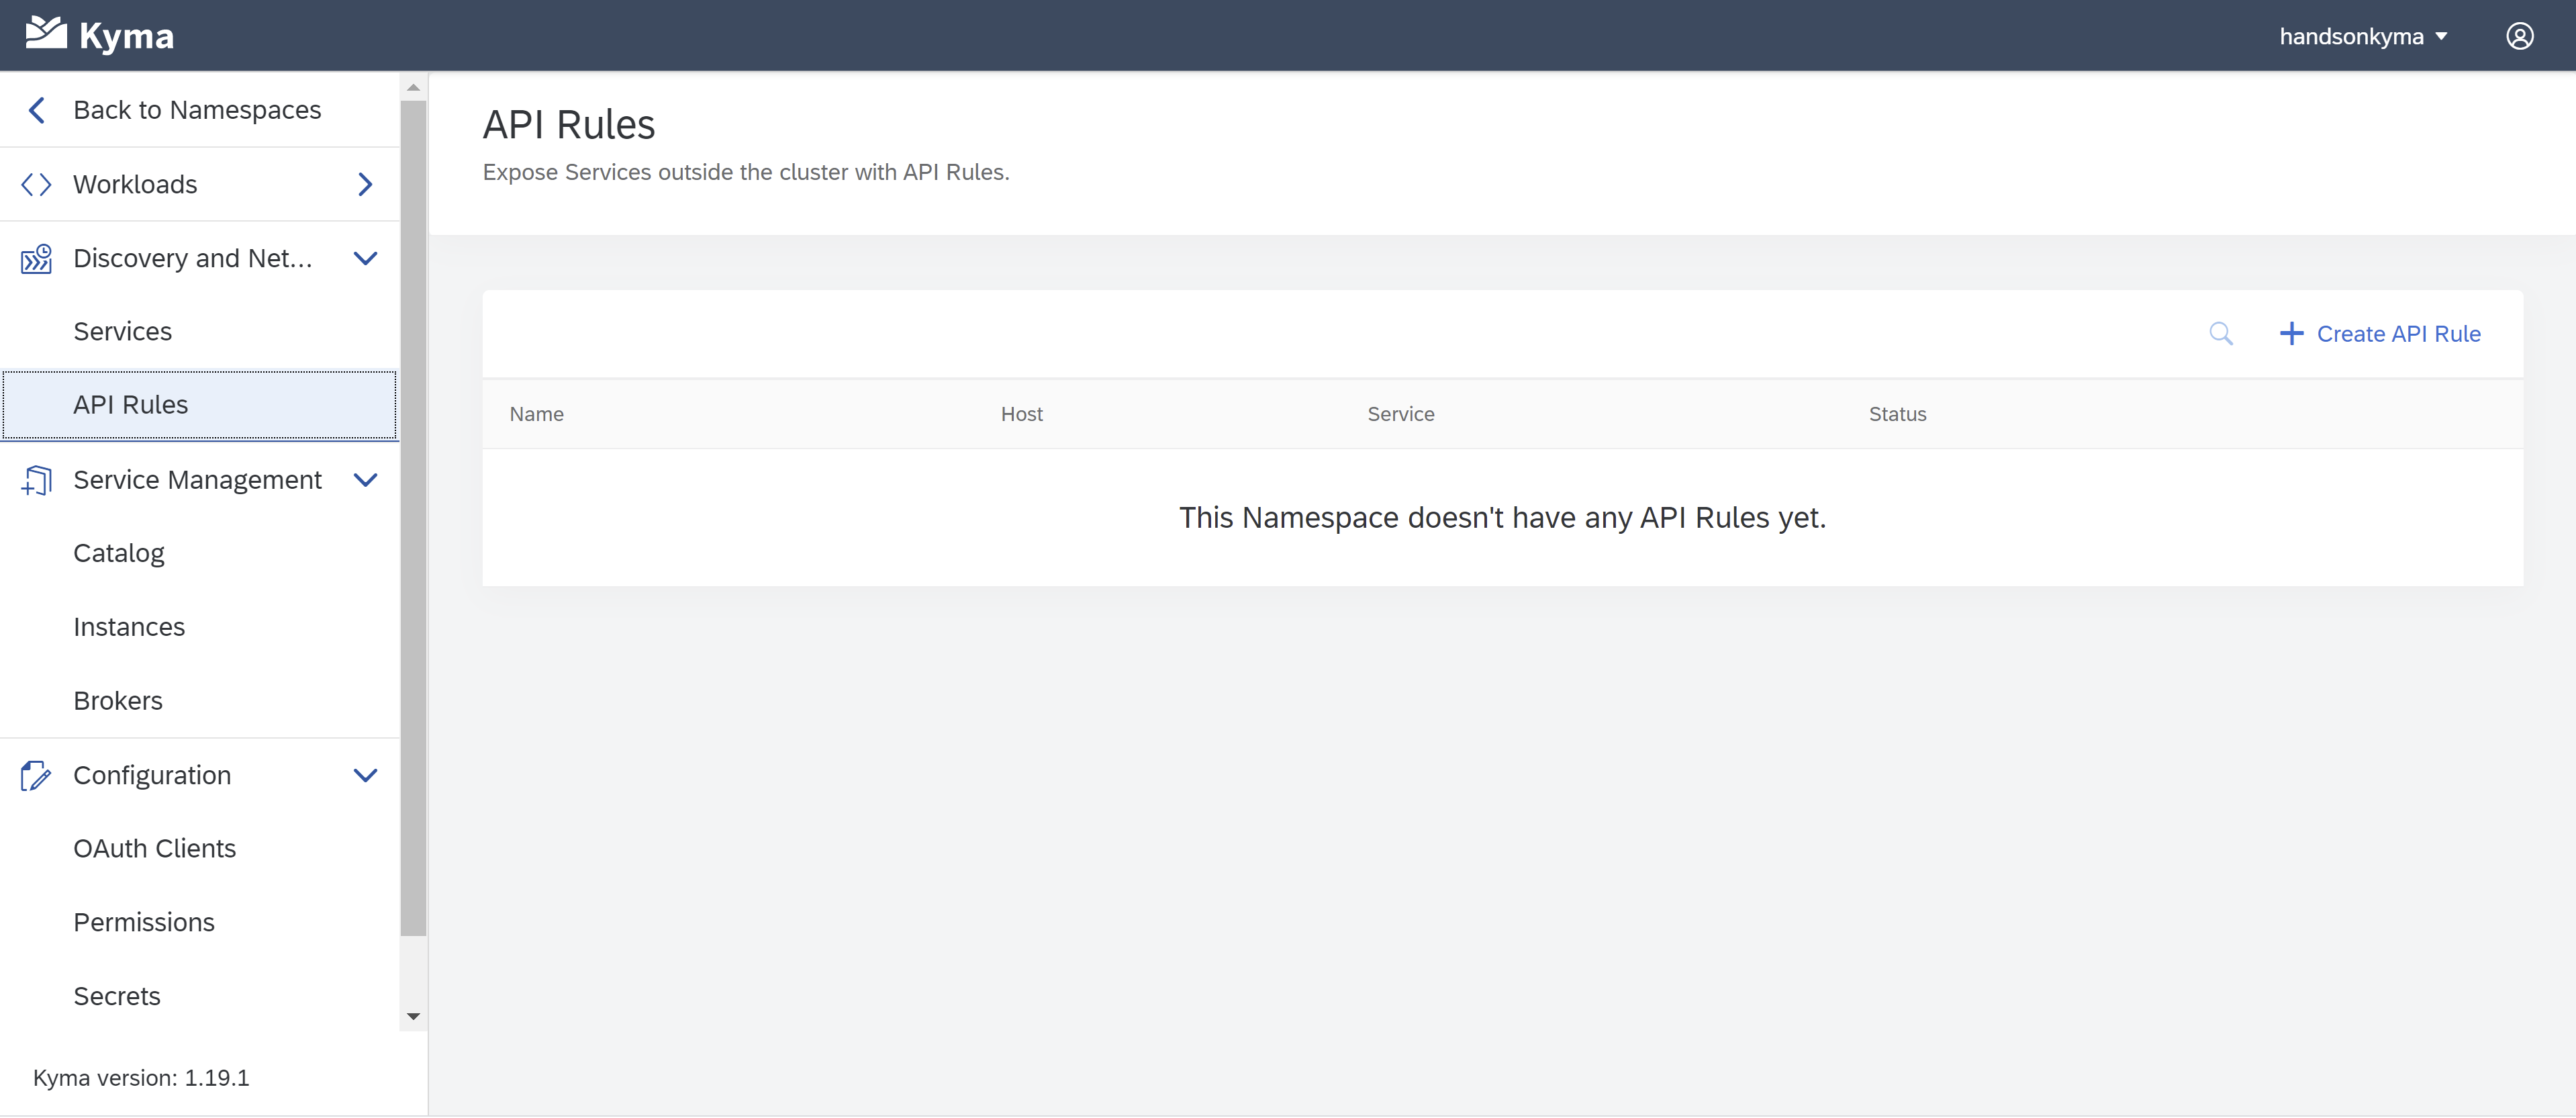
Add a name and a hostname all in small letters. Of course, you can choose from different access strategies. Then click on ,,Create’’.
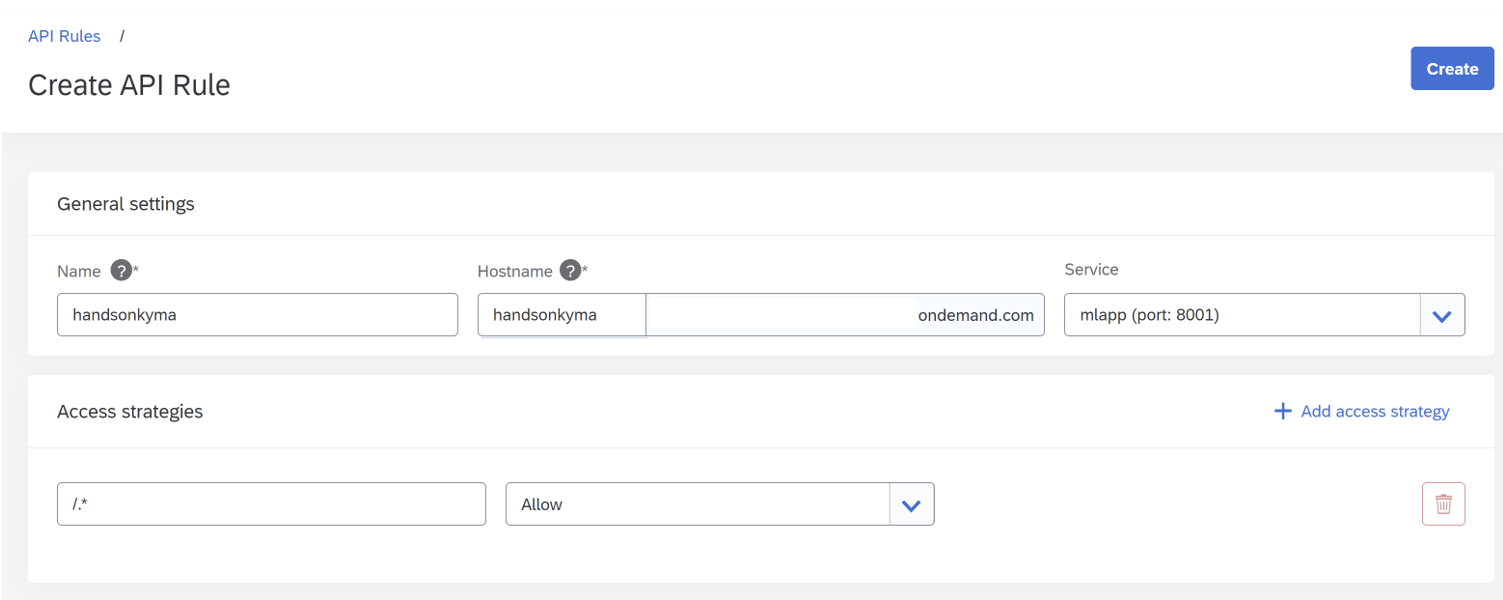
Copy the API rule to your clipboard.

Back in Postman execute the following GET request.

I hope this Hands-On tutorial helped you to get started with Kyma and to bring more machine learning models into production. There are of course many other services and intelligent technologies available in our SAP Business Technology Platform. Have a look in our Service Catalog and bind them to your application.
If you want to dig deeper into Kyma, try out the following Hands-On materials:
- Manage your First Container using Kubernetes in SAP Cloud Platform, Kyma Runtime
- Develop a Full-Stack Application in the Kyma Runtime
- Build an Application in the Kyma Runtime
I want to thank sarah.detzler, stojanm and mike.khatib for their support while writing this Hands-On tutorial.
Cheers!
Yannick Schaper
- SAP Managed Tags:
- Machine Learning,
- SAP BTP, Kyma runtime,
- Kyma Open Source,
- Big Data,
- SAP Business Technology Platform
Labels:
7 Comments
You must be a registered user to add a comment. If you've already registered, sign in. Otherwise, register and sign in.
Labels in this area
-
ABAP CDS Views - CDC (Change Data Capture)
2 -
AI
1 -
Analyze Workload Data
1 -
BTP
1 -
Business and IT Integration
2 -
Business application stu
1 -
Business Technology Platform
1 -
Business Trends
1,658 -
Business Trends
93 -
CAP
1 -
cf
1 -
Cloud Foundry
1 -
Confluent
1 -
Customer COE Basics and Fundamentals
1 -
Customer COE Latest and Greatest
3 -
Customer Data Browser app
1 -
Data Analysis Tool
1 -
data migration
1 -
data transfer
1 -
Datasphere
2 -
Event Information
1,400 -
Event Information
66 -
Expert
1 -
Expert Insights
177 -
Expert Insights
299 -
General
1 -
Google cloud
1 -
Google Next'24
1 -
Kafka
1 -
Life at SAP
780 -
Life at SAP
13 -
Migrate your Data App
1 -
MTA
1 -
Network Performance Analysis
1 -
NodeJS
1 -
PDF
1 -
POC
1 -
Product Updates
4,577 -
Product Updates
344 -
Replication Flow
1 -
RisewithSAP
1 -
SAP BTP
1 -
SAP BTP Cloud Foundry
1 -
SAP Cloud ALM
1 -
SAP Cloud Application Programming Model
1 -
SAP Datasphere
2 -
SAP S4HANA Cloud
1 -
SAP S4HANA Migration Cockpit
1 -
Technology Updates
6,873 -
Technology Updates
422 -
Workload Fluctuations
1
Related Content
- SAP Build Process Automation Pre-built content for Finance Use cases in Technology Blogs by SAP
- Consuming SAP with SAP Build Apps - Mobile Apps for iOS and Android in Technology Blogs by SAP
- Onboarding Users in SAP Quality Issue Resolution in Technology Blogs by SAP
- Now available: starter kit for genAI on SAP BTP in Technology Blogs by SAP
- How to use AI services to translate Picklists in SAP SuccessFactors - An example in Technology Blogs by SAP
Top kudoed authors
| User | Count |
|---|---|
| 39 | |
| 25 | |
| 17 | |
| 13 | |
| 7 | |
| 7 | |
| 7 | |
| 7 | |
| 6 | |
| 6 |