
- SAP Community
- Products and Technology
- Enterprise Resource Planning
- ERP Blogs by SAP
- Data Uploading in SAP S/4HANA from 2020 By using ...
Enterprise Resource Planning Blogs by SAP
Get insights and updates about cloud ERP and RISE with SAP, SAP S/4HANA and SAP S/4HANA Cloud, and more enterprise management capabilities with SAP blog posts.
Turn on suggestions
Auto-suggest helps you quickly narrow down your search results by suggesting possible matches as you type.
Showing results for
former_member73
Explorer
Options
- Subscribe to RSS Feed
- Mark as New
- Mark as Read
- Bookmark
- Subscribe
- Printer Friendly Page
- Report Inappropriate Content
03-09-2021
3:00 PM
Overview – Functions & Features
With the Legacy Data Migration new approach, the functionality will be helping the functional consultants without Developer skills.
This solution is available from S/4HANA Cloud 2008 and SAP S/4HANA 2020 onwards, this will be replaced by the BDC - Batch Data Communication / LSMW - Legacy System Migration Workbench / LTMC - Legacy Transfer Migration Cockpit.
The functional consultant can easy to use this application to migrate their legacy/mass load data (Greenfield/support projects.)
The data can be upload into the SAP S/4HANA system in two ways.
Key facilitators & Benefits: -
Available for SAP S/4HANA and SAP S/4HANA Cloud, included in licenses.
▪ Preconfigured migration objects.
▪ No developer skills are required.
▪ Step-by-step wizard by the system.
▪ Preconfigured migration objects and rules.
▪ Users can enter missing data on the fly during migration (while uploading the data from staging table/file if any key data missing then the user can enter details on the same screen without coming back and reprocess the entire file again.
▪ This Functionality will help to upload the Master data and transactional data (GL, Vendor-BP, Customer-BP, Assets, House bank accounts, and Transaction data).
▪ Predefined staging tables are available by design and separate file templates for each migration object depending on the migration scenario.
▪ The automated mapping between source and target structure.
▪ Migration programs are automatically generated – no data migration programs are required by the customer.
Step by step process simulated and attached screens shots with results below:
Fiori App - Migrate Your Data
Process Flow: -
1.Select Migration Object: The system automatically creates the staging table for each object.
2.Transfer data to staging Tables: Use the provided Templates files or your preferred tools.
3.Prepare the Staging Tables: Prepare the staging tables so data can be transferred.
4.Process mapping Tasks: Ensure that the source data is correctly mapped.
5.Simulate the Migration: Call the function module in test mode to check whether there are any issues.
6.Migrate data: Data updated in SAP and check the relevant reports and tables.
Access the Fiori app - Migrate your data
Note: More information from the available options “Monitoring / Mapping Task / Job Management / Finish Project”.
Here system automatically creating the staging tables for the selected migration objects.
On the migration project screen, you trigger all the steps that are required to transfer the data for each migration object to the target SAP S/4HANA system. Also, you can quickly access additional information and tasks.
Note:
Check the Introduction worksheet to get further details on how to fill the template.
Recommendations:-
Upload the migration file: -
Select the “Upload file” option from the list shown below the screen
Upon upload file, the initial status has been updated as “Validation scheduled” then the status will change to “Data successfully transferred to staging tables” as below 2nd screen.
Click on “show messages” as like above screen to check the details of the messages (error, Warning, Success, Information).
Note:
The target values can be changed while uploading the data (After executing the preparation step).
After confirming the mapping tasks status changed as confirmed.
Conclusion:
SAP Help link:
https://help.sap.com/viewer/d5699934e7004d048c4801b552f3b013/2102.500/en-US/121b34742a904d10bca907bb...
https://help.sap.com/viewer/DRAFT/d3a3eb7caa1842858bf0372e17ad3909/2020.002/en-US/e46095f3fb044369a9...
OSS Notes:
2988692 - SAP S/4HANA Migration Cockpit – Information about different versions
2733253 - FAQ for SAP S/4HANA migration cockpit. Migration approach: Transfer / Migrate data from staging tables
With the Legacy Data Migration new approach, the functionality will be helping the functional consultants without Developer skills.
This solution is available from S/4HANA Cloud 2008 and SAP S/4HANA 2020 onwards, this will be replaced by the BDC - Batch Data Communication / LSMW - Legacy System Migration Workbench / LTMC - Legacy Transfer Migration Cockpit.
The functional consultant can easy to use this application to migrate their legacy/mass load data (Greenfield/support projects.)
The data can be upload into the SAP S/4HANA system in two ways.
- Migrate data directly from SAP System.
- Migrate data using staging tables.
Key facilitators & Benefits: -
Available for SAP S/4HANA and SAP S/4HANA Cloud, included in licenses.
▪ Preconfigured migration objects.
▪ No developer skills are required.
▪ Step-by-step wizard by the system.
▪ Preconfigured migration objects and rules.
▪ Users can enter missing data on the fly during migration (while uploading the data from staging table/file if any key data missing then the user can enter details on the same screen without coming back and reprocess the entire file again.
▪ This Functionality will help to upload the Master data and transactional data (GL, Vendor-BP, Customer-BP, Assets, House bank accounts, and Transaction data).
▪ Predefined staging tables are available by design and separate file templates for each migration object depending on the migration scenario.
▪ The automated mapping between source and target structure.
▪ Migration programs are automatically generated – no data migration programs are required by the customer.
Step by step process simulated and attached screens shots with results below:
Fiori App - Migrate Your Data
- Business Role : AP_BR_CONFIG_EXPERT_DATA_MIG
Process Flow: -
1.Select Migration Object: The system automatically creates the staging table for each object.
2.Transfer data to staging Tables: Use the provided Templates files or your preferred tools.
3.Prepare the Staging Tables: Prepare the staging tables so data can be transferred.
4.Process mapping Tasks: Ensure that the source data is correctly mapped.
5.Simulate the Migration: Call the function module in test mode to check whether there are any issues.
6.Migrate data: Data updated in SAP and check the relevant reports and tables.
Access the Fiori app - Migrate your data
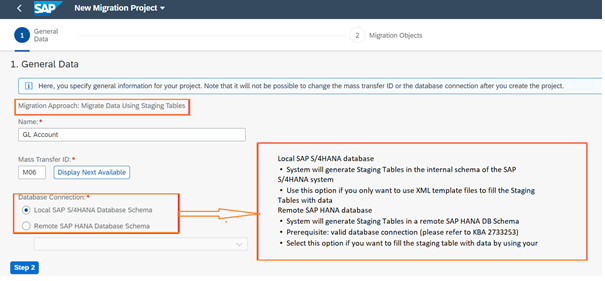
- Select Create Button
- Select Migrate data using Staging Tables

- Enter Name: GL Account (freely defined text)
- Click on Step2 for further process
- Select the relevant Migration object “FI-G/L account”
- Select migration objects - click on the button
- To continue with the next step, click on “Review”

- Confirm your data selection by choosing the “Create Project “button

- Select the “>” button

Note: More information from the available options “Monitoring / Mapping Task / Job Management / Finish Project”.

Here system automatically creating the staging tables for the selected migration objects.
- Select Migration object FI – G/L account

Select Back Arrow / previous screen.

On the migration project screen, you trigger all the steps that are required to transfer the data for each migration object to the target SAP S/4HANA system. Also, you can quickly access additional information and tasks.
- Select “Download template button” for the migration objects
Note:
- The migration cockpit provides XML template files for all delivered migration objects, download standard templates to your local folder, and maintain data as per the template fields.
- Do not delete or hide any fields in the template, the fields are not relevant for the business then leave them blank.


Check the Introduction worksheet to get further details on how to fill the template.
Recommendations:-
- Read the introduction and check field list before starting to fill the template
- Copy and paste values only using the following options: –
- Paste option then Values (V) - within XML file –
- Paste special and then choose Text - from somewhere else –
- Paste option then keep text only - from notepad/text editor
Upload the migration file: -
Select the “Upload file” option from the list shown below the screen

- Select the “Upload” button

- Select file from the desktop folder

Upon upload file, the initial status has been updated as “Validation scheduled” then the status will change to “Data successfully transferred to staging tables” as below 2nd screen.
- Status: Validation Scheduled

- Status: Data successfully transferred to staging tables

Click on “show messages” as like above screen to check the details of the messages (error, Warning, Success, Information).
- Select Back Arrow 2 times / to get the below screen.

- After Data successfully transferred to staging tables, select the action “Prepare” from the dropdown list.

- Upon selecting the “prepare” option, the process will be starting for further next action.

Note:
- Preparation will be starting then automatically updated as Preparation is completed.
- Tables “5” the GL staging tables are updated from the upload file.
- Instances “19” the number of records from the upload file.
- Open “11” the type of GL accounts like how many company codes, controlling areas, Reconciliation types, FSG, etc.

The target values can be changed while uploading the data (After executing the preparation step).

- Select the Back arrow 2 times / to get the below screen.
- Select Mapping Tasks from the drop-down list (System automatically propose the option “Mapping Task”)

- Select the Mapping Task check box for all the items.
- Select confirm button.

- Select the OK button then the status will move from To be confirmed to confirmed


After confirming the mapping tasks status changed as confirmed.

- Mapping task updated as Done “11”
- After confirming the mapping values status automatically set to “simulation”
- Select the “simulation” button from the dropdown list.

- Simulation started

- Simulation completed
- Simulation status Successful “19” has been updated.
- Next action Migration automatically updated in the screen.
- Select the “Migrate” button from the dropdown list.

- Select Ok button

- Process status: Migration started.

- Process status: Migration completed.
- Migration successful “19”

Conclusion:
- With the new process approach, we can upload all master records and transactional data without custom developments and easy to use this process.
- I can see the only one, time taking activity to maintain the data in uploading a file with various tabs, however, this app will help us to upload legacy data/mass data for running business to loading into the SAP S/4HANA system without any technical support.
- This package/solution is default available from SAP S/4HANA 2020 along with LTMC and from 2021 onwards we have only one solution i.e “Migration your data – Migration cockpit(old)” and no more LTMC available from SAP S/4HANA2021 onwards.
- Projects created using transaction LTMC (for SAP S/4HANA) or the app “Migrate your Data – Migration Cockpit (Old)” (for SAP S/4HANA Cloud) cannot be accessed using this new app.
- We can still use LSMW / BDC for upload data if the business still using SAP-GUI.
SAP Help link:
https://help.sap.com/viewer/d5699934e7004d048c4801b552f3b013/2102.500/en-US/121b34742a904d10bca907bb...
https://help.sap.com/viewer/DRAFT/d3a3eb7caa1842858bf0372e17ad3909/2020.002/en-US/e46095f3fb044369a9...
OSS Notes:
2988692 - SAP S/4HANA Migration Cockpit – Information about different versions
2733253 - FAQ for SAP S/4HANA migration cockpit. Migration approach: Transfer / Migrate data from staging tables
- SAP Managed Tags:
- Banking,
- FIN (Finance),
- FIN Accounts Receivable and Payable,
- FIN Controlling,
- FIN General Ledger
Labels:
14 Comments
You must be a registered user to add a comment. If you've already registered, sign in. Otherwise, register and sign in.
Labels in this area
-
Artificial Intelligence (AI)
1 -
Business Trends
363 -
Business Trends
22 -
Customer COE Basics and Fundamentals
1 -
Digital Transformation with Cloud ERP (DT)
1 -
Event Information
461 -
Event Information
24 -
Expert Insights
114 -
Expert Insights
156 -
General
1 -
Governance and Organization
1 -
Introduction
1 -
Life at SAP
415 -
Life at SAP
2 -
Product Updates
4,685 -
Product Updates
217 -
Roadmap and Strategy
1 -
Technology Updates
1,502 -
Technology Updates
89
Related Content
- Work center hierarchy migration object does not exist in S/4HANA 2023 version in Enterprise Resource Planning Q&A
- SAP Fiori for SAP S/4HANA - Composite Roles in launchpad content and layout tools in Enterprise Resource Planning Blogs by SAP
- The length of the field in the source, compare to the target structure, is different in Enterprise Resource Planning Q&A
- S/4 HANA Mock/Test Migration on 3SL to use another client in Test System in Enterprise Resource Planning Q&A
- Regarding Master Recipe upload Migration Object in PP in Enterprise Resource Planning Q&A
Top kudoed authors
| User | Count |
|---|---|
| 12 | |
| 11 | |
| 10 | |
| 8 | |
| 7 | |
| 6 | |
| 4 | |
| 4 | |
| 4 | |
| 3 |