
- SAP Community
- Products and Technology
- Technology
- Technology Blogs by SAP
- Use SAP BusinessObjects REST API with SAP Intellig...
Technology Blogs by SAP
Learn how to extend and personalize SAP applications. Follow the SAP technology blog for insights into SAP BTP, ABAP, SAP Analytics Cloud, SAP HANA, and more.
Turn on suggestions
Auto-suggest helps you quickly narrow down your search results by suggesting possible matches as you type.
Showing results for
Product and Topic Expert
Options
- Subscribe to RSS Feed
- Mark as New
- Mark as Read
- Bookmark
- Subscribe
- Printer Friendly Page
- Report Inappropriate Content
02-17-2021
10:25 AM
In this blog I will show, how you can use the SAP Intelligent RPA 2.0 Low-Code/No-Code approach on top of the SAP BusinessObjects REST API.
Knowing the concepts can be very useful also when you are working with other SAP Applications, Here a similar blog for SAP Analytics Cloud
You will learn how to
In the first part, I will create a Project and Package with some sample automations for the BOE Platform (Logon, Logoff, Group). Here we will use the SAP BusinessObjects REST API, so this part needs Javascript skills and is typically done by Expert Bot Developers.
In the second part, we will create another Project and here we can use the package created in the first part. This will allow Citizen Developers or Business Process Experts to define automations, no coding skills are needed.
For general information regarding SAP Intelligent RPA (videos, blogs, openSAP courses) please read the blog SAP Intelligent RPA – enablement and getting started there is also a free trial.
We will create a New Project, a Data Type to manage session parameters and Automations for Logon, Logoff and manage the SAP BusinessObjects Groups. Finally we generate a Package from the project and this package will be used in the second part.
Most of the steps are the same like for the Automation - Logoff, so we will just have screens for the differences. To keep it simple in the sample it is only possible to add a group, but the automation could be enhanced to delete groups, ...
Now you can test the Logon, Group and Logoff in a new automation, which you probably would do to make sure everything works fine. You can also use easily debugging features of Cloud Studio when testing in the same project.
As we are now creating a package from our project, we will use the package in the second part and also test our automations in the second project.
Now we will create and test an automation using the package.
You have used several key concepts, how to
Hope this was useful and you can now start your own journey in using the REST API of your SAP Application.
Knowing the concepts can be very useful also when you are working with other SAP Applications, Here a similar blog for SAP Analytics Cloud
You will learn how to
- create Automations for reuse in other projects (like Activities provided by the Intelligent RPA SDK packages)
- generate and share a reusable Package
- use a Data Type and Input and Output Parameters
- use Javascript in the Custom script Activity (REST requests using the irpa_core.request() method)
- the basics of using the REST API and get a template you can use to implement your own requirements
Overview
In the first part, I will create a Project and Package with some sample automations for the BOE Platform (Logon, Logoff, Group). Here we will use the SAP BusinessObjects REST API, so this part needs Javascript skills and is typically done by Expert Bot Developers.
In the second part, we will create another Project and here we can use the package created in the first part. This will allow Citizen Developers or Business Process Experts to define automations, no coding skills are needed.
Here how the final automation looks like in Cloud Studio:

For general information regarding SAP Intelligent RPA (videos, blogs, openSAP courses) please read the blog SAP Intelligent RPA – enablement and getting started there is also a free trial.
First Part: Project and Package
We will create a New Project, a Data Type to manage session parameters and Automations for Logon, Logoff and manage the SAP BusinessObjects Groups. Finally we generate a Package from the project and this package will be used in the second part.
- Create a New Project

- Use the Project name: BOE REST-API CustomScript Sample
- To work with the REST API of BusinessObjects, the SAP Intelligent RPA Core SDK is required.So make sure this package is added to your project.
If the Core SDK package is not available on your tenant, you can acquire it from the Store. - Select Dependencies - Manage Dependencies

- Add Dependency
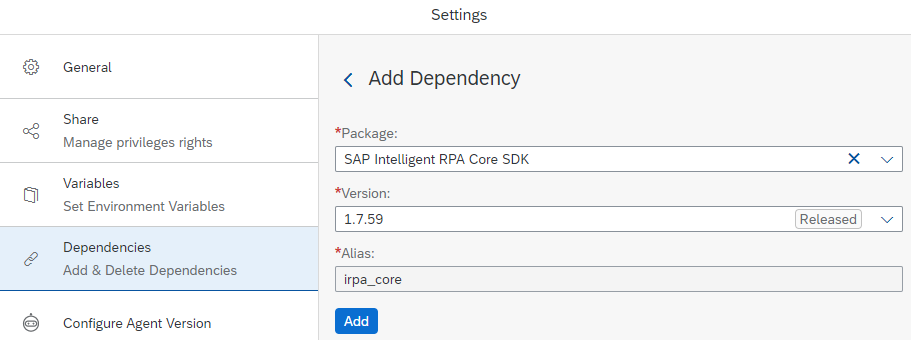
- You will find the package in the list

- Select Create - Data Type

- Use the name dtSessionBOE

- Define the fields of the data type as show in the picture below
- use New Field to add a new row
- use New Child to group parameters, here username, password, authentication
- authentication shows also, how to define values that can be selected later (secEnterprise,secLDAP,secWinAD,secSAPR3)

- Select Save
Automation - Logon
- Select Create - Automation
- The Configure agent version may be displayed - select your installed agent version and confirm

- Use the name Logon - CustomScript for the automation
optional description: Logon to SAP BusinessObjects using REST API
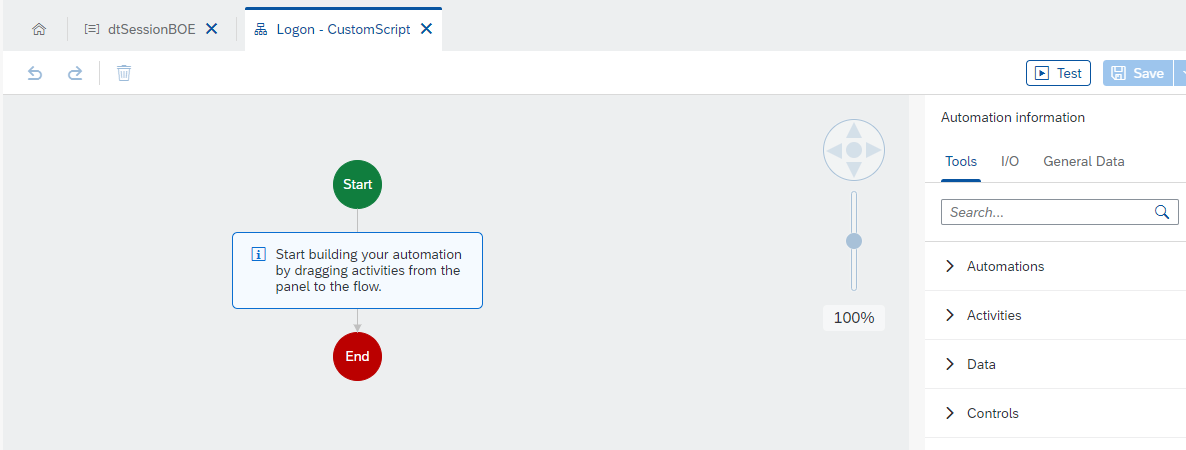
- Select I/O to define an Output parameter
The automation will create a BusinessObjects session and we will use this session in other automations as input parameter. We will set the value for the output parameter later in this automation.
name: sessionBOE
select type dtSessionBOE from the list

- Add the activity to set the session parameters to your automation
- select from Data - Data Types dtSessionBOE and drop to the flow diagram

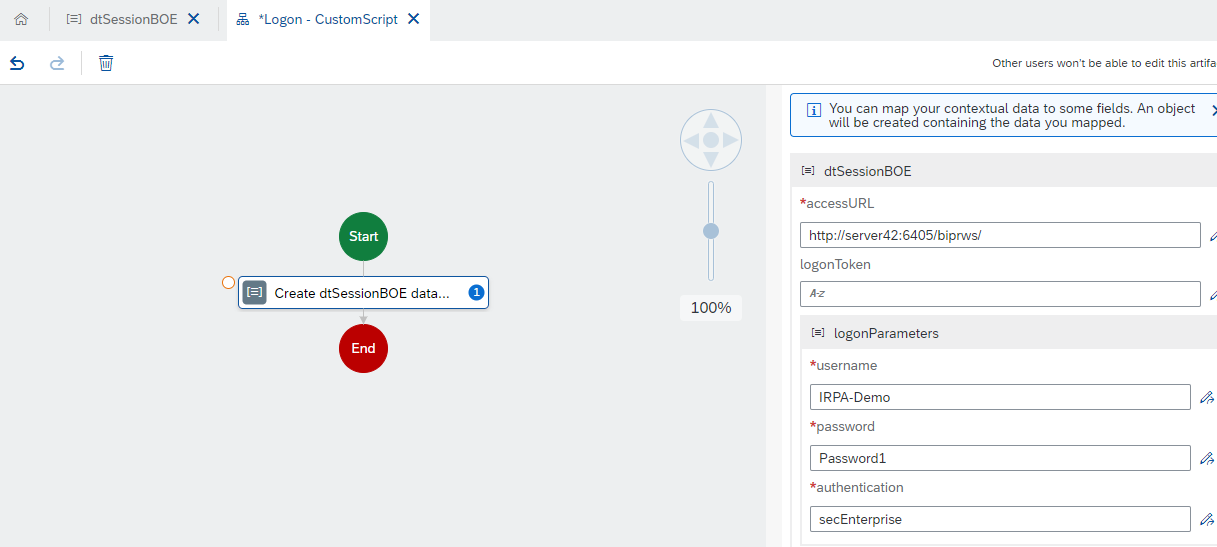
- Select the activity Create dtSessionBOE... in the flow diagram and select Edit Activity

- Enter the parameters of your BusinessObjects system
access URL of the REST API, username, password, ...
important: Slash character / at the end of the url, e.g: http://server42:6405/biprws/
- Save your automation - press Save
- Add the activity Custom Script to your automation

- Select the activity Custom script in the flow diagram and select Edit Script

- Select Add new input parameter
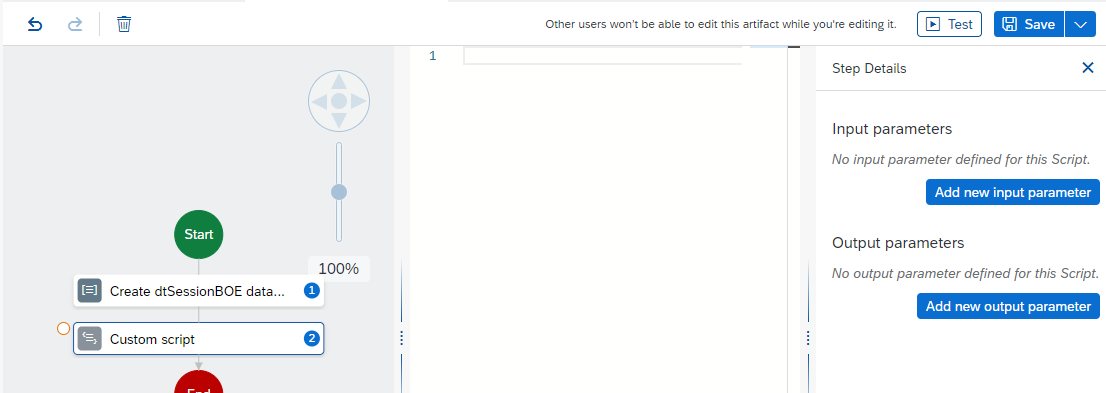
- Enter Input parameter name pSession and select type dtSessionBOE from the list
- Copy the following script code to line 1
const options = {

    resolveBodyOnly: true,

    responseType: 'json',

    url: pSession.accessURL + 'logon/long',

    method: 'POST',

    headers: {

        'Accept': 'application/json',

        'Content-Type': 'application/json'

    },

    body: JSON.stringify({

        'password': pSession.logonParameters.password,

        'clientType': '',

        'auth': pSession.logonParameters.authentication,

        'userName': pSession.logonParameters.username

    })

};

const response = await irpa_core.request.call(options);

//irpa_core.core.log(response);

pSession.logonToken = response.logonToken;
You should have the following definition
red marker is an indicator, that the input parameter is missing (see next step)

Select Custom Script in the flow diagram
- For parameter pSession, select generatedObject from the list
generatedObject is the Output Parameter from the step Create dtSessionBOE data object

- Select End in the flow diagram
now we will assign the value for the output parameter of the automation, we have defined at the beginning. Select generatedObject from the list. In the custom script we have stored the session token in this variable .

- Save your automation
Test the Logon
- Select Test
- On the Test Automation dialog select your Environment, here Test

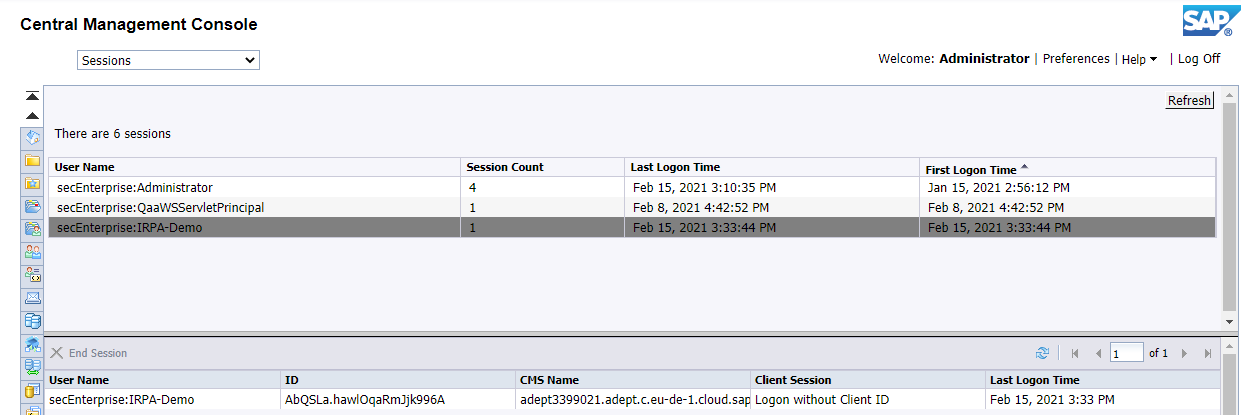
- Test should be successful

- You can check the Session in the Central Management Console of your BusinessObjects system
Automation - Logoff
- Select Create - Automation
- Use the name Logoff - CustomScript for the automation
optional description: Logoff from SAP BusinessObjects using REST API - Select I/O to define an Input parameter
The automation will use the session created with the Logon - Custom Script automation.
name: sessionBOE
select type dtSessionBOE from the list

- Add the activity Custom Script to your automation

- Select the activity Custom script in the flow diagram and select Edit Script
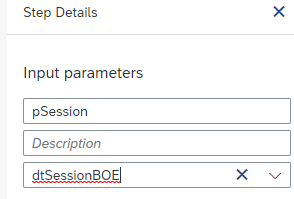
- Select Add new input parameter
- Enter Input parameter name pSession and select type dtSessionBOE from the list
- Copy the following script code to line 1
const options = {

    resolveBodyOnly: true,

    responseType: 'json',

    url: pSession.accessURL + 'logoff',

    method: 'POST',

    headers: {

        'Accept': 'application/json',

        'Content-Type': 'application/json',

        'X-SAP-LogonToken': pSession.logonToken

    }

};

irpa_core.core.log(options);

const response = await irpa_core.request.call(options);

irpa_core.core.log(response);

pSession.logonToken = null;
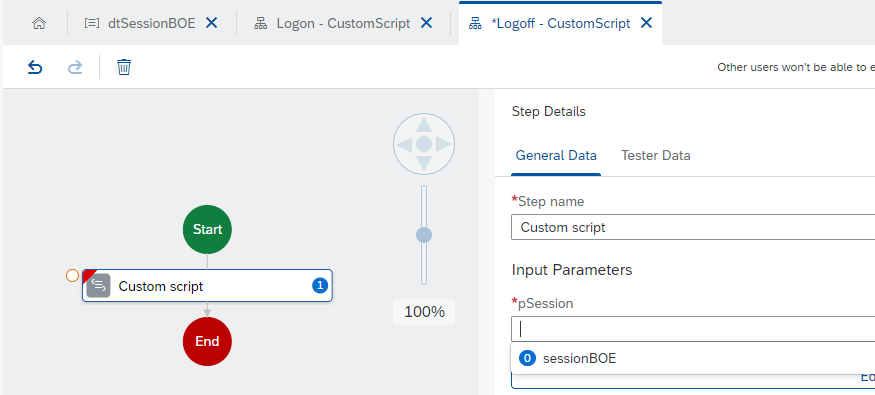
- You should have the following definition
red marker is an indicator, that the input parameter is missing (see next step)

Select Custom Script in the flow diagram
- For parameter pSession, select sessionBOE from the list
this is the Input Parameter for our automation, created with the Logon automation
- Save the automation
Automation - Group
Most of the steps are the same like for the Automation - Logoff, so we will just have screens for the differences. To keep it simple in the sample it is only possible to add a group, but the automation could be enhanced to delete groups, ...
- Select Create - Automation
- Use the name Group - CustomScript for the automation
optional description: Manage Groups in SAP BusinessObjects using the REST API - Select I/O to define an Input parameter
The automation will use the session created with the Logon - Custom Script automation.
name: sessionBOE
select type dtSessionBOE from the list
in addition we have the parameters
- method: to define if a group should be added, deleted, ...
- name: the name of the group

- Add the activity Custom Script to your automation
- Select the activity Custom script in the flow diagram and select Edit Script
- Select Add new input parameter
- Enter Input parameter name pSession and select type dtSessionBOE from the list
- Select Add new input parameter
- Enter Input parameter name name and select type String from the list
- Copy the following script code to line 1
const options = {
resolveBodyOnly: true,
responseType: 'json',
url: pSession.accessURL + '/v1/usergroups/usergroup',
method: 'POST',
headers: {
'Accept': 'application/json',
'Content-Type': 'application/json',
'X-SAP-LogonToken': pSession.logonToken
},
body : JSON.stringify({
'name': name
})
};
const response = await irpa_core.request.call(options);
- You should have the following definition
red marker is an indicator, that the input parameter is missing (see next step)

Select Custom Script in the flow diagram
- For parameter pSession, select sessionBOE from the list
this is the Input Parameter for our automation, created with the Logon automation - For parameter name, select name from the list, this is the input parameter defined for the automation.

- Save the automation
Test the automations
Now you can test the Logon, Group and Logoff in a new automation, which you probably would do to make sure everything works fine. You can also use easily debugging features of Cloud Studio when testing in the same project.
As we are now creating a package from our project, we will use the package in the second part and also test our automations in the second project.
Generate and Share the Package
- Select Projects
- On the sample project select the icon Generate Package

- Confirm the name and select Generate Package

- Select Packages
- On the package select More Options and Share

- On Share Package set Share with: Anyone and Authorization: Read, click on Share
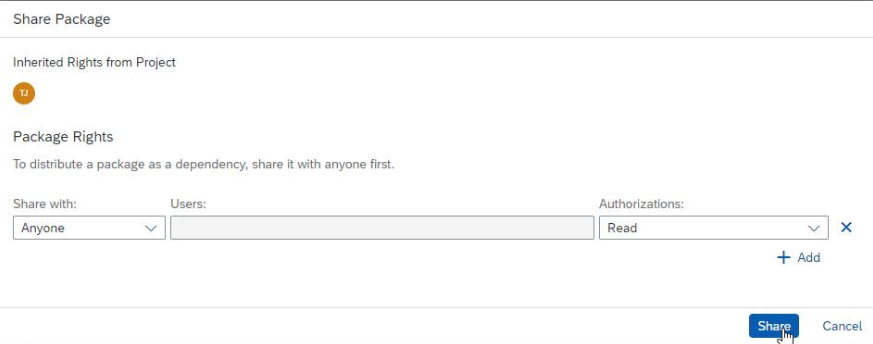
- Your Package is now shared and can be used in Projects
Second Part: No-code Project
Now we will create and test an automation using the package.
Automation – Create Group
- Create a New Project
- Use the Project name: Demo BOE
- Select Dependencies – Manage Dependencies
- Select Other and click Add Dependency

- Select the Package and Version from the list and click Add

- The package is in the list, select close

- Select Create – Automation
- The Configure agent version may be displayed – select your installed agent version and confirm
- Use the name Create Group for the automation
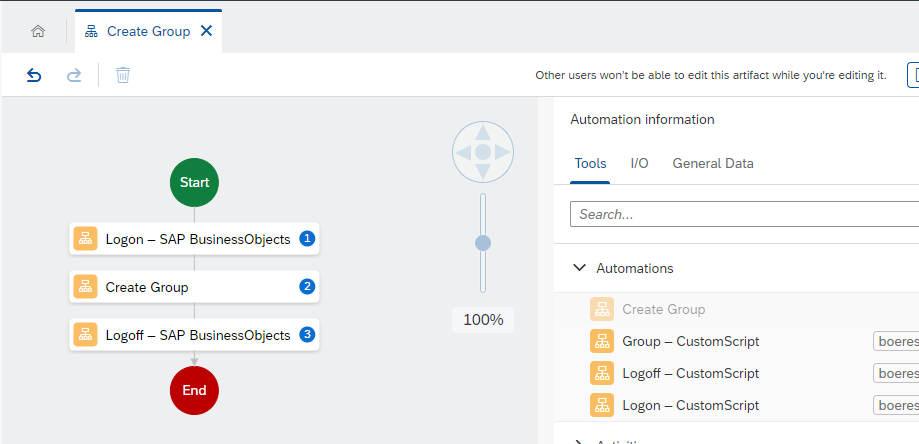
- Add the automations Logon, Group and Logoff to your flow

- Select each step and rename the steps, use
Logon – SAP BusinessObjects
Create Group
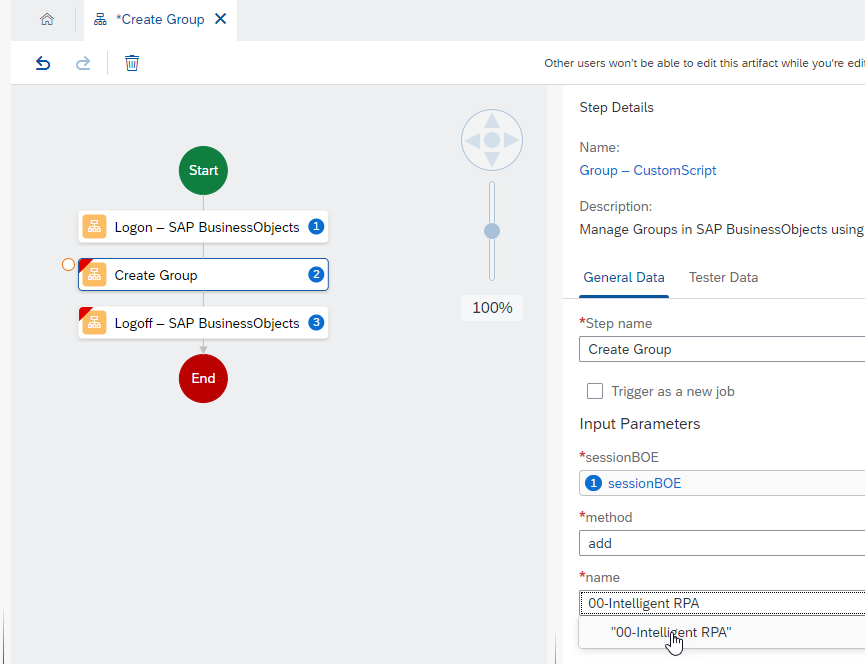
Logoff – SAP BusinessObjects - Select step Create Group and set the Input Parameters
sessionBOE from the list
add string as method
00-Intelligent RPA string for the Group to create
- Select step Logoff – SAP BusinessObjects and set the Input Parameter
sessionBOE from the list

- Save the automation
Test the automation
- Select Test
- Select your Environment
- The automations should be executed successfully

- The group is created in your SAP BusinessObjects system

Conclusion
You have used several key concepts, how to
- create Automations for reuse in other projects (like Activities provided by the Intelligent RPA SDK packages)
- generate and share a reusable Package
- use a Data Type and Input and Output Parameters
- use Javascript in the Custom script Activity (REST requests using the irpa_core.request() method)
- the basics of using the REST API and a template you can use to implement your own requirements
Hope this was useful and you can now start your own journey in using the REST API of your SAP Application.
Labels:
4 Comments
You must be a registered user to add a comment. If you've already registered, sign in. Otherwise, register and sign in.
Labels in this area
-
ABAP CDS Views - CDC (Change Data Capture)
2 -
AI
1 -
Analyze Workload Data
1 -
BTP
1 -
Business and IT Integration
2 -
Business application stu
1 -
Business Technology Platform
1 -
Business Trends
1,658 -
Business Trends
93 -
CAP
1 -
cf
1 -
Cloud Foundry
1 -
Confluent
1 -
Customer COE Basics and Fundamentals
1 -
Customer COE Latest and Greatest
3 -
Customer Data Browser app
1 -
Data Analysis Tool
1 -
data migration
1 -
data transfer
1 -
Datasphere
2 -
Event Information
1,400 -
Event Information
66 -
Expert
1 -
Expert Insights
177 -
Expert Insights
299 -
General
1 -
Google cloud
1 -
Google Next'24
1 -
Kafka
1 -
Life at SAP
780 -
Life at SAP
13 -
Migrate your Data App
1 -
MTA
1 -
Network Performance Analysis
1 -
NodeJS
1 -
PDF
1 -
POC
1 -
Product Updates
4,577 -
Product Updates
345 -
Replication Flow
1 -
RisewithSAP
1 -
SAP BTP
1 -
SAP BTP Cloud Foundry
1 -
SAP Cloud ALM
1 -
SAP Cloud Application Programming Model
1 -
SAP Datasphere
2 -
SAP S4HANA Cloud
1 -
SAP S4HANA Migration Cockpit
1 -
Technology Updates
6,873 -
Technology Updates
427 -
Workload Fluctuations
1
Related Content
- Job and Automation Monitoring features - SAP Cloud ALM in Technology Blogs by Members
- SAP Build Process Automation Agent 3 Updates and Key Benefits in Technology Blogs by SAP
- What is the next product of SAP BusinessObjects Business Intelligence (BI) 4.3? Is it still on-prem? in Technology Q&A
- Recap — SAP Data Unleashed 2024 in Technology Blogs by Members
- SAP Build | SAP Build Code – When Generative AI comes to help! in Technology Blogs by SAP
Top kudoed authors
| User | Count |
|---|---|
| 41 | |
| 25 | |
| 17 | |
| 14 | |
| 9 | |
| 7 | |
| 7 | |
| 6 | |
| 6 | |
| 6 |