In this blog post we will create simple Integration Flow in SAP Integration Suite with following steps:
- Sender provides request, which contains order number via HTTPS
- Then we retrieve this number and store it in the message header. For this step we will use Content Modifier. Please, take a look at this blog post if you need additional details regarding Content Modifier.
- At the next step additional information for the order will be extracted via OData Service.
- Finally we send the enriched message to receiver.
During the scenario we will use SAP Integration Suite and
Postman.
Building Integration Flow
To start we need to create a
Package. We will do it in Design view of SAP Integration Suite and we will fill only mandatory fields:

Design view

Fill mandatory fields
Then let´s create Integration Flow on
Artifacts tab:


Let´s open newly created Integration Flow in
Edit mode:

Edit
Create connection between
Sender and
Start point:
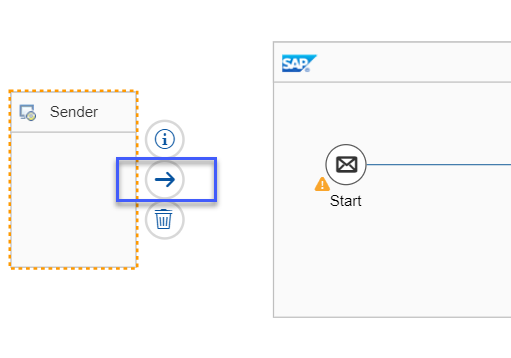
Drag and Drop arrow

Select
SOAP type in the newly appeared window:


In the lower part of the screen provide any address starting with
/ sign at
the Connection tab:

Add a
Content Modifier in the Flow:

Content Modifier

And let´s do the customizing of this step. To start we need to check our example xml message. Let´s take structure from
this open source resource and adjust the message for our needs:
<SOAP-ENV:Envelope xmlns:SOAP-ENV="http://schemas.xmlsoap.org/soap/envelope/">

    <SOAP-ENV:Body>

            <orderNumber>10350</orderNumber>

    </SOAP-ENV:Body>

</SOAP-ENV:Envelope>
Now, when we know the structure of our incoming message, we need to take order number from it and store the number in header area of the message. The detailed mechanism of this operation was described in
this blog, therefore we will provide only final result here:

Content Modifier configuration
Further, let´s add
Content Enricher block:

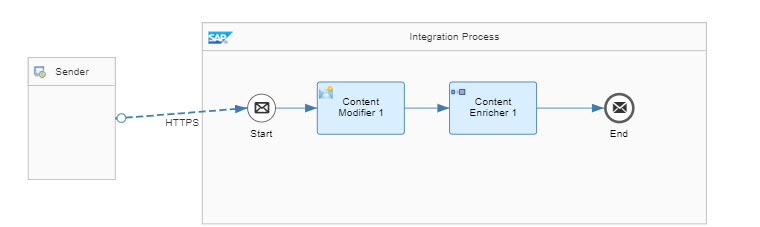
Content Enricher
This operator will take the returned from the receiver message and
combine it with the original one. To have the result of two combined messages in one
enriched payload we need "
Combine"
Algorithm on the
Processing tab:

Content Enricher: Processing tab
To get message from the receiver, we will use OData service. Firstly, we connect the Receiver and the Content Enricher:

Receiver to Content Enricher
Use OData type:


Once added, let´s go to customizing area of the connection,
Connection tab:

Connection tab
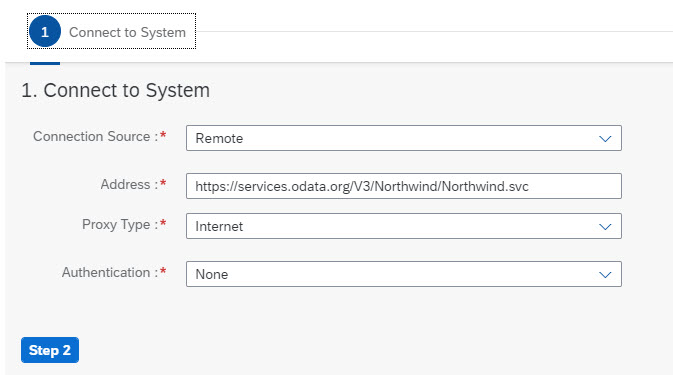
Here we need to specify
address of the OData service to which we will connect. For this demo we will use public service, address of which could be copied from
this link.

Specify address
Let´s leave the rest fields unchanged and go to the
Processing tab. We leave "
Operation Details" with
GET operation, as we need to receive additional information from the Receiver. In the 2nd mandatory field "
Resource Path" we need to specify the append to the OData service, which will be used during the connection to the service provider. To do it we can use Query Editor, which is available by Select button:

Processing tab
On the first step you do not need to edit any fields:
First step
On the 2nd step the Editor calls the service and retrieves available fields. In "Select Entity" field we need to select Orders for our use case:

Select Entity
As a result we get list of fields, available for the Order entity. Four our scenario we will use fields
OrderID, ShippedDate, ShipName, ShipAddress, ShipCity, ShipPostalCode, and ShipCountry:

Select fields
In the 3rd step we can specify conditions for our "select". As it was stated, we need
OrderID, which is
Equal to the number, which was received from the incoming message and stored in the
header area by OrderNo variable on the Content Modifier step:

Filter By and Finish
Now our query is ready:

Set-up
Saving and deploying
Now let´s
Save and
Deploy the Integration flow:

Save and deploy
To check the status of the Integration flow let`s go to the
Operations view:

Operation view

Here we need to wait until the status of the flow would be
Started and copy the
URL of the Flow:

Testing
Now let´s got to Postman and create new tab:

In this new tab change the type of the request to
POST and enter the copied URL:

Let´s go to the
Authorization tab, select
Basic Auth and enter credentials for the Integration Suite:

Authorization tab
Finally let´s go to the
Body tab, select
raw type of
XML message and paste the message we composed earlier:

Body
Now we can click
Send and check the resulting message:

Resulting message
Conclusion
As you can see, the message, which we received as the reply, contains the number, we sent and additional information, which was queried based on the number we sent, and based on request, we composed earlier.
With this simple schema you can combine information from different sources and gather information form the one source, but using different services.
