
- SAP Community
- Products and Technology
- Technology
- Technology Blogs by SAP
- How To Connect Your Corporate Github To SAP Busine...
Technology Blogs by SAP
Learn how to extend and personalize SAP applications. Follow the SAP technology blog for insights into SAP BTP, ABAP, SAP Analytics Cloud, SAP HANA, and more.
Turn on suggestions
Auto-suggest helps you quickly narrow down your search results by suggesting possible matches as you type.
Showing results for
Advisor
Options
- Subscribe to RSS Feed
- Mark as New
- Mark as Read
- Bookmark
- Subscribe
- Printer Friendly Page
- Report Inappropriate Content
02-11-2021
7:24 PM
In this tutorial, I will try to walk you through the process of setting up a connection between your Corporate Github and the SAP Business Application Studio.
Prerequisite setup
Process blueprint
Step 1 : Generate personal access token from the corporate github.
The personal access token will essentially serve as your password and it will have specific authorizations (scopes) associated with it to prevent abuse of the token. Let's now jump into our corporate/enterprise github account and generate the personal access token.
On the settings page, select personal access token and then click the Generate New Token button.
In the note text box, provide a descriptive name for the new token you’re generating. Choose the scopes that should apply to the personal access token you’re generating. I have to reiterate that it’s essential to select the bare minimum scopes needed to perform the tasks you’re generating the token for. You should try and stay away from the admin scopes, unless it’s absolutely necessary.
Click the Generate Token button at the bottom of the page.
Click the copy button next to the generated token to copy it to the clipboard. Paste this code somewhere safe as this code will be required near the end of this tutorial.
Step 2: Connect SAP Cloud Platform to the cloud connector.
Visit the hana trial cockpit, and click the “Enter your trial account button”
On the trial home page, take note of the region and the provider on the trial card and note it down somewhere safe. Click on the trial link at the top of the trial card.
On the trial subaccount page, note down the ID value under the subdomain as this will be used in setting up the cloud connector.
For now, we’re done with the SAP Cloud Platform cockpit and we have to head on to the cloud connector. Login to your cloud connector.
After logging in, we have to now link our instance of cloud connector to our sub account on SAP Cloud Platform. Enter the details you have noted from the previous pages as you can see below and click the save button on the top right of the page.
If you entered the right details, your SAP Cloud Platform sub account will be linked the cloud connector and clicking on the name you defined, will show a page like you can see below.
Step 3: Create a mapping to the corporate github from the cloud connector
Click on the Cloud To On-Premise list item on the cloud connector page and then click the plus (+) button under the access control tab.
Follow the wizard and provide the details as you can see in the next image.
If the right details were provided, the page should show something like below. You have to now click the plus (+) button on the Resources part of the page.
Now fill in the wizard that opens to look like the next image.
If all the right details have been provided, when you click on the check connection button annotated in the image below, you should see that the mapping is reachable.
Step 4: Create a destination in SAP Cloud Platform to connect to the cloud connector
We are going to start by assigning our user some roles to authorize it to make the connections to SAP Business Application Studio and Cloud Connector. Let’s visit the hana trial cockpit to start this step.
Click the users list item on the SAP Cloud Platform cockpit and then click your user.
After clicking your user, on the far right section of the page, you should see the roles assigned to your user. Click the menu button next to the search bar and click assign role collection.
Assign the roles shown in the next image, essentially all the roles related to SAP Business Application Studio, Connectivity and Cloud connector.
Now it’s time to create the destination to point to our cloud connector.
Click on the Destinations list item under connectivity and fill in with the following details to look like the image below before clicking the save button on the page.
After your destination is saved, if you click on the check connection button, you will be presented with an error message. This is no cause for concern, it's a bug that will be fixed in one of the subsequent releases. Just close the error message and move on to the next step.
Step 5: Create the .netrc file and fill it with the right credentials
Navigate to your business application studio page and click on your dev space.
Once you are inside SAP Business Application Studio, open the user folder by clicking the file menu item and and choosing open in the context menu.
Find the user folder in the dialog that pops and either double click the user folder or choose the open button at the bottom of the dialog.
Now that we have the user folder open, we can now create the .netrc file. Right click on the user folder in the explorer panel of SAP Business Application Studio and choose New File.
When the text box dialog pops up, type in .netrc and hit the enter key on the keyboard or click the OK button.
Inside the .netrc file, follow the format below to fill the file and then save the file. This is where we need the personal access token we generated in step 1.
Step 6: Configure git with your email and user name
Now that we are done with the .netrc file, we have to configure git with our corporate git username and email. On the menu bar of SAP Business Application Studio, click on Terminal and choose New Terminal.
The terminal should pop up at the bottom of the page by default, and type the following commands to configure your git username and email.
Final Step: Clone your first project into SAP Business Application Studio.
We are almost done with the tutorial now. Visit your project page on github and copy the link to your project.
Once the link has been copied to the clipboard, we can head on over to SAP Business Application Studio and on the welcome tab of SAP Business Application Studio click on the clone from git button and when the text box pops up at the top of the page, paste the link we copied earlier. Alternatively, go to the terminal and type
If you followed all the steps correctly, you should see that the project has been successfully cloned in the terminal as shown below.
You have successfully cloned your first project from the corporate github. Breathe a sigh of relief and grab a glass of juice and chill. If you face any issues while setting up the connections, please leave a comment and I'll get back to you ASAP.
Happy coding!!!
Prerequisite setup
- You should have a dev space in SAP Business Application studio. Follow this link if you don't have that setup already.
- You should have a corporate or enterprise github account and a project to clone.
- You should have SAP Cloud Connector installed on your local machine and be able to access it through your browser.
Process blueprint
- Generate personal access token from the corporate github.
- Connect SAP Cloud Platform to the cloud connector by adding a subaccount.
- Create a mapping to the corporate github from the cloud connector.
- Create a destination in SAP Cloud Platform to connect to the cloud connector.
- Create the .netrc file and fill it with the right credentials.
- Configure git with your email and user name.
- Clone your first project into SAP Business Application Studio.
Step 1 : Generate personal access token from the corporate github.
The personal access token will essentially serve as your password and it will have specific authorizations (scopes) associated with it to prevent abuse of the token. Let's now jump into our corporate/enterprise github account and generate the personal access token.
Visit your page in your corporate github and click your user avatar in the top right corner. Choose settings in the context menu that pops up.

Image 1: Select settings from the context menu
On the settings page, select personal access token and then click the Generate New Token button.
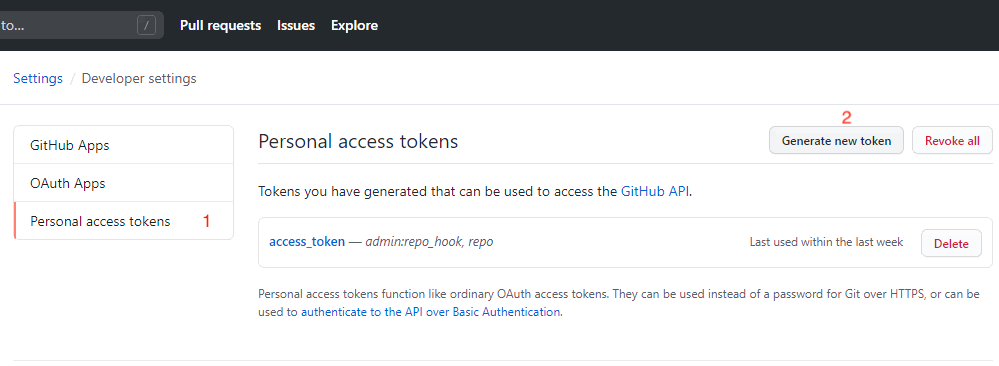
Image 2: Click generate new token
In the note text box, provide a descriptive name for the new token you’re generating. Choose the scopes that should apply to the personal access token you’re generating. I have to reiterate that it’s essential to select the bare minimum scopes needed to perform the tasks you’re generating the token for. You should try and stay away from the admin scopes, unless it’s absolutely necessary.

Image 3: Provide name and choose scopes
Click the Generate Token button at the bottom of the page.

Image 4: Click generate token button
Click the copy button next to the generated token to copy it to the clipboard. Paste this code somewhere safe as this code will be required near the end of this tutorial.

Image 5: Copy the generated token and note it down
Step 2: Connect SAP Cloud Platform to the cloud connector.
Visit the hana trial cockpit, and click the “Enter your trial account button”
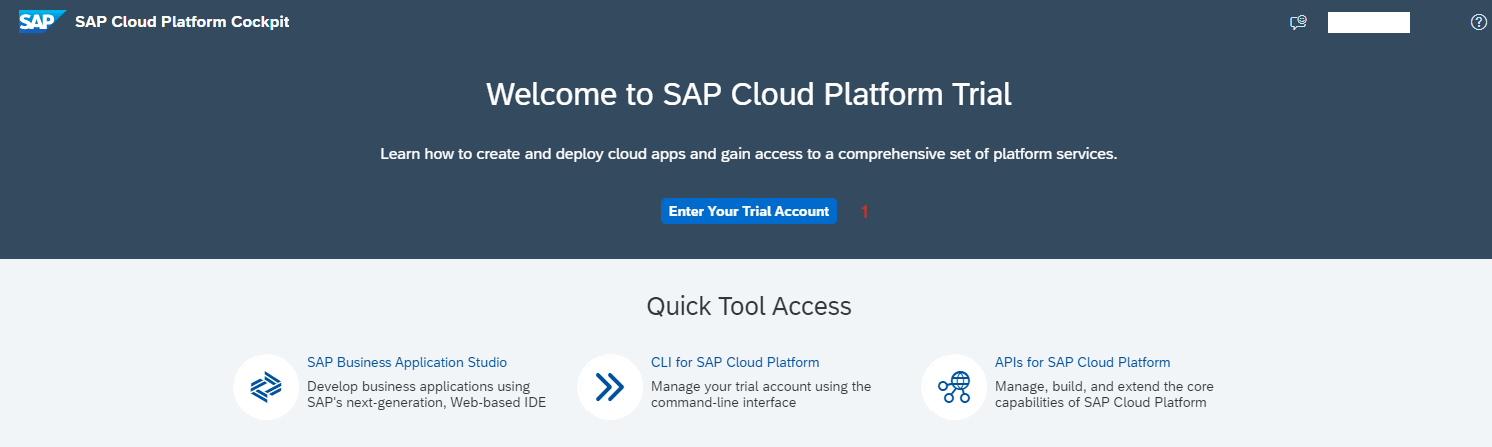
Image 6: Click the enter your trial account button
On the trial home page, take note of the region and the provider on the trial card and note it down somewhere safe. Click on the trial link at the top of the trial card.
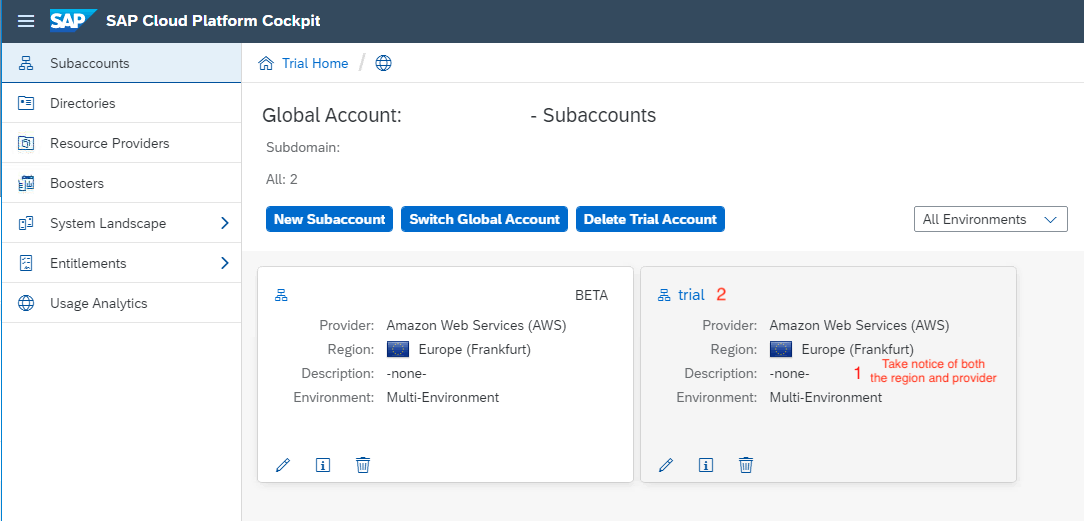
Image 7: Note down your region and provider
On the trial subaccount page, note down the ID value under the subdomain as this will be used in setting up the cloud connector.
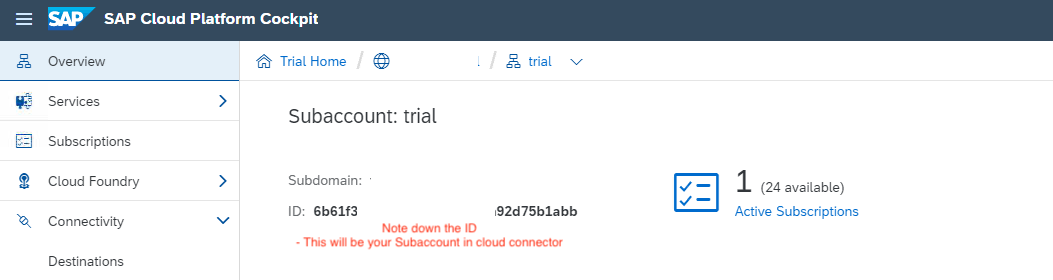
Image 8: Note down the ID value of your subaccount
For now, we’re done with the SAP Cloud Platform cockpit and we have to head on to the cloud connector. Login to your cloud connector.

Image 9: Login to your cloud connector
After logging in, we have to now link our instance of cloud connector to our sub account on SAP Cloud Platform. Enter the details you have noted from the previous pages as you can see below and click the save button on the top right of the page.

Image 10: Define the subaccount with these details
If you entered the right details, your SAP Cloud Platform sub account will be linked the cloud connector and clicking on the name you defined, will show a page like you can see below.

Image 11: Cloud connector connected to SAP Cloud Platform
Step 3: Create a mapping to the corporate github from the cloud connector
Click on the Cloud To On-Premise list item on the cloud connector page and then click the plus (+) button under the access control tab.
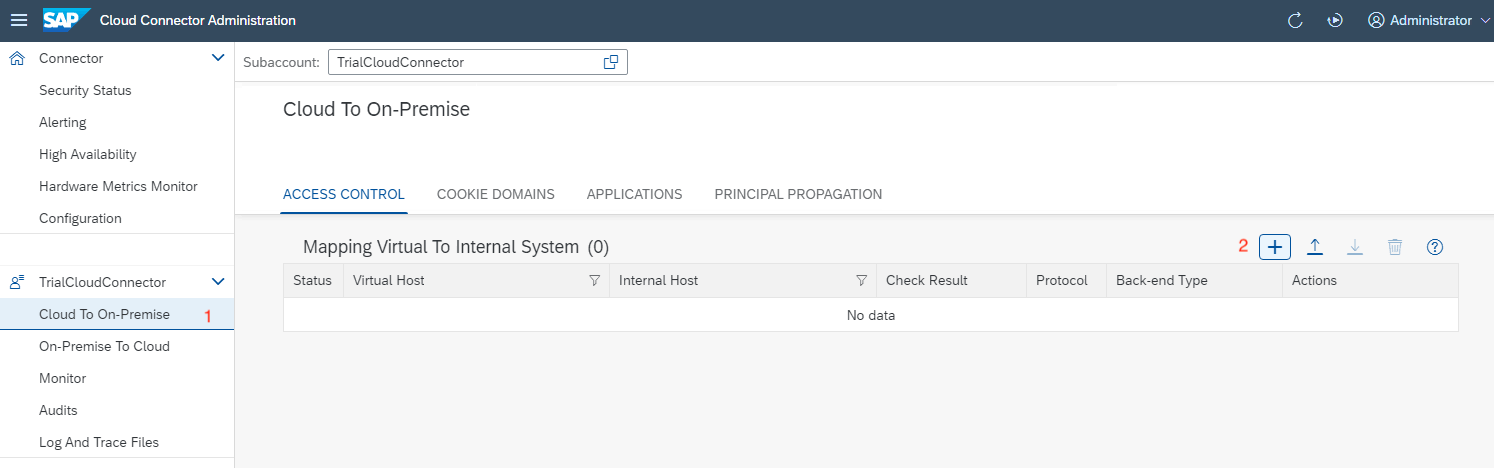
Image 12: Click add mapping button
Follow the wizard and provide the details as you can see in the next image.

Image 13: Follow wizard with these details
If the right details were provided, the page should show something like below. You have to now click the plus (+) button on the Resources part of the page.

Image 14: Add resource path to the mapping
Now fill in the wizard that opens to look like the next image.
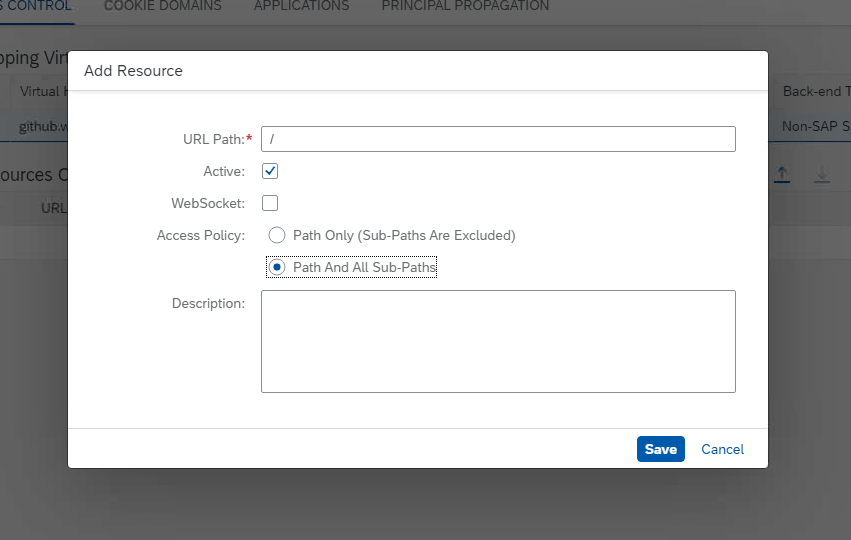
Image 15: Fill in the wizard with these details
If all the right details have been provided, when you click on the check connection button annotated in the image below, you should see that the mapping is reachable.

Image 16: Confirm that the mapping is reachable
Step 4: Create a destination in SAP Cloud Platform to connect to the cloud connector
We are going to start by assigning our user some roles to authorize it to make the connections to SAP Business Application Studio and Cloud Connector. Let’s visit the hana trial cockpit to start this step.
Click the users list item on the SAP Cloud Platform cockpit and then click your user.

Image 17: Select your user from the list of users
After clicking your user, on the far right section of the page, you should see the roles assigned to your user. Click the menu button next to the search bar and click assign role collection.
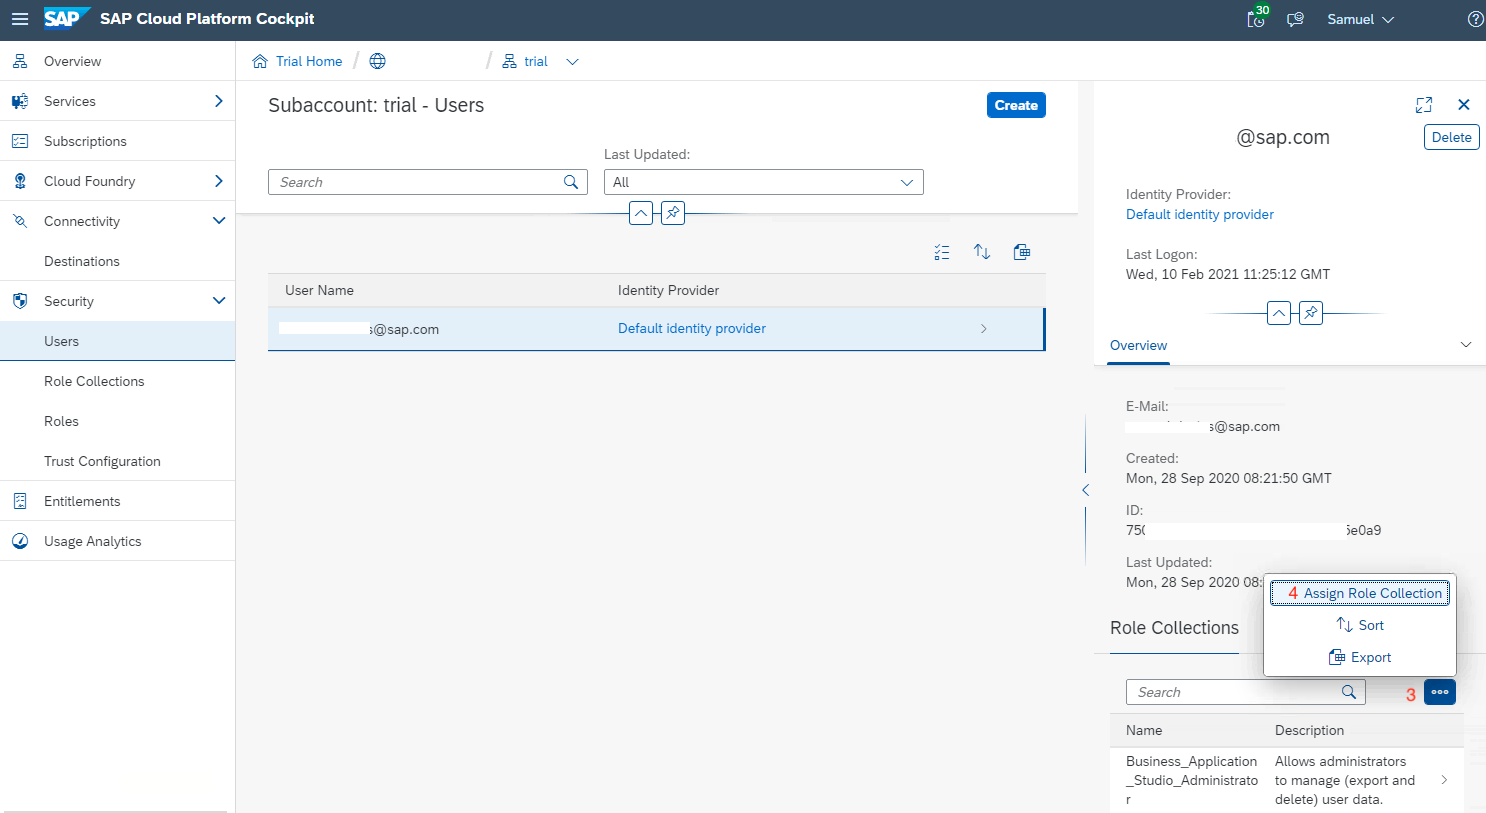
Image 18: Assign roles to your user
Assign the roles shown in the next image, essentially all the roles related to SAP Business Application Studio, Connectivity and Cloud connector.

Image 19: Assign remaining roles to your user
Now it’s time to create the destination to point to our cloud connector.
Click on the Destinations list item under connectivity and fill in with the following details to look like the image below before clicking the save button on the page.

Image 20: Create new destination and fill details
After your destination is saved, if you click on the check connection button, you will be presented with an error message. This is no cause for concern, it's a bug that will be fixed in one of the subsequent releases. Just close the error message and move on to the next step.

Image 21: Ignore this error message.
Step 5: Create the .netrc file and fill it with the right credentials
Navigate to your business application studio page and click on your dev space.
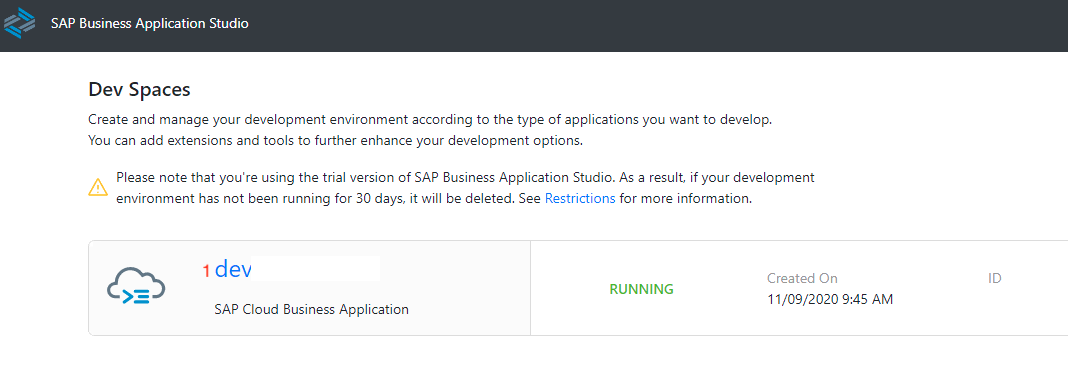
Image 22: Click on your trial dev space
Once you are inside SAP Business Application Studio, open the user folder by clicking the file menu item and and choosing open in the context menu.

Image 23: Open user folder in SAP Business Application Studio
Find the user folder in the dialog that pops and either double click the user folder or choose the open button at the bottom of the dialog.

Image 24: Choose user folder from dialog.
Now that we have the user folder open, we can now create the .netrc file. Right click on the user folder in the explorer panel of SAP Business Application Studio and choose New File.

Image 25: Choose New File
When the text box dialog pops up, type in .netrc and hit the enter key on the keyboard or click the OK button.

Image 26: Enter .netrc in textbox
Inside the .netrc file, follow the format below to fill the file and then save the file. This is where we need the personal access token we generated in step 1.
Sample .netrc file


machine github.wdf.sap.corp

login C48374833

password sdfn3uih-dsf3id-gnlasdnf3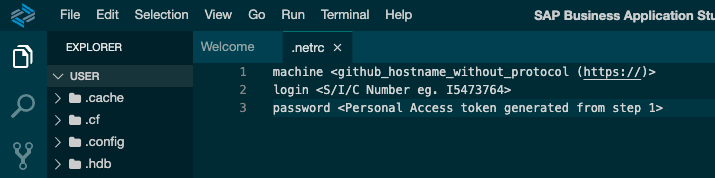
Image 27: Enter the credentials in .netrc file
Step 6: Configure git with your email and user name
Now that we are done with the .netrc file, we have to configure git with our corporate git username and email. On the menu bar of SAP Business Application Studio, click on Terminal and choose New Terminal.
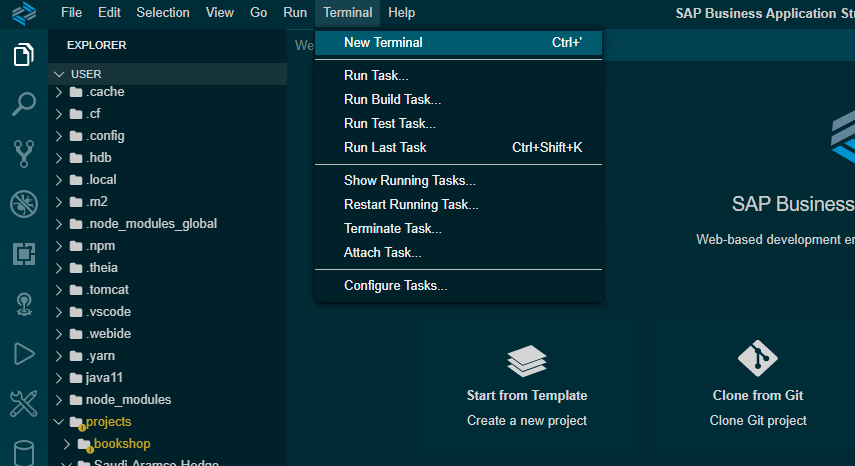
Image 28: Open a new terminal
The terminal should pop up at the bottom of the page by default, and type the following commands to configure your git username and email.
git config --global user.email "your_user_email_address"

git config --global user.name "your_S/I/C_number"
Image 29: Configure git
Final Step: Clone your first project into SAP Business Application Studio.
We are almost done with the tutorial now. Visit your project page on github and copy the link to your project.
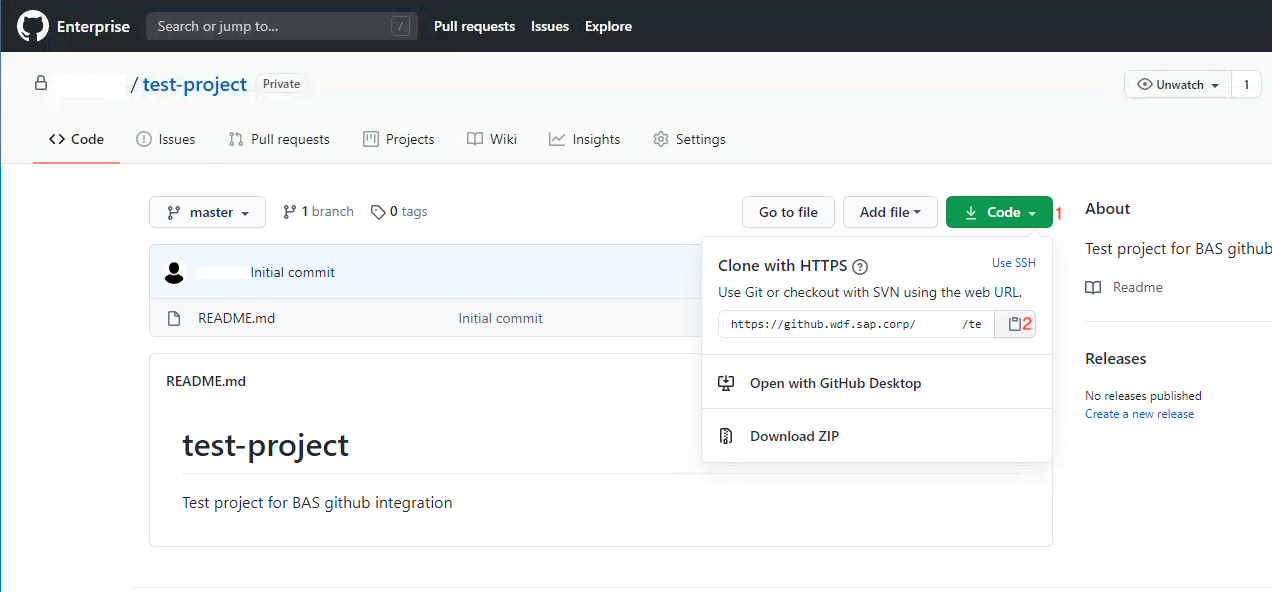
Image 30: Copy your git project url address
Once the link has been copied to the clipboard, we can head on over to SAP Business Application Studio and on the welcome tab of SAP Business Application Studio click on the clone from git button and when the text box pops up at the top of the page, paste the link we copied earlier. Alternatively, go to the terminal and type
git clone <the link you copied>
Image 31: Clone from git with link
If you followed all the steps correctly, you should see that the project has been successfully cloned in the terminal as shown below.

Image 32: Successful git clone
You have successfully cloned your first project from the corporate github. Breathe a sigh of relief and grab a glass of juice and chill. If you face any issues while setting up the connections, please leave a comment and I'll get back to you ASAP.
Happy coding!!!
- SAP Managed Tags:
- SAP Business Application Studio,
- Cloud
Labels:
14 Comments
You must be a registered user to add a comment. If you've already registered, sign in. Otherwise, register and sign in.
Labels in this area
-
ABAP CDS Views - CDC (Change Data Capture)
2 -
AI
1 -
Analyze Workload Data
1 -
BTP
1 -
Business and IT Integration
2 -
Business application stu
1 -
Business Technology Platform
1 -
Business Trends
1,661 -
Business Trends
86 -
CAP
1 -
cf
1 -
Cloud Foundry
1 -
Confluent
1 -
Customer COE Basics and Fundamentals
1 -
Customer COE Latest and Greatest
3 -
Customer Data Browser app
1 -
Data Analysis Tool
1 -
data migration
1 -
data transfer
1 -
Datasphere
2 -
Event Information
1,400 -
Event Information
64 -
Expert
1 -
Expert Insights
178 -
Expert Insights
270 -
General
1 -
Google cloud
1 -
Google Next'24
1 -
Kafka
1 -
Life at SAP
784 -
Life at SAP
11 -
Migrate your Data App
1 -
MTA
1 -
Network Performance Analysis
1 -
NodeJS
1 -
PDF
1 -
POC
1 -
Product Updates
4,578 -
Product Updates
323 -
Replication Flow
1 -
RisewithSAP
1 -
SAP BTP
1 -
SAP BTP Cloud Foundry
1 -
SAP Cloud ALM
1 -
SAP Cloud Application Programming Model
1 -
SAP Datasphere
2 -
SAP S4HANA Cloud
1 -
SAP S4HANA Migration Cockpit
1 -
Technology Updates
6,886 -
Technology Updates
395 -
Workload Fluctuations
1
Related Content
- Top Picks: Innovations Highlights from SAP Business Technology Platform (Q1/2024) in Technology Blogs by SAP
- BTP Apps, F4 Help and Personal Value Lists in Technology Q&A
- SAP Document and Reporting Compliance - 'Colombia' - Contingency Process in Technology Blogs by SAP
- Comprehensive Guideline to SAP VMS in Technology Blogs by Members
- Consuming SAP with SAP Build Apps - Connectivity options for low-code development - part 2 in Technology Blogs by SAP
Top kudoed authors
| User | Count |
|---|---|
| 11 | |
| 10 | |
| 10 | |
| 10 | |
| 8 | |
| 7 | |
| 7 | |
| 7 | |
| 7 | |
| 6 |