
- SAP Community
- Products and Technology
- Technology
- Technology Blogs by SAP
- Enable e-signatures with DocuSign through a chatbo...
Technology Blogs by SAP
Learn how to extend and personalize SAP applications. Follow the SAP technology blog for insights into SAP BTP, ABAP, SAP Analytics Cloud, SAP HANA, and more.
Turn on suggestions
Auto-suggest helps you quickly narrow down your search results by suggesting possible matches as you type.
Showing results for
Advisor
Options
- Subscribe to RSS Feed
- Mark as New
- Mark as Read
- Bookmark
- Subscribe
- Printer Friendly Page
- Report Inappropriate Content
02-10-2021
9:30 AM
In these challenging times, it is more important than ever to take advantage of technology to help our customers to interact so much faster with brands, products and services, and at the same time to be agile while working with contracts or documents that for different business purposes need to be signed. That’s why this is a great example of how you can enable a new commercial channel through a chatbot and leverage e-signature for contracts or documents (like Loan Agreements) to be able to respond so much faster to your customer's demands. This is a team effort, big thanks to javier-garcia for working this use case with me.
In this example, I'll be simulating a retail chatbot channel that sells TVs and Fridges, and as the Retail is offering loans, it is necessary for the user to sign a Loan Agreement in order to place the order with the product he/she is interested in.
As prerequisites, you’ll need to:
Let’s first start with DocuSign. You’ll need to first add a document template. You can create your own or upload mine to follow this exercise.
Go to the Templates tab and click on New.
While editing it, add a template name and description. You can change or upload more documents as templates. In recipients, add the role “Signer” and click Next.
As you can see, in the left panel you can add different fields as Text and Signature boxes.
Here I’m showing the Folio number, where I’m setting the SAP Conversational AI Bot’s Conversation ID (see its properties on the right side). I want for this ID to repeat in all pages of the contract, that’s why you see it repeating itself many times below Data Label. The Data Label conversationId is how the template is going to read the data input, in this case from the SAP Conversational AI bot. I applied the same for other entities like name and payment method.
When you’re finished, click on Save and Close.
Enter again your template and click on More, then History to copy the Template ID.

Now, let’s enable the Integrator Key of your demo account. Go to the Settings Tab and in the left side menu, click on Apps and Keys.
Now click on Add App & Integration Key. Give your App a name and the Integrator Key will be generated automatically.
Copy your Integrator Key and your DocuSign Account ID (see it in the top-left corner) as you will use it later in the back-end app to integrate DocuSign with the SAP Conversational AI bot.
Now create your chatbot. If you’re new using SAP Conversational AI, I recommend you to follow this tutorial to get more in-depth about the capabilities the solution has, and basic concepts as Entities and Intentions.
In my case I’m simulating a chatbot that offers some products on Sale (like TVs and Fridges) with different payment options (one of them being a Loan Agreement).
In the docusign skill I’m configuring the back-end app pushed into the Cloud Foundry environment of the SAP BTP trial account (see the "/envelopes" route at the end of the URL, you'll see it in the code below).
The payment method (terminosPago) is one of the entities I use to pass it to the DocuSign template. By clicking on the yellow “i” on the chat, you can see the bot’s memory. This is how you’re going to access it in the back-end app.
Let’s leave the chatbot ‘til this point for now and let’s start working the back-end app. I developed it using Python.
The most important thing for you to know is how to properly access the DocuSign APIs. For more information see the documentation.
(You’ll configure this later; however, I’ll show it to you now) Where do you configured this from the DocuSign’s side? Go to the Settings tab and click on Connect on the left menu.
Click on Add Configuration, then Custom.
Next, you’ll add the URL of your back-end app (after it is deployed) with the route I mentioned above.
Select as Envelope Event, Envelope Signed/Completed.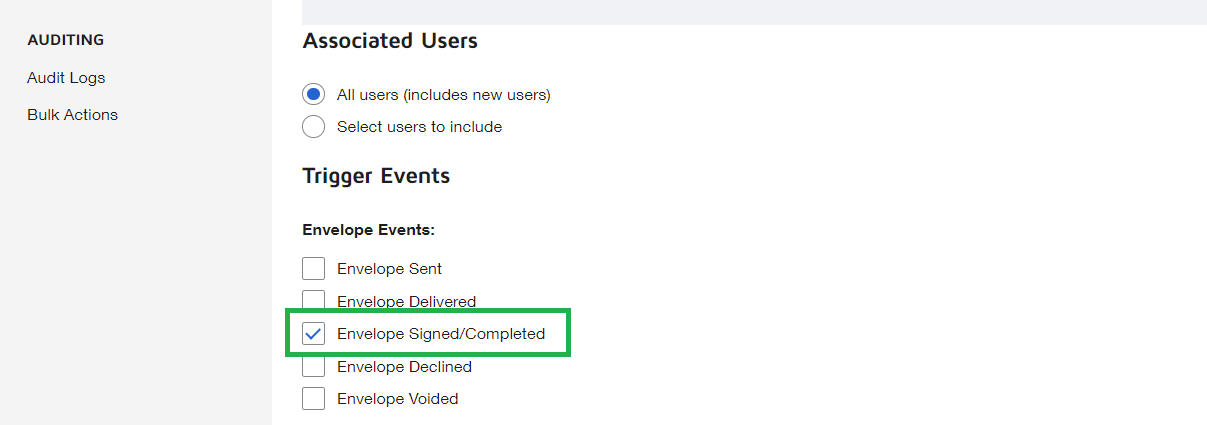
Let’s see how the code should look to meet the 3 points mentioned earlier.
For the 1st one, to create the envelope:
For the 2nd one, to viewing the envelope (its link):
For the 3rd point, to enable the webhook in your DocuSign Account and configuring the chatbot’s reply message when the contact is already signed.
In order to authenticate to your chatbot build in SAP Conversational AI to send the confirmation message to the user, you'll need to look for your Developer Token. For this go to Settings, then to Tokens and copy it. It is recommended to set up an OAuth authentication, however as I'm just building a demo, I used the developer token as pictured below:
Here it goes the sample code for the 3rd point:
For more info about the SAP Conversational AI APIs, check the documentation.
Test the code by using postman and when its ready, deploy your app to your Cloud Foundry API Endpoint, Org and Space, by using the CLI (Command Line Interface) like this:
Go to the route/path where you have your project, and after login with your SAP BTP trial account credentials (cf login) and pointing your API Endpoint, Org and Space, push your application with this line:
Keep in mind that you'll need to enable 3 additional files in your project (manifest.yml, requirements.txt and runtime.txt) for more info check out the documentation. I highlighted in green boxes where the app name is shown, and in yellow the URL of your back-end app, which is the one you're going to use to integrate DocuSign and SAP CAI.
Wait for the app to be created.
Important: Keep in mind that in order for the conversationId and the webhook enabled in the DocuSign Account to work properly, it is important for the chatbot to be exposed at least as a web channel.
Go back to your chatbot's project and enable the webchat script by going to the Connect tab, setting up the webchat, copying it and pasting the generated script into in a simple HTML code to run it locally in your laptop.
Now that you have the back-end app already deployed and your chatbot integrated with this app and as a HTML local script, you should be able to run the demo, to create the envelope (Loan Agreement), sign it and get the chatbot's confirmation response.
Here I'll show you my demo using additional SAP Business Technology Platform Services:
I hope you'd enjoyed this blog post and it helps you to get a broader perspective regarding new business cases 🙂
In this example, I'll be simulating a retail chatbot channel that sells TVs and Fridges, and as the Retail is offering loans, it is necessary for the user to sign a Loan Agreement in order to place the order with the product he/she is interested in.
As prerequisites, you’ll need to:
- Create a DocuSign Trial Demo Account.
- Create a SAP Conversational AI Trial Account.
- Create a SAP Business Technology Platform (formerly SAP Cloud Platform) Trial Account. Follow this tutorial.
- Install the CLI (Command Line Interface) for Cloud Foundry.
Let’s first start with DocuSign. You’ll need to first add a document template. You can create your own or upload mine to follow this exercise.
Go to the Templates tab and click on New.
While editing it, add a template name and description. You can change or upload more documents as templates. In recipients, add the role “Signer” and click Next.
As you can see, in the left panel you can add different fields as Text and Signature boxes.
Here I’m showing the Folio number, where I’m setting the SAP Conversational AI Bot’s Conversation ID (see its properties on the right side). I want for this ID to repeat in all pages of the contract, that’s why you see it repeating itself many times below Data Label. The Data Label conversationId is how the template is going to read the data input, in this case from the SAP Conversational AI bot. I applied the same for other entities like name and payment method.
When you’re finished, click on Save and Close.
Enter again your template and click on More, then History to copy the Template ID.
Now, let’s enable the Integrator Key of your demo account. Go to the Settings Tab and in the left side menu, click on Apps and Keys.
Now click on Add App & Integration Key. Give your App a name and the Integrator Key will be generated automatically.
Copy your Integrator Key and your DocuSign Account ID (see it in the top-left corner) as you will use it later in the back-end app to integrate DocuSign with the SAP Conversational AI bot.
Now create your chatbot. If you’re new using SAP Conversational AI, I recommend you to follow this tutorial to get more in-depth about the capabilities the solution has, and basic concepts as Entities and Intentions.
In my case I’m simulating a chatbot that offers some products on Sale (like TVs and Fridges) with different payment options (one of them being a Loan Agreement).
In the docusign skill I’m configuring the back-end app pushed into the Cloud Foundry environment of the SAP BTP trial account (see the "/envelopes" route at the end of the URL, you'll see it in the code below).
The payment method (terminosPago) is one of the entities I use to pass it to the DocuSign template. By clicking on the yellow “i” on the chat, you can see the bot’s memory. This is how you’re going to access it in the back-end app.
Let’s leave the chatbot ‘til this point for now and let’s start working the back-end app. I developed it using Python.
The most important thing for you to know is how to properly access the DocuSign APIs. For more information see the documentation.
- First, you’ll need to create the envelope (that’s how is called when creating the document). Here you’re going to specify the template ID, template roles and payload. As I’m using a demo account, this is my URL Endpoint API:
https://demo.docusign.net/restapi/v2.1/accounts/<DocuSignAccountID>/envelopes- Second, you’ll need to request the view of the envelope you just created. As I’m using a demo account, this is my URL Endpoint API:
https://demo.docusign.net/restapi/v2.1/accounts/<DocuSignAccountID>/envelopes/<EnvelopeID>/views/rec...- After the document/contract is signed by the user interacting with the chatbot, you may want the chatbot to reply to the user, that they have successfully received the user’s confirmation and signature on the Loan Agreement document/envelope.
- For this, you’ll need to create another route in your code. I named it "/statusrecipient" and by applying this webhook in the DocuSign Account demo, you’ll ask it to send a message using a SAP Conversational AI API when the status is changed to Signed/Completed.
(You’ll configure this later; however, I’ll show it to you now) Where do you configured this from the DocuSign’s side? Go to the Settings tab and click on Connect on the left menu.
Click on Add Configuration, then Custom.
Next, you’ll add the URL of your back-end app (after it is deployed) with the route I mentioned above.
Select as Envelope Event, Envelope Signed/Completed.
Let’s see how the code should look to meet the 3 points mentioned earlier.
For the 1st one, to create the envelope:
@app.route('/envelopes', methods=['POST']) #route expressed in the webhook configuration of the chatbot

def envelopes():


    postRece = json.loads(request.get_data()) #getting data from the chatbot

    conversationId = postRece['conversation']['id']

    language = postRece['conversation']['language']

    terminosPago = postRece['conversation']['memory']['terminospago']['raw']


    #url for creating the envelope

    url_1 = "https://demo.docusign.net/restapi/v2.1/accounts/<DocuSign Account ID>/envelopes"


    #payload to create the envelope

    payload_1 = {


        "templateId": <templateID>,

        "emailSubject": "BestRun Contract",

        "status": "sent",

        "templateRoles": [

            {

                "email": <email>,

                "name": "John Smith",

                "roleName": "Signer",

                "tabs": {

                    "textTabs":[

                    {

                        "tabLabel": "fullName",

                        "value": "John Smith"

                    },

                    {

                        "tabLabel": "name",

                        "value": name

                    },

                    {

                        "tabLabel": "lastName1",

                        "value": "Smith"

                    },

                    {

                        "tabLabel": "lastName2",

                        "value": "Q"

                    },

                    {

                        "tabLabel": "street",

                        "value": "Marsella"

                    },

                    {

                        "tabLabel": "ext",

                        "value": "20"

                    },

                    {

                        "tabLabel": "int",

                        "value": "03"

                    },

                    {

                        "tabLabel": "colonia",

                        "value": "Juárez"

                    },

                    {

                        "tabLabel": "zipCode",

                        "value": "06600"

                    },

                    {

                        "tabLabel": "city",

                        "value": "Cuauhtémoc"

                    },

                    {

                        "tabLabel": "state",

                        "value": "CDMX"

                    },

                    {

                        "tabLabel": "conversationId",

                        "value": conversationId

                    },

                    {

                        "tabLabel": "terminosPago",

                        "value": terminosPago

                    },

                    {

                        "tabLabel": "email",

                        "value": <email>

                    }

                ]

            }

        }

    ]}


    #headers to authenticate to the DocuSign account

    headers = {

      'X-DocuSign-Authentication': json.dumps({"Username": "<Docusign Demo Account Email>","Password": "<DocuSign Demo Account Password>","IntegratorKey": "<Integrator Key>"}),

      'Content-Type': 'application/json'

    }


    #response of creating the envelope

    response = requests.request("POST", url_1, headers= headers, data = json.dumps(payload_1))

    print(response.text.encode('utf8'))
For the 2nd one, to viewing the envelope (its link):
    #url for viewing the recipient (to get the generated document url)

    url_2 = "https://demo.docusign.net/restapi/v2.1/accounts/<DocuSign Account ID>/envelopes/{}/views/recipient".format(response.json()['envelopeId'])


    #payload to "request" the generated document url

    payload_2 = {

        "authenticationMethod": "None",

        "email": "<DocuSign Demo Account Email>",

        "recipientId": "1",

        "returnUrl": "https://www.sap.com/latinamerica/index.html", #change the return URL if you want

        "userName": "<DocuSign Demo Account Email>"

    }


    response_2 = requests.request("POST", url_2, headers=headers, data = json.dumps(payload_2))


    recipient_url = json.loads(response_2.text)['url']


    #response to the chatbot, in this way the user will view the document in order to sign it

    messageCAI = "Perfect, in order to continue with your purchase with a {}, it is required your e-signature in this contract, where you can find the Terms and Conditions of your loan application.".format(terminosPago)


    return jsonify(

    status=200,

    replies=[{

        'type': 'buttons',

        'content': {

            'title': messageCAI,

            'buttons': [{

                'value': recipient_url,

                'title': 'Sign Here',

                'type': 'web_url'

            }]

        }

        }])
For the 3rd point, to enable the webhook in your DocuSign Account and configuring the chatbot’s reply message when the contact is already signed.
In order to authenticate to your chatbot build in SAP Conversational AI to send the confirmation message to the user, you'll need to look for your Developer Token. For this go to Settings, then to Tokens and copy it. It is recommended to set up an OAuth authentication, however as I'm just building a demo, I used the developer token as pictured below:
Here it goes the sample code for the 3rd point:
@app.route('/statusrecipient', methods=['POST'])

def statusrecipient():


    webhook = request.get_data()


    #DocuSign sends the XML file as a string. Needs to be convert to a XML object.

    test_webhook = ET.fromstring(webhook)


    #Using XPath to find values inside the XML object, as the chatbot's conversationId and payment method (terminosPago).

    conversationId = test_webhook.findall(".//*[@name='conversationId']")[0][0].text

    terminosPago = test_webhook.findall(".//*[@name='terminosPago']")[0][0].text


    #Using SAP Conversational AI API to send a message

    url_chatbot = "https://api.cai.tools.sap/connect/v1/conversations/{}/messages".format(conversationId)


    payload = {

        "messages": [

        {

            'type': 'text',

            'delay': 2,

            'content': 'Thank you very much, I have received your e-signature confirmation. At this moment I am creating your purchase order.'

        },

        {

            'type': 'text',

            'delay': 0,

            'content': 'Your order number is: XXXXX. Thanks again for using our BestRun Digital Assistant.'

        },

        {

             'type': 'card',

             'delay': 0,

             'content': {

                 'title': 'Would you like to rate our service?',

                 'subtitle':'Your opinion helps us to improve :)',

                 'imageUrl': 'https://i.imgur.com/qwIacDT.png',

                 'buttons': [

                         {

                         'title': 'Survey',

                         'value': 'https://qtrial2019q2az1.az1.qualtrics.com/jfe/form/SV_d7ssTuPIkOl4PCm', #You can create your own Qualtrics account to publish your surveys.

                         "type": 'web_url'

                         }

                 ]

             }

        }


    ]}


    response_3 = requests.post(url = url_chatbot, data = json.dumps(payload), headers = {"Authorization": "<Chatbot's Developer Token>", "Accept": "*/*", "Content-Type": "application/json"})


    #returning the response to the chatbot

    return jsonify(response = response_3.text)
For more info about the SAP Conversational AI APIs, check the documentation.
Test the code by using postman and when its ready, deploy your app to your Cloud Foundry API Endpoint, Org and Space, by using the CLI (Command Line Interface) like this:
Go to the route/path where you have your project, and after login with your SAP BTP trial account credentials (cf login) and pointing your API Endpoint, Org and Space, push your application with this line:
cf push <app name> -f manifest.ymlKeep in mind that you'll need to enable 3 additional files in your project (manifest.yml, requirements.txt and runtime.txt) for more info check out the documentation. I highlighted in green boxes where the app name is shown, and in yellow the URL of your back-end app, which is the one you're going to use to integrate DocuSign and SAP CAI.

Wait for the app to be created.
Important: Keep in mind that in order for the conversationId and the webhook enabled in the DocuSign Account to work properly, it is important for the chatbot to be exposed at least as a web channel.
Go back to your chatbot's project and enable the webchat script by going to the Connect tab, setting up the webchat, copying it and pasting the generated script into in a simple HTML code to run it locally in your laptop.

Now that you have the back-end app already deployed and your chatbot integrated with this app and as a HTML local script, you should be able to run the demo, to create the envelope (Loan Agreement), sign it and get the chatbot's confirmation response.
Here I'll show you my demo using additional SAP Business Technology Platform Services:
I hope you'd enjoyed this blog post and it helps you to get a broader perspective regarding new business cases 🙂
Labels:
4 Comments
You must be a registered user to add a comment. If you've already registered, sign in. Otherwise, register and sign in.
Labels in this area
-
ABAP CDS Views - CDC (Change Data Capture)
2 -
AI
1 -
Analyze Workload Data
1 -
BTP
1 -
Business and IT Integration
2 -
Business application stu
1 -
Business Technology Platform
1 -
Business Trends
1,661 -
Business Trends
87 -
CAP
1 -
cf
1 -
Cloud Foundry
1 -
Confluent
1 -
Customer COE Basics and Fundamentals
1 -
Customer COE Latest and Greatest
3 -
Customer Data Browser app
1 -
Data Analysis Tool
1 -
data migration
1 -
data transfer
1 -
Datasphere
2 -
Event Information
1,400 -
Event Information
64 -
Expert
1 -
Expert Insights
178 -
Expert Insights
273 -
General
1 -
Google cloud
1 -
Google Next'24
1 -
Kafka
1 -
Life at SAP
784 -
Life at SAP
11 -
Migrate your Data App
1 -
MTA
1 -
Network Performance Analysis
1 -
NodeJS
1 -
PDF
1 -
POC
1 -
Product Updates
4,577 -
Product Updates
326 -
Replication Flow
1 -
RisewithSAP
1 -
SAP BTP
1 -
SAP BTP Cloud Foundry
1 -
SAP Cloud ALM
1 -
SAP Cloud Application Programming Model
1 -
SAP Datasphere
2 -
SAP S4HANA Cloud
1 -
SAP S4HANA Migration Cockpit
1 -
Technology Updates
6,886 -
Technology Updates
403 -
Workload Fluctuations
1
Top kudoed authors
| User | Count |
|---|---|
| 12 | |
| 10 | |
| 9 | |
| 7 | |
| 7 | |
| 7 | |
| 6 | |
| 6 | |
| 5 | |
| 4 |